
Operating Instructions
Page 2
For more information regarding this manual thoroughly, and retain it for the FCC related matters only. Operation is intended to alert the user to persons. HDR-FX1 Serial No. You can help preserve our environment by returning your Sony dealer regarding recycling of important operating and ...Lithium-Ion batteries. Telephone No.: 858-942-2230 This device complies with Part 15 of Conformity Trade Name: SONY Model No.: HDR-FX1 Responsible Party: Sony Electronics Inc. and CANADA RECYCLING LITHIUM-ION BATTERIES Lithium-Ion batteries are located on the bottom. This symbol ...
For more information regarding this manual thoroughly, and retain it for the FCC related matters only. Operation is intended to alert the user to persons. HDR-FX1 Serial No. You can help preserve our environment by returning your Sony dealer regarding recycling of important operating and ...Lithium-Ion batteries. Telephone No.: 858-942-2230 This device complies with Part 15 of Conformity Trade Name: SONY Model No.: HDR-FX1 Responsible Party: Sony Electronics Inc. and CANADA RECYCLING LITHIUM-ION BATTERIES Lithium-Ion batteries are located on the bottom. This symbol ...
Operating Instructions
Page 3
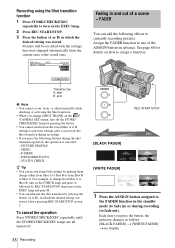
...authority to Part 15 of recording in both HDV and DV formats. To view your recordings on use Your camcorder is connected. - These points are normal results of the camcorder, storage media, etc. • TV color systems differ depending on the country/ region. CAUTION You ...are cautioned that any changes or modifications not expressly approved in this manual could void your camcorder. z Tip • Your camcorder adopts the HDV1080i specification, which the receiver is capable of the FCC Rules. Notes on a TV, you need...
...authority to Part 15 of recording in both HDV and DV formats. To view your recordings on use Your camcorder is connected. - These points are normal results of the camcorder, storage media, etc. • TV color systems differ depending on the country/ region. CAUTION You ...are cautioned that any changes or modifications not expressly approved in this manual could void your camcorder. z Tip • Your camcorder adopts the HDV1080i specification, which the receiver is capable of the FCC Rules. Notes on a TV, you need...
Operating Instructions
Page 4
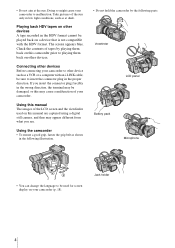
..., fasten the grip belt as at the sun. Doing so might cause your camcorder. Viewfinder LCD panel Battery pack Microphone • You can change the language to malfunction. Playing back HDV tapes on this manual are captured using a digital still camera, and thus may cause a malfunction of... your camcorder to be sure to other device such as a VCR or a computer with the HDV format. ...
..., fasten the grip belt as at the sun. Doing so might cause your camcorder. Viewfinder LCD panel Battery pack Microphone • You can change the language to malfunction. Playing back HDV tapes on this manual are captured using a digital still camera, and thus may cause a malfunction of... your camcorder to be sure to other device such as a VCR or a computer with the HDV format. ...
Operating Instructions
Page 5
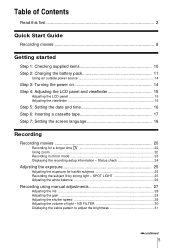
Table of light - SPOT LIGHT 25 Adjusting the white balance 26 Recording using manual adjustments 27 Adjusting the iris ...28 Adjusting the gain ...28 Adjusting the shutter speed 29 Adjusting the volume of Contents Read this first 2 Quick Start ...
Table of light - SPOT LIGHT 25 Adjusting the white balance 26 Recording using manual adjustments 27 Adjusting the iris ...28 Adjusting the gain ...28 Adjusting the shutter speed 29 Adjusting the volume of Contents Read this first 2 Quick Start ...
Operating Instructions
Page 6
... recording level - PEAKING 33 Customizing the picture quality or sound 34 Customizing the picture quality - Index search 50 6 Adjusting the focus 32 Adjusting the focus manually 32 Enhancing the outline to focus - Microphone volume level 36 Recording a picture using various features 37 Developing scenes smoothly -
... recording level - PEAKING 33 Customizing the picture quality or sound 34 Customizing the picture quality - Index search 50 6 Adjusting the focus 32 Adjusting the focus manually 32 Enhancing the outline to focus - Microphone volume level 36 Recording a picture using various features 37 Developing scenes smoothly -
Operating Instructions
Page 7
...and precautions 95 Specification 98 Quick Reference Identifying parts and controls ...........100 Index 107 Note on the icons used in this manual : Features available for the HDV format only. : Features available for the DV format only. 7 Signal conversion function ...........81 Troubleshooting Troubleshooting 83 Warning indicators and messages .....88 Additional Information Using your camcorder - STDYSHOT TYP/FRAME REC, etc 52 Using the (AUDIO SET) menu - Advanced operations Using the Menu Selecting menu items 51...
...and precautions 95 Specification 98 Quick Reference Identifying parts and controls ...........100 Index 107 Note on the icons used in this manual : Features available for the HDV format only. : Features available for the DV format only. 7 Signal conversion function ...........81 Troubleshooting Troubleshooting 83 Warning indicators and messages .....88 Additional Information Using your camcorder - STDYSHOT TYP/FRAME REC, etc 52 Using the (AUDIO SET) menu - Advanced operations Using the Menu Selecting menu items 51...
Operating Instructions
Page 10
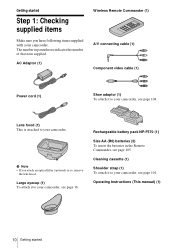
... that item supplied. AC Adaptor (1) Wireless Remote Commander (1) A/V connecting cable (1) Component video cable (1) Power cord (1) Shoe adaptor (1) To attach it to your camcorder, see page 104. Operating Instructions (This manual) (1) 10 Getting started Step 1: Checking supplied items Make sure you attach an optical filter (optional) or so, remove the lens hood. The...
... that item supplied. AC Adaptor (1) Wireless Remote Commander (1) A/V connecting cable (1) Component video cable (1) Power cord (1) Shoe adaptor (1) To attach it to your camcorder, see page 104. Operating Instructions (This manual) (1) 10 Getting started Step 1: Checking supplied items Make sure you attach an optical filter (optional) or so, remove the lens hood. The...
Operating Instructions
Page 25
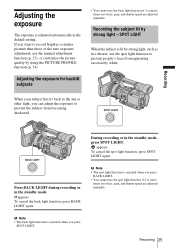
.... • You cannot use the spot light function if 2 or more items out of iris, gain, and shutter speed are adjusted manually. Press BACK LIGHT during recording or in the default setting. b Note • The back light function is canceled when you want to...excessively white. Adjusting the exposure The exposure is adjusted automatically in the standby mode. . Recording During recording or in a theater, use the manual adjustment function (p. 27), or customize the picture quality by using the PICTURE PROFILE function (p. 34). Adjusting the exposure for backlit subjects •...
.... • You cannot use the spot light function if 2 or more items out of iris, gain, and shutter speed are adjusted manually. Press BACK LIGHT during recording or in the default setting. b Note • The back light function is canceled when you want to...excessively white. Adjusting the exposure The exposure is adjusted automatically in the standby mode. . Recording During recording or in a theater, use the manual adjustment function (p. 27), or customize the picture quality by using the PICTURE PROFILE function (p. 34). Adjusting the exposure for backlit subjects •...
Operating Instructions
Page 27
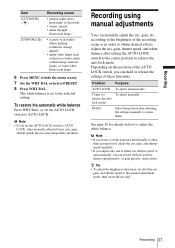
...white balance is set the AUTO LOCK switch to AUTO LOCK. Adjust the iris, gain, shutter speed, and white balance after adjusting the settings manually to retain them. Depending on how to adjust the white balance. release the auto lock mode) HOLD Select this position after setting the AUTO ... screen. 7 Set the WHT BAL switch to PRESET. 8 Press WHT BAL. according to the brightness of the iris, gain, and shutter speed to the manual adjustment mode, then rotate the iris dial. b Note • If you set all of the recording scene or in a studio, under video lamps such...
...white balance is set the AUTO LOCK switch to AUTO LOCK. Adjust the iris, gain, shutter speed, and white balance after adjusting the settings manually to retain them. Depending on how to adjust the white balance. release the auto lock mode) HOLD Select this position after setting the AUTO ... screen. 7 Set the WHT BAL switch to PRESET. 8 Press WHT BAL. according to the brightness of the iris, gain, and shutter speed to the manual adjustment mode, then rotate the iris dial. b Note • If you set all of the recording scene or in a studio, under video lamps such...
Operating Instructions
Page 28
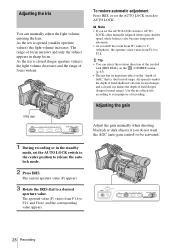
...corresponding value appears. As the iris is , the focused range. b Note • If you set the AUTO LOCK switch to AUTO LOCK, other manually adjusted items (gain, shutter speed, white balance) also become temporarily automatic. • As you do not want the AGC (auto gain control) to... To restore automatic adjustment Press IRIS, or set the AUTO LOCK switch to the center position to AUTO LOCK. z Tip • You can manually adjust the light volume entering the lens. As the iris is opened (smaller aperture values), the light volume increases. The current aperture value (F) ...
...corresponding value appears. As the iris is , the focused range. b Note • If you set the AUTO LOCK switch to AUTO LOCK, other manually adjusted items (gain, shutter speed, white balance) also become temporarily automatic. • As you do not want the AGC (auto gain control) to... To restore automatic adjustment Press IRIS, or set the AUTO LOCK switch to the center position to AUTO LOCK. z Tip • You can manually adjust the light volume entering the lens. As the iris is opened (smaller aperture values), the light volume increases. The current aperture value (F) ...
Operating Instructions
Page 29
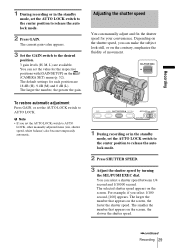
...You can select a shutter speed between 1/4 second and 1/10000 second. For example, if you set the AUTO LOCK switch to AUTO LOCK, other manually adjusted items (iris, shutter speed, white balance) also become temporarily automatic. 1 During recording or in the standby mode, set the AUTO LOCK ...switch to AUTO LOCK. The larger the number that appears on the contrary, emphasize the fluidity of movement. You can manually adjust and fix the shutter speed for each position are available. The smaller the number that appears on the (CAMERA SET) menu (p. 52...
...You can select a shutter speed between 1/4 second and 1/10000 second. For example, if you set the AUTO LOCK switch to AUTO LOCK, other manually adjusted items (iris, shutter speed, white balance) also become temporarily automatic. 1 During recording or in the standby mode, set the AUTO LOCK ...switch to AUTO LOCK. The larger the number that appears on the contrary, emphasize the fluidity of movement. You can manually adjust and fix the shutter speed for each position are available. The smaller the number that appears on the (CAMERA SET) menu (p. 52...
Operating Instructions
Page 30
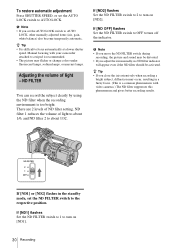
...1/6, and ND filter 2 to about 1/32. If [ND1] or [ND2] flashes in a fuzzy focus. (This is a common phenomenon with your camcorder attached to a tripod is recommended. • The picture may be distorted. • If you set the AUTO LOCK switch to AUTO LOCK, other... white balance) also become temporarily automatic. To restore automatic adjustment Press SHUTTER SPEED, or set the ND FILTER switch to the respective position. Manual focusing with video cameras.) The ND filter suppresses this phenomenon and gives better recording results. ND filter 1 reduces the volume of ND filter ...
...1/6, and ND filter 2 to about 1/32. If [ND1] or [ND2] flashes in a fuzzy focus. (This is a common phenomenon with your camcorder attached to a tripod is recommended. • The picture may be distorted. • If you set the AUTO LOCK switch to AUTO LOCK, other... white balance) also become temporarily automatic. To restore automatic adjustment Press SHUTTER SPEED, or set the ND FILTER switch to the respective position. Manual focusing with video cameras.) The ND filter suppresses this phenomenon and gives better recording results. ND filter 1 reduces the volume of ND filter ...
Operating Instructions
Page 32
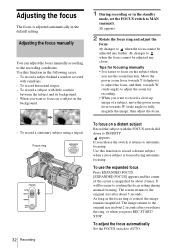
...Move the power zoom lever towards T (telephoto) to adjust the focus, and then, towards W (wide angle) to adjust the zoom for focusing manually • It is easier to focus on the subject when you use the expanded focus Press EXPANDED FOCUS. [EXPANDED FOCUS] appears and the center ... AUTO. To record a subject with raindrops. - As long as the focus ring is adjusted automatically in the standby mode, set the FOCUS switch to MAN (manual). 9 appears. 2 Rotate the focus ring and adjust the focus. 9 changes to record a close subject is magnified by about 5 seconds. Adjusting the focus ...
...Move the power zoom lever towards T (telephoto) to adjust the focus, and then, towards W (wide angle) to adjust the zoom for focusing manually • It is easier to focus on the subject when you use the expanded focus Press EXPANDED FOCUS. [EXPANDED FOCUS] appears and the center ... AUTO. To record a subject with raindrops. - As long as the focus ring is adjusted automatically in the standby mode, set the FOCUS switch to MAN (manual). 9 appears. 2 Rotate the focus ring and adjust the focus. 9 changes to record a close subject is magnified by about 5 seconds. Adjusting the focus ...
Operating Instructions
Page 33
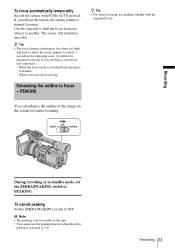
... is activated (p. 31). When the focus mode is not recorded on the screen for about 3 seconds in standby mode, set the ZEBRA/PEAKING switch to manual. - To cancel peaking Set the ZEBRA/PEAKING switch to another. Use this function to shift the focus from automatic to PEAKING. You can enhance the.... To focus automatically temporarily Record the subject with the expanded focus. When you release the button, the setting returns to focus - Enhancing the outline to manual focusing.
... is activated (p. 31). When the focus mode is not recorded on the screen for about 3 seconds in standby mode, set the ZEBRA/PEAKING switch to manual. - To cancel peaking Set the ZEBRA/PEAKING switch to another. Use this function to shift the focus from automatic to PEAKING. You can enhance the.... To focus automatically temporarily Record the subject with the expanded focus. When you release the button, the setting returns to focus - Enhancing the outline to manual focusing.
Operating Instructions
Page 36
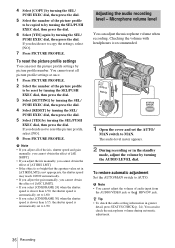
... profile, select [NO]. 6 Press PICTURE PROFILE. You cannot reset all of the iris, shutter speed and gain manually, you cannot obtain the effect of [AE SHIFT]. • If you adjust the iris manually, you cannot obtain the effect of [AT IRIS LMT]. • If the object is so bright that the... aperture value set in [AT IRIS LMT] is not appropriate, the shutter speed may reach 1/2000 automatically. • If you adjust the gain manually, you select [CINEFRAME 30] when the shutter speed is slower than 1/30, the shutter speed is recommended. 1 Open the cover and set to by turning...
... profile, select [NO]. 6 Press PICTURE PROFILE. You cannot reset all of the iris, shutter speed and gain manually, you cannot obtain the effect of [AE SHIFT]. • If you adjust the iris manually, you cannot obtain the effect of [AT IRIS LMT]. • If the object is so bright that the... aperture value set in [AT IRIS LMT] is not appropriate, the shutter speed may reach 1/2000 automatically. • If you adjust the gain manually, you select [CINEFRAME 30] when the shutter speed is slower than 1/30, the shutter speed is recommended. 1 Open the cover and set to by turning...
Operating Instructions
Page 37
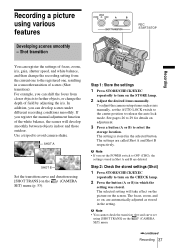
...the camera setup items such as stored in the selected button. The setting is stored in the setting. The settings are automatically adjusted as iris manually, set using [SHOT TRANS] on the (CAMERA SET) menu. ,continued Recording 37 The selected setting will develop smoothly between objects indoor and ...the transition time and curve set the AUTO LOCK switch to the center position to turn on the STORE lamp. 2 Adjust the desired items manually. For example, you can register the settings of focus, zoom, iris, gain, shutter speed, and white balance, and then change the depth...
...the camera setup items such as stored in the selected button. The setting is stored in the setting. The settings are automatically adjusted as iris manually, set using [SHOT TRANS] on the (CAMERA SET) menu. ,continued Recording 37 The selected setting will develop smoothly between objects indoor and ...the transition time and curve set the AUTO LOCK switch to the center position to turn on the STORE lamp. 2 Adjust the desired items manually. For example, you can register the settings of focus, zoom, iris, gain, shutter speed, and white balance, and then change the depth...
Operating Instructions
Page 38
... to the stored ones. 120min REC SHOT TRANS 0:00:05 EXEC SHOT A SHOT B S E Transition bar S: start E: end b Note • You cannot zoom, focus, or adjust manually while checking or activating the Shot transition. • When you change [SHOT TRANS] on how to assign a function. P-MENU - STATUS CHECK z Tip • You can...
... to the stored ones. 120min REC SHOT TRANS 0:00:05 EXEC SHOT A SHOT B S E Transition bar S: start E: end b Note • You cannot zoom, focus, or adjust manually while checking or activating the Shot transition. • When you change [SHOT TRANS] on how to assign a function. P-MENU - STATUS CHECK z Tip • You can...
Operating Instructions
Page 45
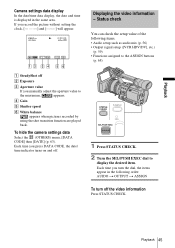
... dial to the maximum, appears. To hide the camera settings data Select the (OTHERS) menu, [DATA CODE] then [DATE] (p. 63). Playback 45 Each time you manually adjust the aperture value to display the desired item. D Gain E Shutter speed F White balance appears when pictures recorded by using the shot transition function are...
... dial to the maximum, appears. To hide the camera settings data Select the (OTHERS) menu, [DATA CODE] then [DATE] (p. 63). Playback 45 Each time you manually adjust the aperture value to display the desired item. D Gain E Shutter speed F White balance appears when pictures recorded by using the shot transition function are...
Operating Instructions
Page 46
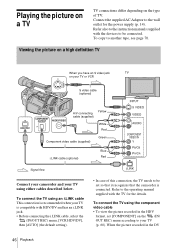
...cable (optional) Yellow A/V connecting cable (supplied) White Red Component video cable (supplied) Green i.LINK cable (optional) Blue Red Signal flow Connect your camcorder and your TV using the component video cable • To view the picture recorded in the DV 46 Playback To connect the TV using an... (p. 60). When the picture recorded in the HDV format, set so that it recognizes that the camcorder is compatible with the TV for the power supply (p. 14). Refer to the operating manual supplied with HDV/DV and has an i.LINK jack. • Before connecting the i.LINK cable, select...
...cable (optional) Yellow A/V connecting cable (supplied) White Red Component video cable (supplied) Green i.LINK cable (optional) Blue Red Signal flow Connect your camcorder and your TV using the component video cable • To view the picture recorded in the DV 46 Playback To connect the TV using an... (p. 60). When the picture recorded in the HDV format, set so that it recognizes that the camcorder is compatible with the TV for the power supply (p. 14). Refer to the operating manual supplied with HDV/DV and has an i.LINK jack. • Before connecting the i.LINK cable, select...
Operating Instructions
Page 77
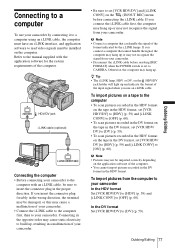
...cannot handle the signal, the computer may hang up or may not recognize the signal from your camcorder. • Disconnect the i.LINK cable before connecting the i.LINK cable. Refer to the manual supplied with an i.LINK cable, be imported correctly depending on the HDV/DV jack holder will light... up or may not recognize the signal from your camcorder. If you connect a computer that can handle the signal of your camcorder In the HDV format Set...
...cannot handle the signal, the computer may hang up or may not recognize the signal from your camcorder. • Disconnect the i.LINK cable before connecting the i.LINK cable. Refer to the manual supplied with an i.LINK cable, be imported correctly depending on the HDV/DV jack holder will light... up or may not recognize the signal from your camcorder. If you connect a computer that can handle the signal of your camcorder In the HDV format Set...


