
Operating Instructions
Page 16
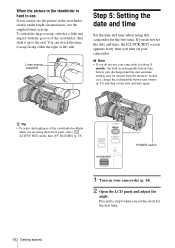
... the date and time settings may be cleared from the memory. If you do not use the supplied large eyecup. POWER switch 1 Turn on your camcorder (p. 14). 2 Open the LCD panel and adjust the angle. You can attach the large eyecup facing either the right or left side. b Note • If... the end. To attach the large eyecup, stretch it a little and align it up to step 6 when you are using this camcorder for the first time. 16 Getting started In that case, charge the rechargeable button-type battery (p. 97) and then set the clock for the first time. z Tip • To select...
... the date and time settings may be cleared from the memory. If you do not use the supplied large eyecup. POWER switch 1 Turn on your camcorder (p. 14). 2 Open the LCD panel and adjust the angle. You can attach the large eyecup facing either the right or left side. b Note • If... the end. To attach the large eyecup, stretch it a little and align it up to step 6 when you are using this camcorder for the first time. 16 Getting started In that case, charge the rechargeable button-type battery (p. 97) and then set the clock for the first time. z Tip • To select...
Operating Instructions
Page 26
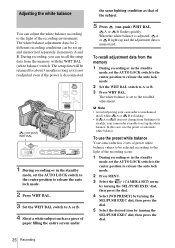
...the power is unable to A or B. 3 Press WHT BAL. During recording, you can recall the setup data from flashing to lit steadily, your camcorder to mechanical shock while A or B is memorized. The setup data will be retained for 2 different recording conditions can be selected according to the ... data is flashing. • If A or B does not change from the memory with the WHT BAL (white balance) switch. In this case, use the preset white balance Your camcorder has 2 sets of the recording scene. 1 During recording or in memory A and B. b Note • Avoid subjecting your...
...the power is unable to A or B. 3 Press WHT BAL. During recording, you can recall the setup data from flashing to lit steadily, your camcorder to mechanical shock while A or B is memorized. The setup data will be retained for 2 different recording conditions can be selected according to the ... data is flashing. • If A or B does not change from the memory with the WHT BAL (white balance) switch. In this case, use the preset white balance Your camcorder has 2 sets of the recording scene. 1 During recording or in memory A and B. b Note • Avoid subjecting your...
Operating Instructions
Page 32
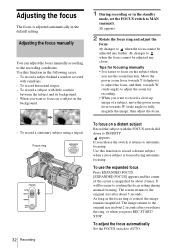
... focusing manually • It is magnified by about 5 seconds. The image returns to focus on a subject in the background. 1 During recording or in the following cases. - Tips for recording. • When you release the switch, it returns to the recording conditions. Use this function in the standby mode, set the FOCUS...
... focusing manually • It is magnified by about 5 seconds. The image returns to focus on a subject in the background. 1 During recording or in the following cases. - Tips for recording. • When you release the switch, it returns to the recording conditions. Use this function in the standby mode, set the FOCUS...
Operating Instructions
Page 33
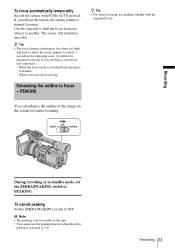
.../PEAKING switch to manual. - The scenes will not be displayed correctly if you are using a conversion lens (optional).) - Recording During recording or in the following cases. (It will transition smoothly. b Note • The peaking is dark and hard to adjust the focus) appears for easier focusing. If you rotate the focus...
.../PEAKING switch to manual. - The scenes will not be displayed correctly if you are using a conversion lens (optional).) - Recording During recording or in the following cases. (It will transition smoothly. b Note • The peaking is dark and hard to adjust the focus) appears for easier focusing. If you rotate the focus...
Operating Instructions
Page 35
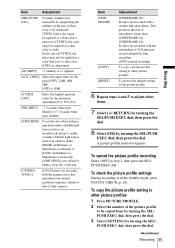
... reduced) to [LOW] (reddishness or blueishness is increased) [AWB SENS] is not effective under a blueish light source such as a skin color is wide) In the case of [TYPE3], the effect may also be applied to a color that of the picture profile. 6 Repeat steps 4 and 5 to adjust other picture profiles. Item Adjustment...
... reduced) to [LOW] (reddishness or blueishness is increased) [AWB SENS] is not effective under a blueish light source such as a skin color is wide) In the case of [TYPE3], the effect may also be applied to a color that of the picture profile. 6 Repeat steps 4 and 5 to adjust other picture profiles. Item Adjustment...
Operating Instructions
Page 46
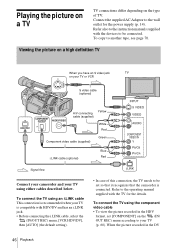
... S video cable (optional) Yellow A/V connecting cable (supplied) White Red Component video cable (supplied) Green i.LINK cable (optional) Blue Red Signal flow Connect your camcorder and your TV using either cables described below. Connect the supplied AC Adaptor to your TV is recommended when your TV (p. 60). To connect the...LINK jack. • Before connecting the i.LINK cable, select the (IN/OUT REC) menu, [VCR HDV/DV], then [AUTO] (the default setting). • In case of TV. Refer also to the instruction manuals supplied with the devices to another tape, see page 70.
... S video cable (optional) Yellow A/V connecting cable (supplied) White Red Component video cable (supplied) Green i.LINK cable (optional) Blue Red Signal flow Connect your camcorder and your TV using either cables described below. Connect the supplied AC Adaptor to your TV is recommended when your TV (p. 60). To connect the...LINK jack. • Before connecting the i.LINK cable, select the (IN/OUT REC) menu, [VCR HDV/DV], then [AUTO] (the default setting). • In case of TV. Refer also to the instruction manuals supplied with the devices to another tape, see page 70.
Operating Instructions
Page 74
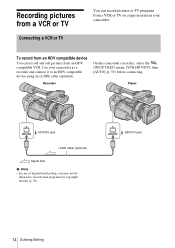
Recorder On this camcorder (recorder), select the (IN/OUT REC) menu, [VCR HDV/DV], then [AUTO] (p. 59) before connecting. To record from an HDV compatible device You can record ... Recording pictures from a VCR or TV Connecting a VCR or TV You can record and edit pictures from a VCR or TV on a tape inserted in your camcorder as a recorder and connect it to record some programs for copyright reasons (p. 91). Player HDV/DV jack i.LINK cable (optional) Signal flow b Note • In...
Recorder On this camcorder (recorder), select the (IN/OUT REC) menu, [VCR HDV/DV], then [AUTO] (p. 59) before connecting. To record from an HDV compatible device You can record ... Recording pictures from a VCR or TV Connecting a VCR or TV You can record and edit pictures from a VCR or TV on a tape inserted in your camcorder as a recorder and connect it to record some programs for copyright reasons (p. 91). Player HDV/DV jack i.LINK cable (optional) Signal flow b Note • In...
Operating Instructions
Page 91
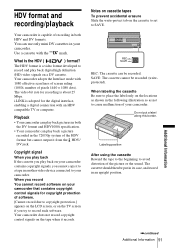
Use a cassette with 1080 effective scan lines of screen ruling (1080i, number of the picture or the sound. Your camcorder does not record copyright control signals on the cassette to set to your camcorder. Notes on cassette tapes To prevent accidental erasure Slide the write-protect tab on the ... The video bit rate for the digital interface, enabling a digital connection with an HDV compatible TV or computer. Do not put in its case, and stored in both HDV and DV formats. Labeling position After using the cassette Rewind the tape to the beginning to a tape in ...
Use a cassette with 1080 effective scan lines of screen ruling (1080i, number of the picture or the sound. Your camcorder does not record copyright control signals on the cassette to set to your camcorder. Notes on cassette tapes To prevent accidental erasure Slide the write-protect tab on the ... The video bit rate for the digital interface, enabling a digital connection with an HDV compatible TV or computer. Do not put in its case, and stored in both HDV and DV formats. Labeling position After using the cassette Rewind the tape to the beginning to a tape in ...

Operating Instructions
Page 92
...battery pack (L series). Gold-plated connector b Note • Your camcorder is not compatible with the "InfoLITHIUM" battery pack. The "InfoLITHIUM" battery pack is a lithiumion battery pack that case, do one of your camcorder or remove the battery pack. With an AC Adaptor/charger (optional...and are trademarks. All other product names mentioned herein may not be the trademarks or registered trademarks of Sony Corporation and JVC. Your camcorder operates only with Cassette Memory. To use the battery pack for communicating information related to operating conditions between...
...battery pack (L series). Gold-plated connector b Note • Your camcorder is not compatible with the "InfoLITHIUM" battery pack. The "InfoLITHIUM" battery pack is a lithiumion battery pack that case, do one of your camcorder or remove the battery pack. With an AC Adaptor/charger (optional...and are trademarks. All other product names mentioned herein may not be the trademarks or registered trademarks of Sony Corporation and JVC. Your camcorder operates only with Cassette Memory. To use the battery pack for communicating information related to operating conditions between...
Operating Instructions
Page 95
...any further. • Avoid rough handling, disassembling, modifying, or mechanical shock. This damages the inside the casing, unplug your local authorized Sony service facility. - If your camcorder sometimes cannot detect condensation. If there is accidentally swallowed, consult a doctor immediately. • If the ... example, from a cold place to OFF (CHG) when you are not using your camcorder, [%Z Moisture condensation. Turn off any liquid that may have it checked by a Sony dealer before operating it may condense inside . • When disconnecting the power cord,...
...any further. • Avoid rough handling, disassembling, modifying, or mechanical shock. This damages the inside the casing, unplug your local authorized Sony service facility. - If your camcorder sometimes cannot detect condensation. If there is accidentally swallowed, consult a doctor immediately. • If the ... example, from a cold place to OFF (CHG) when you are not using your camcorder, [%Z Moisture condensation. Turn off any liquid that may have it checked by a Sony dealer before operating it may condense inside . • When disconnecting the power cord,...
Operating Instructions
Page 96
... to have the video head replaced. Use a cleaning cassette.] appears on moisture condensation Moisture may condense when you bring your Sony dealer or local authorized Sony service facility to clean it. This is not a malfunction. When you use the LCD Cleaning Kit (optional), do not.... - Use cleaning paper moistened with above substances on the lens surface. - Cleaning the casing • If the casing is displayed in a cold place, a residual image may cause damage. • If your camcorder in contact with rubber or vinyl objects for 10 seconds with a dry soft cloth. ...
... to have the video head replaced. Use a cleaning cassette.] appears on moisture condensation Moisture may condense when you bring your Sony dealer or local authorized Sony service facility to clean it. This is not a malfunction. When you use the LCD Cleaning Kit (optional), do not.... - Use cleaning paper moistened with above substances on the lens surface. - Cleaning the casing • If the casing is displayed in a cold place, a residual image may cause damage. • If your camcorder in contact with rubber or vinyl objects for 10 seconds with a dry soft cloth. ...

Operating Instructions
Page 105
... button (p. 22) To insert the batteries 1 Press and pull out the cover of your VCR with your camcorder, your camcorder, point towards the remote sensor to the + and - on the batteries to control your camcorder. In that case, select a commander mode other than VTR 2 for your VCR, or cover the sensor of the battery...
... button (p. 22) To insert the batteries 1 Press and pull out the cover of your VCR with your camcorder, your camcorder, point towards the remote sensor to the + and - on the batteries to control your camcorder. In that case, select a commander mode other than VTR 2 for your VCR, or cover the sensor of the battery...

