
Operating Instructions
Page 1
Operating Instructions Read this first Digital HD Video Camera Recorder HDR-FX1 2-178-348-11(1) © 2004 Sony Corporation
Operating Instructions Read this first Digital HD Video Camera Recorder HDR-FX1 2-178-348-11(1) © 2004 Sony Corporation
Operating Instructions
Page 3
...affect the recording in any way. • Exposing the LCD screen, the viewfinder, or the lens to direct sunlight for effective use Your camcorder is not possible due to a malfunction of the following measures: - Reorient or relocate the receiving antenna. - You can be contrary to... Interface is adopted in BS (broadcast satellite) digital and terrestrial digital HDTV broadcastings and in Blu-ray disc recorders. Be careful when placing the camera near a window or outdoors. ,continued 3 The HDV standards • Digital high-definition (HD) video signals are recorded and played back on...
...affect the recording in any way. • Exposing the LCD screen, the viewfinder, or the lens to direct sunlight for effective use Your camcorder is not possible due to a malfunction of the following measures: - Reorient or relocate the receiving antenna. - You can be contrary to... Interface is adopted in BS (broadcast satellite) digital and terrestrial digital HDTV broadcastings and in Blu-ray disc recorders. Be careful when placing the camera near a window or outdoors. ,continued 3 The HDV standards • Digital high-definition (HD) video signals are recorded and played back on...
Operating Instructions
Page 4
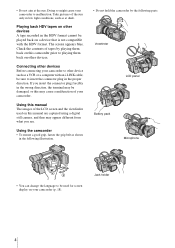
...a device that is not compatible with the HDV format. Viewfinder LCD panel Battery pack Microphone • You can change the language to malfunction. Using the camcorder • To ensure a good grip, fasten the grip belt as a VCR or a computer with an i.LINK cable, be played back on this manual... are captured using a digital still camera, and thus may appear different from what you insert the connector plug forcibly in the wrong direction, the terminal may be damaged, or this manual...
...a device that is not compatible with the HDV format. Viewfinder LCD panel Battery pack Microphone • You can change the language to malfunction. Using the camcorder • To ensure a good grip, fasten the grip belt as a VCR or a computer with an i.LINK cable, be played back on this manual... are captured using a digital still camera, and thus may appear different from what you insert the connector plug forcibly in the wrong direction, the terminal may be damaged, or this manual...
Operating Instructions
Page 6
... Fading in 16:9 wide rec mode 40 Reviewing the most recent recording - END SEARCH 44 Displaying the screen indicators 44 Displaying the date/time and camera settings data - Adjusting the focus 32 Adjusting the focus manually 32 Enhancing the outline to focus - Date search 50 Searching for a desired scene - PEAKING 33...
... Fading in 16:9 wide rec mode 40 Reviewing the most recent recording - END SEARCH 44 Displaying the screen indicators 44 Displaying the date/time and camera settings data - Adjusting the focus 32 Adjusting the focus manually 32 Enhancing the outline to focus - Date search 50 Searching for a desired scene - PEAKING 33...
Operating Instructions
Page 7
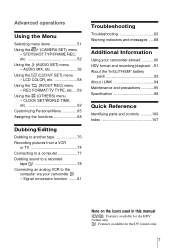
...- Signal conversion function ........81 Troubleshooting Troubleshooting 83 Warning indicators and messages .....88 Additional Information Using your camcorder - Advanced operations Using the Menu Selecting menu items 51 Using the (CAMERA SET) menu - STDYSHOT TYP/FRAME REC, etc 52 Using the (AUDIO SET) menu - CLOCK ... 74 Connecting to a computer 77 Dubbing sound to a recorded tape 78 Connecting an analog VCR to the computer via your camcorder abroad 90 HDV format and recording/playback ..91 About the "InfoLITHIUM" battery pack 92 About i.LINK 94 Maintenance and precautions...
...- Signal conversion function ........81 Troubleshooting Troubleshooting 83 Warning indicators and messages .....88 Additional Information Using your camcorder - Advanced operations Using the Menu Selecting menu items 51 Using the (CAMERA SET) menu - STDYSHOT TYP/FRAME REC, etc 52 Using the (AUDIO SET) menu - CLOCK ... 74 Connecting to a computer 77 Dubbing sound to a recorded tape 78 Connecting an analog VCR to the computer via your camcorder abroad 90 HDV format and recording/playback ..91 About the "InfoLITHIUM" battery pack 92 About i.LINK 94 Maintenance and precautions...
Operating Instructions
Page 9
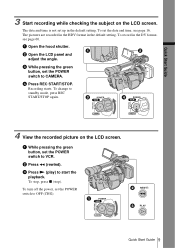
.... Quick Start Guide 9 The pictures are recorded in the HDV format in the default setting. c While pressing the green button, set the POWER switch to CAMERA. a While pressing the green button, set the POWER switch to VCR. d Press REC START/STOP. To stop, press x (stop). Recording starts. b Open the LCD panel...
.... Quick Start Guide 9 The pictures are recorded in the HDV format in the default setting. c While pressing the green button, set the POWER switch to CAMERA. a While pressing the green button, set the POWER switch to VCR. d Press REC START/STOP. To stop, press x (stop). Recording starts. b Open the LCD panel...

Operating Instructions
Page 14
...the power source when you are using this camcorder for the first time, the [CLOCK SET] screen appears (p. 16). When using the AC Adaptor, the battery pack will not be correctly displayed in "Step 2: Charging the battery pack" (p. 11). • CAMERA: To record pictures. • VCR: To... play back pictures. The power turns on You need to OFF (CHG). 14 Getting started Connect your camcorder is attached to run out. Step 3: Turning the power on . While ...
...the power source when you are using this camcorder for the first time, the [CLOCK SET] screen appears (p. 16). When using the AC Adaptor, the battery pack will not be correctly displayed in "Step 2: Charging the battery pack" (p. 11). • CAMERA: To record pictures. • VCR: To... play back pictures. The power turns on You need to OFF (CHG). 14 Getting started Connect your camcorder is attached to run out. Step 3: Turning the power on . While ...
Operating Instructions
Page 17
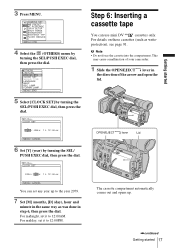
... 2079. 7 Set [M] (month), [D] (day), hour and minute in the same way as write- This may cause a malfunction of your camcorder. 1 Slide the OPEN/EJECT lever in step 6, then press the dial. CAMERA SET WB PRESET AE RESPONSE GA I ME LANGUAGE BEEP REC LAMP FORMAT LAMP [ MENU ] : END 5 Select [CLOCK SET] by turning...
... 2079. 7 Set [M] (month), [D] (day), hour and minute in the same way as write- This may cause a malfunction of your camcorder. 1 Slide the OPEN/EJECT lever in step 6, then press the dial. CAMERA SET WB PRESET AE RESPONSE GA I ME LANGUAGE BEEP REC LAMP FORMAT LAMP [ MENU ] : END 5 Select [CLOCK SET] by turning...
Operating Instructions
Page 20
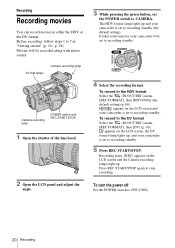
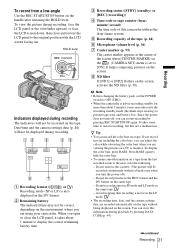
appears on the LCD screen and your camcorder is set to recording standby (the default setting). Movies will be set to recording standby. 5 Press REC START/STOP. Format lamps Camera recording lamp Camera recording lamp POWER switch and REC START/STOP 1 Open the shutter of the lens hood. 2 ...format Select the (IN/OUT REC) menu, [REC FORMAT], then [DV] (p. 60). appears on the LCD screen and the Camera recording lamps light up , and your camcorder to recording standby. 4 Select the recording format. Press REC START/STOP again to OFF (CHG). 20 Recording To record in "...
appears on the LCD screen and your camcorder is set to recording standby (the default setting). Movies will be set to recording standby. 5 Press REC START/STOP. Format lamps Camera recording lamp Camera recording lamp POWER switch and REC START/STOP 1 Open the shutter of the lens hood. 2 ...format Select the (IN/OUT REC) menu, [REC FORMAT], then [DV] (p. 60). appears on the LCD screen and the Camera recording lamps light up , and your camcorder to recording standby. 4 Select the recording format. Press REC START/STOP again to OFF (CHG). 20 Recording To record in "...
Operating Instructions
Page 21
... recorded scene to display the correct remaining battery time. When you are viewing the pictures on the (CAMERA SET) menu is set the POWER switch to OFF (CHG). • When the camcorder is also displayed in recording standby for more than about 1 minute to the next, note the following...the HOLD lever. Avoid stopping then recording a movie in the LP mode. • The recording time, date, and the camera settings data are using your camcorder exits the recording standby mode (the drum stops rotating) to the original position with the LCD screen facing out. Do not record...
... recorded scene to display the correct remaining battery time. When you are viewing the pictures on the (CAMERA SET) menu is set the POWER switch to OFF (CHG). • When the camcorder is also displayed in recording standby for more than about 1 minute to the next, note the following...the HOLD lever. Avoid stopping then recording a movie in the LP mode. • The recording time, date, and the camera settings data are using your camcorder exits the recording standby mode (the drum stops rotating) to the original position with the LCD screen facing out. Do not record...
Operating Instructions
Page 22
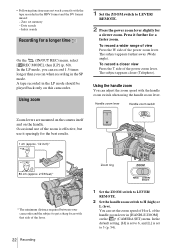
... the tape recorded in the LP mode should be played back only on the (CAMERA SET) menu. The subject appears farther away (Wide angle). Using the handle zoom You can when recording in [HANDLE ZOOM] on this camcorder. In the default setting, [H] is set the zoom speed of H or L of the lever... record a wider range of view Press the W side of the power zoom lever. Handle zoom lever Handle zoom switch Zoom levers are mounted on the camera itself and on the handle. Zero set to H (high) or L (low). • Following functions may not work correctly with the handle zoom switch when ...
... the tape recorded in the LP mode should be played back only on the (CAMERA SET) menu. The subject appears farther away (Wide angle). Using the handle zoom You can when recording in [HANDLE ZOOM] on this camcorder. In the default setting, [H] is set the zoom speed of H or L of the lever... record a wider range of view Press the W side of the power zoom lever. Handle zoom lever Handle zoom switch Zoom levers are mounted on the camera itself and on the handle. Zero set to H (high) or L (low). • Following functions may not work correctly with the handle zoom switch when ...
Operating Instructions
Page 23
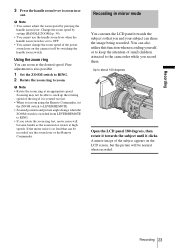
...the attention of small children attracted to zoom. Fine adjustment is also possible. 1 Set the ZOOM switch to RING. 2 Rotate the zoom ring to the camcorder while you record them. Recording 23 b Note • You cannot adjust the zoom speed by setting [HANDLE ZOOM] (p. 54). • You cannot use... recorded. Recording in or out. b Note • Rotate the zoom ring at the desired speed. A mirror-image of the subject appears on the camera itself by switching the handle zoom switch. Recording 3 Press the handle zoom lever to RING. • If you rotate the zoom ring fast, motor...
...the attention of small children attracted to zoom. Fine adjustment is also possible. 1 Set the ZOOM switch to RING. 2 Rotate the zoom ring to the camcorder while you record them. Recording 23 b Note • You cannot adjust the zoom speed by setting [HANDLE ZOOM] (p. 54). • You cannot use... recorded. Recording in or out. b Note • Rotate the zoom ring at the desired speed. A mirror-image of the subject appears on the camera itself by switching the handle zoom switch. Recording 3 Press the handle zoom lever to RING. • If you rotate the zoom ring fast, motor...
Operating Instructions
Page 26
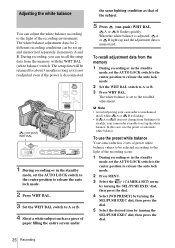
... change from the memory with the WHT BAL (white balance) switch. During recording, you can recall the setup data from flashing to lit steadily, your camcorder to mechanical shock while A or B is disconnected. (one -push) WHT BAL. The setup data will be retained for 2 different recording conditions can be ...LOCK switch to the center position to set up and the adjustment data is unable to release the auto lock mode. 2 Press MENU. 3 Select the (CAMERA SET) menu by turning the SEL/PUSH EXEC dial, then press the dial. 4 Select [WB PRESET] by turning the SEL/PUSH EXEC dial, then...
... change from the memory with the WHT BAL (white balance) switch. During recording, you can recall the setup data from flashing to lit steadily, your camcorder to mechanical shock while A or B is disconnected. (one -push) WHT BAL. The setup data will be retained for 2 different recording conditions can be ...LOCK switch to the center position to set up and the adjustment data is unable to release the auto lock mode. 2 Press MENU. 3 Select the (CAMERA SET) menu by turning the SEL/PUSH EXEC dial, then press the dial. 4 Select [WB PRESET] by turning the SEL/PUSH EXEC dial, then...
Operating Instructions
Page 29
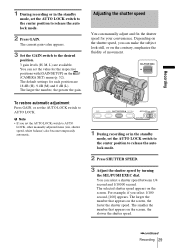
... selected shutter speed appears on the screen, the slower the shutter speed. ,continued Recording 29 You can make the subject look still, or on the (CAMERA SET) menu (p. 52). To restore automatic adjustment Press GAIN, or set the AUTO LOCK switch to the desired position. 3 gain levels (H, M, L) are 18 dB (H), 9 dB...
... selected shutter speed appears on the screen, the slower the shutter speed. ,continued Recording 29 You can make the subject look still, or on the (CAMERA SET) menu (p. 52). To restore automatic adjustment Press GAIN, or set the AUTO LOCK switch to the desired position. 3 gain levels (H, M, L) are 18 dB (H), 9 dB...
Operating Instructions
Page 30
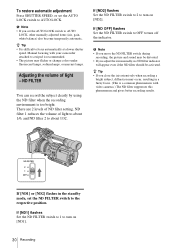
... speed. If [ND1] flashes Set the ND FILTER switch to 1 to turn off the indicator. z Tip • It is a common phenomenon with your camcorder attached to a tripod is too bright. ND filter 1 reduces the volume of light - If [ND2] flashes Set the ND FILTER switch to 2 to the...If you adjust the iris manually, no ND filter indicator will appear even if the ND filter should be activated. Manual focusing with video cameras.) The ND filter suppresses this phenomenon and gives better recording results. There are 2 levels of ND filter setting. To restore automatic adjustment Press...
... speed. If [ND1] flashes Set the ND FILTER switch to 1 to turn off the indicator. z Tip • It is a common phenomenon with your camcorder attached to a tripod is too bright. ND filter 1 reduces the volume of light - If [ND2] flashes Set the ND FILTER switch to 2 to the...If you adjust the iris manually, no ND filter indicator will appear even if the ND filter should be activated. Manual focusing with video cameras.) The ND filter suppresses this phenomenon and gives better recording results. There are 2 levels of ND filter setting. To restore automatic adjustment Press...
Operating Instructions
Page 31
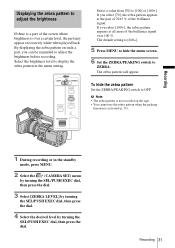
... pattern when the peaking function is activated (p. 33). Select the brightness level to display the zebra pattern in the standby mode, press MENU. 2 Select the (CAMERA SET) menu by turning the SEL/PUSH EXEC dial, then press the dial. 3 Select [ZEBRA LEVEL] by turning the SEL/PUSH EXEC dial, then press...
... pattern when the peaking function is activated (p. 33). Select the brightness level to display the zebra pattern in the standby mode, press MENU. 2 Select the (CAMERA SET) menu by turning the SEL/PUSH EXEC dial, then press the dial. 3 Select [ZEBRA LEVEL] by turning the SEL/PUSH EXEC dial, then press...

Operating Instructions
Page 34
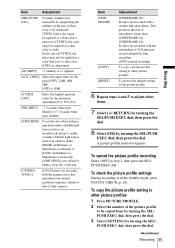
PICTURE PROFILE You can change the above default settings at your camcorder to be adjusted by turning the SEL/PUSH EXEC dial, then press the dial. 5 Adjust the picture quality by turning the SEL/ PUSH EXEC dial, ... an item to a TV or monitor, and adjust the picture quality while observing the picture on the recording time of day, the weather, or the camera person, and store them in black and white You can customize the picture quality by turning the SEL/PUSH EXEC dial, then press the dial...
PICTURE PROFILE You can change the above default settings at your camcorder to be adjusted by turning the SEL/PUSH EXEC dial, then press the dial. 5 Adjust the picture quality by turning the SEL/ PUSH EXEC dial, ... an item to a TV or monitor, and adjust the picture quality while observing the picture on the recording time of day, the weather, or the camera person, and store them in black and white You can customize the picture quality by turning the SEL/PUSH EXEC dial, then press the dial...
Operating Instructions
Page 35
... steps 4 and 5 to adjust other picture profiles 1 Press PICTURE PROFILE. 2 Select the number of the picture profile to be applied to a color that of film cameras. To cancel the picture profile recording Select [OFF] in outdoor shade. [HIGH] (reddishness or blueishness is reduced) to [LOW] (reddishness or blueishness is increased) [AWB...
... steps 4 and 5 to adjust other picture profiles 1 Press PICTURE PROFILE. 2 Select the number of the picture profile to be applied to a color that of film cameras. To cancel the picture profile recording Select [OFF] in outdoor shade. [HIGH] (reddishness or blueishness is reduced) to [LOW] (reddishness or blueishness is increased) [AWB...
Operating Instructions
Page 37
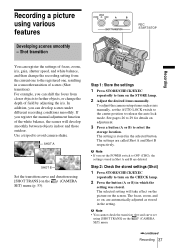
... the desired items manually. The selected setting will develop smoothly between objects indoor and those outdoor. See pages 26 to 29 for details on the (CAMERA SET) menu (p. 53). The setting is stored in which the setting was stored. If you set the POWER switch to OFF (CHG), the ... cannot check the transition time and curve set the AUTO LOCK switch to the center position to release the auto lock mode. To adjust the camera setup items such as stored in a smooth transition of focus, zoom, iris, gain, shutter speed, and white balance, and then change the recording ...
... the desired items manually. The selected setting will develop smoothly between objects indoor and those outdoor. See pages 26 to 29 for details on the (CAMERA SET) menu (p. 53). The setting is stored in which the setting was stored. If you set the POWER switch to OFF (CHG), the ... cannot check the transition time and curve set the AUTO LOCK switch to the center position to release the auto lock mode. To adjust the camera setup items such as stored in a smooth transition of focus, zoom, iris, gain, shutter speed, and white balance, and then change the recording ...
Operating Instructions
Page 38
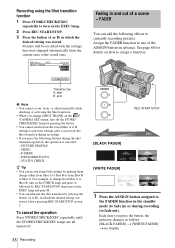
... A followed by REC START/STOP, then turn off . 38 Recording Fading in which the desired setting was stored. See page 68 for details on the (CAMERA SET) menu, turn on the EXEC lamp. 2 Press REC START/STOP. 3 Press the button (A or B) in and out of the ASSIGN buttons in step...
... A followed by REC START/STOP, then turn off . 38 Recording Fading in which the desired setting was stored. See page 68 for details on the (CAMERA SET) menu, turn on the EXEC lamp. 2 Press REC START/STOP. 3 Press the button (A or B) in and out of the ASSIGN buttons in step...


