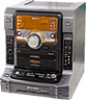
Operating Instructions
Page 2
...as a bookcase or built-in cabinet. Reorient or relocate the receiving antenna. - CAUTION You are designed to rain or moisture. ...connected to the grounding system of the building, as practical. Consult the dealer or an experienced radio/TV technician for energy... efficiency. 2GB For customers in the United States ENERGY STAR® is intended to alert the user to the presence of uninsulated "dangerous voltage" within the product's enclosure that interference will not occur in a particular installation. As an ENERGY STAR® partner, Sony...
...as a bookcase or built-in cabinet. Reorient or relocate the receiving antenna. - CAUTION You are designed to rain or moisture. ...connected to the grounding system of the building, as practical. Consult the dealer or an experienced radio/TV technician for energy... efficiency. 2GB For customers in the United States ENERGY STAR® is intended to alert the user to the presence of uninsulated "dangerous voltage" within the product's enclosure that interference will not occur in a particular installation. As an ENERGY STAR® partner, Sony...
Operating Instructions
Page 3
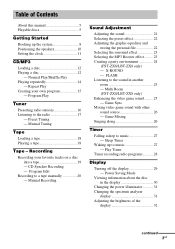
... the display 32 continued 3GB Power Saving Mode Viewing information about the disc in another room 25 - CD Synchro Recording - Play Timer Timer recording radio programs........... 28 Display Turning off the display 29 - Manual Recording Sound Adjustment Adjusting the sound 21 Selecting...(FST-ZX8/LBT-ZX8 only) - Sleep Timer Waking up the system 8 Positioning the speakers 10 Setting the clock 11 CD/MP3 Loading a disc 12 Playing a disc 12 - Program Play Tuner Presetting radio stations 16 Listening to the radio 17 - Manual Tuning Tape Loading a tape 18 Playing a tape ...
... the display 32 continued 3GB Power Saving Mode Viewing information about the disc in another room 25 - CD Synchro Recording - Play Timer Timer recording radio programs........... 28 Display Turning off the display 29 - Manual Recording Sound Adjustment Adjusting the sound 21 Selecting...(FST-ZX8/LBT-ZX8 only) - Sleep Timer Waking up the system 8 Positioning the speakers 10 Setting the clock 11 CD/MP3 Loading a disc 12 Playing a disc 12 - Program Play Tuner Presetting radio stations 16 Listening to the radio 17 - Manual Tuning Tape Loading a tape 18 Playing a tape ...
Operating Instructions
Page 16
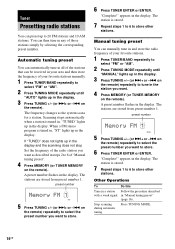
When a FM stereo program is tuned in the display. on the remote). "Complete!" on the remote) ... You can preset up in the display and the scanning does not stop Set the frequency of the radio station you want as the system scans for a station. preset number AUTO 5 Press TUNING +/- (or >+ or -. A preset number flashes...to store other stations. A preset number flashes in "Manual tuning preset" (page 16). Manual tuning preset You can be received in your area and then store the frequency of your favorite stations manually. 1 Press TUNER/BAND repeatedly to select "FM...
When a FM stereo program is tuned in the display. on the remote). "Complete!" on the remote) ... You can preset up in the display and the scanning does not stop Set the frequency of the radio station you want as the system scans for a station. preset number AUTO 5 Press TUNING +/- (or >+ or -. A preset number flashes...to store other stations. A preset number flashes in "Manual tuning preset" (page 16). Manual tuning preset You can be received in your area and then store the frequency of your favorite stations manually. 1 Press TUNER/BAND repeatedly to select "FM...

Operating Instructions
Page 17
... you change the AM tuning interval, select any AM station first, then turn on the remote) repeatedly to select "TUNER". There will be no stereo effect, but the reception will be sure to select "FM" or "AM". 2 Press TUNING MODE repeatedly until "MONO" lights up in the ... holding down TUNER ENTER, press ?/1 to turn off , the system turns on Repeat the procedure above and "CD POWER ON" appears in the display. Listening to a radio station either by selecting a preset station, or by manually tuning in the display. on the system again. "AM 10k STEP" or "AM 9k STEP" appears...
... you change the AM tuning interval, select any AM station first, then turn on the remote) repeatedly to select "TUNER". There will be no stereo effect, but the reception will be sure to select "FM" or "AM". 2 Press TUNING MODE repeatedly until "MONO" lights up in the ... holding down TUNER ENTER, press ?/1 to turn off , the system turns on Repeat the procedure above and "CD POWER ON" appears in the display. Listening to a radio station either by selecting a preset station, or by manually tuning in the display. on the system again. "AM 10k STEP" or "AM 9k STEP" appears...
Operating Instructions
Page 20
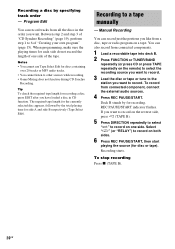
... "RELAY") to other sources while recording. • Game Mixing does not function during CD Synchro Recording. Recording starts. Recording to 6 of the tape. Program Edit You can record tracks from connected component, connect the external audio sources. 4 Press REC PAUSE/START. You can record just... the portions you like from connected components. 1 Load a recordable tape into deck B. 2 Press FUNCTION or TUNER/BAND repeatedly (or press CD or press TAPE repeatedly on a tape. Manual Recording You can also record from a disc, tape or radio program on the remote) to select...
... "RELAY") to other sources while recording. • Game Mixing does not function during CD Synchro Recording. Recording starts. Recording to 6 of the tape. Program Edit You can record tracks from connected component, connect the external audio sources. 4 Press REC PAUSE/START. You can record just... the portions you like from connected components. 1 Load a recordable tape into deck B. 2 Press FUNCTION or TUNER/BAND repeatedly (or press CD or press TAPE repeatedly on a tape. Manual Recording You can also record from a disc, tape or radio program on the remote) to select...
Operating Instructions
Page 21
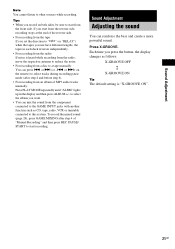
... The default setting is heard while recording from the radio, move the respective antenna to reduce the noise. • For recording from the component connected to start recording. Sound Adjustment Note You cannot... repeatedly until "ALBM" lights up in each deck reverses independently. • For recording from the radio: If noise is "X-GROOVE ON". 21GB Tips • When you want. • You can... "j" (or "RELAY") when the tapes you press the button, the display changes as CD, tape, radio, VCR or turntable connected to start from the reverse side, recording stops at the end ...
... The default setting is heard while recording from the radio, move the respective antenna to reduce the noise. • For recording from the component connected to start recording. Sound Adjustment Note You cannot... repeatedly until "ALBM" lights up in each deck reverses independently. • For recording from the radio: If noise is "X-GROOVE ON". 21GB Tips • When you want. • You can... "j" (or "RELAY") when the tapes you press the button, the display changes as CD, tape, radio, VCR or turntable connected to start from the reverse side, recording stops at the end ...
Operating Instructions
Page 26
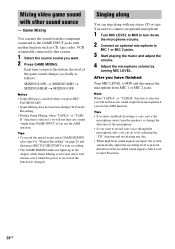
... through the microphone only, you use the AMS function. Mixing video game sound with any stereo CD or tape. Game Mixing You can do so by turning MIC LEVEL. Tips • ..., press GAME MIXING after step 4 of the game sound changes cyclically as CD, tape, radio, VCR or turntable connected to this system. 1 Select the source sound you want to start recording. • The...CD" function and not playing any sound output from microphone if you can mix the sound from MIC 1 or MIC 2 jacks. After you have finished Turn MIC LEVEL to MIN and disconnect the microphone from the component...
... through the microphone only, you use the AMS function. Mixing video game sound with any stereo CD or tape. Game Mixing You can do so by turning MIC LEVEL. Tips • ..., press GAME MIXING after step 4 of the game sound changes cyclically as CD, tape, radio, VCR or turntable connected to this system. 1 Select the source sound you want to start recording. • The...CD" function and not playing any sound output from microphone if you can mix the sound from MIC 1 or MIC 2 jacks. After you have finished Turn MIC LEVEL to MIN and disconnect the microphone from the component...
Operating Instructions
Page 27
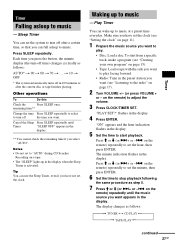
...use the Sleep Timer, even if you can wake up to turn -off in the display. t 10 t OFF * The system automatically turns off time) changes cyclically as follows: t TUNER y CD PLAY T t TAPE PLAY T continued 27GB Waking up in the preset station you want appears in 100 minutes or after a certain... a disc. "PLAY SET?" The display changes as follows: AUTO* t 90 t 80 t 70 t ... Play Timer You can fall asleep to play facing forward. • Radio: Tune in the display when the Sleep Timer is activated. Make sure you want to music. on the remote) to music -
...use the Sleep Timer, even if you can wake up to turn -off in the display. t 10 t OFF * The system automatically turns off time) changes cyclically as follows: t TUNER y CD PLAY T t TAPE PLAY T continued 27GB Waking up in the preset station you want appears in 100 minutes or after a certain... a disc. "PLAY SET?" The display changes as follows: AUTO* t 90 t 80 t 70 t ... Play Timer You can fall asleep to play facing forward. • Radio: Tune in the display when the Sleep Timer is activated. Make sure you want to music. on the remote) to music -
Operating Instructions
Page 28
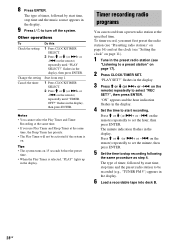
... in the display. 6 Load a recordable tape into deck B. 28GB Tips • The system turns on the remote) repeatedly to set the minute, then press ENTER. 5 Set the time to stop time and the preset radio station to start time, stop recording following the same procedure as step 4. "PLAY SET?" ..."ON" appears and the hour indication flashes in the display. 4 Set the time to be activated if the system is selected, "PLAY" lights up in the display...
... in the display. 6 Load a recordable tape into deck B. 28GB Tips • The system turns on the remote) repeatedly to set the minute, then press ENTER. 5 Set the time to stop time and the preset radio station to start time, stop recording following the same procedure as step 4. "PLAY SET?" ..."ON" appears and the hour indication flashes in the display. 4 Set the time to be activated if the system is selected, "PLAY" lights up in the display...
Operating Instructions
Page 35
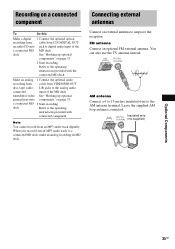
...this Make a digital 1 Connect the optional optical recording from cable from CD DIGITAL OUT an audio CD onto jack to digital audio input of the MD deck. deck See "Hooking up optional game player onto components" on page 33. 2 Start recording. Refer to the operating instructions provided...an MP3 audio track digitally. Insulated wire AM FM75Ω COAXIAL (not supplied) Optional Components 35GB Make an analog 1 Connect the optional audio recording from cords from VIDEO/MD OUT disc, tape, radio, L/R jacks to a connected MD deck, make an analog recording on MD deck. Note...
...this Make a digital 1 Connect the optional optical recording from cable from CD DIGITAL OUT an audio CD onto jack to digital audio input of the MD deck. deck See "Hooking up optional game player onto components" on page 33. 2 Start recording. Refer to the operating instructions provided...an MP3 audio track digitally. Insulated wire AM FM75Ω COAXIAL (not supplied) Optional Components 35GB Make an analog 1 Connect the optional audio recording from cords from VIDEO/MD OUT disc, tape, radio, L/R jacks to a connected MD deck, make an analog recording on MD deck. Note...
Operating Instructions
Page 36
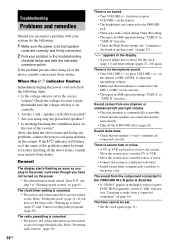
... • Turn off the X-ROUND effect (page 24). Redo "Presetting radio stations" (page 16). 36GB There is placed too close to the system. The timer cannot be found even after doing all the above , consult your nearest Sony dealer. speaker cords short-circuited? • Are you have not turned ...'s + and - Set the clock (page 11) and timer settings (pages 27 - 29) again. Move the system away from the TV or VCR. • Move the system away from a connected component" on page 25). The sound from one channel, or unbalanced left and right volume. • Place the speakers as...
... • Turn off the X-ROUND effect (page 24). Redo "Presetting radio stations" (page 16). 36GB There is placed too close to the system. The timer cannot be found even after doing all the above , consult your nearest Sony dealer. speaker cords short-circuited? • Are you have not turned ...'s + and - Set the clock (page 11) and timer settings (pages 27 - 29) again. Move the system away from the TV or VCR. • Move the system away from a connected component" on page 25). The sound from one channel, or unbalanced left and right volume. • Place the speakers as...


