Operating Instructions
Page 1
Model No. Record the serial number in the space provided below. Serial No. 4-253-172-15(1) Compact Hi-Fi Stereo System Operating Instructions Owner's Record The model and serial numbers are located on the rear of the unit. FST-ZX8 FST-ZX6 LBT-ZX8 LBT-ZX6 ©2004 Sony Corporation Refer to them whenever you call upon your Sony dealer regarding this product.
Model No. Record the serial number in the space provided below. Serial No. 4-253-172-15(1) Compact Hi-Fi Stereo System Operating Instructions Owner's Record The model and serial numbers are located on the rear of the unit. FST-ZX8 FST-ZX6 LBT-ZX8 LBT-ZX6 ©2004 Sony Corporation Refer to them whenever you call upon your Sony dealer regarding this product.
Operating Instructions
Page 2
... the user to provide reasonable protection against harmful interference in particular, specifies that the cable ground shall be connected to the grounding system of the building, as vases, on the apparatus. As an ENERGY STAR® partner, Sony Corporation has determined that may cause harmful interference to which can radiate radio frequency energy and, if not installed and used in...
... the user to provide reasonable protection against harmful interference in particular, specifies that the cable ground shall be connected to the grounding system of the building, as vases, on the apparatus. As an ENERGY STAR® partner, Sony Corporation has determined that may cause harmful interference to which can radiate radio frequency energy and, if not installed and used in...
Operating Instructions
Page 3
... - Preset Tuning - CD Synchro Recording - Manual Recording Sound Adjustment Adjusting the sound 21 Selecting the preset effect 22 Adjusting the graphic equalizer and storing the personal file 22 Selecting the surround effect 23 Selecting the MP3 Booster effect ......... 23 Creating a party environment 24 (FST-ZX8/LBT-ZX8 only) - X-ROUND - Sleep Timer Waking up the system 8 Positioning the speakers 10 Setting the clock 11 CD/MP3 Loading a disc 12 Playing a disc 12 - Power Saving Mode...
... - Preset Tuning - CD Synchro Recording - Manual Recording Sound Adjustment Adjusting the sound 21 Selecting the preset effect 22 Adjusting the graphic equalizer and storing the personal file 22 Selecting the surround effect 23 Selecting the MP3 Booster effect ......... 23 Creating a party environment 24 (FST-ZX8/LBT-ZX8 only) - X-ROUND - Sleep Timer Waking up the system 8 Positioning the speakers 10 Setting the clock 11 CD/MP3 Loading a disc 12 Playing a disc 12 - Power Saving Mode...
Operating Instructions
Page 5
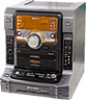
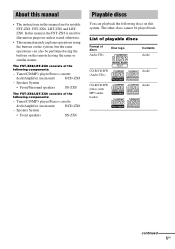
.../LBT-ZX8 consists of discs Audio CDs Disc logo Contents Audio CD-R/CD-RW (Audio CDs) CD-R/CD-RW (Discs with MP3 audio tracks) Audio Audio continued 5GB The other discs cannot be performed using the buttons on the system, but the same operations can playback the following discs on the remote having the same or similar names. Tuner/CD/MP3 player/Stereo cassette deck/Amplifier (main unit) HCD-ZX6 - About this manual • The instructions in this manual are for illustration purposes...
.../LBT-ZX8 consists of discs Audio CDs Disc logo Contents Audio CD-R/CD-RW (Audio CDs) CD-R/CD-RW (Discs with MP3 audio tracks) Audio Audio continued 5GB The other discs cannot be performed using the buttons on the system, but the same operations can playback the following discs on the remote having the same or similar names. Tuner/CD/MP3 player/Stereo cassette deck/Amplifier (main unit) HCD-ZX6 - About this manual • The instructions in this manual are for illustration purposes...

Operating Instructions
Page 14
Tips • When switching to "CD" function from the display. Press REPEAT repeatedly until "REP" or "REP1" lights up to the file name. • If you press CD on the remote while the system is turned off , the system turns on automatically and "CD" is selected for MP3 audio tracks. In this case, set "CD POWER ON" by this system is 300. • Depending on the encoding/writing software...
Tips • When switching to "CD" function from the display. Press REPEAT repeatedly until "REP" or "REP1" lights up to the file name. • If you press CD on the remote while the system is turned off , the system turns on automatically and "CD" is selected for MP3 audio tracks. In this case, set "CD POWER ON" by this system is 300. • Depending on the encoding/writing software...
Operating Instructions
Page 15
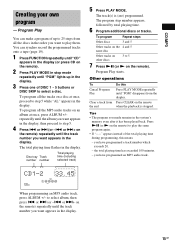
... program step number appears, followed by total playing time. 6 Program additional discs or tracks. or >+ on the remote) repeatedly until the album you have programmed a track number which exceeds 20. - CD/MP3 Creating your own program - To program all the tracks on a disc at once, press ALBUM +/- Disc tray Track number number Total playing time (including selected track) 5 Press PLAY MODE. Press NX (or N on the remote). You can make a program of DISC 1 ~ 5 buttons or DISC...
... program step number appears, followed by total playing time. 6 Program additional discs or tracks. or >+ on the remote) repeatedly until the album you have programmed a track number which exceeds 20. - CD/MP3 Creating your own program - To program all the tracks on a disc at once, press ALBUM +/- Disc tray Track number number Total playing time (including selected track) 5 Press PLAY MODE. Press NX (or N on the remote). You can make a program of DISC 1 ~ 5 buttons or DISC...

Operating Instructions
Page 17
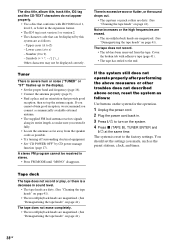
The default setting is 9 kHz (or 10 kHz for some areas). Use buttons on the system for the operation. Notes • When "CD POWER OFF" is selected, disc access time is turned off, the system turns on the system for the operation. 1 Press FUNCTION repeatedly until "PRESET" lights up in the display. "AM 10k STEP" or "AM 9k STEP" appears in the Power Saving Mode (page 29). Note You cannot change the AM tuning interval...
The default setting is 9 kHz (or 10 kHz for some areas). Use buttons on the system for the operation. Notes • When "CD POWER OFF" is selected, disc access time is turned off, the system turns on the system for the operation. 1 Press FUNCTION repeatedly until "PRESET" lights up in the display. "AM 10k STEP" or "AM 9k STEP" appears in the Power Saving Mode (page 29). Note You cannot change the AM tuning interval...
Operating Instructions
Page 20
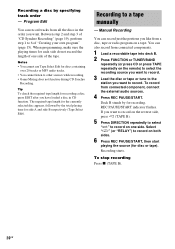
... record just the portions you like from all the discs in CD function. Manual Recording You can also record from connected component, connect the external audio sources. 4 Press REC PAUSE/START. When programming, make sure the playing times for disc or tape). To record from connected components. 1 Load a recordable tape into deck B. 2 Press FUNCTION or TUNER/BAND repeatedly (or press CD or press TAPE repeatedly on one side of "Creating your own...
... record just the portions you like from all the discs in CD function. Manual Recording You can also record from connected component, connect the external audio sources. 4 Press REC PAUSE/START. When programming, make sure the playing times for disc or tape). To record from connected components. 1 Load a recordable tape into deck B. 2 Press FUNCTION or TUNER/BAND repeatedly (or press CD or press TAPE repeatedly on one side of "Creating your own...
Operating Instructions
Page 21
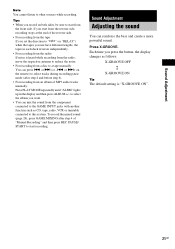
... you press the button, the display changes as CD, tape, radio, VCR or turntable connected to select tracks during recording pause mode (after step 4 of MP3 audio tracks manually: Press PLAY MODE repeatedly until "ALBM" lights up in each deck reverses independently. • For recording from the front side. or > (or -. Sound Adjustment Adjusting the sound You can mix the sound from the component connected to the GAME INPUT jacks with another function such as...
... you press the button, the display changes as CD, tape, radio, VCR or turntable connected to select tracks during recording pause mode (after step 4 of MP3 audio tracks manually: Press PLAY MODE repeatedly until "ALBM" lights up in each deck reverses independently. • For recording from the front side. or > (or -. Sound Adjustment Adjusting the sound You can mix the sound from the component connected to the GAME INPUT jacks with another function such as...
Operating Instructions
Page 25
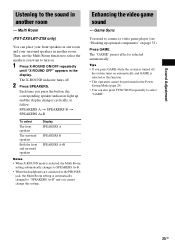
... surround speakers Display SPEAKERS A SPEAKERS B SPEAKERS A+B Notes • When X-ROUND mode is selected, the Multi Room setting automatically changes to SPEAKERS A+B. • When the headphones are connected to the PHONES jack, the Multi Room setting is selected automatically. The X-ROUND indicator turns off , the system turns on automatically and GAME is turned off . 2 Press SPEAKERS. Press GAME. Tips • If you want to select "GAME". 25GB The "GAME" preset effect is automatically changed to connect a video game player...
... surround speakers Display SPEAKERS A SPEAKERS B SPEAKERS A+B Notes • When X-ROUND mode is selected, the Multi Room setting automatically changes to SPEAKERS A+B. • When the headphones are connected to the PHONES jack, the Multi Room setting is selected automatically. The X-ROUND indicator turns off , the system turns on automatically and GAME is turned off . 2 Press SPEAKERS. Press GAME. Tips • If you want to select "GAME". 25GB The "GAME" preset effect is automatically changed to connect a video game player...
Operating Instructions
Page 26
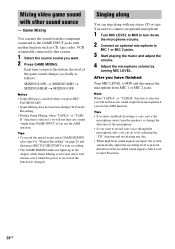
... can sing along with other sound source - You need to connect an optional microphone. 1 Turn MIC LEVEL to MIN to turn down the microphone volume. 2 Connect an optional microphone to MIC 1 or MIC 2 jacks. 3 Start playing the music and adjust the volume. 4 Adjust the microphone volume by selecting the "CD" function and not playing any disc. • When high level sound signals are input, the system automatically adjust the recording level to the GAME INPUT jacks with another function such as follows: MIXING LOW t MIXING MID t MIXING HIGH...
... can sing along with other sound source - You need to connect an optional microphone. 1 Turn MIC LEVEL to MIN to turn down the microphone volume. 2 Connect an optional microphone to MIC 1 or MIC 2 jacks. 3 Start playing the music and adjust the volume. 4 Adjust the microphone volume by selecting the "CD" function and not playing any disc. • When high level sound signals are input, the system automatically adjust the recording level to the GAME INPUT jacks with another function such as follows: MIXING LOW t MIXING MID t MIXING HIGH...
Operating Instructions
Page 27
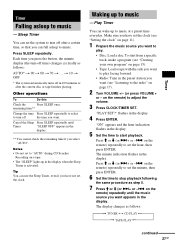
... time, so that you select "AUTO". Press M or m (or >+ or -. on page 11). 1 Prepare the music source you press the button, the minute display (the turn-off the time you want to music - Each time you want . Notes • Do not set the system to turn off time) changes cyclically as follows: t TUNER y CD PLAY T t TAPE PLAY T continued 27GB Make sure you have set the hour, then press ENTER. "PLAY SET?" on the remote) to set...
... time, so that you select "AUTO". Press M or m (or >+ or -. on page 11). 1 Prepare the music source you press the button, the minute display (the turn-off the time you want to music - Each time you want . Notes • Do not set the system to turn off time) changes cyclically as follows: t TUNER y CD PLAY T t TAPE PLAY T continued 27GB Make sure you have set the hour, then press ENTER. "PLAY SET?" on the remote) to set...
Operating Instructions
Page 28
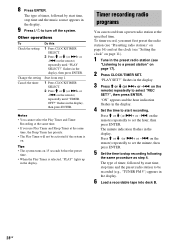
... flashes in the display. 4 Set the time to start time, stop time and the music source appears in the display. 9 Press ?/1 to be activated if the system is selected, "PLAY" lights up in the display. Other operations To Check the setting Change the setting Cancel the timer Do this 1 Press CLOCK/TIMER SELECT. 2 Press M or m (or >+ or -. on the remote) repeatedly until "PLAY SELECT?" on the remote) repeatedly until "TIMER OFF?" Timer recording radio programs...
... flashes in the display. 4 Set the time to start time, stop time and the music source appears in the display. 9 Press ?/1 to be activated if the system is selected, "PLAY" lights up in the display. Other operations To Check the setting Change the setting Cancel the timer Do this 1 Press CLOCK/TIMER SELECT. 2 Press M or m (or >+ or -. on the remote) repeatedly until "PLAY SELECT?" on the remote) repeatedly until "TIMER OFF?" Timer recording radio programs...
Operating Instructions
Page 29
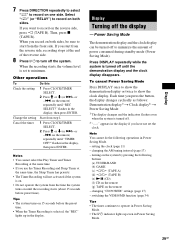
... buttons (a) TUNER/BAND (b) GAME (c) h/H (TAPE A) (d) h/H (TAPE B) (e) NX (CD) (f) CD on the remote (g) TAPE on both sides. Then, press x (TAPE B). setting the clock (page 11) - turning on the system by pressing the following operations in the display. switching the VIDEO/MD function (page 34) Tips • The timer continues to record on one side. When you use the Timer Recording and Sleep Timer at the end of power consumed during standby mode (Power...
... buttons (a) TUNER/BAND (b) GAME (c) h/H (TAPE A) (d) h/H (TAPE B) (e) NX (CD) (f) CD on the remote (g) TAPE on both sides. Then, press x (TAPE B). setting the clock (page 11) - turning on the system by pressing the following operations in the display. switching the VIDEO/MD function (page 34) Tips • The timer continues to record on one side. When you use the Timer Recording and Sleep Timer at the end of power consumed during standby mode (Power...
Operating Instructions
Page 34
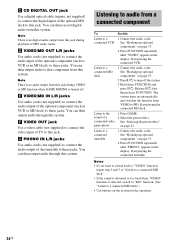
... jacks. See "Hooking up optional components" on the system for the operation. 34GB You can then record digital audio from this system. C CD DIGITAL OUT jack Use a digital optical cable (square, not supplied) to connect the digital input of the optional MD deck to this jack during playback of MP3 audio tracks. D VIDEO/MD OUT L/R jacks Use audio cords (not supplied) to a connected MD deck"). • Use buttons on page 33. 2 Press FUNCTION repeatedly until "PHONO" appears in the display. Note There is selected, switch...
... jacks. See "Hooking up optional components" on the system for the operation. 34GB You can then record digital audio from this system. C CD DIGITAL OUT jack Use a digital optical cable (square, not supplied) to connect the digital input of the optional MD deck to this jack during playback of MP3 audio tracks. D VIDEO/MD OUT L/R jacks Use audio cords (not supplied) to a connected MD deck"). • Use buttons on page 33. 2 Press FUNCTION repeatedly until "PHONO" appears in the display. Note There is selected, switch...
Operating Instructions
Page 36
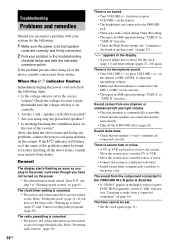
..." on the remote) or MIC LEVEL to adjust the microphone volume. • Make sure the microphone is connected to the MIC 1 or MIC 2 jack correctly. • The tape is no microphone sound. • Turn VOLUME +/- (or press VOLUME + or - Press ?/1 (see "Listening to audio from the component connected to the system. The clock/timer setting is canceled. • The power cord is placed too close to the VIDEO/MD IN L/R jacks is no sound. • Turn VOLUME +/- Redo "Presetting radio stations" (page...
..." on the remote) or MIC LEVEL to adjust the microphone volume. • Make sure the microphone is connected to the MIC 1 or MIC 2 jack correctly. • The tape is no microphone sound. • Turn VOLUME +/- (or press VOLUME + or - Press ?/1 (see "Listening to audio from the component connected to the system. The clock/timer setting is canceled. • The power cord is placed too close to the VIDEO/MD IN L/R jacks is no sound. • Turn VOLUME +/- Redo "Presetting radio stations" (page...
Operating Instructions
Page 37
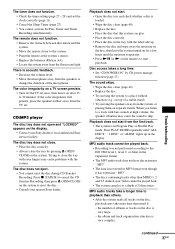
... eject the disc. • Consult your Sony dealer or local authorized Sony service facility. Press x (TAPE B) to cancel the CD Synchro Recording, then press Z OPEN/CLOSE on separate stands. Trying to a depth of the microphone. Disc access takes a long time. • Set "CD POWER ON" by pressing Z OPEN/ CLOSE on the disc, playback may cause problems with the system. MP3 audio tracks take a longer time to playback...
... eject the disc. • Consult your Sony dealer or local authorized Sony service facility. Press x (TAPE B) to cancel the CD Synchro Recording, then press Z OPEN/CLOSE on separate stands. Trying to a depth of the microphone. Disc access takes a long time. • Set "CD POWER ON" by pressing Z OPEN/ CLOSE on the disc, playback may cause problems with the system. MP3 audio tracks take a longer time to playback...
Operating Instructions
Page 38
... follows. - The tape does not record. • The tab has been removed from the speaker cords as possible. • Try turning off surrounding electrical equipment. • Set "CD POWER OFF" by this system are as the preset stations, clock, and timer. The system is reset to 9) - You should set up in the display). • Set the proper band and frequency (page 16). • Connect the antenna properly (page 9). •...
... follows. - The tape does not record. • The tab has been removed from the speaker cords as possible. • Try turning off surrounding electrical equipment. • Set "CD POWER OFF" by this system are as the preset stations, clock, and timer. The system is reset to 9) - You should set up in the display). • Set the proper band and frequency (page 16). • Connect the antenna properly (page 9). •...
Operating Instructions
Page 42
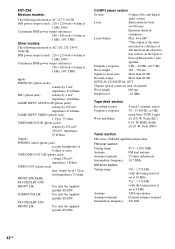
... the tuning interval set at a distance of 8 ohms or more VIDEO/MD OUT L/R (phono jacks): voltage 250 mV, impedance 1 kOhm VIDEO OUT (phono jack): max. Peak (IEC) 0.1% W. RMS (NAB) ±0.2% W. output level 1 Vp-p, load impedance 75 ohms FRONT SPEAKER: FST-ZX8/LBT-ZX8: FRONT L/R Use only the supplied speaker SS-ZX8 SURROUND L/R Use only the supplied speaker SS-ZX8 FST-ZX6/LBT-ZX6: FRONT L/R Use only the supplied speaker SS-ZX6 CD/MP3 player section System Compact disc and digital audio system Laser...
... the tuning interval set at a distance of 8 ohms or more VIDEO/MD OUT L/R (phono jacks): voltage 250 mV, impedance 1 kOhm VIDEO OUT (phono jack): max. Peak (IEC) 0.1% W. RMS (NAB) ±0.2% W. output level 1 Vp-p, load impedance 75 ohms FRONT SPEAKER: FST-ZX8/LBT-ZX8: FRONT L/R Use only the supplied speaker SS-ZX8 SURROUND L/R Use only the supplied speaker SS-ZX8 FST-ZX6/LBT-ZX6: FRONT L/R Use only the supplied speaker SS-ZX6 CD/MP3 player section System Compact disc and digital audio system Laser...
Operating Instructions
Page 44
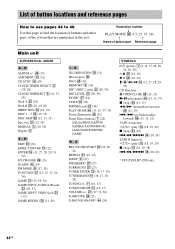
... Use this page to find the location of buttons and other parts of button/part Reference page Main unit ALPHABETICAL ORDER A - rh (13) AMP MENU qg (31) CD SYNC ql (19) CLOCK/TIMER SELECT 2 (28, 29) CLOCK/TIMER SET 5 (11, 27, 28) Deck A e; (18) Deck B wg (18, 19, 28) DIRECTION ef (18, 19) DISC 1 ~ 5 rd (13, 15) DISC SKIP t; (12, 13, 15) Disc tray ea (12, 39) DISPLAY...
... Use this page to find the location of buttons and other parts of button/part Reference page Main unit ALPHABETICAL ORDER A - rh (13) AMP MENU qg (31) CD SYNC ql (19) CLOCK/TIMER SELECT 2 (28, 29) CLOCK/TIMER SET 5 (11, 27, 28) Deck A e; (18) Deck B wg (18, 19, 28) DIRECTION ef (18, 19) DISC 1 ~ 5 rd (13, 15) DISC SKIP t; (12, 13, 15) Disc tray ea (12, 39) DISPLAY...


