
Operating Instructions
Page 6
... Changing the Sound 45 Selecting a Sound Field 47 Adjusting the level parameters 49 Enjoying Movies 50 Changing the Angles 50 Displaying the Subtitles 51 Checking the Play Information (ADVANCED 52 Using ... System (RDS) (Only for the European models 61 Naming Preset Stations 61 Settings and Adjustments 63 Using the Setup Display 63 Setting the Display or Sound Track Language (LANGUAGE SETUP 64 Settings for the Display (SCREEN SETUP 65 Custom Settings (CUSTOM SETUP 66 Settings for the Speakers (SPEAKER SETUP 67 Additional...
... Changing the Sound 45 Selecting a Sound Field 47 Adjusting the level parameters 49 Enjoying Movies 50 Changing the Angles 50 Displaying the Subtitles 51 Checking the Play Information (ADVANCED 52 Using ... System (RDS) (Only for the European models 61 Naming Preset Stations 61 Settings and Adjustments 63 Using the Setup Display 63 Setting the Display or Sound Track Language (LANGUAGE SETUP 64 Settings for the Display (SCREEN SETUP 65 Custom Settings (CUSTOM SETUP 66 Settings for the Speakers (SPEAKER SETUP 67 Additional...

Operating Instructions
Page 10
Front Panel 1 POWER switch/indicator (31) 2 Disc tray (31) 3 A OPEN/CLOSE (31) 4 Front panel display (11) 5 ./> PREV/NEXT, PRESET +/- (29, 32) 6 H (play) (31) 7 X (pause) (32) 8 x (stop) (31) 9 PHONES jack (31) q; VOLUME control (31) qa SOUND FIELD +/- (47) qs DISPLAY (47, 60) qd BAND (29) qf FUNCTION (59) qg (remote sensor) (17) 10 Index to Parts and Controls For more information, refer to the pages indicated in parentheses.
Front Panel 1 POWER switch/indicator (31) 2 Disc tray (31) 3 A OPEN/CLOSE (31) 4 Front panel display (11) 5 ./> PREV/NEXT, PRESET +/- (29, 32) 6 H (play) (31) 7 X (pause) (32) 8 x (stop) (31) 9 PHONES jack (31) q; VOLUME control (31) qa SOUND FIELD +/- (47) qs DISPLAY (47, 60) qd BAND (29) qf FUNCTION (59) qg (remote sensor) (17) 10 Index to Parts and Controls For more information, refer to the pages indicated in parentheses.

Operating Instructions
Page 11
... back a SACD, CD, or VIDEO CD Playing status Current index number (The index indicator does not appear during SACD playback.) Current play mode Current sound ALL1DISC S AUTO TITLE TRACK DIGITAL FM AM NTSCPBC ANGLE CHAPTER INDEX H TUNED M MONO ST S dB REPEAT 1 k H z PROGRAM M H ...z SHUFFLE Lights up during PBC playback (VIDEO CD only) Current track number When listening to the radio Preset number Playing time Current play mode Monaural/Stereo effect ALL1DISC S AUTO TITLE PRO LOGIC DIGITAL FM AM NTSCPBC ANGLE TRACK CHAPTER INDEX H TUNED M MONO ST S dB REPEAT 1 k H z PROGRAM...
... back a SACD, CD, or VIDEO CD Playing status Current index number (The index indicator does not appear during SACD playback.) Current play mode Current sound ALL1DISC S AUTO TITLE TRACK DIGITAL FM AM NTSCPBC ANGLE CHAPTER INDEX H TUNED M MONO ST S dB REPEAT 1 k H z PROGRAM M H ...z SHUFFLE Lights up during PBC playback (VIDEO CD only) Current track number When listening to the radio Preset number Playing time Current play mode Monaural/Stereo effect ALL1DISC S AUTO TITLE PRO LOGIC DIGITAL FM AM NTSCPBC ANGLE TRACK CHAPTER INDEX H TUNED M MONO ST S dB REPEAT 1 k H z PROGRAM...

Operating Instructions
Page 13
... the dark. TV/VIDEO (58) wa REPEAT (38) ws MUTING (32) wd TIME (42) wf FUNCTION (59) wg BAND (29) wh Number buttons (33) wj SOUND FIELD (47) wk DISPLAY (47, 60) wl ENTER e; SUBTITLE (51) qa VOL +/- (60) qs ./> PREV/NEXT, TV/PRESET +/- (29, 32) qd H PLAY/SELECT (31) qf... TITLE (33) qg DVD DISPLAY (38) qh C/X/x/c/ENTER (25) qj DVD SETUP (54) qk [/1 (on /standby) (58) 2 OPEN/CLOSE (31) 3 NAME (61) 4 STEREO/MONO (60) 5 MEMORY (29) 6 CLEAR (35) 7 PLAY MODE (35) 8 AUDIO (45) 9 ANGLE (50) q; CONTROL DVD/TV switch (58) ea m/M/ / SLOW, TUNING +/- (29, 39) es x STOP...
... the dark. TV/VIDEO (58) wa REPEAT (38) ws MUTING (32) wd TIME (42) wf FUNCTION (59) wg BAND (29) wh Number buttons (33) wj SOUND FIELD (47) wk DISPLAY (47, 60) wl ENTER e; SUBTITLE (51) qa VOL +/- (60) qs ./> PREV/NEXT, TV/PRESET +/- (29, 32) qd H PLAY/SELECT (31) qf... TITLE (33) qg DVD DISPLAY (38) qh C/X/x/c/ENTER (25) qj DVD SETUP (54) qk [/1 (on /standby) (58) 2 OPEN/CLOSE (31) 3 NAME (61) 4 STEREO/MONO (60) 5 MEMORY (29) 6 CLEAR (35) 7 PLAY MODE (35) 8 AUDIO (45) 9 ANGLE (50) q; CONTROL DVD/TV switch (58) ea m/M/ / SLOW, TUNING +/- (29, 39) es x STOP...

Operating Instructions
Page 15
... green t when you select "REPEAT" except "OFF." Sets the disc to the default setting. You can make various adjustments to items such as picture and sound. See page 52.) m Control Menu display off The Control Menu items are different depending on the disc while playing a DVD. REPEAT (page 38) ADVANCED (DVD...
... green t when you select "REPEAT" except "OFF." Sets the disc to the default setting. You can make various adjustments to items such as picture and sound. See page 52.) m Control Menu display off The Control Menu items are different depending on the disc while playing a DVD. REPEAT (page 38) ADVANCED (DVD...
Operating Instructions
Page 17
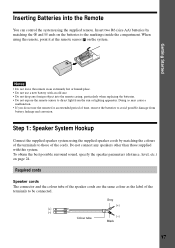
... or lighting apparatus. When using the remote, point it at the remote sensor on the batteries to be connected. To obtain the best possible surround sound, specify the speaker parameters (distance, level, etc.) on page 24. Getting Started Notes • Do not leave the remote in an extremely hot or humid...
... or lighting apparatus. When using the remote, point it at the remote sensor on the batteries to be connected. To obtain the best possible surround sound, specify the speaker parameters (distance, level, etc.) on page 24. Getting Started Notes • Do not leave the remote in an extremely hot or humid...
Operating Instructions
Page 19
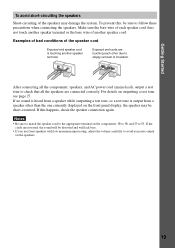
...test tone is touching another speaker terminal. Exposed end cords are touching each speaker cord does not touch another speaker cord. For details on the components: 3 to 3, and # to follow these precautions when connecting the speakers. Make sure the bare wire of each other than the one ...currently displayed on the speakers. 19 After connecting all the components, speakers, and AC power cord (mains lead), output a test tone to check that all the speakers are reversed, the sound will be sure to #. If this , be distorted and will lack bass. &#...
...test tone is touching another speaker terminal. Exposed end cords are touching each speaker cord does not touch another speaker cord. For details on the components: 3 to 3, and # to follow these precautions when connecting the speakers. Make sure the bare wire of each other than the one ...currently displayed on the speakers. 19 After connecting all the components, speakers, and AC power cord (mains lead), output a test tone to check that all the speakers are reversed, the sound will be sure to #. If this , be distorted and will lack bass. &#...

Operating Instructions
Page 24
Speaker Setup For the best possible surround sound, all the speakers other than the front speakers. You may adjust the speaker parameters using SPEAKER SETUP in any position. The front speakers can be ...) closer (C) to the side, depending on the shape of the speakers from the listening position. Specifying the speaker parameters To obtain the best possible surround sound, first specify the distance of your listening position, then set the balance and level. You can place the subwoofer in the setup display (page 67...
Speaker Setup For the best possible surround sound, all the speakers other than the front speakers. You may adjust the speaker parameters using SPEAKER SETUP in any position. The front speakers can be ...) closer (C) to the side, depending on the shape of the speakers from the listening position. Specifying the speaker parameters To obtain the best possible surround sound, first specify the distance of your listening position, then set the balance and level. You can place the subwoofer in the setup display (page 67...

Operating Instructions
Page 25
..., the parameter turns off and is used . If you do not connect centre or rear speakers, or move the rear speakers, set in the "Virtual" sound field (page 47) properly. -NO: Select this . SETUP. xSIZE When you cannot change them. Position and height of the front, rear, and centre speakers - Since...
..., the parameter turns off and is used . If you do not connect centre or rear speakers, or move the rear speakers, set in the "Virtual" sound field (page 47) properly. -NO: Select this . SETUP. xSIZE When you cannot change them. Position and height of the front, rear, and centre speakers - Since...

Operating Instructions
Page 27
... panel display. 5 Repeat Steps 3 and 4 to be adjusted using C/c. If you do not operate the remote for a few seconds, the value disappears from each speaker sounds the same using X/x. • Items adjusted in 9 LEVEL. Height diagram Getting Started C C 60 D D 30 • R. HIGH Select this if the rear speakers are located in...
... panel display. 5 Repeat Steps 3 and 4 to be adjusted using C/c. If you do not operate the remote for a few seconds, the value disappears from each speaker sounds the same using X/x. • Items adjusted in 9 LEVEL. Height diagram Getting Started C C 60 D D 30 • R. HIGH Select this if the rear speakers are located in...

Operating Instructions
Page 28
... set the speaker parameters back to +6 dB, 1 dB steps). • S. If you select an item, the sound cuts off for a moment. • Depending on the settings of other speakers, the subwoofer may output excessive sound. is displayed and all the speakers at one time Use the VOLUME control. Press AMP MENU repeatedly...
... set the speaker parameters back to +6 dB, 1 dB steps). • S. If you select an item, the sound cuts off for a moment. • Depending on the settings of other speakers, the subwoofer may output excessive sound. is displayed and all the speakers at one time Use the VOLUME control. Press AMP MENU repeatedly...

Operating Instructions
Page 32
... the front panel display, so you can restart the disc from the beginning of the disc, press x twice, then press H. 32 the disc Mute the sound Press MUTING. As long as you do not open the disc tray, Resume Play will work even if the system enters standby mode by pressing...
... the front panel display, so you can restart the disc from the beginning of the disc, press x twice, then press H. 32 the disc Mute the sound Press MUTING. As long as you do not open the disc tray, Resume Play will work even if the system enters standby mode by pressing...

Operating Instructions
Page 34
... for interactive operations. When you play VIDEO CDs interactively by pressing X/x or the number buttons. 3 Press ENTER. 4 Follow the instructions in the menu for the sound using a menu. Refer to change. 3 To change other such operations. Number buttons 1 23 4 56 7 89 >10 10/0 Playing VIDEO CDs with PBC Functions (PBC Playback...
... for interactive operations. When you play VIDEO CDs interactively by pressing X/x or the number buttons. 3 Press ENTER. 4 Follow the instructions in the menu for the sound using a menu. Refer to change. 3 To change other such operations. Number buttons 1 23 4 56 7 89 >10 10/0 Playing VIDEO CDs with PBC Functions (PBC Playback...

Operating Instructions
Page 45
xWhen playing a VIDEO CD, or CD The default setting is underlined. • STEREO: The standard stereo sound • 1/L: The sound of the left channel (monaural) • 2/R: The sound of the right channel (monaural) xWhen playing a SACD In stop mode, depending on the SACD, the choice of the SACD to...turned off. Notes • For discs not in multiple audio formats. With stereo CDs or VIDEO CDs, you can select the sound from both the right and left speakers. (In this case, the sound loses its stereo effect.) For example, when playing a disc containing a song with multilingual tracks...
xWhen playing a VIDEO CD, or CD The default setting is underlined. • STEREO: The standard stereo sound • 1/L: The sound of the left channel (monaural) • 2/R: The sound of the right channel (monaural) xWhen playing a SACD In stop mode, depending on the SACD, the choice of the SACD to...turned off. Notes • For discs not in multiple audio formats. With stereo CDs or VIDEO CDs, you can select the sound from both the right and left speakers. (In this case, the sound loses its stereo effect.) For example, when playing a disc containing a song with multilingual tracks...

Operating Instructions
Page 46
...solid line regardless of the disc When you play MPEG AUDIO sound tracks, the system outputs PCM (stereo) signals. PROGRAM FORMAT DTS 3/2.1 L CR LFE LS RS Notes • When the signal contains rear signal components such as LS, RS, or S, the Surround effect ...," the channels being output. Displaying the audio information of the LFE signal component being played are displayed on the screen. When an LFE signal component is not output, "LFE" is enclosed in the programme format display mean the following sound component: L: Front (left) R : Front (right) C : Centre LS...
...solid line regardless of the disc When you play MPEG AUDIO sound tracks, the system outputs PCM (stereo) signals. PROGRAM FORMAT DTS 3/2.1 L CR LFE LS RS Notes • When the signal contains rear signal components such as LS, RS, or S, the Surround effect ...," the channels being output. Displaying the audio information of the LFE signal component being played are displayed on the screen. When an LFE signal component is not output, "LFE" is enclosed in the programme format display mean the following sound component: L: Front (left) R : Front (right) C : Centre LS...

Operating Instructions
Page 47
...sampling frequency). MULTI DIMENSION (page 48) to . CINEMA STUDIO EX A* Reproduces the sound characteristics of the Sony Pictures Entertainment's classic editing studio using the 3D sound imaging of sound effects. Each time you press DISPLAY, the front panel display switches as follows: remaining...and then return to select the pre-programmed sound fields. Sound Adjustments CINEMA STUDIO EX B* Reproduces the sound characteristics of the Sony Pictures Entertainment's mixing studio using the 3D sound imaging of the pre-programmed sound fields according to the programme you listen to...
...sampling frequency). MULTI DIMENSION (page 48) to . CINEMA STUDIO EX A* Reproduces the sound characteristics of the Sony Pictures Entertainment's classic editing studio using the 3D sound imaging of sound effects. Each time you press DISPLAY, the front panel display switches as follows: remaining...and then return to select the pre-programmed sound fields. Sound Adjustments CINEMA STUDIO EX B* Reproduces the sound characteristics of the Sony Pictures Entertainment's mixing studio using the 3D sound imaging of the pre-programmed sound fields according to the programme you listen to...

Operating Instructions
Page 48
... small rectangular concert hall. Software with 2 channel audio signals, is played according to create surround effects. 2 CH STEREO Outputs the sound from a single pair of actual rear speakers. Multi channel surround formats are downmixed to create an array of virtual rear... of a large rectangular concert hall. NORMAL SURROUND Software with multichannel surround audio signals is decoded with stereo sound capabilities. V. MULTI DIMENSION* (Virtual Multi Dimension) Uses 3D sound imaging to two channels. This mode creates 5 sets of virtual speakers surrounding the listener at a ...
... small rectangular concert hall. Software with 2 channel audio signals, is played according to create surround effects. 2 CH STEREO Outputs the sound from a single pair of actual rear speakers. Multi channel surround formats are downmixed to create an array of virtual rear... of a large rectangular concert hall. NORMAL SURROUND Software with multichannel surround audio signals is decoded with stereo sound capabilities. V. MULTI DIMENSION* (Virtual Multi Dimension) Uses 3D sound imaging to two channels. This mode creates 5 sets of virtual speakers surrounding the listener at a ...
Operating Instructions
Page 49
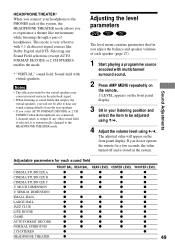
... panel display. REAR LEVEL CENTER LEVEL WOOFER LEVEL CINEMA STUDIO EX A z z z z z CINEMA STUDIO EX B z z z z z CINEMA STUDIO EX C z z z z z V. If any Sound Field selections (except AUTO FORMAT DECODE or 2 CH STEREO) enables the mode. * "VIRTUAL" sound field: Sound field with virtual speakers. MULTI DIMENSION z z z z z V. DIMENSION z z z SMALL HALL z z z z z LARGE HALL z z z z z JAZZ CLUB z z z z z LIVE HOUSE z z z z z GAME z z z z z AUTO FORMAT...
... panel display. REAR LEVEL CENTER LEVEL WOOFER LEVEL CINEMA STUDIO EX A z z z z z CINEMA STUDIO EX B z z z z z CINEMA STUDIO EX C z z z z z V. If any Sound Field selections (except AUTO FORMAT DECODE or 2 CH STEREO) enables the mode. * "VIRTUAL" sound field: Sound field with virtual speakers. MULTI DIMENSION z z z z z V. DIMENSION z z z SMALL HALL z z z z z LARGE HALL z z z z z JAZZ CLUB z z z z z LIVE HOUSE z z z z z GAME z z z z z AUTO FORMAT...

Operating Instructions
Page 52
...as Mbps (Mega bit per second) and the audio as the bit rate or the disc layer that you can get higher quality pictures or sounds. However, this does not always mean that is being played. DVD DISPLAY X/x ENTER 1 Press DVD DISPLAY during playback. BIT RATE BIT RATE... 384kbps Audio Mbps 0 5 10 Video When playing MPEG audio sound tracks BIT RATE 0 0 5 kbps 1000 Mbps 10 Audio Video Bit rate refers to select (ADVANCED), then press ENTER. While playing a disc, an approximate...
...as Mbps (Mega bit per second) and the audio as the bit rate or the disc layer that you can get higher quality pictures or sounds. However, this does not always mean that is being played. DVD DISPLAY X/x ENTER 1 Press DVD DISPLAY during playback. BIT RATE BIT RATE... 384kbps Audio Mbps 0 5 10 Video When playing MPEG audio sound tracks BIT RATE 0 0 5 kbps 1000 Mbps 10 Audio Video Bit rate refers to select (ADVANCED), then press ENTER. While playing a disc, an approximate...

Operating Instructions
Page 60
...supplied antennas. TUNING +/- 1 Press FUNCTION repeatedly until TUNER appears on the remote. There will be no stereo effect, but the reception will improve. To check the frequency or sound field Press DISPLAY repeatedly. repeatedly to the Radio Preset radio stations in Step 2. ALL1DISC S AUTO TITLE ...select the preset station you press DISPLAY, the front panel display changes as follows: index name of the station t frequency t sound field t index name of the station To turn off the radio Press ?/1. 60 STEREO/ MONO PRESET +/- 1 23 4 56 7 89 >10 10/0 ?/1 FUNCTION DISPLAY VOL +/-
...supplied antennas. TUNING +/- 1 Press FUNCTION repeatedly until TUNER appears on the remote. There will be no stereo effect, but the reception will improve. To check the frequency or sound field Press DISPLAY repeatedly. repeatedly to the Radio Preset radio stations in Step 2. ALL1DISC S AUTO TITLE ...select the preset station you press DISPLAY, the front panel display changes as follows: index name of the station t frequency t sound field t index name of the station To turn off the radio Press ?/1. 60 STEREO/ MONO PRESET +/- 1 23 4 56 7 89 >10 10/0 ?/1 FUNCTION DISPLAY VOL +/-

