
Operating Instructions
Page 2
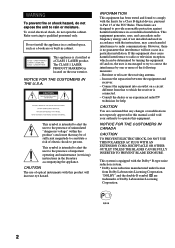
... approved in this equipment. These limits are designed to operate this manual could void your authority to provide reasonable protection against harmful interference in a residential installation. Reorient or relocate the receiving antenna. - CAUTION You are trademarks of important operating and maintenance (servicing) instructions in cabinet. CAUTION The use of optical instruments with the instructions, may be determined by one or more of...
... approved in this equipment. These limits are designed to operate this manual could void your authority to provide reasonable protection against harmful interference in a residential installation. Reorient or relocate the receiving antenna. - CAUTION You are trademarks of important operating and maintenance (servicing) instructions in cabinet. CAUTION The use of optical instruments with the instructions, may be determined by one or more of...
Operating Instructions
Page 3
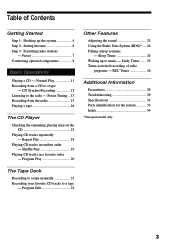
... the system 4 Step 2: Setting the time 6 Step 3: Presetting radio stations - REC Timer 26 Additional Information Precautions 28 Troubleshooting 29 Specifications 31 Parts identification for the remote 33 Index 34 * European model only The Tape Deck Recording to a tape manually 21 Recording your favorite CD tracks to the radio - CD Synchro Recording 12 Listening to a tape - Normal Play 11 Recording from the radio 15 Playing a tape 16 The CD Player Checking the remaining playing time...
... the system 4 Step 2: Setting the time 6 Step 3: Presetting radio stations - REC Timer 26 Additional Information Precautions 28 Troubleshooting 29 Specifications 31 Parts identification for the remote 33 Index 34 * European model only The Tape Deck Recording to a tape manually 21 Recording your favorite CD tracks to the radio - CD Synchro Recording 12 Listening to a tape - Normal Play 11 Recording from the radio 15 Playing a tape 16 The CD Player Checking the remaining playing time...
Operating Instructions
Page 7
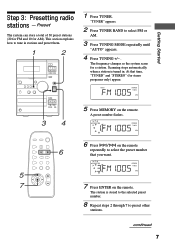
... 7 AUTO STEREO FM1005 TUNED MHz 5 Press MEMORY on the remote 6 repeatedly to preset other stations. A preset number flashes. PRESET STEREO 3FM1005 TUNED MHz 5 7 7 Press ENTER on the remote. The station is tuned in stations and preset them. 1 2 Z bB x m M X z + - Getting Started Step 3: Presetting radio stations - Preset The system can store a total of 30 preset stations (20 for FM and 10 for a station. This section explains how to select FM or AM. 3 Press TUNING MODE repeatedly until "AUTO" appears. 4 Press TUNING +/- . The frequency changes...
... 7 AUTO STEREO FM1005 TUNED MHz 5 Press MEMORY on the remote 6 repeatedly to preset other stations. A preset number flashes. PRESET STEREO 3FM1005 TUNED MHz 5 7 7 Press ENTER on the remote. The station is tuned in stations and preset them. 1 2 Z bB x m M X z + - Getting Started Step 3: Presetting radio stations - Preset The system can store a total of 30 preset stations (20 for FM and 10 for a station. This section explains how to select FM or AM. 3 Press TUNING MODE repeatedly until "AUTO" appears. 4 Press TUNING +/- . The frequency changes...
Operating Instructions
Page 8
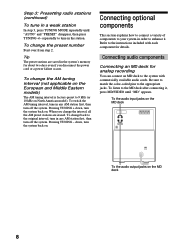
... connect a variety of components to your system in a weak station In step 3, press TUNING MODE repeatedly until "MD" appears. Step 3: Presetting radio stations (continued) To tune in order to enhance it , press MD/VIDEO until "AUTO" and "PRESET" disappear, then press TUNING +/- To change the AM tuning interval (not applicable on the European and Middle Eastern models) The AM tuning interval is factory-preset to the instructions included with commercially available audio cords...
... connect a variety of components to your system in a weak station In step 3, press TUNING MODE repeatedly until "MD" appears. Step 3: Presetting radio stations (continued) To tune in order to enhance it , press MD/VIDEO until "AUTO" and "PRESET" disappear, then press TUNING +/- To change the AM tuning interval (not applicable on the European and Middle Eastern models) The AM tuning interval is factory-preset to the instructions included with commercially available audio cords...
Operating Instructions
Page 11
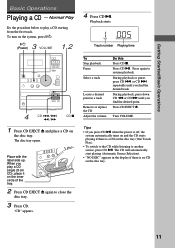
... place a CD on the system, press ?/1. 3 ?/1 (Power) VOLUME 1,2 Z bB x m M X z + - or CD > repeatedly until you find the desired point. Turn VOLUME. The disc tray opens. STANDBY ?/1 MD/VIDEO CD TAPE TUNER + TUNING MODE - Playback starts. 1 005 Track number Playing time To Stop playback Pause Select a track Locate a desired point in the display if there is a CD on the disc tray (One Touch Play). • To switch to the CD while listening...
... place a CD on the system, press ?/1. 3 ?/1 (Power) VOLUME 1,2 Z bB x m M X z + - or CD > repeatedly until you find the desired point. Turn VOLUME. The disc tray opens. STANDBY ?/1 MD/VIDEO CD TAPE TUNER + TUNING MODE - Playback starts. 1 005 Track number Playing time To Stop playback Pause Select a track Locate a desired point in the display if there is a CD on the disc tray (One Touch Play). • To switch to the CD while listening...

Operating Instructions
Page 13
Basic Operations 6 Press DIR MODE on the remote repeatedly to select " " to record on one side of the tape, or " "or " " to record on page 7). Preset Tuning Presetting radio stations in the system's memory in advance makes it easy to " ." To stop recording Press TAPE x. Listening to another source during CD Synchro Recording. Recording starts. Z u x . > m M VOLUME 4 STEREO/ MONO continued 13 ";" appears. • To start recording on...
Basic Operations 6 Press DIR MODE on the remote repeatedly to select " " to record on one side of the tape, or " "or " " to record on page 7). Preset Tuning Presetting radio stations in the system's memory in advance makes it easy to " ." To stop recording Press TAPE x. Listening to another source during CD Synchro Recording. Recording starts. Z u x . > m M VOLUME 4 STEREO/ MONO continued 13 ";" appears. • To start recording on...

Operating Instructions
Page 14
... tune in the station last received (One Touch Play). • To switch to the radio while listening to another source, press TUNER BAND (Automatic Source Selection). • If there is off the radio Adjust the volume Do this button again to restore the broadcast to select FM or AM. 3 Press TUNING MODE repeatedly until "AUTO" and "PRESET" disappear, then press TUNING +/- Listening to display the preset number of the desired station. PRESET STEREO 3FM1005 TUNED MHz Preset number Frequency Tips...
... tune in the station last received (One Touch Play). • To switch to the radio while listening to another source, press TUNER BAND (Automatic Source Selection). • If there is off the radio Adjust the volume Do this button again to restore the broadcast to select FM or AM. 3 Press TUNING MODE repeatedly until "AUTO" and "PRESET" disappear, then press TUNING +/- Listening to display the preset number of the desired station. PRESET STEREO 3FM1005 TUNED MHz Preset number Frequency Tips...

Operating Instructions
Page 15
... preset number of the tape, or " "or " " to record on the system, press ?/1. continued 1 Press TUNER. Basic Operations Recording from the radio Do the procedure below to tune in a preset station (see page 13) and record from the radio to select FM or AM. 3 Press TUNING MODE repeatedly until "PRESET" appears. 4 Press TUNING +/- TAPE x 8 5 ?/1 (Power) TAPE nN 6 Z bB x m M X z + - The tape stands by for recording. Z u x . > m M 123 4 2 Press TUNER BAND to a tape. PRESET STEREO 3FM1005 TUNED MHz Preset number Frequency...
... preset number of the tape, or " "or " " to record on the system, press ?/1. continued 1 Press TUNER. Basic Operations Recording from the radio Do the procedure below to tune in a preset station (see page 13) and record from the radio to select FM or AM. 3 Press TUNING MODE repeatedly until "PRESET" appears. 4 Press TUNING +/- TAPE x 8 5 ?/1 (Power) TAPE nN 6 Z bB x m M X z + - The tape stands by for recording. Z u x . > m M 123 4 2 Press TUNER BAND to a tape. PRESET STEREO 3FM1005 TUNED MHz Preset number Frequency...
Operating Instructions
Page 17
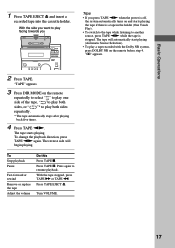
... tape stopped, press TAPE M or TAPE m. Basic Operations 1 Press TAPE EJECT Z and insert a recorded tape into the cassette holder. To change the playback direction, press TAPE nN again. "TAPE" appears. 3 Press DIR MODE on the remote before step 4. Press again to play both sides repeatedly. * The tape automatically stops after playing back five times. 4 Press TAPE nN. Turn VOLUME. 17 The reverse side will automatically start playing (Automatic Source Selection). • To play a tape...
... tape stopped, press TAPE M or TAPE m. Basic Operations 1 Press TAPE EJECT Z and insert a recorded tape into the cassette holder. To change the playback direction, press TAPE nN again. "TAPE" appears. 3 Press DIR MODE on the remote before step 4. Press again to play both sides repeatedly. * The tape automatically stops after playing back five times. 4 Press TAPE nN. Turn VOLUME. 17 The reverse side will automatically start playing (Automatic Source Selection). • To play a tape...

Operating Instructions
Page 23
... adjust the bass and treble, you can adjust the treble in 7 steps (+3 ~ 0 ~ -3). Adjusting the bass , Turn BASS. To stop recording Press TAPE x. You can use the DSG (Dynamic Sound Generator) function to enjoy a more dynamic sound , Press DSG. Recording starts. To cancel Program Edit Press PLAY MODE repeatedly until " " changes to " ". Adjusting the treble , Turn TREBLE. To cancel the DSG Press DSG again. Tips • To record with the Dolby NR system on, press DOLBY...
... adjust the bass and treble, you can adjust the treble in 7 steps (+3 ~ 0 ~ -3). Adjusting the bass , Turn BASS. To stop recording Press TAPE x. You can use the DSG (Dynamic Sound Generator) function to enjoy a more dynamic sound , Press DSG. Recording starts. To cancel Program Edit Press PLAY MODE repeatedly until " " changes to " ". Adjusting the treble , Turn TREBLE. To cancel the DSG Press DSG again. Tips • To record with the Dolby NR system on, press DOLBY...
Operating Instructions
Page 24
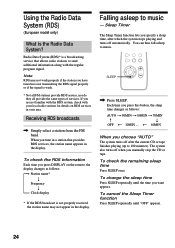
... time you choose "AUTO" The system turns off after which the system stops playing and turns off when you have tuned in the display. To cancel the Sleep Timer function Press SLEEP repeatedly until the time you specify a sleep time, after the current CD or tape finishes playing (up to send additional information along with your local radio stations for details on the remote, the display changes as follows: AUTO...
... time you choose "AUTO" The system turns off after which the system stops playing and turns off when you have tuned in the display. To cancel the Sleep Timer function Press SLEEP repeatedly until the time you specify a sleep time, after the current CD or tape finishes playing (up to send additional information along with your local radio stations for details on the remote, the display changes as follows: AUTO...

Operating Instructions
Page 25
... 4,6, 7,8 2 TIMER SELECT 1 Prepare the music source you press the button, the display changes as follows: t TUNER Tt CD T t TAPE T continued 25 Each time you want appears. The minute indication begins flashing next. 700 c DAILY Press l or L repeatedly to the radio" on and off at specified times. Other Features Waking up to set the minute, then press ENTER. To use this function, make a program (see "Playing CD tracks...
... 4,6, 7,8 2 TIMER SELECT 1 Prepare the music source you press the button, the display changes as follows: t TUNER Tt CD T t TAPE T continued 25 Each time you want appears. The minute indication begins flashing next. 700 c DAILY Press l or L repeatedly to the radio" on and off at specified times. Other Features Waking up to set the minute, then press ENTER. To use this function, make a program (see "Playing CD tracks...
Operating Instructions
Page 26
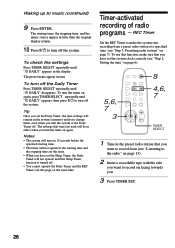
... Once you set the system clock correctly (see "Step 2: Setting the time" on page 6). 5,6, 7 3 8 4,6, 7 TIMER SELECT 1 Tune in the preset radio station that were last used will not operate if the starting time, the stopping time, and the music source appear in turn off the system. To check the settings Press TIMER SELECT repeatedly until "c DAILY" appears, then press ?/1 to turn . Notes • The system will remain in the display. To use this...
... Once you set the system clock correctly (see "Step 2: Setting the time" on page 6). 5,6, 7 3 8 4,6, 7 TIMER SELECT 1 Tune in the preset radio station that were last used will not operate if the starting time, the stopping time, and the music source appear in turn off the system. To check the settings Press TIMER SELECT repeatedly until "c DAILY" appears, then press ?/1 to turn . Notes • The system will remain in the display. To use this...

Operating Instructions
Page 28
... by the plug. Extremely hot or cold - Very humid - Tape type: CrO2/METAL NORMAL Detector slots 28 To disconnect the power cord (mains lead), pull it out by qualified personnel before operating it any of side A If you have any disc that the operating voltage of your nearest Sony dealer. Remove the CD and leave the system turned on the...
... by the plug. Extremely hot or cold - Very humid - Tape type: CrO2/METAL NORMAL Detector slots 28 To disconnect the power cord (mains lead), pull it out by qualified personnel before operating it any of side A If you have any disc that the operating voltage of your nearest Sony dealer. Remove the CD and leave the system turned on the...
Operating Instructions
Page 29
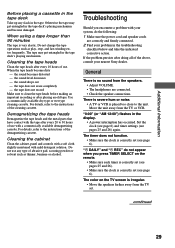
... speaker cords are connected. • Check the speaker connections. Additional Information Before placing a cassette in the tape deck Take up any type of abrasive pad, scouring powder or solvent such as play, stop, and fast-winding etc. When using a tape longer than 90 minutes The tape is no sound from the speakers. • Adjust VOLUME. • The headphones are correctly and firmly connected. 2 Find your nearest Sony...
... speaker cords are connected. • Check the speaker connections. Additional Information Before placing a cassette in the tape deck Take up any type of abrasive pad, scouring powder or solvent such as play, stop, and fast-winding etc. When using a tape longer than 90 minutes The tape is no sound from the speakers. • Adjust VOLUME. • The headphones are correctly and firmly connected. 2 Find your nearest Sony...

Operating Instructions
Page 30
... the system's sensor. • The batteries in the remote have run down . • Condensation has built up in sound level. • The heads are unbalanced. • Check the speaker connections and placement. Demagnetize them (see page 29). Clean them (see page 29). Play does not start from the first track. • The player is no tape in Program or Shuffle Play. Tape Deck...
... the system's sensor. • The batteries in the remote have run down . • Condensation has built up in sound level. • The heads are unbalanced. • Check the speaker connections and placement. Demagnetize them (see page 29). Clean them (see page 29). Play does not start from the first track. • The player is no tape in Program or Shuffle Play. Tape Deck...
Operating Instructions
Page 31
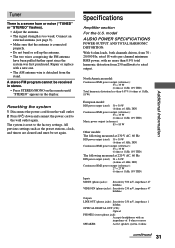
... the preset stations, clock, and timers are cleared and must be received in stereo. • Press STEREO/MONO on the remote until "STEREO" appears in the display. rated 18 watts per channel minimum RMS power, with an impedance of 8 ohms or more SPEAKER: Active speaker system, 6 ohms continued 31 Specifications Amplifier section For the U.S. Additional Information Tuner There is a severe hum or noise ("TUNED" or "STEREO" flashes). • Adjust the antenna. • The signal strength is connected...
... the preset stations, clock, and timers are cleared and must be received in stereo. • Press STEREO/MONO on the remote until "STEREO" appears in the display. rated 18 watts per channel minimum RMS power, with an impedance of 8 ohms or more SPEAKER: Active speaker system, 6 ohms continued 31 Specifications Amplifier section For the U.S. Additional Information Tuner There is a severe hum or noise ("TUNED" or "STEREO" flashes). • Adjust the antenna. • The signal strength is connected...
Operating Instructions
Page 32
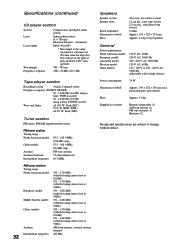
... W Dimensions (w/h/d) Approx. 190 × 252 × 310 mm incl. projecting parts and controls Mass Approx. 5.6 kg Supplied accessories Remote commander (1) AM loop antenna (1) FM wire antenna (1) Batteries (2) Design and specifications are subject to change without notice. RMS (NAB) ±0.2% W. Specifications (continued) CD player section System Laser Laser output Wavelength Frequency response Compact disc and digital audio system Semiconductor laser (λ = 780 nm) Emission duration: continuous MAX 44.6 µ...
... W Dimensions (w/h/d) Approx. 190 × 252 × 310 mm incl. projecting parts and controls Mass Approx. 5.6 kg Supplied accessories Remote commander (1) AM loop antenna (1) FM wire antenna (1) Batteries (2) Design and specifications are subject to change without notice. RMS (NAB) ±0.2% W. Specifications (continued) CD player section System Laser Laser output Wavelength Frequency response Compact disc and digital audio system Semiconductor laser (λ = 780 nm) Emission duration: continuous MAX 44.6 µ...
Operating Instructions
Page 33
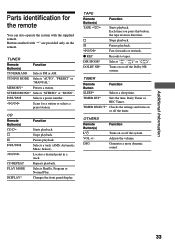
... sound. 33 l/L Selects a preset number. Stops playback. Changes the front panel display. TUNING MODE Selects "AUTO", "PRESET" or "MANUAL". TIMER SET* Sets the time, Daily Timer or REC Timer. TIMER SELECT* Checks the settings and turns on or off the system. Additional Information Parts identification for a station or selects a preset station. TUNER Remote Button(s) TUNER/BAND Function Selects FM or AM. MEMORY* Presets a station. CD Remote Button(s) CD H s S l/L j/J CD REPEAT PLAY MODE DISPLAY* Function Starts playback. Repeats playback. TAPE Remote Button(s) TAPE...
... sound. 33 l/L Selects a preset number. Stops playback. Changes the front panel display. TUNING MODE Selects "AUTO", "PRESET" or "MANUAL". TIMER SET* Sets the time, Daily Timer or REC Timer. TIMER SELECT* Checks the settings and turns on or off the system. Additional Information Parts identification for a station or selects a preset station. TUNER Remote Button(s) TUNER/BAND Function Selects FM or AM. MEMORY* Presets a station. CD Remote Button(s) CD H s S l/L j/J CD REPEAT PLAY MODE DISPLAY* Function Starts playback. Repeats playback. TAPE Remote Button(s) TAPE...
Operating Instructions
Page 34
... 24 R Radio stations presetting 7 tuning in 13 Recording a CD 12 a radio program 15 a tape manually 21 CDs by specifying the track order 22 timer-activated recording 26 Repeat Play 18 Resetting the system 31 S Setting the time 6 Shuffle Play 19 Sleep Timer 24 Speakers 4 34 Index A Adjusting the bass 23 the treble 23 the volume 11, 14, 17 Antennas 4, 9, 10 Automatic Source Selection 11, 14, 17 B Batteries 5 C CD player 11, 12, 18 Clock setting 6 Connecting.
... 24 R Radio stations presetting 7 tuning in 13 Recording a CD 12 a radio program 15 a tape manually 21 CDs by specifying the track order 22 timer-activated recording 26 Repeat Play 18 Resetting the system 31 S Setting the time 6 Shuffle Play 19 Sleep Timer 24 Speakers 4 34 Index A Adjusting the bass 23 the treble 23 the volume 11, 14, 17 Antennas 4, 9, 10 Automatic Source Selection 11, 14, 17 B Batteries 5 C CD player 11, 12, 18 Clock setting 6 Connecting.


