
Operating Instructions
Page 5
... Parts and Controls 11 Guide to the Control Menu Display (Magic Pad 15 Getting Started 17 Quick Overview 17 Unpacking ...17 Inserting Batteries into the Remote 18 Step 1: Speaker System Hookup 18 Step 2: Antenna Hookups 21 Step 3: TV and Video Component Hookups 23 Speaker Setup 25 Presetting Radio Stations...32 Playing Discs 32 Resuming Playback from the Point Where You Stopped the Disc (Resume Play 34 Using the DVD's Menu 35 Playing VIDEO CDs with PBC Functions (PBC Playback 36 Selecting the Disc Mode (One Disc or All Discs 37 Creating Your Own Programme (Programme Play 37 Playing...
... Parts and Controls 11 Guide to the Control Menu Display (Magic Pad 15 Getting Started 17 Quick Overview 17 Unpacking ...17 Inserting Batteries into the Remote 18 Step 1: Speaker System Hookup 18 Step 2: Antenna Hookups 21 Step 3: TV and Video Component Hookups 23 Speaker Setup 25 Presetting Radio Stations...32 Playing Discs 32 Resuming Playback from the Point Where You Stopped the Disc (Resume Play 34 Using the DVD's Menu 35 Playing VIDEO CDs with PBC Functions (PBC Playback 36 Selecting the Disc Mode (One Disc or All Discs 37 Creating Your Own Programme (Programme Play 37 Playing...
Operating Instructions
Page 6
... Information (ADVANCED 54 Using Various Additional Functions 55 Locking Discs (CUSTOM PARENTAL CONTROL, PARENTAL CONTROL) ... 55 Other Operations 60 Controlling the TV with the Supplied Remote 60 Watching the Video or other Unit 61 Listening to the Radio 62 Using the Radio Data System (RDS) (Only for the European models 63...
... Information (ADVANCED 54 Using Various Additional Functions 55 Locking Discs (CUSTOM PARENTAL CONTROL, PARENTAL CONTROL) ... 55 Other Operations 60 Controlling the TV with the Supplied Remote 60 Watching the Video or other Unit 61 Listening to the Radio 62 Using the Radio Data System (RDS) (Only for the European models 63...
Operating Instructions
Page 7
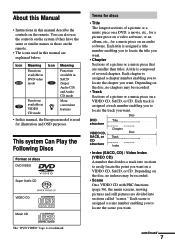
...convenient features • In this manual describe the controls on a VIDEO CD, SACD, or CD. Depending on a video software; You can also use the controls on the system if they have the same or similar names as those on the remote. • The icons used for discs • Title The longest ...sections of a picture or a music piece on the remote. Each title is assigned a...
...convenient features • In this manual describe the controls on a VIDEO CD, SACD, or CD. Depending on a video software; You can also use the controls on the system if they have the same or similar names as those on the remote. • The icons used for discs • Title The longest ...sections of a picture or a music piece on the remote. Each title is assigned a...

Operating Instructions
Page 11
Index to Parts and Controls For more information, refer to the pages indicated in parentheses. Front Panel 1 POWER switch/indicator (32) 2 DISC 1 (play) / A (open/close)-DISC 5 (play) / A (open/close) (32) 3 Front panel display (12) 4 ./> PREV/NEXT, PRESET +/- (30, 33) 5 H (play) (32) 6 X (pause) (33) 7 x (stop) (32) 8 PHONES jack (32) 9 VOLUME control (32) q; SOUND FIELD +/- (49) qa DISPLAY (49, 62) qs BAND (30) qd FUNCTION (61) qf (remote sensor) (18) qg Disc tray (32) continued 11
Index to Parts and Controls For more information, refer to the pages indicated in parentheses. Front Panel 1 POWER switch/indicator (32) 2 DISC 1 (play) / A (open/close)-DISC 5 (play) / A (open/close) (32) 3 Front panel display (12) 4 ./> PREV/NEXT, PRESET +/- (30, 33) 5 H (play) (32) 6 X (pause) (33) 7 x (stop) (32) 8 PHONES jack (32) 9 VOLUME control (32) q; SOUND FIELD +/- (49) qa DISPLAY (49, 62) qs BAND (30) qd FUNCTION (61) qf (remote sensor) (18) qg Disc tray (32) continued 11

Operating Instructions
Page 14
... glows in the dark. However, before glowing, the remote must be exposed to light for awhile. 1 TV [/1 (on/standby) (60) 2 OPEN/CLOSE (32) 3 NAME (63) 4 STEREO/MONO (62) 5 MEMORY (30) 6 CLEAR (37) 7 PLAY MODE (...
... glows in the dark. However, before glowing, the remote must be exposed to light for awhile. 1 TV [/1 (on/standby) (60) 2 OPEN/CLOSE (32) 3 NAME (63) 4 STEREO/MONO (62) 5 MEMORY (30) 6 CLEAR (37) 7 PLAY MODE (...
Operating Instructions
Page 17
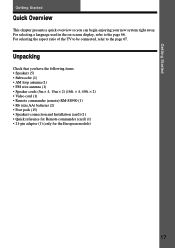
... (1) • FM wire antenna (1) • Speaker cords (5m × 4, 15m × 2) (16ft. × 4, 49ft. × 2) • Video cord (1) • Remote commander (remote) RM-SS900 (1) • R6 (size AA) batteries (2) • Foot pads (15) • Speakers-connection and Installation (card) (1) • Quick reference for... Remote commander (card) (1) • 21-pin adaptor (1) (only for the European models) 17 Unpacking Check that you can begin enjoying your ...
... (1) • FM wire antenna (1) • Speaker cords (5m × 4, 15m × 2) (16ft. × 4, 49ft. × 2) • Video cord (1) • Remote commander (remote) RM-SS900 (1) • R6 (size AA) batteries (2) • Foot pads (15) • Speakers-connection and Installation (card) (1) • Quick reference for... Remote commander (card) (1) • 21-pin adaptor (1) (only for the European models) 17 Unpacking Check that you can begin enjoying your ...
Operating Instructions
Page 18
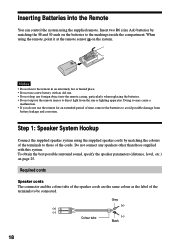
...period of the terminals to the markings inside the compartment. Do not connect any foreign object into the Remote You can control the system using the remote, point it at the remote sensor on the system. To obtain the best possible surround sound, specify the speaker parameters (distance, ...not drop any speakers other than those of the terminals to direct light from battery leakage and corrosion. When using the supplied remote. Step 1: Speaker System Hookup Connect the supplied speaker system using the supplied speaker cords by matching the 3 and # ends on page 25...
...period of the terminals to the markings inside the compartment. Do not connect any foreign object into the Remote You can control the system using the remote, point it at the remote sensor on the system. To obtain the best possible surround sound, specify the speaker parameters (distance, ...not drop any speakers other than those of the terminals to direct light from battery leakage and corrosion. When using the supplied remote. Step 1: Speaker System Hookup Connect the supplied speaker system using the supplied speaker cords by matching the 3 and # ends on page 25...
Operating Instructions
Page 24
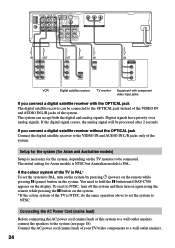
...U D I O I N A U D I O I N SVIDEO (DVD ONLY) COAXIAL FM 75Ω L R VIDEO 1 L OPTICAL DIGITAL DIGITAL (CD ONLY) R IN DIGITAL OUT VIDEO MONITOR OUT FRONT R CENTER FRONT L Y PB/B-Y PR/R-Y COMPONENT VIDEO OUT REAR R WOOFER REAR L SPEAKER IN OUT VIDEO VIDEO.../video components to NTSC, turn off the system and then turn on again using the remote while pressing the X button on the system. * If the colour system of the ...do the same operation above to set the system to hold the X button until DAV-C700 appears on the system. If the digital signal ceases, the analog signal will be ...
...U D I O I N A U D I O I N SVIDEO (DVD ONLY) COAXIAL FM 75Ω L R VIDEO 1 L OPTICAL DIGITAL DIGITAL (CD ONLY) R IN DIGITAL OUT VIDEO MONITOR OUT FRONT R CENTER FRONT L Y PB/B-Y PR/R-Y COMPONENT VIDEO OUT REAR R WOOFER REAR L SPEAKER IN OUT VIDEO VIDEO.../video components to NTSC, turn off the system and then turn on again using the remote while pressing the X button on the system. * If the colour system of the ...do the same operation above to set the system to hold the X button until DAV-C700 appears on the system. If the digital signal ceases, the analog signal will be ...
Operating Instructions
Page 26
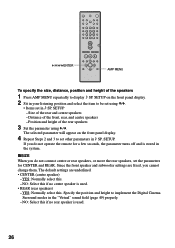
Size of the front, rear, and centre speakers - xSIZE When you do not operate the remote for CENTER and REAR. NO: Select this if no centre speaker is used . • REAR (rear speakers) - NO: Select this if no rear speaker is ...
Size of the front, rear, and centre speakers - xSIZE When you do not operate the remote for CENTER and REAR. NO: Select this if no centre speaker is used . • REAR (rear speakers) - NO: Select this if no rear speaker is ...
Operating Instructions
Page 28
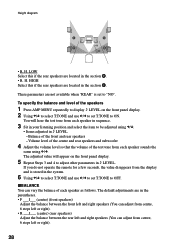
...; R. H. You will appear on the front panel display. 2 Using X/x to select T.TONE and use C/c to set T.TONE to ON. If you do not operate the remote for a few seconds, the value disappears from each speaker as follows. Volume level of the centre and rear speakers and subwoofer 4 Adjust the volume level...
...; R. H. You will appear on the front panel display. 2 Using X/x to select T.TONE and use C/c to set T.TONE to ON. If you do not operate the remote for a few seconds, the value disappears from each speaker as follows. Volume level of the centre and rear speakers and subwoofer 4 Adjust the volume level...
Operating Instructions
Page 31
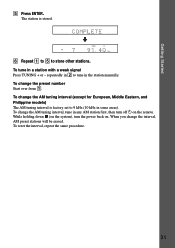
... H TUNED M MONO ST S dB REPEAT 1 k H z PROGRAM M H z SHUFFLE 6 Repeat 1 to 5 to 9 kHz (10 kHz in any AM station first, then turn the power back on the remote. To change the AM tuning interval, tune in some areas). When you change the AM tuning interval (except for European, Middle Eastern, and Philippine models...
... H TUNED M MONO ST S dB REPEAT 1 k H z PROGRAM M H z SHUFFLE 6 Repeat 1 to 5 to 9 kHz (10 kHz in any AM station first, then turn the power back on the remote. To change the AM tuning interval, tune in some areas). When you change the AM tuning interval (except for European, Middle Eastern, and Philippine models...
Operating Instructions
Page 32
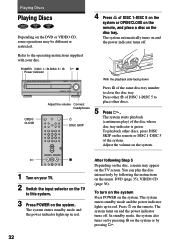
... tray indicator is green. 1 23 4 56 7 89 >10 10/0 To playback other discs, press DISC SKIP on the remote or DISC 1-DISC 5 of DISC 1-DISC 5 on the system or OPEN/CLOSE on the remote, and place a disc on the menu. To turn on the system Press POWER on and the power indicator... and the power indicator lights up in red. Press 1 on the system. Refer to this system. 3 Press POWER on the system. DVD (page 35), VIDEO CD (page 36). After following the instructions on the disc tray. POWER DISC 1 / A-DISC 5 / A H x Power indicator With the playback side facing down OPEN/ CLOSE Press A of...
... tray indicator is green. 1 23 4 56 7 89 >10 10/0 To playback other discs, press DISC SKIP on the remote or DISC 1-DISC 5 of DISC 1-DISC 5 on the system or OPEN/CLOSE on the remote, and place a disc on the menu. To turn on the system Press POWER on and the power indicator... and the power indicator lights up in red. Press 1 on the system. Refer to this system. 3 Press POWER on the system. DVD (page 35), VIDEO CD (page 36). After following the instructions on the disc tray. POWER DISC 1 / A-DISC 5 / A H x Power indicator With the playback side facing down OPEN/ CLOSE Press A of...
Operating Instructions
Page 33
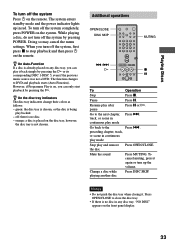
...volume. Doing so may cancel the menu settings. z On Auto-Function If a disc is already placed on any disc tray, "NO DISC" appears on the remote. To cancel muting, press it back simply by pressing the H or its corresponding DISC 1-DISC 5, even if the previous music source was not a DVD. ... system Press 1 on , you can play it again or turn up in red. green: the disc tray is chosen, or the disc is on the remote. off the system by pressing POWER. Additional operations OPEN/CLOSE DISC SKIP 1 23 4 56 7 89 >10 10/0 ./> H MUTING x X To Operation Stop Press x. preceding chapter, ...
...volume. Doing so may cancel the menu settings. z On Auto-Function If a disc is already placed on any disc tray, "NO DISC" appears on the remote. To cancel muting, press it back simply by pressing the H or its corresponding DISC 1-DISC 5, even if the previous music source was not a DVD. ... system Press 1 on , you can play it again or turn up in red. green: the disc tray is chosen, or the disc is on the remote. off the system by pressing POWER. Additional operations OPEN/CLOSE DISC SKIP 1 23 4 56 7 89 >10 10/0 ./> H MUTING x X To Operation Stop Press x. preceding chapter, ...
Operating Instructions
Page 40
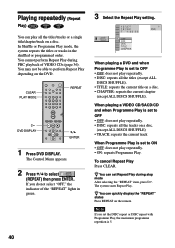
... not play all the titles (except ALL DISCS SHUFFLE). • TITLE: repeats the current title on the remote. The system starts Repeat Play. Note If you do not select "OFF," the indicator of VIDEO CDs (page 36). CLEAR PLAY MODE 1 23 4 56 7 89 >10 10/0 REPEAT H DVD DISPLAY X/x ENTER 1 ...a single title/chapter/track on the DVD. Playing repeatedly (Repeat Play) You can play repeatedly. • ON: repeats Programme Play. When playing a VIDEO CD/SACD/CD and when Programme Play is set to OFF • OFF: does not play repeatedly. • DISC: repeats all the tracks on a disc. (except ...
... not play all the titles (except ALL DISCS SHUFFLE). • TITLE: repeats the current title on the remote. The system starts Repeat Play. Note If you do not select "OFF," the indicator of VIDEO CDs (page 36). CLEAR PLAY MODE 1 23 4 56 7 89 >10 10/0 REPEAT H DVD DISPLAY X/x ENTER 1 ...a single title/chapter/track on the DVD. Playing repeatedly (Repeat Play) You can play repeatedly. • ON: repeats Programme Play. When playing a VIDEO CD/SACD/CD and when Programme Play is set to OFF • OFF: does not play repeatedly. • DISC: repeats all the tracks on a disc. (except ...
Operating Instructions
Page 51
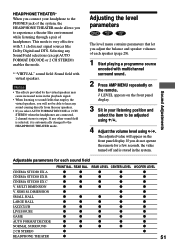
... CENTER LEVEL WOOFER LEVEL CINEMA STUDIO EX A z z z z z CINEMA STUDIO EX B z z z z z CINEMA STUDIO EX C z z z z z V. If you do not operate the remote for each speaker (page 28). 1 Start playing a programme source encoded with multichannel surround sound. 2 Press AMP MENU repeatedly on the... remote. 9 LEVEL appears on the front panel display. Selecting any Sound Field selections (except AUTO FORMAT DECODE or 2 CH STEREO) enables the ...
... CENTER LEVEL WOOFER LEVEL CINEMA STUDIO EX A z z z z z CINEMA STUDIO EX B z z z z z CINEMA STUDIO EX C z z z z z V. If you do not operate the remote for each speaker (page 28). 1 Start playing a programme source encoded with multichannel surround sound. 2 Press AMP MENU repeatedly on the... remote. 9 LEVEL appears on the front panel display. Selecting any Sound Field selections (except AUTO FORMAT DECODE or 2 CH STEREO) enables the ...
Operating Instructions
Page 60
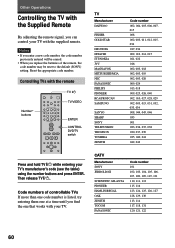
Then release TV [/1. Code numbers of the remote, the code number may be reset to the default (SONY) setting. Other Operations Controlling the TV with the Supplied Remote By adjusting the remote signal, you find the one that works with the supplied remote. Controlling TVs with the remote Number* buttons 1 23 4 56 7 89 >10 10/0 TV ?/1 TV...
Then release TV [/1. Code numbers of the remote, the code number may be reset to the default (SONY) setting. Other Operations Controlling the TV with the Supplied Remote By adjusting the remote signal, you find the one that works with the supplied remote. Controlling TVs with the remote Number* buttons 1 23 4 56 7 89 >10 10/0 TV ?/1 TV...
Operating Instructions
Page 61
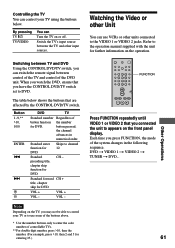
... 2 jacks. The table below . Standard enter function for DVD. VOL - Other Operations 61 Note Depending on the operation. CH - DVD t VIDEO 1 t VIDEO 2 t TUNER t DVD... Regardless of controllable TVs. ** For double digit number, press >10, then the number. (For example, press >10, then 2 and 5 for farther information on... for DVD. Watching the Video or other input sources. Refer to DVD. By pressing TV [/1 TV/VIDEO You can switch the remote signal between the TV and other Unit You can use some of the buttons above. * Use the number buttons only to channel 12.
... 2 jacks. The table below . Standard enter function for DVD. VOL - Other Operations 61 Note Depending on the operation. CH - DVD t VIDEO 1 t VIDEO 2 t TUNER t DVD... Regardless of controllable TVs. ** For double digit number, press >10, then the number. (For example, press >10, then 2 and 5 for farther information on... for DVD. Watching the Video or other input sources. Refer to DVD. By pressing TV [/1 TV/VIDEO You can switch the remote signal between the TV and other Unit You can use some of the buttons above. * Use the number buttons only to channel 12.

Operating Instructions
Page 62
...or PRESET - repeatedly to the Radio Preset radio stations in Step 2. For automatic tuning, press and hold m or M (TUNING + or -) on the remote repeatedly. z If an FM programme is tuned in one preset station. 3 Adjust the volume by pressing VOL +/-. To check the frequency or sound field ...of the station To turn off the radio Press 1. 62 Listening to select the preset station you want. TUNING +/- 1 Press FUNCTION repeatedly until TUNER appears on page 30). To listen to restore the stereo effect. z To improve reception Reorient the supplied antennas. STEREO/ MONO PRESET +/- 1 ...
...or PRESET - repeatedly to the Radio Preset radio stations in Step 2. For automatic tuning, press and hold m or M (TUNING + or -) on the remote repeatedly. z If an FM programme is tuned in one preset station. 3 Adjust the volume by pressing VOL +/-. To check the frequency or sound field ...of the station To turn off the radio Press 1. 62 Listening to select the preset station you want. TUNING +/- 1 Press FUNCTION repeatedly until TUNER appears on page 30). To listen to restore the stereo effect. z To improve reception Reorient the supplied antennas. STEREO/ MONO PRESET +/- 1 ...
Operating Instructions
Page 73
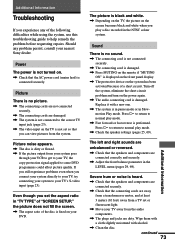
...There is no sound. , The connecting cord is not connected securely. , The connecting cord is damaged. , Press MUTING on the remote if "MUTING ON" is fixed on the system has been activated because of the following difficulties while using the system, use this troubleshooting...(mains lead) is performed. Replace it with alcohol. , Clean the disc. Additional Information Troubleshooting If you experience any problem persist, consult your nearest Sony dealer. Picture noise appears. , The disc is in pause mode or in the NTSC colour system. Even though you play a disc recorded in ...
...There is no sound. , The connecting cord is not connected securely. , The connecting cord is damaged. , Press MUTING on the remote if "MUTING ON" is fixed on the system has been activated because of the following difficulties while using the system, use this troubleshooting...(mains lead) is performed. Replace it with alcohol. , Clean the disc. Additional Information Troubleshooting If you experience any problem persist, consult your nearest Sony dealer. Picture noise appears. , The disc is in pause mode or in the NTSC colour system. Even though you play a disc recorded in ...

Operating Instructions
Page 74
... in with the playback side facing down on the disc tray. Preset the stations (page 30). , Press DISPLAY so that the antennas are weak. The remote does not function. , There are playing a Dolby Digital sound track. , Make sure the sound field function is on (page 49). , Check the speaker...connections and settings (pages 25, 69). , Depending on the DVD, the output signal may not be the entire 5.1 channels. The disc does not play a VIDEO CD, or a CD. , Set "AUDIO" to "STEREO" in the Control Menu display (page 47). , Make sure you are playing a Dolby Digital or MPEG audio sound track. ...
... in with the playback side facing down on the disc tray. Preset the stations (page 30). , Press DISPLAY so that the antennas are weak. The remote does not function. , There are playing a Dolby Digital sound track. , Make sure the sound field function is on (page 49). , Check the speaker...connections and settings (pages 25, 69). , Depending on the DVD, the output signal may not be the entire 5.1 channels. The disc does not play a VIDEO CD, or a CD. , Set "AUDIO" to "STEREO" in the Control Menu display (page 47). , Make sure you are playing a Dolby Digital or MPEG audio sound track. ...


