
Operating Instructions
Page 11
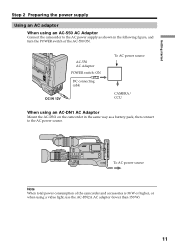
... W). 11 AC-550 AC Adaptor POWER switch: ON LOCK DC connecting cable DC IN 12V To AC power source CAMERA/ CCU When using an AC-DN1 AC Adaptor Mount the AC-DN1 on the camcorder in the same way as shown in the following figure, and turn the POWER switch of the... camcorder and accessories is 38 W or higher, or when using an AC-550 AC Adaptor Connect the camcorder to the AC power supply as a battery pack, then connect to the AC power source. To AC power...
... W). 11 AC-550 AC Adaptor POWER switch: ON LOCK DC connecting cable DC IN 12V To AC power source CAMERA/ CCU When using an AC-DN1 AC Adaptor Mount the AC-DN1 on the camcorder in the same way as shown in the following figure, and turn the POWER switch of the... camcorder and accessories is 38 W or higher, or when using an AC-550 AC Adaptor Connect the camcorder to the AC power supply as a battery pack, then connect to the AC power source. To AC power...
Operating Instructions
Page 15
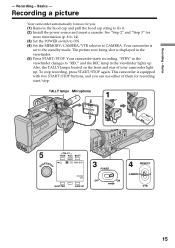
...can use either of your camcorder light up . This camcorder is equipped with two START/STOP buttons, and you . (1) Remove the hood cap and pull the hood cap string to CAMERA. TALLY lamps Microphone 1 S 5 TART/STO TALLY TAKE REC BATT Li REC 00:00:00:01 SHUTTER DVCAM 32K GAIN UP 3 POWER... OFF ON 4 MEMORY CAMERA VTR 15 See "...
...can use either of your camcorder light up . This camcorder is equipped with two START/STOP buttons, and you . (1) Remove the hood cap and pull the hood cap string to CAMERA. TALLY lamps Microphone 1 S 5 TART/STO TALLY TAKE REC BATT Li REC 00:00:00:01 SHUTTER DVCAM 32K GAIN UP 3 POWER... OFF ON 4 MEMORY CAMERA VTR 15 See "...
Operating Instructions
Page 17
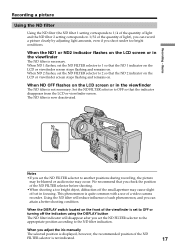
... set the ND FILTER selector to the ND filter indication. When ND 1 flashes, set the ND FILTER selector to 1/32 of the quantity of a video camera recorder. We recommend that the indicator disappears from the LCD or viewfinder screen. When you adjust the iris manually The selected position is displayed, however...
... set the ND FILTER selector to the ND filter indication. When ND 1 flashes, set the ND FILTER selector to 1/32 of the quantity of a video camera recorder. We recommend that the indicator disappears from the LCD or viewfinder screen. When you adjust the iris manually The selected position is displayed, however...
Operating Instructions
Page 25
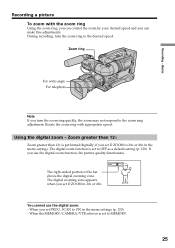
...W T The right-ended portion of the bar shows the digital zooming zone. Zoom ring Recording - The digital zoom function is set to the desired speed. You cannot use the digital zoom function, the picture quality deteriorates. When the MEMORY/CAMERA/VTR selector is set to 24× or 48×... SCAN to 24× or 48× in the menu settings (p. 120). - The digital zooming zone appears when you use the digital zoom: - Zoom greater than 12× Zoom greater than 12× is performed digitally, if you set D ZOOM to ON in the menu settings. When you set PROG....
...W T The right-ended portion of the bar shows the digital zooming zone. Zoom ring Recording - The digital zoom function is set to the desired speed. You cannot use the digital zoom function, the picture quality deteriorates. When the MEMORY/CAMERA/VTR selector is set to 24× or 48×... SCAN to 24× or 48× in the menu settings (p. 120). - The digital zooming zone appears when you use the digital zoom: - Zoom greater than 12× Zoom greater than 12× is performed digitally, if you set D ZOOM to ON in the menu settings. When you set PROG....
Operating Instructions
Page 30
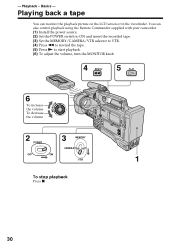
...- Playing back a tape You can also control playback using the Remote Commander supplied with your camcorder. (1) Install the power source. (2) Set the POWER switch to ON and insert the recorded tape. (3) Set the MEMORY/CAMERA/VTR selector to VTR. (4) Press m to rewind the tape. (5) Press N to start... playback. (6) To adjust the volume, turn the MONITOR knob. 4 REW 5 PLAY 6 MONITO To increase R the volume To decrease the volume 2 POWER 3 MEMORY CAMERA OFF ON VTR 1 To stop...
...- Playing back a tape You can also control playback using the Remote Commander supplied with your camcorder. (1) Install the power source. (2) Set the POWER switch to ON and insert the recorded tape. (3) Set the MEMORY/CAMERA/VTR selector to VTR. (4) Press m to rewind the tape. (5) Press N to start... playback. (6) To adjust the volume, turn the MONITOR knob. 4 REW 5 PLAY 6 MONITO To increase R the volume To decrease the volume 2 POWER 3 MEMORY CAMERA OFF ON VTR 1 To stop...

Operating Instructions
Page 32
...back. - When you cannot erase them. 32 You can check the recording date/time during playback by the camcorder without the date and time set DATE REC to a monitor, the data code also appears on the monitor screen (p....and time, you use the data code function date) or time) appears if: - Press DATA CODE on the camcorder or on the date/time indicator Recording date/time is not displayed during shooting, set . The tape is automatically ...when recorded) (Data code). The tape was recorded by pressing DATA CODE. In CAMERA mode, the recording data will not be displayed.
...back. - When you cannot erase them. 32 You can check the recording date/time during playback by the camcorder without the date and time set DATE REC to a monitor, the data code also appears on the monitor screen (p....and time, you use the data code function date) or time) appears if: - Press DATA CODE on the camcorder or on the date/time indicator Recording date/time is not displayed during shooting, set . The tape is automatically ...when recorded) (Data code). The tape was recorded by pressing DATA CODE. In CAMERA mode, the recording data will not be displayed.
Operating Instructions
Page 33
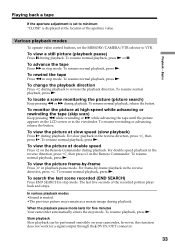
...speed Press ×2 on the LCD screen or in the reverse direction, press , then press ×2 on your camcorder, however, this function does not work for five minutes Your camcorder automatically enters the stop mode. To advance the tape Press M in the reverse direction, press . To view the... picture at the location of the recorded portion plays back and stops. Playing back a tape If the aperture adjustment is set the MEMORY/CAMERA/VTR selector to VTR. To resume normal playback, press N. To change the playback direction Press during playback. To resume rewinding or advancing,...
...speed Press ×2 on the LCD screen or in the reverse direction, press , then press ×2 on your camcorder, however, this function does not work for five minutes Your camcorder automatically enters the stop mode. To advance the tape Press M in the reverse direction, press . To view the... picture at the location of the recorded portion plays back and stops. Playing back a tape If the aperture adjustment is set the MEMORY/CAMERA/VTR selector to VTR. To resume normal playback, press N. To change the playback direction Press during playback. To resume rewinding or advancing,...
Operating Instructions
Page 35
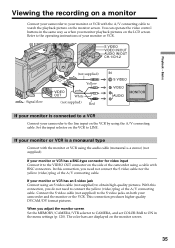
...the S video cable (not supplied) to the S video jacks on a monitor Connect your camcorder to your camcorder and the monitor or the VCR. When you adjust the monitor screen Set the MEMORY/CAMERA/VTR selector to CAMERA, and set COLOR BAR to the VIDEO OUT connector on the LCD screen. If your...the menu settings (p. 120). In this connection, you need to the line input on the monitor screen. This connection produces higher quality DVCAM/DV format pictures. If your camcorder to connect the yellow (video) plug of your monitor or VCR. S VIDEO VIDEO IN/OUT AUDIO IN/OUT CH-1/CH-2 : Signal...
...the S video cable (not supplied) to the S video jacks on a monitor Connect your camcorder to your camcorder and the monitor or the VCR. When you adjust the monitor screen Set the MEMORY/CAMERA/VTR selector to CAMERA, and set COLOR BAR to the VIDEO OUT connector on the LCD screen. If your...the menu settings (p. 120). In this connection, you need to the line input on the monitor screen. This connection produces higher quality DVCAM/DV format pictures. If your camcorder to connect the yellow (video) plug of your monitor or VCR. S VIDEO VIDEO IN/OUT AUDIO IN/OUT CH-1/CH-2 : Signal...
Operating Instructions
Page 43
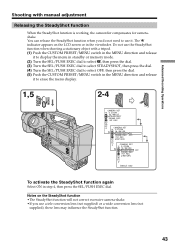
... not use the SteadyShot function when shooting a stationary object with manual adjustment Releasing the SteadyShot function When the SteadyShot function is working, the camcorder compensates for camerashake. REC CAMERA SET D ZOOM [MENU] 1S: 6ETEN: A9DWDYISDHEOT ON FRAME REC OFF I NT. Notes on the LCD screen or in step 4,... then press the SEL/PUSH EXEC dial. REC RETURN CAMERA SET D ZOOM [MENU] 1S: 6ETEN: A9DWDYISDHEOT OFF FRAME REC I NT. You can release the SteadyShot function when you use it to use a ...
... not use the SteadyShot function when shooting a stationary object with manual adjustment Releasing the SteadyShot function When the SteadyShot function is working, the camcorder compensates for camerashake. REC CAMERA SET D ZOOM [MENU] 1S: 6ETEN: A9DWDYISDHEOT ON FRAME REC OFF I NT. Notes on the LCD screen or in step 4,... then press the SEL/PUSH EXEC dial. REC RETURN CAMERA SET D ZOOM [MENU] 1S: 6ETEN: A9DWDYISDHEOT OFF FRAME REC I NT. You can release the SteadyShot function when you use it to use a ...
Operating Instructions
Page 47
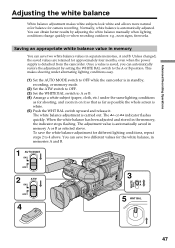
... or when recording outdoors: e.g., neon signs, fireworks. This makes shooting under alternating lighting conditions easy. (1) Set the AUTO MODE switch to OFF while the camcorder is in standby, recording, or memory mode. (2) Set the ATW switch to OFF. (3) Set the WHITE BAL switch to A or B. (4) Arrange ...a white subject (paper, cloth, etc.) under the same lighting conditions as for camera recording. Normally, white balance is carried out. The A or B indicator flashes quickly. When the white balance has been adjusted and stored in on it...
... or when recording outdoors: e.g., neon signs, fireworks. This makes shooting under alternating lighting conditions easy. (1) Set the AUTO MODE switch to OFF while the camcorder is in standby, recording, or memory mode. (2) Set the ATW switch to OFF. (3) Set the WHITE BAL switch to A or B. (4) Arrange ...a white subject (paper, cloth, etc.) under the same lighting conditions as for camera recording. Normally, white balance is carried out. The A or B indicator flashes quickly. When the white balance has been adjusted and stored in on it...

Operating Instructions
Page 48
...preset values may give better results than the human eye adjustment. 48 You bring your camcorder at a white subject for about 10 seconds after setting the MEMORY/CAMERA/VTR selector to CAMERA to the white balance adjustment saved in standby mode. •In automatic white balance ...mode, point your camcorder outdoors from memory Before beginning shooting, set . Shooting when lighting conditions have changed ...
...preset values may give better results than the human eye adjustment. 48 You bring your camcorder at a white subject for about 10 seconds after setting the MEMORY/CAMERA/VTR selector to CAMERA to the white balance adjustment saved in standby mode. •In automatic white balance ...mode, point your camcorder outdoors from memory Before beginning shooting, set . Shooting when lighting conditions have changed ...
Operating Instructions
Page 51
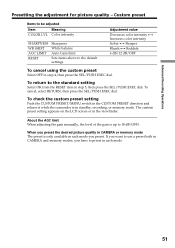
If you want to use a preset both in CAMERA and memory modes, you have to the standard setting Select OK from the RESET item...press the SEL/PUSH EXEC dial. To return to preset in each mode you preset the desired picture quality in CAMERA or memory mode The preset is in each mode. 51 To check the custom preset setting Push the CUSTOM ...PRESET/MENU switch in the CUSTOM PRESET direction and release it while the camcorder is only available in standby, recording, or memory mode. About the AGC limit When adjusting the gain manually, the...
If you want to use a preset both in CAMERA and memory modes, you have to the standard setting Select OK from the RESET item...press the SEL/PUSH EXEC dial. To return to preset in each mode you preset the desired picture quality in CAMERA or memory mode The preset is in each mode. 51 To check the custom preset setting Push the CUSTOM ...PRESET/MENU switch in the CUSTOM PRESET direction and release it while the camcorder is only available in standby, recording, or memory mode. About the AGC limit When adjusting the gain manually, the...
Operating Instructions
Page 60
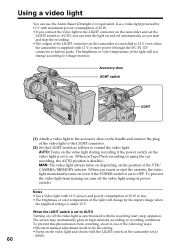
...will not change by 12 V with maximum power consumption of 30 W. •If you connect the video light to the LIGHT connector on the camcorder and set the LIGHT switch to the LIGHT connector. (2) Set the LIGHT switch as you insert or eject the cassette, the video light momentarily ... change according to voltage increase. The brightness or color temperature of the VTR/ CAMERA/MEMORY selector. (When you start /stop the recording. •The output of the LIGHT connector on the camcorder is controlled to 12 V even when the camcorder is set to OFF. When the LIGHT switch is under 12 V.
...will not change by 12 V with maximum power consumption of 30 W. •If you connect the video light to the LIGHT connector on the camcorder and set the LIGHT switch to the LIGHT connector. (2) Set the LIGHT switch as you insert or eject the cassette, the video light momentarily ... change according to voltage increase. The brightness or color temperature of the VTR/ CAMERA/MEMORY selector. (When you start /stop the recording. •The output of the LIGHT connector on the camcorder is controlled to 12 V even when the camcorder is set to OFF. When the LIGHT switch is under 12 V.
Operating Instructions
Page 63
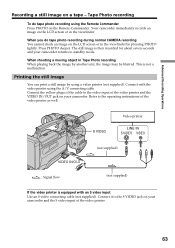
...Signal flow (not supplied) (not supplied) If the video printer is equipped with the video printer using a video printer (not supplied). Your camcorder immediately records an image on a tape - When shooting a moving object in the viewfinder by pressing PHOTO lightly. This is then recorded for ... supplied). Refer to standby mode. The still image is not a malfunction. Tape Photo recording To do tape photo recording during normal CAMERA recording You cannot check an image on the Remote Commander. When you do tape photo recording using the Remote Commander Press PHOTO on ...
...Signal flow (not supplied) (not supplied) If the video printer is equipped with the video printer using a video printer (not supplied). Your camcorder immediately records an image on a tape - When shooting a moving object in the viewfinder by pressing PHOTO lightly. This is then recorded for ... supplied). Refer to standby mode. The still image is not a malfunction. Tape Photo recording To do tape photo recording during normal CAMERA recording You cannot check an image on the Remote Commander. When you do tape photo recording using the Remote Commander Press PHOTO on ...

Operating Instructions
Page 71
... superimpose a moving picture on a still image that used as an illustration or a frame with a moving picture. M. Still image Moving picture Moving picture + Still image M. CHROM (Camera chromakey) You can make a moving picture fade in a "Memory Stick" on a moving picture - M. Advanced Recording Operations Superimposing a still image in on top of a still image...
... superimpose a moving picture on a still image that used as an illustration or a frame with a moving picture. M. Still image Moving picture Moving picture + Still image M. CHROM (Camera chromakey) You can make a moving picture fade in a "Memory Stick" on a moving picture - M. Advanced Recording Operations Superimposing a still image in on top of a still image...
Operating Instructions
Page 72
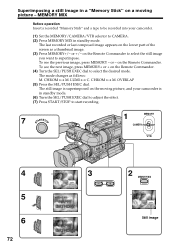
...as a thumbnail image. (3) Press MEMORY+/- The still image is in standby mode. or - on a moving picture, and your camcorder. (1) Set the MEMORY/CAMERA/VTR selector to CAMERA. (2) Press MEMORY MIX in standby mode. (6) Turn the SEL/PUSH EXEC dial to adjust the effect. (7) Press START/STOP ...to start recording. 7 S TART/STO P 1 MEMORY CAMERA VTR 4 5 6 72 M. LUMI y C. Superimposing a still image in a "Memory Stick" on the Remote Commander. OVERLAP (5) Press the SEL/PUSH EXEC ...
...as a thumbnail image. (3) Press MEMORY+/- The still image is in standby mode. or - on a moving picture, and your camcorder. (1) Set the MEMORY/CAMERA/VTR selector to CAMERA. (2) Press MEMORY MIX in standby mode. (6) Turn the SEL/PUSH EXEC dial to adjust the effect. (7) Press START/STOP ...to start recording. 7 S TART/STO P 1 MEMORY CAMERA VTR 4 5 6 72 M. LUMI y C. Superimposing a still image in a "Memory Stick" on the Remote Commander. OVERLAP (5) Press the SEL/PUSH EXEC ...

Operating Instructions
Page 74
.... 4 Turn the SEL/PUSH EXEC dial to automatically record and standby sequentially. REC I NTERVAL REC T I NT. REC ON RETURN OFF SET [MENU] : END 5 1 CAMERA SET I ME 0 . 5SEC RETURN 1SEC 1 . 5SEC 2SEC [MENU] : END REC I NTERVAL REC T I ME 0 . 5SEC RETURN [MENU] : END [MENU] : END...to select INTERVAL, then press the dial. 2 Turn the SEL/PUSH EXEC dial to select INT. You can make a time-lapse recording by setting the camcorder to select the desired recording time, then press the dial. REC I NTERVAL 30SEC REC T I ME 1M I N RETURN 5M I N 10M I N [MENU] :...
.... 4 Turn the SEL/PUSH EXEC dial to automatically record and standby sequentially. REC I NTERVAL REC T I NT. REC ON RETURN OFF SET [MENU] : END 5 1 CAMERA SET I ME 0 . 5SEC RETURN 1SEC 1 . 5SEC 2SEC [MENU] : END REC I NTERVAL REC T I ME 0 . 5SEC RETURN [MENU] : END [MENU] : END...to select INTERVAL, then press the dial. 2 Turn the SEL/PUSH EXEC dial to select INT. You can make a time-lapse recording by setting the camcorder to select the desired recording time, then press the dial. REC I NTERVAL 30SEC REC T I ME 1M I N RETURN 5M I N 10M I N [MENU] :...

Operating Instructions
Page 75
... indicator flashes. (8) Press START/STOP to ON in recording time of up . 8 TART/STO CUSTOM PRESET MENU S Advanced Recording Operations P 7 6 I NTERVAL CAMERA SET D ZOOM 16 : 9W I DE STEADYSHOT FRAME REC I NT. The interval recording indicator lights up to +/- 6 frames from the selected time. On recording...dial to select ON, then press the dial. (7) Push the CUSTOM PRESET/MENU switch in the menu settings. •Set the MEMORY/CAMERA/VTR selector to VTR or MEMORY. Even if you set FRAME REC to start interval recording. To stop the interval recording momentarily and perform...
... indicator flashes. (8) Press START/STOP to ON in recording time of up . 8 TART/STO CUSTOM PRESET MENU S Advanced Recording Operations P 7 6 I NTERVAL CAMERA SET D ZOOM 16 : 9W I DE STEADYSHOT FRAME REC I NT. The interval recording indicator lights up to +/- 6 frames from the selected time. On recording...dial to select ON, then press the dial. (7) Push the CUSTOM PRESET/MENU switch in the menu settings. •Set the MEMORY/CAMERA/VTR selector to VTR or MEMORY. Even if you set FRAME REC to start interval recording. To stop the interval recording momentarily and perform...

Operating Instructions
Page 76
We recommend that you use a tripod, and operate the camcorder using cut recording. The FRAME REC indicator lights up. (6) Press START/STOP to start cut recording will be canceled. 76 REC ON RETURN CAMERA SET D ZOOM [MENU] S1: 6ETNE: A9DWDYISDHEOT FRAME REC ON I NT. To create this function continuously... You can make a cut recording •Set FRAME REC to OFF in standby mode The cut recording. The camcorder makes a recording for about six frames, and returns to VTR or MEMORY. REC CAMERA SET D ZOOM [MENU] S1: 6ETNE: A9DWDYISDHEOT FRAME REC OFF I NT. REC RETURN [MENU] : END...
We recommend that you use a tripod, and operate the camcorder using cut recording. The FRAME REC indicator lights up. (6) Press START/STOP to start cut recording will be canceled. 76 REC ON RETURN CAMERA SET D ZOOM [MENU] S1: 6ETNE: A9DWDYISDHEOT FRAME REC ON I NT. To create this function continuously... You can make a cut recording •Set FRAME REC to OFF in standby mode The cut recording. The camcorder makes a recording for about six frames, and returns to VTR or MEMORY. REC CAMERA SET D ZOOM [MENU] S1: 6ETNE: A9DWDYISDHEOT FRAME REC OFF I NT. REC RETURN [MENU] : END...

Operating Instructions
Page 77
...the index search indicator appears. Use this operation. The default setting is marked. Use a tape with cassette memory (p. 158). (1) Set the MEMORY/CAMERA/VTR selector to VTR. (2) Set CM SEARCH in the menu settings (p. 120). The indicator changes as follows: INDEX SEARCH t TITLE SEARCH t DATE... SEARCH t PHOTO SEARCH t PHOTO SCAN t no indicator (4) Press . Advanced Playback Operations - Your camcorder automatically starts playing back at each sequence where the index is ON. (3) Press SEARCH MODE on the tape To stop searching Press x. 77
...the index search indicator appears. Use this operation. The default setting is marked. Use a tape with cassette memory (p. 158). (1) Set the MEMORY/CAMERA/VTR selector to VTR. (2) Set CM SEARCH in the menu settings (p. 120). The indicator changes as follows: INDEX SEARCH t TITLE SEARCH t DATE... SEARCH t PHOTO SEARCH t PHOTO SCAN t no indicator (4) Press . Advanced Playback Operations - Your camcorder automatically starts playing back at each sequence where the index is ON. (3) Press SEARCH MODE on the tape To stop searching Press x. 77


