Operating Instructions
Page 7
... accessories supplied 9 1 Preparing the battery pack 10 2 Inserting the battery pack/a "Memory Stick Duo" (not supplied) ........ 11 3 Turning the camera on the screen 28 Battery life and memory capacity 30 Battery life and number of images you can record/view 30 Number of still images and recording time ...Battery pack and power 33 Shooting still images/movies 34 Viewing images 34 Precautions 35 Specifications 36 7 HOME/Menu 21 Using the HOME screen 21 HOME items 22 GB Using menu items 23 Menu items 24 Enjoying your computer 26 Supported Operating Systems for USB connection and ...
... accessories supplied 9 1 Preparing the battery pack 10 2 Inserting the battery pack/a "Memory Stick Duo" (not supplied) ........ 11 3 Turning the camera on the screen 28 Battery life and memory capacity 30 Battery life and number of images you can record/view 30 Number of still images and recording time ...Battery pack and power 33 Shooting still images/movies 34 Viewing images 34 Precautions 35 Specifications 36 7 HOME/Menu 21 Using the HOME screen 21 HOME items 22 GB Using menu items 23 Menu items 24 Enjoying your computer 26 Supported Operating Systems for USB connection and ...
Operating Instructions
Page 8
...for damaged content or recording failure Sony cannot compensate for Camera File system) universal standard established by JEITA (Japan Electronics and Information Technology Industries Association). • Sony does not guarantee that the camera will play back images. • Using the camera in insufficient light emission. [ ...data. [ Notes on the LCD screen and lens • The LCD screen is manufactured using the camera [ Internal memory and "Memory Stick Duo" back up Do not turn on the camera again. [ On image data compatibility • The camera conforms with DCF (Design rule ...
...for damaged content or recording failure Sony cannot compensate for Camera File system) universal standard established by JEITA (Japan Electronics and Information Technology Industries Association). • Sony does not guarantee that the camera will play back images. • Using the camera in insufficient light emission. [ ...data. [ Notes on the LCD screen and lens • The LCD screen is manufactured using the camera [ Internal memory and "Memory Stick Duo" back up Do not turn on the camera again. [ On image data compatibility • The camera conforms with DCF (Design rule ...

Operating Instructions
Page 11
...battery/"Memory Stick Duo" cover. Change the battery with the tip of use and circumstances. • The Clock Set screen appears when you turn on and check the remaining battery charge on the camera for the first time (page 13). 11 GB 2 Insert the "Memory Stick Duo" (not supplied). 3 Insert ...the battery pack. 4 Close the battery/"Memory Stick Duo" cover. [ When there is no "Memory Stick Duo" inserted The camera records/plays back images using the internal memory (approx. 15 MB). [ To check the remaining battery charge Press POWER to turn on the LCD...
...battery/"Memory Stick Duo" cover. Change the battery with the tip of use and circumstances. • The Clock Set screen appears when you turn on and check the remaining battery charge on the camera for the first time (page 13). 11 GB 2 Insert the "Memory Stick Duo" (not supplied). 3 Insert ...the battery pack. 4 Close the battery/"Memory Stick Duo" cover. [ When there is no "Memory Stick Duo" inserted The camera records/plays back images using the internal memory (approx. 15 MB). [ To check the remaining battery charge Press POWER to turn on the LCD...
Operating Instructions
Page 16
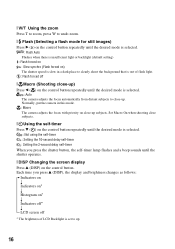
... to up. 16 Each time you press the shutter button, the self-timer lamp flashes and a beep sounds until the shutter operates. [ DISP Changing the screen display Press v (DISP) on the control button. [ W/T Using the zoom Press T to zoom, press W to undo zoom. [ Flash (Selecting a flash mode for ...insufficient light or backlight (default setting) : Flash forced on : Slow synchro (Flash forced on) The shutter speed is slow in this mode. : Macro The camera adjusts the focus with priority on close -up. Set Macro On when shooting close subjects. [ Using the self-timer Press V ( ) on the control ...
... to up. 16 Each time you press the shutter button, the self-timer lamp flashes and a beep sounds until the shutter operates. [ DISP Changing the screen display Press v (DISP) on the control button. [ W/T Using the zoom Press T to zoom, press W to undo zoom. [ Flash (Selecting a flash mode for ...insufficient light or backlight (default setting) : Flash forced on : Slow synchro (Flash forced on) The shutter speed is slow in this mode. : Macro The camera adjusts the focus with priority on close -up. Set Macro On when shooting close subjects. [ Using the self-timer Press V ( ) on the control ...
Operating Instructions
Page 18
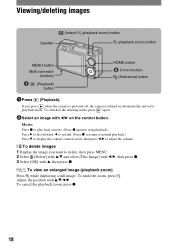
... forward, b to rewind. (Press z to return to normal playback.) Press V to display the volume control screen, then press b/B to adjust the volume. [ To delete images 1 Display the image you press when the camera is powered off, the camera is turned on the control button. Adjust the position with b/B on automatically and set to...
... forward, b to rewind. (Press z to return to normal playback.) Press V to display the volume control screen, then press b/B to adjust the volume. [ To delete images 1 Display the image you press when the camera is powered off, the camera is turned on the control button. Adjust the position with b/B on automatically and set to...
Operating Instructions
Page 19
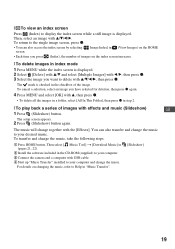
...in a folder, select [All In This Folder], then press z in "Music Transfer". [Slideshow] 19 You can also access the index screen by selecting [ Image Index] in screen. (View Images) on the HOME • Each time you press (Index), the number of images on changing the music, refer to your... computer. 3 Connect the camera and a computer with v/V/b/B. For details on the index screen increases. [ To delete images in the CD-ROM (supplied) to Help in step 2. [ To play back a series of the...
...in a folder, select [All In This Folder], then press z in "Music Transfer". [Slideshow] 19 You can also access the index screen by selecting [ Image Index] in screen. (View Images) on the HOME • Each time you press (Index), the number of images on changing the music, refer to your... computer. 3 Connect the camera and a computer with v/V/b/B. For details on the index screen increases. [ To delete images in the CD-ROM (supplied) to Help in step 2. [ To play back a series of the...
Operating Instructions
Page 20
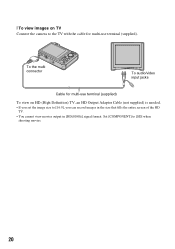
[ To view images on HD (High Definition) TV, an HD Output Adaptor Cable (not supplied) is needed. • If you set the image size to [16:9], you can record images in the size that fills the entire screen of the HD TV. • You cannot view movies output in [HD(1080i)] signal format. To the multi connector To audio/video input jacks Cable for multi-use terminal (supplied) To view on TV Connect the camera to [SD] when shooting movies. 20 Set [COMPONENT] to the TV with the cable for multi-use terminal (supplied).
[ To view images on HD (High Definition) TV, an HD Output Adaptor Cable (not supplied) is needed. • If you set the image size to [16:9], you can record images in the size that fills the entire screen of the HD TV. • You cannot view movies output in [HD(1080i)] signal format. To the multi connector To audio/video input jacks Cable for multi-use terminal (supplied) To view on TV Connect the camera to [SD] when shooting movies. 20 Set [COMPONENT] to the TV with the cable for multi-use terminal (supplied).
Operating Instructions
Page 21
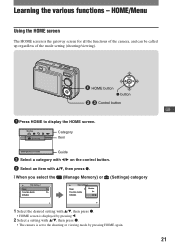
... then press z. [ When you select the (Manage Memory) or (Settings) category 1 Select the desired setting with v/V, then press z. • The camera is the gateway screen for all the functions of the camera, and can be called up regardless of the mode setting (shooting/viewing). HOME/Menu Using the HOME... screen The HOME screen is set to display the HOME screen. Learning the various functions - HOME button z button ɟ ɠ Control button GB 1 Press ...
... then press z. [ When you select the (Manage Memory) or (Settings) category 1 Select the desired setting with v/V, then press z. • The camera is the gateway screen for all the functions of the camera, and can be called up regardless of the mode setting (shooting/viewing). HOME/Menu Using the HOME... screen The HOME screen is set to display the HOME screen. Learning the various functions - HOME button z button ɟ ɠ Control button GB 1 Press ...

Operating Instructions
Page 22
Folder Copy Function Guide COMPONENT Wide Zoom Display Grid Line Digital Zoom Auto Review * DSC-W120/W125/W130 only. 22 Categories Shooting View Images Slideshow Print Manage Memory Settings Items Shooting Single Image Image Index Slideshow ... Create REC. For details on the operation 1 page 21 HOME items Pressing HOME displays the following items. Details on the items are displayed on the screen by the guide.
Folder Copy Function Guide COMPONENT Wide Zoom Display Grid Line Digital Zoom Auto Review * DSC-W120/W125/W130 only. 22 Categories Shooting View Images Slideshow Print Manage Memory Settings Items Shooting Single Image Image Index Slideshow ... Create REC. For details on the operation 1 page 21 HOME items Pressing HOME displays the following items. Details on the items are displayed on the screen by the guide.

Operating Instructions
Page 23
... button. • If the desired item is hidden, keep pressing v/V until the item appears on the screen. 3 Select a setting with b/B. • If the desired item is hidden, keep pressing b/B until the item appears on the screen. • Select an item in playback mode, and press z. 4 Press MENU to display the menu. Using...
... button. • If the desired item is hidden, keep pressing v/V until the item appears on the screen. 3 Select a setting with b/B. • If the desired item is hidden, keep pressing b/B until the item appears on the screen. • Select an item in playback mode, and press z. 4 Press MENU to display the menu. Using...

Operating Instructions
Page 24
... smile. Shooting Settings Selects the shooting settings. 24 For details on the operation 1 page 23 Menu items The available menu items vary depending on the screen. Face Detection Selects the priority subject for the Smile Shutter function.
... smile. Shooting Settings Selects the shooting settings. 24 For details on the operation 1 page 23 Menu items The available menu items vary depending on the screen. Face Detection Selects the priority subject for the Smile Shutter function.

Operating Instructions
Page 27
... 27 click the shortcut created on your computer, and insert the CD- ROM (supplied) into the CD-ROM drive. The screen below appears. [ For Macintosh users 1 Turn on -screen instructions to copy. • When you install "Cyber-shot Handbook", the "Cyber-shot Step-up Guide" will be installed ...ROM drive. 2 Select the [Handbook] folder and copy "Handbook.pdf" stored in detail. GB When you click the [Cyber-shot Handbook] button, the screen for copying "Cyber-shot Handbook" appears. 2 Follow the on your computer, and insert the CD- Viewing "Cyber-shot Handbook" "Cyber-shot Handbook" ...
... 27 click the shortcut created on your computer, and insert the CD- ROM (supplied) into the CD-ROM drive. The screen below appears. [ For Macintosh users 1 Turn on -screen instructions to copy. • When you install "Cyber-shot Handbook", the "Cyber-shot Step-up Guide" will be installed ...ROM drive. 2 Select the [Handbook] folder and copy "Handbook.pdf" stored in detail. GB When you click the [Cyber-shot Handbook] button, the screen for copying "Cyber-shot Handbook" appears. 2 Follow the on your computer, and insert the CD- Viewing "Cyber-shot Handbook" "Cyber-shot Handbook" ...
Operating Instructions
Page 28
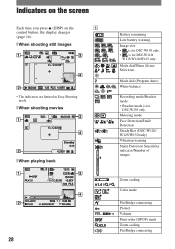
... dial/Menu (Scene Selection) Mode dial (Program Auto) White balance Recording mode/Bracket mode • Bracket mode is for DSC-W130 only. Indicators on the screen Each time you press v (DISP) on the A control button, the display changes (page 16). [ When shooting still images • The indicators are limited in Easy...
... dial/Menu (Scene Selection) Mode dial (Program Auto) White balance Recording mode/Bracket mode • Bracket mode is for DSC-W130 only. Indicators on the screen Each time you press v (DISP) on the A control button, the display changes (page 16). [ When shooting still images • The indicators are limited in Easy...
Operating Instructions
Page 30
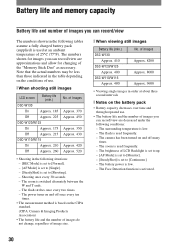
... been turned on and off once every ten times. • The measurement method is based on the CIPA standard. (CIPA: Camera & Imaging Products Association) • The battery life and the number of images do not change, regardless of image size. [ When viewing still images Battery ... about three second intervals [ Notes on the battery pack • Battery capacity decreases over time and through repeated use . [ When shooting still images LCD screen Battery life (min.) DSC-W130 On Approx. 185 Off Approx. 225 DSC-W120/W125 On Approx. 175 Off Approx. 215 DSC-W110/W115 On Approx...
... been turned on and off once every ten times. • The measurement method is based on the CIPA standard. (CIPA: Camera & Imaging Products Association) • The battery life and the number of images do not change, regardless of image size. [ When viewing still images Battery ... about three second intervals [ Notes on the battery pack • Battery capacity decreases over time and through repeated use . [ When shooting still images LCD screen Battery life (min.) DSC-W130 On Approx. 185 Off Approx. 225 DSC-W120/W125 On Approx. 175 Off Approx. 215 DSC-W110/W115 On Approx...

Operating Instructions
Page 33
.... 33 If a code such as "C/E:ss:ss" appears on the screen, refer to prevent wearing down the battery pack. Turn on the power. 3 Initialize the settings (page 22). 4 Consult your Sony dealer or local authorized Sony service facility. The power turns off automatically to "Cyber-shot Handbook". ...Handbook" (PDF). Replace it with a new one minute, re-insert the battery pack, then turn on , the camera turns off suddenly. • If you do not operate the camera for about one . • Use a recommended battery pack. Insert charged battery pack (page 10). • The ...
.... 33 If a code such as "C/E:ss:ss" appears on the screen, refer to prevent wearing down the battery pack. Turn on the power. 3 Initialize the settings (page 22). 4 Consult your Sony dealer or local authorized Sony service facility. The power turns off automatically to "Cyber-shot Handbook". ...Handbook" (PDF). Replace it with a new one minute, re-insert the battery pack, then turn on , the camera turns off suddenly. • If you do not operate the camera for about one . • Use a recommended battery pack. Insert charged battery pack (page 10). • The ...
Operating Instructions
Page 35
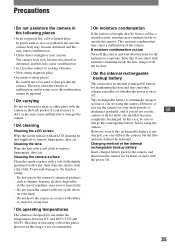
... becomes completely discharged. In this may cause malfunction or damage the camera. [ On cleaning Cleaning the LCD screen Wipe the screen surface with moisture remaining inside or outside the camera. This may cause the camera to remove fingerprints, dust, etc. Do not leave the camera in contact with a soft cloth to malfunction, and in some cases...
... becomes completely discharged. In this may cause malfunction or damage the camera. [ On cleaning Cleaning the LCD screen Wipe the screen surface with moisture remaining inside or outside the camera. This may cause the camera to remove fingerprints, dust, etc. Do not leave the camera in contact with a soft cloth to malfunction, and in some cases...
Operating Instructions
Page 36
...BG1 battery pack, strap, etc.) Microphone: Monaural Speaker: Monaural Exif Print: Compatible PRINT Image Matching III: Compatible PictBridge: Compatible 36 Specifications Camera [System] Image device: DSC-W130 7.18 mm (1/2.5 type) color CCD, Primary color filter DSC-W110/W115/W120/W125 7.20 mm...connector: Video output Audio output (Monaural) USB communication USB communication: Hi-Speed USB (USB 2.0 compliant) [LCD screen] LCD panel: 6.2 cm (2.5 type) TFT drive Total number of camera: DSC-W130 Approx. 8.1 Megapixels DSC-W110/W115/W120/W125 Approx. 7.2 Megapixels Lens: Carl Zeiss Vario-Tessar ...
...BG1 battery pack, strap, etc.) Microphone: Monaural Speaker: Monaural Exif Print: Compatible PRINT Image Matching III: Compatible PictBridge: Compatible 36 Specifications Camera [System] Image device: DSC-W130 7.18 mm (1/2.5 type) color CCD, Primary color filter DSC-W110/W115/W120/W125 7.20 mm...connector: Video output Audio output (Monaural) USB communication USB communication: Hi-Speed USB (USB 2.0 compliant) [LCD screen] LCD panel: 6.2 cm (2.5 type) TFT drive Total number of camera: DSC-W130 Approx. 8.1 Megapixels DSC-W110/W115/W120/W125 Approx. 7.2 Megapixels Lens: Carl Zeiss Vario-Tessar ...


