
Instruction Manual
Page 7
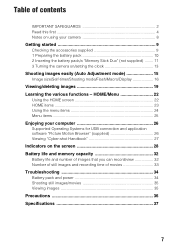
... Using the HOME screen 22 HOME items 23 Using the menu items 24 Menu items 25 Enjoying your computer 26 Supported Operating Systems for USB connection and application software "Picture Motion Browser" (supplied 26 Viewing "Cyber-shot Handbook 27 Indicators on the screen 28 Battery life and memory... 9 1 Preparing the battery pack 10 2 Inserting the battery pack/a "Memory Stick Duo" (not supplied) ........ 11 3 Turning the camera on/setting the clock 13 Shooting images easily (Auto Adjustment mode 15 Image size/Self-timer/Shooting mode/Flash/Macro/Display 16 Viewing/deleting images...
... Using the HOME screen 22 HOME items 23 Using the menu items 24 Menu items 25 Enjoying your computer 26 Supported Operating Systems for USB connection and application software "Picture Motion Browser" (supplied 26 Viewing "Cyber-shot Handbook 27 Indicators on the screen 28 Battery life and memory... 9 1 Preparing the battery pack 10 2 Inserting the battery pack/a "Memory Stick Duo" (not supplied) ........ 11 3 Turning the camera on/setting the clock 13 Shooting images easily (Auto Adjustment mode 15 Image size/Self-timer/Shooting mode/Flash/Macro/Display 16 Viewing/deleting images...
Instruction Manual
Page 17
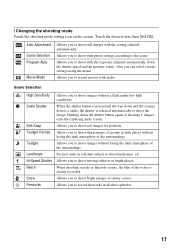
... images with the exposure adjusted automatically (both the shutter speed and the aperture value). Allows you to record movies with audio. Holding down and the camera detects a smile, the shutter is released automatically to shoot sharp images of people in dark places without losing the dark atmosphere of the surroundings. Allows... image. When shooting seaside or lakeside scenes, the blue of snowy scenes. Focuses only on the screen. Allows you can select various settings using the menu. Also you to record fireworks in bright places.
... images with the exposure adjusted automatically (both the shutter speed and the aperture value). Allows you to record movies with audio. Holding down and the camera detects a smile, the shutter is released automatically to shoot sharp images of people in dark places without losing the dark atmosphere of the surroundings. Allows... image. When shooting seaside or lakeside scenes, the blue of snowy scenes. Focuses only on the screen. Allows you can select various settings using the menu. Also you to record fireworks in bright places.

Instruction Manual
Page 20
...deselect the mark. 3 Touch [t], and then touch [OK]. • To delete all the images in a folder, select (All In This Folder) from (Delete) in the menu screen, then touch [OK]. [ To play back a series of images (Slideshow) Touch . [ To view images on a high definition TV, an HD output adaptor cable (DSC...-T75 only) is required. To the multi connector To audio/video input jacks Cable for multi-use terminal When viewing on TV screen Connect the camera to 16:9, the images will be shown in the check box of the image. [ To view an index screen Touch (Index) to display the previous...
...deselect the mark. 3 Touch [t], and then touch [OK]. • To delete all the images in a folder, select (All In This Folder) from (Delete) in the menu screen, then touch [OK]. [ To play back a series of images (Slideshow) Touch . [ To view images on a high definition TV, an HD output adaptor cable (DSC...-T75 only) is required. To the multi connector To audio/video input jacks Cable for multi-use terminal When viewing on TV screen Connect the camera to 16:9, the images will be shown in the check box of the image. [ To view an index screen Touch (Index) to display the previous...

Instruction Manual
Page 22
... the item in shooting mode or playback mode. 1Touch [HOME] to the previous screen. 22 HOME/Menu Using the HOME screen The HOME screen is the gateway screen for all the functions of whether the camera is functional only when you select (Settings). 2 Touch the desired setting item. Item Category [HOME] 2Touch... it. • Touch [×] or [BACK] to return to display the HOME screen. Learning the various functions - You can access this screen regardless of your camera.
... the item in shooting mode or playback mode. 1Touch [HOME] to the previous screen. 22 HOME/Menu Using the HOME screen The HOME screen is the gateway screen for all the functions of whether the camera is functional only when you select (Settings). 2 Touch the desired setting item. Item Category [HOME] 2Touch... it. • Touch [×] or [BACK] to return to display the HOME screen. Learning the various functions - You can access this screen regardless of your camera.

Instruction Manual
Page 24
Using the menu items 1Touch [MENU] to turn off the menu. 24 Touch [?] to hide this guide. [MENU] • Different items will become visible depending on the selected mode. 2Touch the desired menu item. • If the desired item is hidden, keep touching v/V until the item appears on the screen. 3Touch the desired setting item. 4Touch [BACK] to display the menu.
Using the menu items 1Touch [MENU] to turn off the menu. 24 Touch [?] to hide this guide. [MENU] • Different items will become visible depending on the selected mode. 2Touch the desired menu item. • If the desired item is hidden, keep touching v/V until the item appears on the screen. 3Touch the desired setting item. 4Touch [BACK] to display the menu.

Instruction Manual
Page 25
...Color Mode Changes the vividness of flash light. Selects the folder for shooting REC Mode Selects the continuous shooting method. Menu for viewing images. Displays still images in 16:9. Metering Mode Selects the metering mode. SteadyShot Selects the anti-blur mode.... Flash Level Adjusts the amount of the image or adds special effects. Face Detection Detects the faces of images. Setup Selects the shooting settings. Menu for viewing (Retouch) (Paint) (Multi Resizing) (Wide Zoom Display) (Slideshow) (Delete) (Protect) (Print) (Rotate) (Select Folder) ...
...Color Mode Changes the vividness of flash light. Selects the folder for shooting REC Mode Selects the continuous shooting method. Menu for viewing images. Displays still images in 16:9. Metering Mode Selects the metering mode. SteadyShot Selects the anti-blur mode.... Flash Level Adjusts the amount of the image or adds special effects. Face Detection Detects the faces of images. Setup Selects the shooting settings. Menu for viewing (Retouch) (Paint) (Multi Resizing) (Wide Zoom Display) (Slideshow) (Delete) (Protect) (Print) (Rotate) (Select Folder) ...

Instruction Manual
Page 28
...Displays the HOME screen. Indication Backs to select the Scene Selection mode. Metering mode settings ISO number settings Exposure Value settings Image size settings MENU B Display BACK DISP C Display 0.5m 1.0m 3.0m 7.0m 0EV Self-timer settings Shooting mode settings Shooting mode (Scene Selection) ...settings • Touch in the DSC-T70/T75 only. Displays the MENU screen. This cancels the focusing on the screen to change to the display selection screen (page 18). [ When shooting still images [ ...
...Displays the HOME screen. Indication Backs to select the Scene Selection mode. Metering mode settings ISO number settings Exposure Value settings Image size settings MENU B Display BACK DISP C Display 0.5m 1.0m 3.0m 7.0m 0EV Self-timer settings Shooting mode settings Shooting mode (Scene Selection) ...settings • Touch in the DSC-T70/T75 only. Displays the MENU screen. This cancels the focusing on the screen to change to the display selection screen (page 18). [ When shooting still images [ ...

Instruction Manual
Page 30
... change the settings by touching the following: 1, 2. Screen indicators Screen indicators 3 to the single image screen from the index screen. MENU Playbacks the slide show the current setting status. Displays the MENU screen. Selects the playback folder. C Display Indication Battery remaining Image size C:32:00 Check mark Print order (DPOF) mark Protect...
... change the settings by touching the following: 1, 2. Screen indicators Screen indicators 3 to the single image screen from the index screen. MENU Playbacks the slide show the current setting status. Displays the MENU screen. Selects the playback folder. C Display Indication Battery remaining Image size C:32:00 Check mark Print order (DPOF) mark Protect...


