

Instruction Manual
Page 13
... not on the touch panel. 1 Touch the desired date display format, then touch [t]. 2 Touch each item, then set its numeric value by touching v/V. 3 Touch [OK]. Taking your finger. • When the item you touch the top right of the screen while shooting, the icons will make the icons reappear. 13 To hide this camera by touching [BACK]. • Touching [?] displays the...
... not on the touch panel. 1 Touch the desired date display format, then touch [t]. 2 Touch each item, then set its numeric value by touching v/V. 3 Touch [OK]. Taking your finger. • When the item you touch the top right of the screen while shooting, the icons will make the icons reappear. 13 To hide this camera by touching [BACK]. • Touching [?] displays the...

Instruction Manual
Page 16
... display on TV Shoot at a small image size for still images E Shooting close-up F Changing the screen display [ Changing the image size Touch the image size setting icon on the screen. Touch the desired item, then [BACK]. Touch the desired item, then [BACK]. Image size/Self-timer/Shooting mode/Flash/Macro/Display A Changing the image...
... display on TV Shoot at a small image size for still images E Shooting close-up F Changing the screen display [ Changing the image size Touch the image size setting icon on the screen. Touch the desired item, then [BACK]. Touch the desired item, then [BACK]. Image size/Self-timer/Shooting mode/Flash/Macro/Display A Changing the image...
Instruction Manual
Page 17
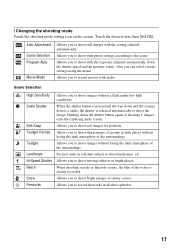
... menu. Allows you to shoot moving subjects in dark places without losing the dark atmosphere of the surroundings. [ Changing the shooting mode Touch the shooting mode setting icon on a distant subject to shoot landscapes, etc. Allows you to shoot still images with audio. Auto Adjustment...the way down the shutter button again or shooting 6 images exits the capturing smile screen. Allows you to shoot the image. When the shutter button is clearly recorded. Holding down and the camera detects a smile, the shutter is released automatically to shoot images without losing the ...
... menu. Allows you to shoot moving subjects in dark places without losing the dark atmosphere of the surroundings. [ Changing the shooting mode Touch the shooting mode setting icon on a distant subject to shoot landscapes, etc. Allows you to shoot still images with audio. Auto Adjustment...the way down the shutter button again or shooting 6 images exits the capturing smile screen. Allows you to shoot the image. When the shutter button is clearly recorded. Holding down and the camera detects a smile, the shutter is released automatically to shoot images without losing the ...
Instruction Manual
Page 18
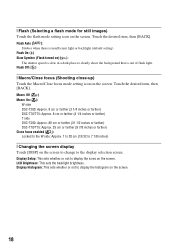
... Auto ( ): Strobes when there is insufficient light or backlight (default setting) Flash On ( ) Slow Synchro (Flash forced on the screen to change to clearly shoot the background that is out of flash light. Touch the desired item, then [BACK]. Macro Off ( ) Macro On ( ): W side DSC-T200: Approx. 8 cm or farther (3 1/4 inches or...: Approx. 25 cm or farther (9 7/8 inches or farther) Close focus enabled ( ): Locked to the W side: Approx. 1 to 20 cm (13/32 to 7 7/8 inches) [ Changing the screen display Touch [DISP] on ) ( ): The shutter speed is slow in a dark place to the display selection...
... Auto ( ): Strobes when there is insufficient light or backlight (default setting) Flash On ( ) Slow Synchro (Flash forced on the screen to change to clearly shoot the background that is out of flash light. Touch the desired item, then [BACK]. Macro Off ( ) Macro On ( ): W side DSC-T200: Approx. 8 cm or farther (3 1/4 inches or...: Approx. 25 cm or farther (9 7/8 inches or farther) Close focus enabled ( ): Locked to the W side: Approx. 1 to 20 cm (13/32 to 7 7/8 inches) [ Changing the screen display Touch [DISP] on ) ( ): The shutter speed is slow in a dark place to the display selection...

Instruction Manual
Page 19
... image with / . Fast forward/Rewind: m/M (Touch B or x to return to enlarge the corresponding area. v/V/b/B: Adjusts the position. [BACK]: Cancels playback zoom. : Turns v/V/b/B on/off , the camera is displayed to normal playback.) Volume control:Touch , then adjust the volume with the zoom (W/T) ...control bar disappears. to playback a movie. Touch again. If you want to delete, then touch . 2 Touch [OK]. [ To view an enlarged image (playback zoom) Touch a still image while it is turned on the screen to playback mode. Touch out. Viewing/deleting images DSC-T70/T75...
... image with / . Fast forward/Rewind: m/M (Touch B or x to return to enlarge the corresponding area. v/V/b/B: Adjusts the position. [BACK]: Cancels playback zoom. : Turns v/V/b/B on/off , the camera is displayed to normal playback.) Volume control:Touch , then adjust the volume with the zoom (W/T) ...control bar disappears. to playback a movie. Touch again. If you want to delete, then touch . 2 Touch [OK]. [ To view an enlarged image (playback zoom) Touch a still image while it is turned on the screen to playback mode. Touch out. Viewing/deleting images DSC-T70/T75...

Instruction Manual
Page 20
... multi-use terminal When viewing on TV screen Connect the camera to deselect the mark. 3 Touch [t], and then touch [OK]. • To delete all the images in a folder, select (All In This Folder) from (Delete) in index mode 1 Touch while the index screen is required. [ To view an index screen Touch (Index) to display the previous/next page...
... multi-use terminal When viewing on TV screen Connect the camera to deselect the mark. 3 Touch [t], and then touch [OK]. • To delete all the images in a folder, select (All In This Folder) from (Delete) in index mode 1 Touch while the index screen is required. [ To view an index screen Touch (Index) to display the previous/next page...

Instruction Manual
Page 22
... that you want to change, and then touch the desired setting value to set . [ When you select the (Manage Memory) or (Settings) category 1 Touch the category you want to the previous screen. 22 You can access this screen regardless of whether the camera is in the category you want to set... it. • Touch [×] or [BACK] to return to change the settings. • ...
... that you want to change, and then touch the desired setting value to set . [ When you select the (Manage Memory) or (Settings) category 1 Touch the category you want to the previous screen. 22 You can access this screen regardless of whether the camera is in the category you want to set... it. • Touch [×] or [BACK] to return to change the settings. • ...

Instruction Manual
Page 23
...Mode Shooting Settings 2 Auto Orientation Smile Level Clock Settings Language Setting Format Music Create REC. Folder Copy Function Guide Calibration COMPONENT TV TYPE Grid Line Digital Zoom Auto Review 23 Category Shooting View Images Printing, Other Manage Memory Settings Items Auto Adjustment Scene Selection Program Auto Movie Mode Single Image Image... Index Slideshow Print Music Tool Download Music Memory Tool Memory Stick Tool Format Change REC. For details on the operation 1 page 22 HOME items Touching [HOME] displays the following items. Details on the items are displayed on the...
...Mode Shooting Settings 2 Auto Orientation Smile Level Clock Settings Language Setting Format Music Create REC. Folder Copy Function Guide Calibration COMPONENT TV TYPE Grid Line Digital Zoom Auto Review 23 Category Shooting View Images Printing, Other Manage Memory Settings Items Auto Adjustment Scene Selection Program Auto Movie Mode Single Image Image... Index Slideshow Print Music Tool Download Music Memory Tool Memory Stick Tool Format Change REC. For details on the operation 1 page 22 HOME items Touching [HOME] displays the following items. Details on the items are displayed on the...

Instruction Manual
Page 24
Using the menu items 1Touch [MENU] to turn off the menu. 24 Touch [?] to hide this guide. [MENU] • Different items will become visible depending on the selected mode. 2Touch the desired menu item. • If the desired item is hidden, keep touching v/V until the item appears on the screen. 3Touch the desired setting item. 4Touch [BACK] to display the menu.
Using the menu items 1Touch [MENU] to turn off the menu. 24 Touch [?] to hide this guide. [MENU] • Different items will become visible depending on the selected mode. 2Touch the desired menu item. • If the desired item is hidden, keep touching v/V until the item appears on the screen. 3Touch the desired setting item. 4Touch [BACK] to display the menu.

Instruction Manual
Page 28
.... Flash mode settings Macro/Close focus settings Changes the screen display. Indication Backs to select the Scene Selection mode. Indicators on the screen Touch [DISP] on the subject selected by touching the following: 1, 2, 3. • Touching an icon displays the guide about the touched item. Metering mode settings ISO number settings Exposure Value settings A Display HOME Indication...
.... Flash mode settings Macro/Close focus settings Changes the screen display. Indication Backs to select the Scene Selection mode. Indicators on the screen Touch [DISP] on the subject selected by touching the following: 1, 2, 3. • Touching an icon displays the guide about the touched item. Metering mode settings ISO number settings Exposure Value settings A Display HOME Indication...
Instruction Manual
Page 29
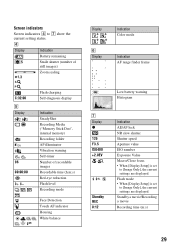
... internal memory) Recording folder AF illuminator Vibration warning Self-timer Number of recordable images Recordable time (h:m:s) Red-eye reduction Flash level Recording mode Face Detection Touch AF indicator Housing White balance Low battery warning Histogram G Display z 125 F3.5 ISO400 +2.0EV Standby REC 0:12 Indication AE/AF lock NR slow ... Aperture value ISO number Exposure Value Macro/Close focus • When [Display Setup] is set to [Image Only], the current settings are displayed. Screen indicators Screen indicators 4 to [Image Only], the current settings are displayed.
... internal memory) Recording folder AF illuminator Vibration warning Self-timer Number of recordable images Recordable time (h:m:s) Red-eye reduction Flash level Recording mode Face Detection Touch AF indicator Housing White balance Low battery warning Histogram G Display z 125 F3.5 ISO400 +2.0EV Standby REC 0:12 Indication AE/AF lock NR slow ... Aperture value ISO number Exposure Value Macro/Close focus • When [Display Setup] is set to [Image Only], the current settings are displayed. Screen indicators Screen indicators 4 to [Image Only], the current settings are displayed.

Instruction Manual
Page 30
... size C:32:00 Check mark Print order (DPOF) mark Protect Playback zoom Self-diagnosis display 30 A Display HOME Indication Displays the HOME screen. [ When playing back still images [ When playing back movies B Display BACK x N m M DISP Indication Backs to index mode.... Deletes the image. Stop Playback Playback zoom Turns v/V/b/B on/off. Displays the MENU screen. Displays the previous/next image. Screen operation You can change the settings by touching the following: 1, 2. MENU Playbacks the slide show the current setting status. Selects the playback folder....
... size C:32:00 Check mark Print order (DPOF) mark Protect Playback zoom Self-diagnosis display 30 A Display HOME Indication Displays the HOME screen. [ When playing back still images [ When playing back movies B Display BACK x N m M DISP Indication Backs to index mode.... Deletes the image. Stop Playback Playback zoom Turns v/V/b/B on/off. Displays the MENU screen. Displays the previous/next image. Screen operation You can change the settings by touching the following: 1, 2. MENU Playbacks the slide show the current setting status. Selects the playback folder....
Instruction Manual
Page 36
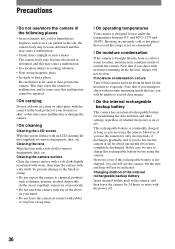
...skirt, as this may cause malfunction or damage the camera. [ On cleaning Cleaning the LCD screen Wipe the screen surface with any of the internal rechargeable backup battery Insert charged battery pack in the camera, and then leave the camera for the moisture to evaporate. To prevent damage ...to the finish or casing: • Do not expose the camera to chemical products such as thinner, benzine, alcohol, disposable cloths, insect repellent, sunscreen or insecticide. • Do not touch the camera with an LCD cleaning kit (not supplied) to remove fingerprints, dust, etc....
...skirt, as this may cause malfunction or damage the camera. [ On cleaning Cleaning the LCD screen Wipe the screen surface with any of the internal rechargeable backup battery Insert charged battery pack in the camera, and then leave the camera for the moisture to evaporate. To prevent damage ...to the finish or casing: • Do not expose the camera to chemical products such as thinner, benzine, alcohol, disposable cloths, insect repellent, sunscreen or insecticide. • Do not touch the camera with an LCD cleaning kit (not supplied) to remove fingerprints, dust, etc....


