
Instruction Manual
Page 1
Operating Instructions Before operating the unit, please read "Cybershot Handbook" (PDF) and "Cyber-shot Step-up Guide" on the CD-ROM (supplied) using a computer. Digital Still Camera Instruction Manual GB DSC-T70/T75/T200 For details on advanced operations, please read this manual thoroughly, and retain it for future reference. © 2007 Sony Corporation 3-219-483-11(1)
Operating Instructions Before operating the unit, please read "Cybershot Handbook" (PDF) and "Cyber-shot Step-up Guide" on the CD-ROM (supplied) using a computer. Digital Still Camera Instruction Manual GB DSC-T70/T75/T200 For details on advanced operations, please read this manual thoroughly, and retain it for future reference. © 2007 Sony Corporation 3-219-483-11(1)
Instruction Manual
Page 2
... than the other sources, refer to the operating instructions. [ Polarization This set should still fail to fit, contact your electrician to your home, consult your Sony dealer regarding this can result in the operating instructions and adhere to rain or moisture. Model No. If you call upon your dealer or local...
... than the other sources, refer to the operating instructions. [ Polarization This set should still fail to fit, contact your electrician to your home, consult your Sony dealer regarding this can result in the operating instructions and adhere to rain or moisture. Model No. If you call upon your dealer or local...
Instruction Manual
Page 3
Use a cloth lightly dampened with a cloth or other materials. - Never place the set in a confined space, such as opening or removing covers may result in fire, electric shock, or other similar surface. - When the power cord or plug is in damage and will prevent damage to the set due to excessive shock by the manufacturer. [ Ventilation The slots and openings in the cabinet are specified in performance - this set during a lightning storm, or when it is provided. - Installation [ Water and Moisture Do not use liquid cleaners or aerosol cleaners. The set may result in safe ...
Use a cloth lightly dampened with a cloth or other materials. - Never place the set in a confined space, such as opening or removing covers may result in fire, electric shock, or other similar surface. - When the power cord or plug is in damage and will prevent damage to the set due to excessive shock by the manufacturer. [ Ventilation The slots and openings in the cabinet are specified in performance - this set during a lightning storm, or when it is provided. - Installation [ Water and Moisture Do not use liquid cleaners or aerosol cleaners. The set may result in safe ...
Instruction Manual
Page 4
...The number below is for the FCC related matters only. [ Regulatory Information Declaration of Conformity Trade Name: SONY Model No.: DSC-T200 Responsible Party: Sony Electronics Inc. This Class B digital apparatus complies with the specified type only. Address: 16530 Via Esprillo, San Diego, CA 92127U.S.A. Telephone...Ion batteries. [ HD Output Adaptor Cable This device complies with Part 15 of Conformity Trade Name: SONY Model No.: DSC-T70, DSC-T75 Responsible Party: Sony Electronics Inc. Do not expose the batteries to the collection and recycling location nearest you have any ...
...The number below is for the FCC related matters only. [ Regulatory Information Declaration of Conformity Trade Name: SONY Model No.: DSC-T200 Responsible Party: Sony Electronics Inc. This Class B digital apparatus complies with the specified type only. Address: 16530 Via Esprillo, San Diego, CA 92127U.S.A. Telephone...Ion batteries. [ HD Output Adaptor Cable This device complies with Part 15 of Conformity Trade Name: SONY Model No.: DSC-T70, DSC-T75 Responsible Party: Sony Electronics Inc. Do not expose the batteries to the collection and recycling location nearest you have any ...
Instruction Manual
Page 5
... more detailed information about recycling of electrical and electronic equipment. Consult the dealer or an experienced radio/TV technician for a Class B digital device, pursuant to Part 15 of FCC Rules. For Customers in Europe This product has been tested and found to comply with the...USB, etc.) again. [ Disposal of Old Electrical & Electronic Equipment (Applicable in the European Union and other European countries with the limits for a digital device pursuant to Subpart B of Part 15 of the FCC Rules. The recycling of the following measures: - For the State of correctly, you...
... more detailed information about recycling of electrical and electronic equipment. Consult the dealer or an experienced radio/TV technician for a Class B digital device, pursuant to Part 15 of FCC Rules. For Customers in Europe This product has been tested and found to comply with the...USB, etc.) again. [ Disposal of Old Electrical & Electronic Equipment (Applicable in the European Union and other European countries with the limits for a digital device pursuant to Subpart B of Part 15 of the FCC Rules. The recycling of the following measures: - For the State of correctly, you...

Instruction Manual
Page 6
...(i.e., marked with an or mark) must be used. Should the fuse in the plug supplied need to be sure to this product is Sony Corporation, 1-7-1 Konan Minato-ku Tokyo, 1080075 Japan. Notice for customers in separate service or guarantee documents. If the plug supplied with BS 1363... 61, 70327 Stuttgart, Germany. If you change the fuse. Never use the plug without the fuse cover. The Authorized Representative for your nearest Sony service station. 6 For any service or guarantee matters please refer to the addresses given in the United Kingdom A moulded plug complying with this ...
...(i.e., marked with an or mark) must be used. Should the fuse in the plug supplied need to be sure to this product is Sony Corporation, 1-7-1 Konan Minato-ku Tokyo, 1080075 Japan. Notice for customers in separate service or guarantee documents. If the plug supplied with BS 1363... 61, 70327 Stuttgart, Germany. If you change the fuse. Never use the plug without the fuse cover. The Authorized Representative for your nearest Sony service station. 6 For any service or guarantee matters please refer to the addresses given in the United Kingdom A moulded plug complying with this ...
Instruction Manual
Page 7
...supplied 9 1 Preparing the battery pack 10 2 Inserting the battery pack/a "Memory Stick Duo" (not supplied) ........ 11 3 Turning the camera on the screen 28 Battery life and memory capacity 32 Battery life and number of images that you can record/view 32 Number of still...first 4 Notes on using your computer 26 Supported Operating Systems for USB connection and application software "Picture Motion Browser" (supplied 26 Viewing "Cyber-shot Handbook 27 Indicators on /setting the clock 13 Shooting images easily (Auto Adjustment mode 15 Image size/Self-timer/Shooting mode/Flash/Macro/...
...supplied 9 1 Preparing the battery pack 10 2 Inserting the battery pack/a "Memory Stick Duo" (not supplied) ........ 11 3 Turning the camera on the screen 28 Battery life and memory capacity 32 Battery life and number of images that you can record/view 32 Number of still...first 4 Notes on using your computer 26 Supported Operating Systems for USB connection and application software "Picture Motion Browser" (supplied 26 Viewing "Cyber-shot Handbook 27 Indicators on /setting the clock 13 Shooting images easily (Auto Adjustment mode 15 Image size/Self-timer/Shooting mode/Flash/Macro/...
Instruction Manual
Page 8
...the recording in sandy or dusty locations may cause malfunctions. • If moisture condensation occurs, remove it wet, immediately wipe off the camera or remove the battery pack or "Memory Stick Duo" while the access lamp is manufactured using extremely high-precision technology so over 99.... may render the recording medium unusable, or cause image data breakdown, damage or loss. • Clean the flash surface before use the camera near a location that generates strong radio waves or emits radiation. Water entering the inside of flash emission may cause dirt on recording/playback ...
...the recording in sandy or dusty locations may cause malfunctions. • If moisture condensation occurs, remove it wet, immediately wipe off the camera or remove the battery pack or "Memory Stick Duo" while the access lamp is manufactured using extremely high-precision technology so over 99.... may render the recording medium unusable, or cause image data breakdown, damage or loss. • Clean the flash surface before use the camera near a location that generates strong radio waves or emits radiation. Water entering the inside of flash emission may cause dirt on recording/playback ...
Instruction Manual
Page 9
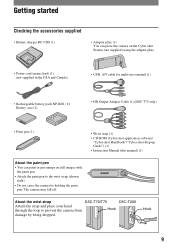
... off. Getting started Checking the accessories supplied • Battery charger BC-CSD (1) • Adaptor plate (1) You can place the camera on the Cyber-shot Station (not supplied) using the adaptor plate. • Power cord (mains lead) (1) (not supplied in the USA and Canada...(1) • HD Output Adaptor Cable (1) (DSC-T75 only) • Paint pen (1) • Wrist strap (1) • CD-ROM (Cyber-shot application software/ "Cyber-shot Handbook"/"Cyber-shot Step-up Guide") (1) • Instruction Manual (this manual) (1) About the paint pen • You can paint or put stamps on still...
... off. Getting started Checking the accessories supplied • Battery charger BC-CSD (1) • Adaptor plate (1) You can place the camera on the Cyber-shot Station (not supplied) using the adaptor plate. • Power cord (mains lead) (1) (not supplied in the USA and Canada...(1) • HD Output Adaptor Cable (1) (DSC-T75 only) • Paint pen (1) • Wrist strap (1) • CD-ROM (Cyber-shot application software/ "Cyber-shot Handbook"/"Cyber-shot Step-up Guide") (1) • Instruction Manual (this manual) (1) About the paint pen • You can paint or put stamps on still...

Instruction Manual
Page 10
.... The CHARGE lamp lights up, and charging starts. Charging may take longer under certain circumstances or conditions. • See page 32 for use with compatible Sony batteries. 10 1 Preparing the battery pack For customers in the USA and Canada Plug For customers in countries/regions other than the USA and Canada...
.... The CHARGE lamp lights up, and charging starts. Charging may take longer under certain circumstances or conditions. • See page 32 for use with compatible Sony batteries. 10 1 Preparing the battery pack For customers in the USA and Canada Plug For customers in countries/regions other than the USA and Canada...

Instruction Manual
Page 11
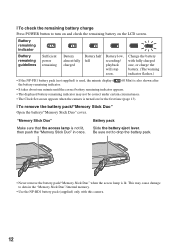
... way in until it clicks. 3 Insert the battery pack. 4 Close the battery/"Memory Stick Duo" cover. [ When there is no "Memory Stick Duo" inserted The camera records/plays back images using the internal memory (approx. 31 MB). 11 Battery eject lever Align the v mark of the battery pack. 2 Inserting the battery...
... way in until it clicks. 3 Insert the battery pack. 4 Close the battery/"Memory Stick Duo" cover. [ When there is no "Memory Stick Duo" inserted The camera records/plays back images using the internal memory (approx. 31 MB). 11 Battery eject lever Align the v mark of the battery pack. 2 Inserting the battery...
Instruction Manual
Page 12
This may not be correct under certain circumstances. • The Clock Set screen appears when the camera is turned on the LCD screen. Change the battery with this camera. 12 Slide the battery eject lever. Be sure not to turn on and check the remaining battery on for the first time (page 13...
This may not be correct under certain circumstances. • The Clock Set screen appears when the camera is turned on the LCD screen. Change the battery with this camera. 12 Slide the battery eject lever. Be sure not to turn on and check the remaining battery on for the first time (page 13...

Instruction Manual
Page 13
.... • When the item you touch the top right of the screen while shooting, the icons will make the icons reappear. 13 To hide this camera by touching v/V. 3 Touch [OK]. On the touch panel buttons Perform settings on this guide, touch [?] again. • When you want to set its ...numeric value by lightly touching the buttons or icons on the screen with your finger off the screen will momentarily disappear. 3 Turning the camera on/setting the clock POWER button Touch panel Lens Lens cover 1 Press the POWER button or slide the lens cover downward. 2 Set the clock...
.... • When the item you touch the top right of the screen while shooting, the icons will make the icons reappear. 13 To hide this camera by touching v/V. 3 Touch [OK]. On the touch panel buttons Perform settings on this guide, touch [?] again. • When you want to set its ...numeric value by lightly touching the buttons or icons on the screen with your finger off the screen will momentarily disappear. 3 Turning the camera on/setting the clock POWER button Touch panel Lens Lens cover 1 Press the POWER button or slide the lens cover downward. 2 Set the clock...

Instruction Manual
Page 14
[ To set the date and time again Touch [HOME], then touch (Settings) t [ Clock Settings] (pages 22, 23). [ When you turn on the power • Once the battery is inserted in the camera, it may take time before operation becomes possible. • If the camera is running on battery power and you do not operate the camera for about three minutes, the camera turns off automatically to prevent wearing down the battery pack (Auto power-off function). 14
[ To set the date and time again Touch [HOME], then touch (Settings) t [ Clock Settings] (pages 22, 23). [ When you turn on the power • Once the battery is inserted in the camera, it may take time before operation becomes possible. • If the camera is running on battery power and you do not operate the camera for about three minutes, the camera turns off automatically to prevent wearing down the battery pack (Auto power-off function). 14
Instruction Manual
Page 15
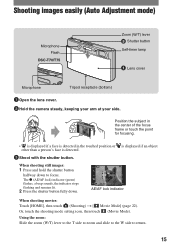
... mode) Microphone Flash DSC-T70/T75 Zoom (W/T) lever Shutter button Self-timer lamp Lens cover Microphone Tripod receptacle (bottom) 1 Open the lens cover. 2 Hold the camera steady, keeping your arm at your side.
... mode) Microphone Flash DSC-T70/T75 Zoom (W/T) lever Shutter button Self-timer lamp Lens cover Microphone Tripod receptacle (bottom) 1 Open the lens cover. 2 Hold the camera steady, keeping your arm at your side.

Instruction Manual
Page 16
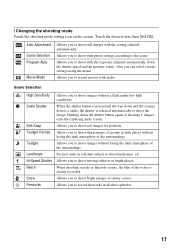
Self-Timer Off ( ): Not using the self-timer Self-Timer 10sec ( ): Setting the 10-second delay self-timer Self-Timer 2sec ( ): Setting the 2-second delay self-timer Press the shutter button, the self-timer lamp flashes, and a beep sounds until the shutter operates. 16 Image size/Self-timer/Shooting mode/Flash/Macro/Display A Changing the image size B Using the self-timer C Changing the shooting mode D Selecting a flash mode for still images E Shooting close-up to A4(8.5 × 11") For prints up F Changing the screen display [ Changing the image size Touch the image size setting icon on...
Self-Timer Off ( ): Not using the self-timer Self-Timer 10sec ( ): Setting the 10-second delay self-timer Self-Timer 2sec ( ): Setting the 2-second delay self-timer Press the shutter button, the self-timer lamp flashes, and a beep sounds until the shutter operates. 16 Image size/Self-timer/Shooting mode/Flash/Macro/Display A Changing the image size B Using the self-timer C Changing the shooting mode D Selecting a flash mode for still images E Shooting close-up to A4(8.5 × 11") For prints up F Changing the screen display [ Changing the image size Touch the image size setting icon on...
Instruction Manual
Page 17
... a distant subject to shoot landscapes, etc. Allows you to shoot sharp images of the water is released automatically to the scene. Holding down and the camera detects a smile, the shutter is clearly recorded. Allows you to shoot with preset settings according to shoot the image.
... a distant subject to shoot landscapes, etc. Allows you to shoot sharp images of the water is released automatically to the scene. Holding down and the camera detects a smile, the shutter is clearly recorded. Allows you to shoot with preset settings according to shoot the image.
Instruction Manual
Page 18
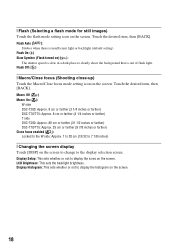
Flash Auto ( ): Strobes when there is insufficient light or backlight (default setting) Flash On ( ) Slow Synchro (Flash forced on) ( ): The shutter speed is slow in a dark place to display the icons on the screen. 18 Touch the desired item, then [BACK]. Flash Off ( ) [ Macro/Close focus (Shooting close-up) Touch the Macro/Close focus mode setting icon on the screen. Display Setup: This sets whether or not to clearly shoot the background that is out of flash light. Touch the desired item, then [BACK]. Macro Off ( ) Macro On ( ): W side DSC-T200: Approx. 8 cm or farther (3 1/4 ...
Flash Auto ( ): Strobes when there is insufficient light or backlight (default setting) Flash On ( ) Slow Synchro (Flash forced on) ( ): The shutter speed is slow in a dark place to display the icons on the screen. 18 Touch the desired item, then [BACK]. Flash Off ( ) [ Macro/Close focus (Shooting close-up) Touch the Macro/Close focus mode setting icon on the screen. Display Setup: This sets whether or not to clearly shoot the background that is out of flash light. Touch the desired item, then [BACK]. Macro Off ( ) Macro On ( ): W side DSC-T200: Approx. 8 cm or farther (3 1/4 ...

Instruction Manual
Page 19
... displayed to select an image. Stop: Touch x. [ To delete images 1 Display the image you press (Playback) when the camera is powered off . • You can also enlarge the image with / . If you want to delete, then touch . 2 Touch [OK]. [ To view an enlarged image (...
... displayed to select an image. Stop: Touch x. [ To delete images 1 Display the image you press (Playback) when the camera is powered off . • You can also enlarge the image with / . If you want to delete, then touch . 2 Touch [OK]. [ To view an enlarged image (...

Instruction Manual
Page 20
... displayed. 2 Touch the thumbnail images to add a check mark to 16:9, the images will be shown in screen. (View Images) on TV screen Connect the camera to delete. [ To view an index screen Touch (Index) to display the previous/next page.
... displayed. 2 Touch the thumbnail images to add a check mark to 16:9, the images will be shown in screen. (View Images) on TV screen Connect the camera to delete. [ To view an index screen Touch (Index) to display the previous/next page.
