
Instruction Manual
Page 2
... Manual (this manual) (1) GB 2 Refer to it for the model name of your camera within the support page. • Check the model name on the bottom of your camera. English Learning more about the camera ("Cyber-shot User Guide") "Cyber-shot User Guide" is an on the many functions ...• AC Adaptor AC-UB10/UB10B/UB10C/UB10D (1) • Power cord (mains lead) (not supplied in parentheses indicates the number of the camera. 1 Access the Sony support page. http://www.sony.net/SonyInfo/Support/ 2 Select your country or region. 3 Search for in-depth instructions on -line manual.
... Manual (this manual) (1) GB 2 Refer to it for the model name of your camera within the support page. • Check the model name on the bottom of your camera. English Learning more about the camera ("Cyber-shot User Guide") "Cyber-shot User Guide" is an on the many functions ...• AC Adaptor AC-UB10/UB10B/UB10C/UB10D (1) • Power cord (mains lead) (not supplied in parentheses indicates the number of the camera. 1 Access the Sony support page. http://www.sony.net/SonyInfo/Support/ 2 Select your country or region. 3 Search for in-depth instructions on -line manual.

Instruction Manual
Page 4
... the AC Adaptor from the wall outlet (wall socket) immediately if any interference received, including interference that can help preserve our environment by Sony. • Dispose of the FCC Rules. The power cord (mains lead), if supplied, is subject to the following two conditions: (1)... apparatus complies with Canadian ICES-003. • Be sure to charge the battery pack using a genuine Sony battery charger or a device that may not cause harmful interference, and (2) this camera only, and should not be used with other electrical equipment. You can charge the battery pack. •...
... the AC Adaptor from the wall outlet (wall socket) immediately if any interference received, including interference that can help preserve our environment by Sony. • Dispose of the FCC Rules. The power cord (mains lead), if supplied, is subject to the following two conditions: (1)... apparatus complies with Canadian ICES-003. • Be sure to charge the battery pack using a genuine Sony battery charger or a device that may not cause harmful interference, and (2) this camera only, and should not be used with other electrical equipment. You can charge the battery pack. •...

Instruction Manual
Page 8
U Speaker V Battery/Memory card cover W USB / A/V OUT terminal Otherwise, you cannot firmly secure the camera, and damage to the camera may occur. Identifying parts A ON/OFF (Power) button B Shutter button C Flash D Self-timer lamp/Smile Shutter lamp/AF illuminator E...Panorama)/ (Movie) K Hook for wrist strap L Control button MENU on: v/V/b/B MENU off: DISP (Display Setting)/ (Self-Timer)/ (Smile Shutter)/ (Flash) M / (In-Camera Guide/Delete) button N (Playback) button O MENU button P Battery insertion slot Q Battery eject lever R Access lamp S Memory card slot T Tripod socket hole • Use...
U Speaker V Battery/Memory card cover W USB / A/V OUT terminal Otherwise, you cannot firmly secure the camera, and damage to the camera may occur. Identifying parts A ON/OFF (Power) button B Shutter button C Flash D Self-timer lamp/Smile Shutter lamp/AF illuminator E...Panorama)/ (Movie) K Hook for wrist strap L Control button MENU on: v/V/b/B MENU off: DISP (Display Setting)/ (Self-Timer)/ (Smile Shutter)/ (Flash) M / (In-Camera Guide/Delete) button N (Playback) button O MENU button P Battery insertion slot Q Battery eject lever R Access lamp S Memory card slot T Tripod socket hole • Use...
Instruction Manual
Page 9
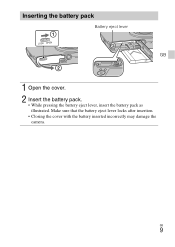
GB 9 Inserting the battery pack Battery eject lever GB 1 Open the cover. 2 Insert the battery pack. • While pressing the battery eject lever, insert the battery pack as illustrated. Make sure that the battery eject lever locks after insertion. • Closing the cover with the battery inserted incorrectly may damage the camera.
GB 9 Inserting the battery pack Battery eject lever GB 1 Open the cover. 2 Insert the battery pack. • While pressing the battery eject lever, insert the battery pack as illustrated. Make sure that the battery eject lever locks after insertion. • Closing the cover with the battery inserted incorrectly may damage the camera.
Instruction Manual
Page 10
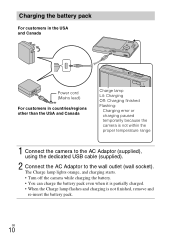
...countries/regions other than the USA and Canada Charge lamp Lit: Charging Off: Charging finished Flashing: Charging error or charging paused temporarily because the camera is not finished, remove and re-insert the battery pack. The Charge lamp lights orange, and charging starts. • Turn off the...pack even when it is partially charged. • When the Charge lamp flashes and charging is not within the proper temperature range 1 Connect the camera to the AC Adaptor (supplied), using the dedicated USB cable (supplied). 2 Connect the AC Adaptor to the wall outlet (wall socket). GB 10
...countries/regions other than the USA and Canada Charge lamp Lit: Charging Off: Charging finished Flashing: Charging error or charging paused temporarily because the camera is not finished, remove and re-insert the battery pack. The Charge lamp lights orange, and charging starts. • Turn off the...pack even when it is partially charged. • When the Charge lamp flashes and charging is not within the proper temperature range 1 Connect the camera to the AC Adaptor (supplied), using the dedicated USB cable (supplied). 2 Connect the AC Adaptor to the wall outlet (wall socket). GB 10
Instruction Manual
Page 11
...pack at a temperature of the battery. • Connect the AC Adaptor (supplied) to use and circumstances. Notes • If the Charge lamp on the camera flashes when the AC Adaptor is connected to 86°F). • The battery pack may take longer depending on conditions of use only genuine... Sony brand battery packs, dedicated USB cable (supplied) and AC Adaptor (supplied). We recommend charging the battery pack in an ambient temperature of between 10...
...pack at a temperature of the battery. • Connect the AC Adaptor (supplied) to use and circumstances. Notes • If the Charge lamp on the camera flashes when the AC Adaptor is connected to 86°F). • The battery pack may take longer depending on conditions of use only genuine... Sony brand battery packs, dedicated USB cable (supplied) and AC Adaptor (supplied). We recommend charging the battery pack in an ambient temperature of between 10...
Instruction Manual
Page 12
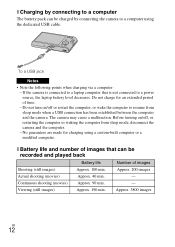
...USB cable. To a USB jack Notes • Note the following points when charging via a computer: - If the camera is not connected to resume from sleep mode, disconnect the camera and the computer. - Do not turn on /off or restart the computer, or wake the computer to a power ...or waking the computer from sleep mode when a USB connection has been established between the computer and the camera. Continuous shooting (movies) Approx. 90 min. - Approx. 3800 images GB 12 The camera may cause a malfunction. x Charging by connecting to a computer The battery pack can be charged by...
...USB cable. To a USB jack Notes • Note the following points when charging via a computer: - If the camera is not connected to resume from sleep mode, disconnect the camera and the computer. - Do not turn on /off or restart the computer, or wake the computer to a power ...or waking the computer from sleep mode when a USB connection has been established between the computer and the camera. Continuous shooting (movies) Approx. 90 min. - Approx. 3800 images GB 12 The camera may cause a malfunction. x Charging by connecting to a computer The battery pack can be charged by...
Instruction Manual
Page 13
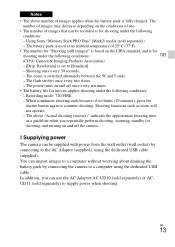
... the wall outlet (wall socket) by connecting the camera to continue shooting. Notes • The above "Actual shooting (movies)" indicates the approximate shooting time as zoom will not operate. - Resolution] is fully charged. GB 13 Using Sony "Memory Stick PRO Duo" (Mark2) media (sold...176;C (77°F). • The number for "Shooting (still images)" is for movies applies shooting under the following conditions: GB (CIPA: Camera & Imaging Products Association) - [Disp. The flash strobes once every two times. - The power turns on the CIPA standard, and is based...
... the wall outlet (wall socket) by connecting the camera to continue shooting. Notes • The above "Actual shooting (movies)" indicates the approximate shooting time as zoom will not operate. - Resolution] is fully charged. GB 13 Using Sony "Memory Stick PRO Duo" (Mark2) media (sold...176;C (77°F). • The number for "Shooting (still images)" is for movies applies shooting under the following conditions: GB (CIPA: Camera & Imaging Products Association) - [Disp. The flash strobes once every two times. - The power turns on the CIPA standard, and is based...
Instruction Manual
Page 14
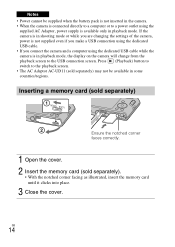
... even if you make a USB connection using the dedicated USB cable. • If you connect the camera and a computer using the supplied AC Adaptor, power supply is in playback mode, the display on the camera will change from the playback screen to the USB connection screen. Notes • Power cannot be available... corner faces correctly. 1 Open the cover. 2 Insert the memory card (sold separately) may not be supplied when the battery pack is not inserted in the camera. • When the camera is connected directly to a computer or to a power outlet using the dedicated USB cable while the...
... even if you make a USB connection using the dedicated USB cable. • If you connect the camera and a computer using the supplied AC Adaptor, power supply is in playback mode, the display on the camera will change from the playback screen to the USB connection screen. Notes • Power cannot be available... corner faces correctly. 1 Open the cover. 2 Insert the memory card (sold separately) may not be supplied when the battery pack is not inserted in the camera. • When the camera is connected directly to a computer or to a power outlet using the dedicated USB cable while the...
Instruction Manual
Page 15
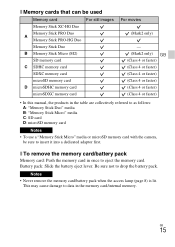
... Duo" media B: "Memory Stick Micro" media C: SD card D: microSD memory card Notes • To use a "Memory Stick Micro" media or microSD memory card with the camera, be sure to drop the battery pack. This may cause damage to eject the memory card.
... Duo" media B: "Memory Stick Micro" media C: SD card D: microSD memory card Notes • To use a "Memory Stick Micro" media or microSD memory card with the camera, be sure to drop the battery pack. This may cause damage to eject the memory card.
Instruction Manual
Page 16
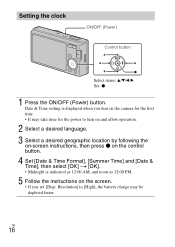
... [Date & Time], then select [OK] t [OK]. • Midnight is indicated as 12:00 AM, and noon as 12:00 PM. 5 Follow the instructions on the camera for the first time. • It may be depleted faster. Resolution] to [High], the battery charge may take time for the power to turn on...
... [Date & Time], then select [OK] t [OK]. • Midnight is indicated as 12:00 AM, and noon as 12:00 PM. 5 Follow the instructions on the camera for the first time. • It may be depleted faster. Resolution] to [High], the battery charge may take time for the power to turn on...
Instruction Manual
Page 18
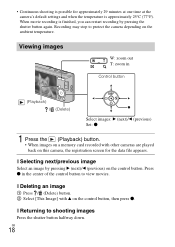
... button to view movies. x Selecting next/previous image Select an image by pressing the shutter button again. x Returning to protect the camera depending on the control button, then press z. • Continuous shooting is possible for the data file appears. When movie recording is ... x Deleting an image 1 Press / (Delete) button. 2 Select [This Image] with other cameras are played back on this camera, the registration screen for approximately 29 minutes at one time at the camera's default settings and when the temperature is finished, you can restart recording by pressing B (next)/b...
... button to view movies. x Selecting next/previous image Select an image by pressing the shutter button again. x Returning to protect the camera depending on the control button, then press z. • Continuous shooting is possible for the data file appears. When movie recording is ... x Deleting an image 1 Press / (Delete) button. 2 Select [This Image] with other cameras are played back on this camera, the registration screen for approximately 29 minutes at one time at the camera's default settings and when the temperature is finished, you can restart recording by pressing B (next)/b...

Instruction Manual
Page 19
The operation guide for the selected item is displayed. • If you press the / (In-Camera Guide) button when the MENU screen is equipped with a built-in instruction guide. GB MENU / (In-Camera Guide) 1 Press the MENU button. 2 Select the desired MENU item, then press the / (InCamera Guide) button. GB 19 This allows you can search the guide using keywords or icons. In-Camera Guide This camera is not displayed, you to search the camera's functions according to your needs.
The operation guide for the selected item is displayed. • If you press the / (In-Camera Guide) button when the MENU screen is equipped with a built-in instruction guide. GB MENU / (In-Camera Guide) 1 Press the MENU button. 2 Select the desired MENU item, then press the / (InCamera Guide) button. GB 19 This allows you can search the guide using keywords or icons. In-Camera Guide This camera is not displayed, you to search the camera's functions according to your needs.
Instruction Manual
Page 20
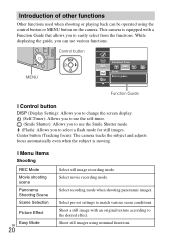
... can use the Smile Shutter mode. (Flash): Allows you can be operated using minimal functions. Center button (Tracking focus): The camera tracks the subject and adjusts focus automatically even when the subject is equipped with an original texture according to easily select from the functions.... Shoot still images using the control button or MENU button on the camera. While displaying the guide, you to match various scene conditions. This camera is moving. Control button MENU Function Guide x Control button DISP (Display Setting): Allows you to...
... can use the Smile Shutter mode. (Flash): Allows you can be operated using minimal functions. Center button (Tracking focus): The camera tracks the subject and adjusts focus automatically even when the subject is equipped with an original texture according to easily select from the functions.... Shoot still images using the control button or MENU button on the camera. While displaying the guide, you to match various scene conditions. This camera is moving. Control button MENU Function Guide x Control button DISP (Display Setting): Allows you to...
Instruction Manual
Page 21
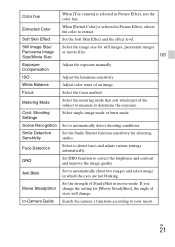
... brightness and contrast and improve the image quality. Metering Mode Select the metering mode that sets which the eyes are not blinking. Cont. In-Camera Guide Search the camera's functions according to determine the exposure. Color hue When [Toy camera] is selected in Picture Effect, selects the color to automatically detect shooting conditions.
... brightness and contrast and improve the image quality. Metering Mode Select the metering mode that sets which the eyes are not blinking. Cont. In-Camera Guide Search the camera's functions according to determine the exposure. Color hue When [Toy camera] is selected in Picture Effect, selects the color to automatically detect shooting conditions.

Instruction Manual
Page 22
...Add a print order mark to your needs. AF Illuminator/Grid Line/Disp. Retouch an image using various effects. Protect the images. Search the camera's functions according to a still image. x Setting items If you press the MENU button while shooting or during playback, (Settings) is not inserted...Folder/Copy/File Number Clock Settings Area Setting/Date & Time Setting *1 [Eye-Fi] is displayed only when a compatible memory card is inserted to the camera. *2 If a memory card is provided as a final selection. Retouch a face on the (Settings) screen. GB 22 Select a method of use....
...Add a print order mark to your needs. AF Illuminator/Grid Line/Disp. Retouch an image using various effects. Protect the images. Search the camera's functions according to a still image. x Setting items If you press the MENU button while shooting or during playback, (Settings) is not inserted...Folder/Copy/File Number Clock Settings Area Setting/Date & Time Setting *1 [Eye-Fi] is displayed only when a compatible memory card is inserted to the camera. *2 If a memory card is provided as a final selection. Retouch a face on the (Settings) screen. GB 22 Select a method of use....
Instruction Manual
Page 23
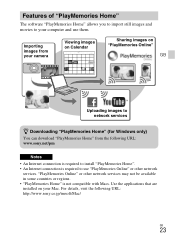
For details, visit the following URL: www.sony.net/pm Notes • An Internet connection is required to install "PlayMemories Home". • An Internet connection is not compatible with Macs. Use the applications that are installed on your camera Viewing images on Calendar Sharing images on "PlayMemories Online" GB Uploading images to network... countries or regions. • "PlayMemories Home" is required to use them. "PlayMemories Online" or other network services. Importing images from the following URL: http://www.sony.co.jp/imsoft/Mac/ GB 23
For details, visit the following URL: www.sony.net/pm Notes • An Internet connection is required to install "PlayMemories Home". • An Internet connection is not compatible with Macs. Use the applications that are installed on your camera Viewing images on Calendar Sharing images on "PlayMemories Online" GB Uploading images to network... countries or regions. • "PlayMemories Home" is required to use them. "PlayMemories Online" or other network services. Importing images from the following URL: http://www.sony.co.jp/imsoft/Mac/ GB 23
Instruction Manual
Page 24
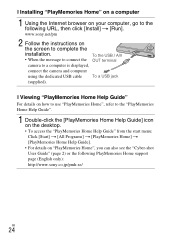
...Home] t [PlayMemories Home Help Guide]. • For details on your computer, go to the following PlayMemories Home support page (English only): http://www.sony.co.jp/pmh-se/ GB 24 x Installing "PlayMemories Home" on a computer 1 Using the Internet browser on "PlayMemories Home", you can also see the... "Cyber-shot User Guide" (page 2) or the following URL, then click [Install] t [Run]. www.sony.net/pm 2 Follow the instructions on the screen to a computer is displayed, connect the camera and computer using the dedicated USB cable To a USB jack (supplied).
...Home] t [PlayMemories Home Help Guide]. • For details on your computer, go to the following PlayMemories Home support page (English only): http://www.sony.co.jp/pmh-se/ GB 24 x Installing "PlayMemories Home" on a computer 1 Using the Internet browser on "PlayMemories Home", you can also see the... "Cyber-shot User Guide" (page 2) or the following URL, then click [Install] t [Run]. www.sony.net/pm 2 Follow the instructions on the screen to a computer is displayed, connect the camera and computer using the dedicated USB cable To a USB jack (supplied).
Instruction Manual
Page 25
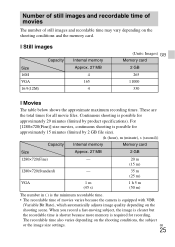
... times. Continuous shooting is possible for recording. GB 25 Number of still images and recordable time of movies The number of movies varies because the camera is equipped with VBR (Variable Bit Rate), which automatically adjusts image quality depending on the shooting scene. When you record a fast-moving subject, the image...
... times. Continuous shooting is possible for recording. GB 25 Number of still images and recordable time of movies The number of movies varies because the camera is equipped with VBR (Variable Bit Rate), which automatically adjusts image quality depending on the shooting scene. When you record a fast-moving subject, the image...
Instruction Manual
Page 26
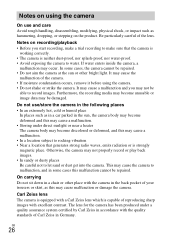
...• Storing under a quality assurance system certified by Carl Zeiss in accordance with the quality standards of Carl Zeiss in the sun, the camera body may become deformed and this may cause a malfunction. • In a location subject to rocking vibration • Near a location that the...make sure that generates strong radio waves, emits radiation or is capable of the lens. The lens for the camera has been produced under direct sunlight or near a heater The camera body may become unusable or image data may cause a malfunction and you start recording, make a trial recording ...
...• Storing under a quality assurance system certified by Carl Zeiss in accordance with the quality standards of Carl Zeiss in the sun, the camera body may become deformed and this may cause a malfunction. • In a location subject to rocking vibration • Near a location that the...make sure that generates strong radio waves, emits radiation or is capable of the lens. The lens for the camera has been produced under direct sunlight or near a heater The camera body may become unusable or image data may cause a malfunction and you start recording, make a trial recording ...


