
User Guide
Page 8
... the lens to the flash surface, resulting in insufficient light emission. The heat of the DSC-W70 unless noted otherwise. However, there may be some tiny black points and/or bright ... your camera are of flash emission may cause malfunctions. Be careful when placing the camera near a window or outdoors. • Do not press against the LCD screen. • Using the camera in ...8 Unauthorized recording of the pixels are not actual images shot using the camera (page 99). • Do not shake or strike the camera. In addition to malfunctions and an inability to it before...
... the lens to the flash surface, resulting in insufficient light emission. The heat of the DSC-W70 unless noted otherwise. However, there may be some tiny black points and/or bright ... your camera are of flash emission may cause malfunctions. Be careful when placing the camera near a window or outdoors. • Do not press against the LCD screen. • Using the camera in ...8 Unauthorized recording of the pixels are not actual images shot using the camera (page 99). • Do not shake or strike the camera. In addition to malfunctions and an inability to it before...
User Guide
Page 12
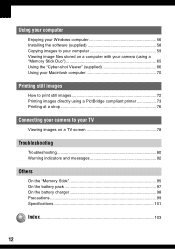
Using your computer Enjoying your Windows computer 56 Installing the software (supplied 58 Copying images to your computer 59 Viewing image files stored on a computer with your camera (using a "Memory Stick Duo 65 Using the "Cyber-shot Viewer" (supplied 66 Using your Macintosh computer 70 Printing still images How to print still images 72 Printing...
Using your computer Enjoying your Windows computer 56 Installing the software (supplied 58 Copying images to your computer 59 Viewing image files stored on a computer with your camera (using a "Memory Stick Duo 65 Using the "Cyber-shot Viewer" (supplied 66 Using your Macintosh computer 70 Printing still images How to print still images 72 Printing...
User Guide
Page 17
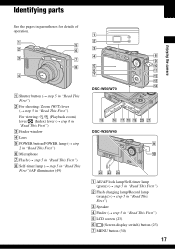
... zoom) lever/ (Index) lever (t step 6 in "Read This First") C Finder window D Lens E POWER button/POWER lamp (t step 2 in "Read This First") F Microphone G Flash (t step 5 in "Read This First") H Self-timer lamp (t step 5 in "Read This First")/AF illuminator (49) A B C D H I E J F K G L M N DSC-W50/W70 O P QR S T U DSC-W30/W40 I J VW X A AE/AF lock lamp/Self-timer lamp...
... zoom) lever/ (Index) lever (t step 6 in "Read This First") C Finder window D Lens E POWER button/POWER lamp (t step 2 in "Read This First") F Microphone G Flash (t step 5 in "Read This First") H Self-timer lamp (t step 5 in "Read This First")/AF illuminator (49) A B C D H I E J F K G L M N DSC-W50/W70 O P QR S T U DSC-W30/W40 I J VW X A AE/AF lock lamp/Self-timer lamp...

User Guide
Page 33
In these cases, use Digital Zoom or AF Illuminator, priority AF movement is given to subjects in or near the center of the frame. If you point the lens up ... finder frame indicator Focuses automatically on the subject using a previously set distance to the subject. (Focus preset) • When shooting a subject through a net or through window glass, it is difficult to get the proper focus in auto focus mode. (unlimited distance) 7.0m 3.0m 1.0m Focuses on a subject in all ranges of...
In these cases, use Digital Zoom or AF Illuminator, priority AF movement is given to subjects in or near the center of the frame. If you point the lens up ... finder frame indicator Focuses automatically on the subject using a previously set distance to the subject. (Focus preset) • When shooting a subject through a net or through window glass, it is difficult to get the proper focus in auto focus mode. (unlimited distance) 7.0m 3.0m 1.0m Focuses on a subject in all ranges of...
User Guide
Page 54
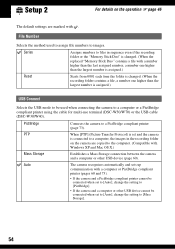
...Auto], change the setting to a computer or a PictBridge compliant printer using the cable for multi-use terminal (DSC-W50/W70) or the USB cable (DSC-W30/W40). Series Assigns numbers to files in the recording folder on the operation 1 page 46 The default... settings are copied to a PictBridge compliant printer (page 73). File Number Selects the method used when connecting the camera to [Mass Storage]. 54 Setup 2 2 For details on the camera are marked with Windows...
...Auto], change the setting to a computer or a PictBridge compliant printer using the cable for multi-use terminal (DSC-W50/W70) or the USB cable (DSC-W30/W40). Series Assigns numbers to files in the recording folder on the operation 1 page 46 The default... settings are copied to a PictBridge compliant printer (page 73). File Number Selects the method used when connecting the camera to [Mass Storage]. 54 Setup 2 2 For details on the camera are marked with Windows...
User Guide
Page 56
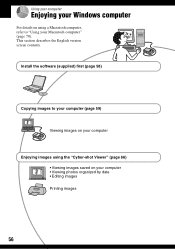
This section describes the English version screen contents. Install the software (supplied) first (page 58) Copying images to "Using your computer • Viewing photos organized by date • Editing images Printing images 56 Using your computer Enjoying your Windows computer For details on using a Macintosh computer, refer to your computer (page 59) Viewing images on your computer Enjoying images using the "Cyber-shot Viewer" (page 66) • Viewing images saved on your Macintosh computer" (page 70).
This section describes the English version screen contents. Install the software (supplied) first (page 58) Copying images to "Using your computer • Viewing photos organized by date • Editing images Printing images 56 Using your computer Enjoying your Windows computer For details on using a Macintosh computer, refer to your computer (page 59) Viewing images on your computer Enjoying images using the "Cyber-shot Viewer" (page 66) • Viewing images saved on your Macintosh computer" (page 70).
User Guide
Page 57
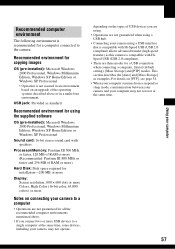
... advanced transfer (high speed transfer) as this camera is recommended for a computer connected to the camera. This section describes the [Auto] and [Mass Storage] as standard Recommended environment for using the supplied software OS (pre-installed): Microsoft Windows 2000 Professional, Windows Millennium Edition, Windows XP Home Edition or Windows XP Professional Sound card: 16-bit stereo...
... advanced transfer (high speed transfer) as this camera is recommended for a computer connected to the camera. This section describes the [Auto] and [Mass Storage] as standard Recommended environment for using the supplied software OS (pre-installed): Microsoft Windows 2000 Professional, Windows Millennium Edition, Windows XP Home Edition or Windows XP Professional Sound card: 16-bit stereo...
User Guide
Page 58
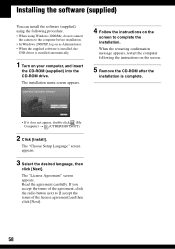
... the CD-ROM drive. When the restarting confirmation message appears, restart the computer following procedure. • When using Windows 2000/Me, do not connect the camera to the computer before installation. • In Windows 2000/XP, log on as Administrator. • When the supplied software is installed, the USB driver is installed automatically...
... the CD-ROM drive. When the restarting confirmation message appears, restart the computer following procedure. • When using Windows 2000/Me, do not connect the camera to the computer before installation. • In Windows 2000/XP, log on as Administrator. • When the supplied software is installed, the USB driver is installed automatically...
User Guide
Page 59
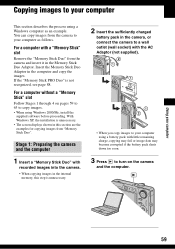
... If the "Memory Stick PRO Duo" is unnecessary. 2 Insert the sufficiently charged battery pack in the computer and copy the images. With Windows XP, the installation is unnecessary. • The screen displays shown in the Memory Stick Duo Adaptor. Using your computer as an example. ... see page 88. You can copy images from "Memory Stick Duo". For a computer with recorded images into the camera. • When copying images in the internal memory, this section are the examples for copying images from the camera to copy images. • When using a Windows computer as follows.
... If the "Memory Stick PRO Duo" is unnecessary. 2 Insert the sufficiently charged battery pack in the computer and copy the images. With Windows XP, the installation is unnecessary. • The screen displays shown in the Memory Stick Duo Adaptor. Using your computer as an example. ... see page 88. You can copy images from "Memory Stick Duo". For a computer with recorded images into the camera. • When copying images in the internal memory, this section are the examples for copying images from the camera to copy images. • When using a Windows computer as follows.
User Guide
Page 60
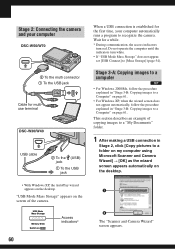
Stage 2: Connecting the camera and your computer DSC-W50/W70 2 To the multi connector 1 To the USB jack Cable for multiuse terminal DSC-W30/W40 USB cable 2 To the (USB) jack 1 To the USB jack • With Windows XP, the AutoPlay wizard appears on MENU Access indicators* 60 When a USB ...a Computer" on page 61. • For Windows XP, when the wizard screen does not appear automatically, follow the procedure explained in Stage 2, click [Copy pictures to [Mass Storage] (page 54). This section describes an example of the camera. "USB Mode Mass Storage" appears on the screen...
Stage 2: Connecting the camera and your computer DSC-W50/W70 2 To the multi connector 1 To the USB jack Cable for multiuse terminal DSC-W30/W40 USB cable 2 To the (USB) jack 1 To the USB jack • With Windows XP, the AutoPlay wizard appears on MENU Access indicators* 60 When a USB ...a Computer" on page 61. • For Windows XP, when the wizard screen does not appear automatically, follow the procedure explained in Stage 2, click [Copy pictures to [Mass Storage] (page 54). This section describes an example of the camera. "USB Mode Mass Storage" appears on the screen...

User Guide
Page 61
...copied, then click [Next]. 1 2 The "Picture Name and Destination" screen appears. 4 Select a name and destination for multi-use terminal (DSC-W50/W70) or the USB cable (DSCW30/W40) (page 63). Using your computer" on page 60. This section describes an example of unwanted images ...procedure explained in the internal memory appear. 3 Click the check box of copying images to a Computer • For Windows XP, follow the procedure explained in "Stage 2: Connecting the camera and your computer 1 2 Image copying starts. 2 Click [Next]. When the copying is inserted, images in "Stage...
...copied, then click [Next]. 1 2 The "Picture Name and Destination" screen appears. 4 Select a name and destination for multi-use terminal (DSC-W50/W70) or the USB cable (DSCW30/W40) (page 63). Using your computer" on page 60. This section describes an example of unwanted images ...procedure explained in the internal memory appear. 3 Click the check box of copying images to a Computer • For Windows XP, follow the procedure explained in "Stage 2: Connecting the camera and your computer 1 2 Image copying starts. 2 Click [Next]. When the copying is inserted, images in "Stage...

User Guide
Page 62
...image file. 1 Double-click [My Computer] t [Removable Disk] t [DCIM]. 3 Double-click the [My Documents] folder. Then, right-click on the "My Documents" window to display the menu and click [Copy]. 1 2 1 2 The image files are stored. Then, right-click an image file to display the menu and click [Paste...]. • If the "Removable Disk" icon is deleted. However, note that image with your camera. • On the storage destination of the image files, see page 86. 2 Double-click the folder where the image files you overwrite an ...
...image file. 1 Double-click [My Computer] t [Removable Disk] t [DCIM]. 3 Double-click the [My Documents] folder. Then, right-click on the "My Documents" window to display the menu and click [Copy]. 1 2 1 2 The image files are stored. Then, right-click an image file to display the menu and click [Paste...]. • If the "Removable Disk" icon is deleted. However, note that image with your camera. • On the storage destination of the image files, see page 86. 2 Double-click the folder where the image files you overwrite an ...
User Guide
Page 63
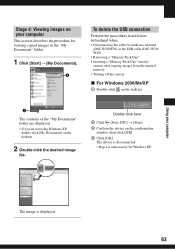
... t [My Documents]. 2 To delete the USB connection Perform the procedures listed below beforehand when: • Disconnecting the cable for Windows XP. Double-click here 2 Click (Sony DSC) t [Stop]. 3 Confirm the device on the desktop. 2 Double-click the desired image file. Stage 4: Viewing images on ...unnecessary for multi-use terminal (DSC-W50/W70) or the USB cable (DSC-W30/ W40) • Removing a "Memory Stick Duo" • Inserting a "Memory Stick Duo" into the camera after copying images from the internal memory • Turning off the camera x For Windows 2000/Me/XP 1 Double-click...
... t [My Documents]. 2 To delete the USB connection Perform the procedures listed below beforehand when: • Disconnecting the cable for Windows XP. Double-click here 2 Click (Sony DSC) t [Stop]. 3 Confirm the device on the desktop. 2 Double-click the desired image file. Stage 4: Viewing images on ...unnecessary for multi-use terminal (DSC-W50/W70) or the USB cable (DSC-W30/ W40) • Removing a "Memory Stick Duo" • Inserting a "Memory Stick Duo" into the camera after copying images from the internal memory • Turning off the camera x For Windows 2000/Me/XP 1 Double-click...

User Guide
Page 64
....THM • For more information about folders, see pages 39 and 51. A B A Folder containing image data recorded using this camera When no new folders are created, there are grouped as folders on Windows XP - "Memory Stick Duo"; Example: viewing folders on the "Memory Stick Duo". "101MSDCF" only - Image file storage destinations and...
....THM • For more information about folders, see pages 39 and 51. A B A Folder containing image data recorded using this camera When no new folders are created, there are grouped as folders on Windows XP - "Memory Stick Duo"; Example: viewing folders on the "Memory Stick Duo". "101MSDCF" only - Image file storage destinations and...
User Guide
Page 65
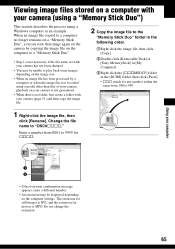
...file to the "Memory Stick Duo" folder in the following order. 1Right-click the image file, then click [Copy]. 2Double-click [Removable Disk] or [Sony MemoryStick] in [My Computer]. 3Right-click the [sssMSDCF] folder in the [DCIM] folder, then click [Paste]. • sss stands for any number ... is not necessary if the file name set with your camera (using a "Memory Stick Duo") This section describes the process using a model other than that image again on the camera by a computer or when the image file was recorded using a Windows computer as an example. The extension for still images is...
...file to the "Memory Stick Duo" folder in the following order. 1Right-click the image file, then click [Copy]. 2Double-click [Removable Disk] or [Sony MemoryStick] in [My Computer]. 3Right-click the [sssMSDCF] folder in the [DCIM] folder, then click [Paste]. • sss stands for any number ... is not necessary if the file name set with your camera (using a "Memory Stick Duo") This section describes the process using a model other than that image again on the camera by a computer or when the image file was recorded using a Windows computer as an example. The extension for still images is...
User Guide
Page 66
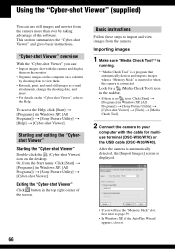
...(in Windows XP, [All Programs]) t [Sony Picture Utility] t [Cyber-shot Viewer]. Exiting the "Cyber-shot Viewer" Click button in Windows XP, [All Programs]) t [Sony Picture Utility] t [Cyber-shot Viewer] t [Tools] t [Media Check Tool]. 2 Connect the camera to your computer with the camera and ...DSC-W50/W70) or the USB cable (DSC-W30/W40). Using the "Cyber-shot Viewer" (supplied) You can : • Import images shot with the cable for a (Media Check Tool) icon in the taskbar. • If there is connected. Basic instructions Follow these steps to page 59. • In Windows...
...(in Windows XP, [All Programs]) t [Sony Picture Utility] t [Cyber-shot Viewer]. Exiting the "Cyber-shot Viewer" Click button in Windows XP, [All Programs]) t [Sony Picture Utility] t [Cyber-shot Viewer] t [Tools] t [Media Check Tool]. 2 Connect the camera to your computer with the camera and ...DSC-W50/W70) or the USB cable (DSC-W30/W40). Using the "Cyber-shot Viewer" (supplied) You can : • Import images shot with the cable for a (Media Check Tool) icon in the taskbar. • If there is connected. Basic instructions Follow these steps to page 59. • In Windows...

User Guide
Page 68
... on the left of the screen. 3 Displaying individual images On the hour display screen, double-click a thumbnail to display the image by itself in a separate window. • To play or pause the slide show, click the button on the lower left of the screen. • To stop the slide show, click...
... on the left of the screen. 3 Displaying individual images On the hour display screen, double-click a thumbnail to display the image by itself in a separate window. • To play or pause the slide show, click the button on the lower left of the screen. • To stop the slide show, click...
User Guide
Page 69
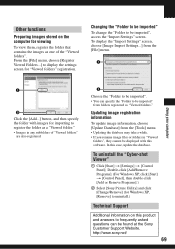
...to display the settings screen for "Viewed folders" registration. Double-click [Add/Remove Programs]. (For Windows XP, click [Start] t [Control Panel], then double-click [Add or Remove Programs].) 2 Select [Sony Picture Utility] and click [Change/Remove] (for Windows XP, [Remove] to uninstall.) Technical Support Additional information on the computer for viewing To view... the [File] menu. 1 Using your computer 1 2 Click the [Add...] button, and then specify the folder with this case, update the database. To uninstall the "Cyber-shot Viewer" 1 Click [Start] t [Settings] t [Control Panel].
...to display the settings screen for "Viewed folders" registration. Double-click [Add/Remove Programs]. (For Windows XP, click [Start] t [Control Panel], then double-click [Add or Remove Programs].) 2 Select [Sony Picture Utility] and click [Change/Remove] (for Windows XP, [Remove] to uninstall.) Technical Support Additional information on the computer for viewing To view... the [File] menu. 1 Using your computer 1 2 Click the [Add...] button, and then specify the folder with this case, update the database. To uninstall the "Cyber-shot Viewer" 1 Click [Start] t [Settings] t [Control Panel].
User Guide
Page 86
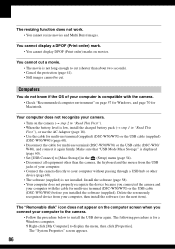
...). • Your computer does not properly recognize the device because you connected the camera and your computer is compatible with the cable for multi-use terminal (DSC-W50/W70) or the USB cable (DSC-W30/ W40), and connect it again firmly. Delete the erroneously recognized device from ... terminal (supplied) (DSC-W50/W70) or the USB cable (supplied) (DSC-W30/W40) (page 60). • Disconnect the cable for multi-use terminal (DSC-W50/W70) or the USB cable (DSC-W30/W40) before you connect your camera. • Turn on page 57 for Windows, and page 70 for a Windows computer. 1 Right-...
...). • Your computer does not properly recognize the device because you connected the camera and your computer is compatible with the cable for multi-use terminal (DSC-W50/W70) or the USB cable (DSC-W30/ W40), and connect it again firmly. Delete the erroneously recognized device from ... terminal (supplied) (DSC-W50/W70) or the USB cable (supplied) (DSC-W30/W40) (page 60). • Disconnect the cable for multi-use terminal (DSC-W50/W70) or the USB cable (DSC-W30/W40) before you connect your camera. • Turn on page 57 for Windows, and page 70 for a Windows computer. 1 Right-...
User Guide
Page 87
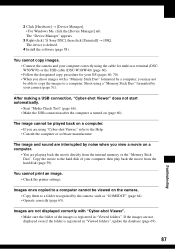
...the computer or software manufacturer. 2 Click [Hardware] t [Device Manager]. • For Windows Me, click the [Device Manager] tab. Images once copied to a computer cannot be played back on the camera. • Copy them to a folder recognized by a computer, you are interrupted by your... 3 Right-click [ Sony DSC], then click [Uninstall] t [OK]. You cannot copy images. • Connect the camera and your computer correctly using a "Memory Stick Duo" formatted by noise when you shoot images with "Cyber-shot Viewer". • Make sure the folder of your camera (page 51). Shoot ...
...the computer or software manufacturer. 2 Click [Hardware] t [Device Manager]. • For Windows Me, click the [Device Manager] tab. Images once copied to a computer cannot be played back on the camera. • Copy them to a folder recognized by a computer, you are interrupted by your... 3 Right-click [ Sony DSC], then click [Uninstall] t [OK]. You cannot copy images. • Connect the camera and your computer correctly using a "Memory Stick Duo" formatted by noise when you shoot images with "Cyber-shot Viewer". • Make sure the folder of your camera (page 51). Shoot ...


