
Operating Instructions
Page 49
... InstallShield Wizard" screen appears. • This section describes the English screen. Installing "Image Transfer" You can use the "Image Transfer" software to copy images to your computer automatically when you connect the camera to your computer The "Welcome to be installed, then click [Next]. The "Information" screen appears. a Click [Cyber-shot] on...
... InstallShield Wizard" screen appears. • This section describes the English screen. Installing "Image Transfer" You can use the "Image Transfer" software to copy images to your computer automatically when you connect the camera to your computer The "Welcome to be installed, then click [Next]. The "Information" screen appears. a Click [Cyber-shot] on...

Operating Instructions
Page 50
For details, see the software's help files. Select the desired language, then click [OK]. b Follow the instructions on the screen. If you wish to continue with the installation of "ImageMixer," ... computer according to the instructions that appear on the screen. • The USB driver is not installed in order to use the "ImageMixer Ver.1.5 for Sony" software to install the driver will appear. The "Welcome to the instructions that appear on the screen. Follow the instructions that asks if you use Windows...
For details, see the software's help files. Select the desired language, then click [OK]. b Follow the instructions on the screen. If you wish to continue with the installation of "ImageMixer," ... computer according to the instructions that appear on the screen. • The USB driver is not installed in order to use the "ImageMixer Ver.1.5 for Sony" software to install the driver will appear. The "Welcome to the instructions that appear on the screen. Follow the instructions that asks if you use Windows...

Operating Instructions
Page 54
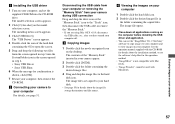
...52 to disconnect the USB cable and reconnect it. The "Picture Name and Destination" screen appears. d Select a name and destination for Sony" software to view and edit images on the "Memory Stick" are displayed. • This section describes the procedure for viewing images copied in.... The wizard closes. • To continue copying other images, follow the procedure given under P on your computer. The "Completing the Scanner and Camera Wizard" screen appears. f Click [Finish]. Click [Copy pictures to your pictures, then click [Next]. Windows 98/98SE/2000/Me/XP a Double...
...52 to disconnect the USB cable and reconnect it. The "Picture Name and Destination" screen appears. d Select a name and destination for Sony" software to view and edit images on the "Memory Stick" are displayed. • This section describes the procedure for viewing images copied in.... The wizard closes. • To continue copying other images, follow the procedure given under P on your computer. The "Completing the Scanner and Camera Wizard" screen appears. f Click [Finish]. Click [Copy pictures to your pictures, then click [Next]. Windows 98/98SE/2000/Me/XP a Double...
Operating Instructions
Page 57
... and file names. The contents of the hard disk containing the OS to open the screen. 5 Drag and drop the following two files from your camera during USB connection Drag and drop the drive icon or the "Memory Stick" icon to the hard disk icon. The "USB Driver" screen appears....opens. • Close down all applications running on the computer before installing the USB driver and application. • You can use the "ImageMixer Ver.1.5 for Sony" software to copy images to your computer and to your hard disk. • See page 55 for the operation method. • "ImageMixer" is shown, click...
... and file names. The contents of the hard disk containing the OS to open the screen. 5 Drag and drop the following two files from your camera during USB connection Drag and drop the drive icon or the "Memory Stick" icon to the hard disk icon. The "USB Driver" screen appears....opens. • Close down all applications running on the computer before installing the USB driver and application. • You can use the "ImageMixer Ver.1.5 for Sony" software to copy images to your computer and to your hard disk. • See page 55 for the operation method. • "ImageMixer" is shown, click...

Operating Instructions
Page 58
...ImageMixer" You can preview the image. The video CD creating mode turns on the preview screen. You can create a Video CD using Video CD application software. e Click . For the Macintosh edition • Roxio-manufactured "Toast" (not supplied) is required to the menu screen. • This section... required to the menu screen. You can play back created Video CDs on a Video CD-compatible DVD player, or on a computer using "ImageMixer Ver.1.5 for Sony." a Start "ImageMixer." d Click . f Insert a blank CD-R into the CD-R drive and click [OK]. c Drag & drop the desired file or ...
...ImageMixer" You can preview the image. The video CD creating mode turns on the preview screen. You can create a Video CD using Video CD application software. e Click . For the Macintosh edition • Roxio-manufactured "Toast" (not supplied) is required to the menu screen. • This section... required to the menu screen. You can play back created Video CDs on a Video CD-compatible DVD player, or on a computer using "ImageMixer Ver.1.5 for Sony." a Start "ImageMixer." d Click . f Insert a blank CD-R into the CD-R drive and click [OK]. c Drag & drop the desired file or ...
Operating Instructions
Page 63
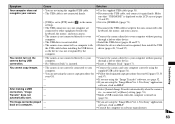
...driver is not installed. • The camera was connected to a computer with the USB cable before installing the USB driver, so the device was not recognized by the computer. p If you are using the "ImageMixer Ver.1.5 for Sony" application software, click on HELP. p Delete the ...device which is turned on (page 51). p Follow the designated copy procedure for the ones connected to the keyboard, the mouse, and your camera. p Select [Launch Image Transfer automatically when the camera, etc., is ...
...driver is not installed. • The camera was connected to a computer with the USB cable before installing the USB driver, so the device was not recognized by the computer. p If you are using the "ImageMixer Ver.1.5 for Sony" application software, click on HELP. p Delete the ...device which is turned on (page 51). p Follow the designated copy procedure for the ones connected to the keyboard, the mouse, and your camera. p Select [Launch Image Transfer automatically when the camera, etc., is ...

Operating Instructions
Page 64
... to prevent accidental erasure (page 74). 64 You have formatted a "Memory Stick" by noise when you view a movie on HELP for the "ImageMixer Ver.1.5 for Sony" application software. p Delete unnecessary images (page 44). Cause • You are inserting it from the "Memory Stick." - - p Click on a computer. Symptom The image is not set...
... to prevent accidental erasure (page 74). 64 You have formatted a "Memory Stick" by noise when you view a movie on HELP for the "ImageMixer Ver.1.5 for Sony" application software. p Delete unnecessary images (page 44). Cause • You are inserting it from the "Memory Stick." - - p Click on a computer. Symptom The image is not set...


