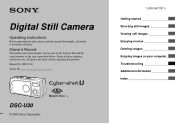
Operating Instructions
Page 1
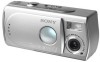
Model No. Owner's Record The model and serial numbers are located on your Sony dealer regarding this manual thoroughly, and retain it for future reference. DSC-U30 Serial No. Digital Still Camera Operating Instructions Before operating the unit, please read this product. Record the serial number in the space provided below. Refer to these numbers whenever...
Model No. Owner's Record The model and serial numbers are located on your Sony dealer regarding this manual thoroughly, and retain it for future reference. DSC-U30 Serial No. Digital Still Camera Operating Instructions Before operating the unit, please read this product. Record the serial number in the space provided below. Refer to these numbers whenever...
Operating Instructions
Page 3
...Customers in Europe This product has been tested and found compliant with your nearest Sony service station. Attention for the customers in the plug supplied need to be used rechargeable batteries to this camera. Never use the plug without the fuse cover. Please consult with the limits... sets out in Canada THIS CLASS B DIGITAL APPARATUS COMPLIES WITH CANADIAN ICES-003. 3 THIS DEVICE COMPLIES WITH PART 15 ...
...Customers in Europe This product has been tested and found compliant with your nearest Sony service station. Attention for the customers in the plug supplied need to be used rechargeable batteries to this camera. Never use the plug without the fuse cover. Please consult with the limits... sets out in Canada THIS CLASS B DIGITAL APPARATUS COMPLIES WITH CANADIAN ICES-003. 3 THIS DEVICE COMPLIES WITH PART 15 ...
Operating Instructions
Page 4
...points (white, red, blue or green in color) that constantly appear on the LCD screen in any way. • Be careful when placing the camera near a window or outdoors. This is lit. Precaution on copyright Television programs, films, video tapes, and other materials may occur. These points are ...and playback of images recorded or edited with an LCD finder) and lens • The LCD screen and the LCD finder are manufactured using your camera Trial recording Before you record one-time events, you open the battery/"Memory Stick" cover while the access lamp is not a malfunction. 4 ...
...points (white, red, blue or green in color) that constantly appear on the LCD screen in any way. • Be careful when placing the camera near a window or outdoors. This is lit. Precaution on copyright Television programs, films, video tapes, and other materials may occur. These points are ...and playback of images recorded or edited with an LCD finder) and lens • The LCD screen and the LCD finder are manufactured using your camera Trial recording Before you record one-time events, you open the battery/"Memory Stick" cover while the access lamp is not a malfunction. 4 ...

Operating Instructions
Page 5
.... Note on how to record or play back properly. The camera may not be able to remove it before use the camera near a location that generates strong radio wave or emits radiation. Trademarks • "Memory Stick," and "MagicGate Memory Stick" are trademarks of Sony Corporation. • "Memory Stick Duo" and are trademarks of...
.... Note on how to record or play back properly. The camera may not be able to remove it before use the camera near a location that generates strong radio wave or emits radiation. Trademarks • "Memory Stick," and "MagicGate Memory Stick" are trademarks of Sony Corporation. • "Memory Stick Duo" and are trademarks of...
Operating Instructions
Page 6
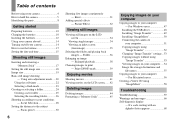
........54 Image file storage destinations and file names 55 Copying images to your computer - Table of contents Before using your camera 4 How to hold the camera 5 Identifying the parts 8 Getting started Preparing batteries 10 Charging the batteries 10 Inserting the batteries 12 Using your... code starting with an alphabet letter appears 68 Picture Effect 32 Viewing still images Viewing still images on your computer Copying images to your camera 14 How to use the buttons 15 Setting the date and time 15 Shooting still images Inserting and removing a "Memory Stick 17 Setting ...
........54 Image file storage destinations and file names 55 Copying images to your computer - Table of contents Before using your camera 4 How to hold the camera 5 Identifying the parts 8 Getting started Preparing batteries 10 Charging the batteries 10 Inserting the batteries 12 Using your... code starting with an alphabet letter appears 68 Picture Effect 32 Viewing still images Viewing still images on your computer Copying images to your camera 14 How to use the buttons 15 Setting the date and time 15 Shooting still images Inserting and removing a "Memory Stick 17 Setting ...

Operating Instructions
Page 10
Getting started Preparing batteries Charging the batteries Use the following batteries in this camera. In addition, the battery remaining indicator is finished, disconnect the power cord (mains lead) from the wall outlet (wall socket), and remove the Nickel-Metal... source (mains) as long as it is connected to an easily accessible wall outlet (wall socket) close by disconnecting the plug from a manufacturer other than Sony. • Be sure to charge the Nickel-Metal Hydride batteries supplied with the correct polarity +/-. Acceptable batteries HR11/45: HR03 (size AAA) Nickel-Metal ...
Getting started Preparing batteries Charging the batteries Use the following batteries in this camera. In addition, the battery remaining indicator is finished, disconnect the power cord (mains lead) from the wall outlet (wall socket), and remove the Nickel-Metal... source (mains) as long as it is connected to an easily accessible wall outlet (wall socket) close by disconnecting the plug from a manufacturer other than Sony. • Be sure to charge the Nickel-Metal Hydride batteries supplied with the correct polarity +/-. Acceptable batteries HR11/45: HR03 (size AAA) Nickel-Metal ...

Operating Instructions
Page 12
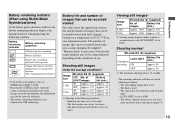
... to time, use a dry cloth to drop the batteries when opening or closing the battery/"Memory Stick" cover. 12 To remove the batteries Hold the camera with the battery/"Memory Stick" cover facing upward, open the cover, and remove the batteries. • Be careful not to wipe any dirt off of...
... to time, use a dry cloth to drop the batteries when opening or closing the battery/"Memory Stick" cover. 12 To remove the batteries Hold the camera with the battery/"Memory Stick" cover facing upward, open the cover, and remove the batteries. • Be careful not to wipe any dirt off of...
Operating Instructions
Page 13
The numbers of images that the actual numbers may not be less than indicated depending on the conditions under which the camera is 15 seconds. • The remaining indicator will stop soon. of images Battery life (min.) Approx. 3000 Approx. 150 Approx. 3000 Approx...maximum shooting time is being used - The flash is used and the state of 25°C (77°F) in the following situations: - The camera has been turned on the environment, this information may be correctly indicated. • The battery remaining indicator is not displayed in USB connecting. The ...
The numbers of images that the actual numbers may not be less than indicated depending on the conditions under which the camera is 15 seconds. • The remaining indicator will stop soon. of images Battery life (min.) Approx. 3000 Approx. 150 Approx. 3000 Approx...maximum shooting time is being used - The flash is used and the state of 25°C (77°F) in the following situations: - The camera has been turned on the environment, this information may be correctly indicated. • The battery remaining indicator is not displayed in USB connecting. The ...

Operating Instructions
Page 14
...arrow or press the POWER. However, the auto power-off function If you open it clicks into place. • If you do not operate the camera for the first time, the DATE NOTATION screen appears on the design of the wall outlet (wall socket) [b]. When you turn on. The POWER...closed until it again more slowly. If this may cause a malfunction. 14 Turning on . BC-CS2A/CS2B • Do not use your camera for about three minutes, the camera turns off automatically to 240 V AC, 50/60 Hz. Use a commercially available AC plug adaptor [a], if necessary, depending on the LCD ...
...arrow or press the POWER. However, the auto power-off function If you open it clicks into place. • If you do not operate the camera for the first time, the DATE NOTATION screen appears on the design of the wall outlet (wall socket) [b]. When you turn on. The POWER...closed until it again more slowly. If this may cause a malfunction. 14 Turning on . BC-CS2A/CS2B • Do not use your camera for about three minutes, the camera turns off automatically to 240 V AC, 50/60 Hz. Use a commercially available AC plug adaptor [a], if necessary, depending on the LCD ...
Operating Instructions
Page 15
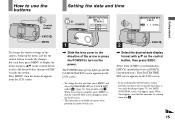
... v/V on the LCD screen. • If the rechargeable button battery, which provides the power for saving the time data, is in the direction of the camera, bring up and the DATE NOTATION screen appears on the LCD screen. • To change the date and time, press MENU and select [DATE&TIME...
... v/V on the LCD screen. • If the rechargeable button battery, which provides the power for saving the time data, is in the direction of the camera, bring up and the DATE NOTATION screen appears on the LCD screen. • To change the date and time, press MENU and select [DATE&TIME...
Operating Instructions
Page 19
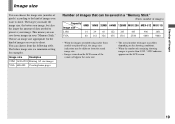
... image size appropriate for the kind of images you can choose from the actual image size. • Images viewed on the LCD screen of the camera all appear the same size. • The actual number of images may be saved in your image. You can save fewer images in a "Memory Stick... 2.0M 14 29 60 122 245 445 906 1851 VGA 80 161 326 656 1316 2380 4840 9880 • When the images recorded using earlier Sony models are played back, the image size indication may differ depending on the LCD screen. 19
... image size appropriate for the kind of images you can choose from the actual image size. • Images viewed on the LCD screen of the camera all appear the same size. • The actual number of images may be saved in your image. You can save fewer images in a "Memory Stick... 2.0M 14 29 60 122 245 445 906 1851 VGA 80 161 326 656 1316 2380 4840 9880 • When the images recorded using earlier Sony models are played back, the image size indication may differ depending on the LCD screen. 19
Operating Instructions
Page 20
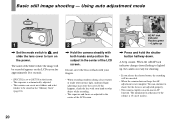
...the center of the LCD screen. The name of the folder where the image will be canceled. • When the camera does not beep, the AF adjustment is not adjusted properly. • This camera employs an auto-macro AF function. AE/AF lock indicator Flashes green 3 t Lights up , the.... Do not cover the lens or flash with both hands and position the subject in the "Memory Stick" (page 24). 2 , Hold the camera steadily with your hand or other intense light, undesired light (ghosting) may enter the screen. The minimum focal distance to the subject is automatically adjusted...
...the center of the LCD screen. The name of the folder where the image will be canceled. • When the camera does not beep, the AF adjustment is not adjusted properly. • This camera employs an auto-macro AF function. AE/AF lock indicator Flashes green 3 t Lights up , the.... Do not cover the lens or flash with both hands and position the subject in the "Memory Stick" (page 24). 2 , Hold the camera steadily with your hand or other intense light, undesired light (ghosting) may enter the screen. The minimum focal distance to the subject is automatically adjusted...

Operating Instructions
Page 21
... Press the shutter button fully down the batteries (page 14). A beep sounds. Auto Focus When you do not operate the camera for extending the battery life. • This camera is equipped with MENU and v/V on , the AE/AF lock indicator changes to turn off . When "RECORDING" disappears from... the shutter button, then recompose the shot and focus again. When the menu operation is useful for about three minutes during recording or playback, the camera turns off , as long as a mirror or a luminous body. • A flashing subject. • A backlit subject. The Auto Focus function may ...
... Press the shutter button fully down the batteries (page 14). A beep sounds. Auto Focus When you do not operate the camera for extending the battery life. • This camera is equipped with MENU and v/V on , the AE/AF lock indicator changes to turn off . When "RECORDING" disappears from... the shutter button, then recompose the shot and focus again. When the menu operation is useful for about three minutes during recording or playback, the camera turns off , as long as a mirror or a luminous body. • A flashing subject. • A backlit subject. The Auto Focus function may ...

Operating Instructions
Page 23
... the control button repeatedly to Auto, and the red-eye reduction operates if the flash strobes. (Forced flash): The flash strobes regardless of the camera, the focus and the exposure may not be shot after approximately 10 seconds. Each time you press MENU, the menu disappears and the (self...control button, then press EXEC. The image will be correctly set. , Set the mode switch to , and press v ( ) on the lighting conditions, the camera will decide if there is enough light, and will use the flash accordingly. (Red-eye reduction): Flash mode is set to select a flash mode. When...
... the control button repeatedly to Auto, and the red-eye reduction operates if the flash strobes. (Forced flash): The flash strobes regardless of the camera, the focus and the exposure may not be shot after approximately 10 seconds. Each time you press MENU, the menu disappears and the (self...control button, then press EXEC. The image will be correctly set. , Set the mode switch to , and press v ( ) on the lighting conditions, the camera will decide if there is enough light, and will use the flash accordingly. (Red-eye reduction): Flash mode is set to select a flash mode. When...

Operating Instructions
Page 24
... individual differences, the distance to store images. Be careful not to allow your hand to reduce the red-eye phenomenon. Creating or selecting a folder Your camera can create multiple folders in a dark place. When the folder capacity is exceeded, a new folder is turned off. Red-eye reduction The flash pre-strobes...
... individual differences, the distance to store images. Be careful not to allow your hand to reduce the red-eye phenomenon. Creating or selecting a folder Your camera can create multiple folders in a dark place. When the folder capacity is exceeded, a new folder is turned off. Red-eye reduction The flash pre-strobes...

Operating Instructions
Page 25
... EXEC. Select [CREATE FOLDER] with v/V on the LCD screen. • You can also carry out this operation when the mode switch is created with the camera. • Images are recorded in step 3. 25
... EXEC. Select [CREATE FOLDER] with v/V on the LCD screen. • You can also carry out this operation when the mode switch is created with the camera. • Images are recorded in step 3. 25

Operating Instructions
Page 26
... AUTO SELFTIMER OFF P.EFFECT OFF MENU 1 , Set the mode switch to a different folder with v/V on the LCD screen. • You can also carry out this camera. 26
... AUTO SELFTIMER OFF P.EFFECT OFF MENU 1 , Set the mode switch to a different folder with v/V on the LCD screen. • You can also carry out this camera. 26

Operating Instructions
Page 31
... mode Select [AUTO] in the Illumination snap mode or the Twilight mode. If you release the shutter button before all five images are shot, the camera stops shooting as soon as you press MENU, the menu disappears and the indicator is approximately 0.5 seconds. However, the recording interval may be longer in...
... mode Select [AUTO] in the Illumination snap mode or the Twilight mode. If you release the shutter button before all five images are shot, the camera stops shooting as soon as you press MENU, the menu disappears and the indicator is approximately 0.5 seconds. However, the recording interval may be longer in...

Operating Instructions
Page 32
.... B&W SOLARIZE The picture is clearer and the picture looks like an old photograph. Picture Effect You can digitally process images to five images are recorded as long as you release the shutter button before the camera records five images, only the images that the menu disappears from the LCD screen. 4 , Press the...
.... B&W SOLARIZE The picture is clearer and the picture looks like an old photograph. Picture Effect You can digitally process images to five images are recorded as long as you release the shutter button before the camera records five images, only the images that the menu disappears from the LCD screen. 4 , Press the...

Operating Instructions
Page 34
... close the lens cover while viewing images, the power shuts off. 2.0M 101 6 / 8 101-0006 2003 7 4 10:30AM 2 , Select the desired still image with your camera almost immediately on viewing movies, see page 79. • For details on the LCD screen. Viewing still images on the LCD screen Single (singleimage) screen...
... close the lens cover while viewing images, the power shuts off. 2.0M 101 6 / 8 101-0006 2003 7 4 10:30AM 2 , Select the desired still image with your camera almost immediately on viewing movies, see page 79. • For details on the LCD screen. Viewing still images on the LCD screen Single (singleimage) screen...


