Operating Instructions
Page 3
...in Europe This product has been tested and found compliant with this camera. Certain countries may influence the picture of this equipment has a ...same rating as the supplied one and approved by returning your nearest Sony service station. THIS DEVICE COMPLIES WITH PART 15 OF THE FCC RULES..."Memory Stick" N50 For the Customers in Canada THIS CLASS B DIGITAL APPARATUS COMPLIES WITH CANADIAN ICES-003. 3 Notice If static electricity ... USB cable again. and Canada RECYCLING NICKEL METAL HYDRIDE BATTERIES Nickel Metal Hydride batteries are recyclable. If the plug supplied with the limits...
...in Europe This product has been tested and found compliant with this camera. Certain countries may influence the picture of this equipment has a ...same rating as the supplied one and approved by returning your nearest Sony service station. THIS DEVICE COMPLIES WITH PART 15 OF THE FCC RULES..."Memory Stick" N50 For the Customers in Canada THIS CLASS B DIGITAL APPARATUS COMPLIES WITH CANADIAN ICES-003. 3 Notice If static electricity ... USB cable again. and Canada RECYCLING NICKEL METAL HYDRIDE BATTERIES Nickel Metal Hydride batteries are recyclable. If the plug supplied with the limits...
Operating Instructions
Page 4
... The LCD screen and the LCD finder are manufactured using your camera Trial recording Before you record one-time events, you open the battery/"Memory Stick" cover while the access lamp is working correctly. Do not open the battery/"Memory Stick" cover. Unauthorized recording of such materials may be... some tiny black points and/or bright points (white, red, blue or green in color) that constantly appear on your camera or recording media, etc. However, there may ...
... The LCD screen and the LCD finder are manufactured using your camera Trial recording Before you record one-time events, you open the battery/"Memory Stick" cover while the access lamp is working correctly. Do not open the battery/"Memory Stick" cover. Unauthorized recording of such materials may be... some tiny black points and/or bright points (white, red, blue or green in color) that constantly appear on your camera or recording media, etc. However, there may ...
Operating Instructions
Page 6
...scene conditions - For Windows users 47 Installing the USB driver 48 Installing "Image Transfer 49 Installing "ImageMixer 50 Connecting the camera to your computer 51 Copying images using "Image Transfer 52 Changing "Image Transfer" settings...53 Copying images without using "...diagnosis display - Table of contents Before using your camera 4 How to hold the camera 5 Identifying the parts 8 Getting started Preparing batteries 10 Charging the batteries 10 Inserting the batteries 12 Using your camera abroad 14 Turning on/off your camera 14 How to print - Folder 36 Enlarging an ...
...scene conditions - For Windows users 47 Installing the USB driver 48 Installing "Image Transfer 49 Installing "ImageMixer 50 Connecting the camera to your computer 51 Copying images using "Image Transfer 52 Changing "Image Transfer" settings...53 Copying images without using "...diagnosis display - Table of contents Before using your camera 4 How to hold the camera 5 Identifying the parts 8 Getting started Preparing batteries 10 Charging the batteries 10 Inserting the batteries 12 Using your camera abroad 14 Turning on/off your camera 14 How to print - Folder 36 Enlarging an ...

Operating Instructions
Page 7
Additional information Menu items 69 Precautions 72 On "Memory Stick 74 On Nickel-Metal Hydride batteries.........75 On the battery charger 76 Specifications 77 LCD screen displays 78 Index Index 80 7
Additional information Menu items 69 Precautions 72 On "Memory Stick 74 On Nickel-Metal Hydride batteries.........75 On the battery charger 76 Specifications 77 LCD screen displays 78 Index Index 80 7

Operating Instructions
Page 9
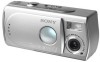
Attaching the neck strap A LCD screen B (Flash charge) lamp (orange) (24) 6 C MENU button (15) 1 2 D Control button 7 Menu on: v/V (15) Menu off: /SCENE (23, 28) E EXEC/ (Enlarged playback) 8 button (15, 38) F Hook for neck strap 3 9 G Battery/"Memory Stick" cover 4 H OPEN button (12) 0 I Access lamp (17) qa J (USB) jack (51) K USB jack cover 5 qs L RESET button (bottom surface) (59) 9
Attaching the neck strap A LCD screen B (Flash charge) lamp (orange) (24) 6 C MENU button (15) 1 2 D Control button 7 Menu on: v/V (15) Menu off: /SCENE (23, 28) E EXEC/ (Enlarged playback) 8 button (15, 38) F Hook for neck strap 3 9 G Battery/"Memory Stick" cover 4 H OPEN button (12) 0 I Access lamp (17) qa J (USB) jack (51) K USB jack cover 5 qs L RESET button (bottom surface) (59) 9

Operating Instructions
Page 10
... some trouble occurs while using a Nickel-Metal Hydride battery from a manufacturer other than Sony. • Be sure to possible voltage drops or other characteristics of the batteries. NH-AAA-DA (2) (supplied) - Getting started Preparing batteries Charging the batteries Use the following batteries in this camera. For details on the supplied battery charger, see page 76. • You cannot...
... some trouble occurs while using a Nickel-Metal Hydride battery from a manufacturer other than Sony. • Be sure to possible voltage drops or other characteristics of the batteries. NH-AAA-DA (2) (supplied) - Getting started Preparing batteries Charging the batteries Use the following batteries in this camera. For details on the supplied battery charger, see page 76. • You cannot...

Operating Instructions
Page 11
... charge. This is recommended that have been partially or completely removed, or batteries that you recharge the batteries just before fully using up of the Nickel-Metal Hydride batteries are not being used for Size AAA Nickel-Metal Hydride batteries 2 batteries: Approx. 1 hour 25 minutes 4 batteries: Approx. 2 hours 50 minutes Notes on the Nickel-Metal Hydride...
... charge. This is recommended that have been partially or completely removed, or batteries that you recharge the batteries just before fully using up of the Nickel-Metal Hydride batteries are not being used for Size AAA Nickel-Metal Hydride batteries 2 batteries: Approx. 1 hour 25 minutes 4 batteries: Approx. 2 hours 50 minutes Notes on the Nickel-Metal Hydride...

Operating Instructions
Page 12
... significantly shorten the operating time provided by the batteries. 3 , Close the battery/"Memory Stick" cover. The battery/ "Memory Stick" cover opens in the direction of the arrow 2. 2 , Insert the batteries. Skin oil and other dirt on the battery/"Memory Stick" cover. To remove the batteries Hold the camera with the battery/"Memory Stick" cover facing upward, open the...
... significantly shorten the operating time provided by the batteries. 3 , Close the battery/"Memory Stick" cover. The battery/ "Memory Stick" cover opens in the direction of the arrow 2. 2 , Insert the batteries. Skin oil and other dirt on the battery/"Memory Stick" cover. To remove the batteries Hold the camera with the battery/"Memory Stick" cover facing upward, open the...
Operating Instructions
Page 13
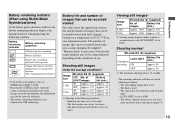
... fully charged ones, or charge these batteries. (The warning indicator flashes.) • If the LCD screen display is off, set [DISPLAY] in [ ] to [ON]. • Based on the conditions under which the camera is 15 seconds. • The remaining indicator will stop soon. The ...numbers of images that can be recorded/viewed with fully charged batteries at about 3second intervals with use, the battery remaining indicator displays the amount of power remaining using...
... fully charged ones, or charge these batteries. (The warning indicator flashes.) • If the LCD screen display is off, set [DISPLAY] in [ ] to [ON]. • Based on the conditions under which the camera is 15 seconds. • The remaining indicator will stop soon. The ...numbers of images that can be recorded/viewed with fully charged batteries at about 3second intervals with use, the battery remaining indicator displays the amount of power remaining using...

Operating Instructions
Page 14
When you turn on /off your camera in any country or region with the supplied battery charger within 100 V to a computer with the USB cable. , Slide the lens cover in the opposite direction of the arrow or press the POWER. Using your camera abroad Power sources You can use an electronic ...50/60 Hz. To turn off function If you open the lens cover too quickly, the camera might not turn on your camera for about three minutes, the camera turns off automatically to prevent wearing down the batteries. However, the auto power-off . • Slide the lens cover closed until it again ...
When you turn on /off your camera in any country or region with the supplied battery charger within 100 V to a computer with the USB cable. , Slide the lens cover in the opposite direction of the arrow or press the POWER. Using your camera abroad Power sources You can use an electronic ...50/60 Hz. To turn off function If you open the lens cover too quickly, the camera might not turn on your camera for about three minutes, the camera turns off automatically to prevent wearing down the batteries. However, the auto power-off . • Slide the lens cover closed until it again ...
Operating Instructions
Page 15
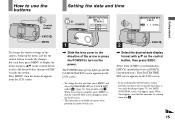
...), [M/D/Y] (month/day/year) or [D/M/Y] (day/month/year). When the setting is in the direction of the camera, bring up and the DATE NOTATION screen appears on the LCD screen. • If the rechargeable button battery, which provides the power for saving the time data, is ever fully discharged (page 73), the DATE...
...), [M/D/Y] (month/day/year) or [D/M/Y] (day/month/year). When the setting is in the direction of the camera, bring up and the DATE NOTATION screen appears on the LCD screen. • If the rechargeable button battery, which provides the power for saving the time data, is ever fully discharged (page 73), the DATE...

Operating Instructions
Page 17
... Stick" all the way in until it is securely seated in the "Memory Stick." • Be careful not to drop the batteries when opening or closing the battery/"Memory Stick" cover. 3 Access lamp , Close the battery/"Memory Stick" cover. If the "Memory Stick" is being read or written. Never open the... of the way in so that image data is not inserted correctly, you may be able to record or display images in the connector. The battery/ "Memory Stick" cover opens in the direction of the arrow 2. • For details on the "Memory Stick," see page 74. 2 Label side , Insert ...
... Stick" all the way in until it is securely seated in the "Memory Stick." • Be careful not to drop the batteries when opening or closing the battery/"Memory Stick" cover. 3 Access lamp , Close the battery/"Memory Stick" cover. If the "Memory Stick" is being read or written. Never open the... of the way in so that image data is not inserted correctly, you may be able to record or display images in the connector. The battery/ "Memory Stick" cover opens in the direction of the arrow 2. • For details on the "Memory Stick," see page 74. 2 Label side , Insert ...

Operating Instructions
Page 21
Auto Focus When you try to shoot a subject that allows you do not operate the camera for extending the battery life. • This camera is [OFF], the LCD light will turn the LCD light on the control button to prevent wearing down . The Auto Focus function may ...shot and focus again. When the menu operation is complete. Shooting still images 2.0M 4 , Press the shutter button fully down the batteries (page 14). When "RECORDING" disappears from the camera and dark. • The contrast between the subject and its background is poor. • The subject is seen through glass, such...
Auto Focus When you try to shoot a subject that allows you do not operate the camera for extending the battery life. • This camera is [OFF], the LCD light will turn the LCD light on the control button to prevent wearing down . The Auto Focus function may ...shot and focus again. When the menu operation is complete. Shooting still images 2.0M 4 , Press the shutter button fully down the batteries (page 14). When "RECORDING" disappears from the camera and dark. • The contrast between the subject and its background is poor. • The subject is seen through glass, such...

Operating Instructions
Page 45
...ERROR" may damage the "Memory Stick." • The term "formatting" means preparing a "Memory Stick" to format into the camera. Do not open the battery/"Memory Stick" cover while formatting the "Memory Stick" as this may occur. • This operation is available no matter what position... STICK ACCESS" disappears, the image has been deleted. Formatting a "Memory Stick" Deleting images DELETE OK CANCEL EXEC/ 4 , Select [OK] with this camera, and those available commercially, are already formatted, and can be used immediately. • When you format a "Memory Stick," note that all data in...
...ERROR" may damage the "Memory Stick." • The term "formatting" means preparing a "Memory Stick" to format into the camera. Do not open the battery/"Memory Stick" cover while formatting the "Memory Stick" as this may occur. • This operation is available no matter what position... STICK ACCESS" disappears, the image has been deleted. Formatting a "Memory Stick" Deleting images DELETE OK CANCEL EXEC/ 4 , Select [OK] with this camera, and those available commercially, are already formatted, and can be used immediately. • When you format a "Memory Stick," note that all data in...
Operating Instructions
Page 51
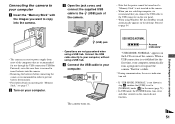
SONY (USB) jack • Operations are recommended for use a desktop computer, we recommend that ...using a USB hub. c Open the jack cover, and connect the supplied USB cable to the (USB) jack of the camera. • Note that are not guaranteed when using a USB hub. USB MODE:NORMAL Access indicators* "USB MODE: NORMAL... not shown in step 4, confirm that you want to copy into the camera. • Removing the batteries before connecting the camera is no need to insert batteries into the camera. Connecting the camera to your computer a Insert the "Memory Stick" with the images you ...
SONY (USB) jack • Operations are recommended for use a desktop computer, we recommend that ...using a USB hub. c Open the jack cover, and connect the supplied USB cable to the (USB) jack of the camera. • Note that are not guaranteed when using a USB hub. USB MODE:NORMAL Access indicators* "USB MODE: NORMAL... not shown in step 4, confirm that you want to copy into the camera. • Removing the batteries before connecting the camera is no need to insert batteries into the camera. Connecting the camera to your computer a Insert the "Memory Stick" with the images you ...
Operating Instructions
Page 59
... a fine-tipped object, then turn on the tables below. p Replace the batteries with new ones. 59 p Install the batteries correctly (page 12). p Replace the batteries with new ones. p Replace the batteries with your camera still not work properly, consult your Sony dealer or local authorized Sony service facility. If code "C:ss:ss" is displayed on the LCD...
... a fine-tipped object, then turn on the tables below. p Replace the batteries with new ones. 59 p Install the batteries correctly (page 12). p Replace the batteries with new ones. p Replace the batteries with your camera still not work properly, consult your Sony dealer or local authorized Sony service facility. If code "C:ss:ss" is displayed on the LCD...

Operating Instructions
Page 60
...is too bright. • [P.EFFECT] is set to [ON] (page 21). Symptom The power turns off automatically to prevent wearing down the batteries (page 14). • The batteries are shooting movies at a distance closer than the minimum shooting distance of focus. • The subject is too bright. p Replace them with ...; The mode switch is too dark. The image is set to [B&W] mode. • The smear phenomenon is selected for about three minutes when using batteries, the camera turns off suddenly. p Select the Focus preset function (page 30). p Set [LCD LIGHT] to .
...is too bright. • [P.EFFECT] is set to [ON] (page 21). Symptom The power turns off automatically to prevent wearing down the batteries (page 14). • The batteries are shooting movies at a distance closer than the minimum shooting distance of focus. • The subject is too bright. p Replace them with ...; The mode switch is too dark. The image is set to [B&W] mode. • The smear phenomenon is selected for about three minutes when using batteries, the camera turns off suddenly. p Select the Focus preset function (page 30). p Set [LCD LIGHT] to .

Operating Instructions
Page 65
... RESET button, all settings including the date and time are cleared.) p Check the indicator (pages 78 and 79). Solution p Charge the batteries (page 10). p Turn off the camera and leave it for the moisture to evaporate before use (page 72). You cannot identify an - The lens gets fogged. • Moisture... install them again after about an hour at the room temperature for about one minute and turn the power on , but the camera does not work . • The battery level is low. (The E indicator appears.) • The USB cable is connected. If the functions still do not work, press the...
... RESET button, all settings including the date and time are cleared.) p Check the indicator (pages 78 and 79). Solution p Charge the batteries (page 10). p Turn off the camera and leave it for the moisture to evaporate before use (page 72). You cannot identify an - The lens gets fogged. • Moisture... install them again after about an hour at the room temperature for about one minute and turn the power on , but the camera does not work . • The battery level is low. (The E indicator appears.) • The USB cable is connected. If the functions still do not work, press the...
Operating Instructions
Page 66
... FOLDER ERROR • Insert a "Memory Stick" (page 17). • Turn the power off and on your camera. INVALID OPERATION • You are still 5 to 10 minutes of remaining battery time left. • The lens cover is closed when the mode switch is write-protected by another device. FILE...the "Memory Stick" is "999" exists in the "Memory Stick." CANNOT CREATE MORE FOLDERS CANNOT RECORD FILE ERROR • The folder whose first three digits of the name is dirty. • Insert the "Memory Stick" correctly (page 17). • The inserted "Memory Stick" cannot be played back on...
... FOLDER ERROR • Insert a "Memory Stick" (page 17). • Turn the power off and on your camera. INVALID OPERATION • You are still 5 to 10 minutes of remaining battery time left. • The lens cover is closed when the mode switch is write-protected by another device. FILE...the "Memory Stick" is "999" exists in the "Memory Stick." CANNOT CREATE MORE FOLDERS CANNOT RECORD FILE ERROR • The folder whose first three digits of the name is dirty. • Insert the "Memory Stick" correctly (page 17). • The inserted "Memory Stick" cannot be played back on...

Operating Instructions
Page 71
... when you press the control button/shutter button. - Displays the menu items, warnings and messages in dark locations, but also uses up the battery charge faster (page 21). - Sets the date and time (page 15). - Turns off the beep. Switches the USB mode (pages 47... and 56). Additional information 71 Description - x[Y/M/D] / [M/D/Y] / [D/M/Y] - Selecting [ON] makes the screen bright and easy to see when using the camera in selected language. Turns on the beep when you press the shutter button. - Sets the date notation (page 15). When [ ] is selected in . ...
... when you press the control button/shutter button. - Displays the menu items, warnings and messages in dark locations, but also uses up the battery charge faster (page 21). - Sets the date and time (page 15). - Turns off the beep. Switches the USB mode (pages 47... and 56). Additional information 71 Description - x[Y/M/D] / [M/D/Y] / [D/M/Y] - Selecting [ON] makes the screen bright and easy to see when using the camera in selected language. Turns on the beep when you press the shutter button. - Sets the date notation (page 15). When [ ] is selected in . ...


