User Guide
Page 1
...DSC-T5 Serial No DSC-T5 "Read This First" (separate volume) Explains the set-up and basic operations for future reference. Printed in the space provided below. Refer to frequently asked questions can be found at our Customer Support Website. Model No. Record the serial number in Japan Digital Still Camera...Using your computer Printing still images Connecting your camera to your Sony dealer regarding this product and answers to these numbers whenever you call upon your TV Troubleshooting Others Index 2635482110 © 2005 Sony Corporation Printed on the bottom. Owner's ...
...DSC-T5 Serial No DSC-T5 "Read This First" (separate volume) Explains the set-up and basic operations for future reference. Printed in the space provided below. Refer to frequently asked questions can be found at our Customer Support Website. Model No. Record the serial number in Japan Digital Still Camera...Using your computer Printing still images Connecting your camera to your Sony dealer regarding this product and answers to these numbers whenever you call upon your TV Troubleshooting Others Index 2635482110 © 2005 Sony Corporation Printed on the bottom. Owner's ...
User Guide
Page 4
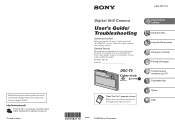
...Memory Stick Duo" data may be destroyed. Carl Zeiss lens This camera is equipped with your camera. Always protect your data by making a back up method. Read "Precautions" (page 97) before using the camera for the first time. (t step 1 in "Read This First") • The battery pack can be charged even ...if it is capable of reproducing sharp images with the quality standards of "Memory Stick". Also, even if the battery pack is not fully charged, you do not intend to a malfunction of your camera or recording media...
...Memory Stick Duo" data may be destroyed. Carl Zeiss lens This camera is equipped with your camera. Always protect your data by making a back up method. Read "Precautions" (page 97) before using the camera for the first time. (t step 1 in "Read This First") • The battery pack can be charged even ...if it is capable of reproducing sharp images with the quality standards of "Memory Stick". Also, even if the battery pack is not fully charged, you do not intend to a malfunction of your camera or recording media...
User Guide
Page 6
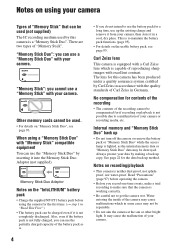
For full use of the digital still camera Prepare the camera and shoot images easily "Read This First" (separate volume) 1 Prepare the battery pack 2 Turn the camera on/set the clock 3 Insert a "Memory Stick Duo" (not supplied) 4 Select the image size for use 5 Shoot images easily (Auto adjustment mode) Shoot still images (...
For full use of the digital still camera Prepare the camera and shoot images easily "Read This First" (separate volume) 1 Prepare the battery pack 2 Turn the camera on/set the clock 3 Insert a "Memory Stick Duo" (not supplied) 4 Select the image size for use 5 Shoot images easily (Auto adjustment mode) Shoot still images (...

User Guide
Page 13
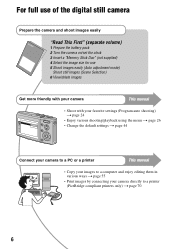
Selecting the image quality (compression ratio) in combination (page 33) You can select the compression ratio when digital images are recorded in the same 3:2 aspect ratio as photograph printing paper or postcards, etc. ** Both edges of the image may be sent by email ... quality but has a smaller file size. 13 Example: An attached image to be cut off when printing (page 87). Enjoying the camera Selecting the image size for use (t step 4 in "Read This First") Pixel Many pixels (Fine image quality and large file size) Example: Printing in up to e-mail or creating web...
Selecting the image quality (compression ratio) in combination (page 33) You can select the compression ratio when digital images are recorded in the same 3:2 aspect ratio as photograph printing paper or postcards, etc. ** Both edges of the image may be sent by email ... quality but has a smaller file size. 13 Example: An attached image to be cut off when printing (page 87). Enjoying the camera Selecting the image size for use (t step 4 in "Read This First") Pixel Many pixels (Fine image quality and large file size) Example: Printing in up to e-mail or creating web...

User Guide
Page 14
... 5 8 4 9 A Shutter button (t step 5 in "Read This First") B Mode switch (24) C Flash (t step 5 in "Read This First") D Self-timer lamp (t step 5 in "Read This First")/AF illuminator (47) E POWER button (t step 2 in "Read This First") F POWER lamp (t step 2 in "Read This First") G Microphone H Lens I Lens cover (t step ... button (t step 4 and 6 in "Read This First") F For shooting: Zoom (W/T) button (t step 5 in "Read This First") For viewing: / (Playback zoom) button/ (Index) button (t step 6 in "Read This First") G Hook for wrist strap (t "Read This First") H Speaker I Battery/"Memory...
... 5 8 4 9 A Shutter button (t step 5 in "Read This First") B Mode switch (24) C Flash (t step 5 in "Read This First") D Self-timer lamp (t step 5 in "Read This First")/AF illuminator (47) E POWER button (t step 2 in "Read This First") F POWER lamp (t step 2 in "Read This First") G Microphone H Lens I Lens cover (t step ... button (t step 4 and 6 in "Read This First") F For shooting: Zoom (W/T) button (t step 5 in "Read This First") For viewing: / (Playback zoom) button/ (Index) button (t step 6 in "Read This First") G Hook for wrist strap (t "Read This First") H Speaker I Battery/"Memory...

User Guide
Page 15
You will be unable to firmly secure the camera to tripods having screws longer than 5.5 mm (7/32 inch). Enjoying the camera L "Memory Stick Duo" slot (t step 3 in "Read This First") M Battery insertion slot (t step 1 in "Read This First") N Battery eject lever (t step 1 in "Read This First") O Multi connector (bottom) When using an AC-LS5K AC Adaptor... IN jack v mark 3 To wall outlet P Tripod receptacle (bottom) • Use a tripod with a screw length of less than 5.5 mm (7/32 inch), and may damage the camera. 15
You will be unable to firmly secure the camera to tripods having screws longer than 5.5 mm (7/32 inch). Enjoying the camera L "Memory Stick Duo" slot (t step 3 in "Read This First") M Battery insertion slot (t step 1 in "Read This First") N Battery eject lever (t step 1 in "Read This First") O Multi connector (bottom) When using an AC-LS5K AC Adaptor... IN jack v mark 3 To wall outlet P Tripod receptacle (bottom) • Use a tripod with a screw length of less than 5.5 mm (7/32 inch), and may damage the camera. 15

User Guide
Page 16
... (24, 33) WB White balance (32) STBY REC SL Standby/Recording a movie (t step 5 in "Read This First") Camera mode (Scene Selection) (t step 5 in "Read This First") Camera mode (Program) (24) Flash mode (t step 5 in "Read This First") 1.3 Zoom scaling (t 45, step 5 in "Read This First") ON B Display S AF M AF 1.0m Red-eye reduction (46) Sharpness (36...
... (24, 33) WB White balance (32) STBY REC SL Standby/Recording a movie (t step 5 in "Read This First") Camera mode (Scene Selection) (t step 5 in "Read This First") Camera mode (Program) (24) Flash mode (t step 5 in "Read This First") 1.3 Zoom scaling (t 45, step 5 in "Read This First") ON B Display S AF M AF 1.0m Red-eye reduction (46) Sharpness (36...

User Guide
Page 17
Enjoying the camera C Display 5M 3:2 3M 1M VGA 16:9 FINE 640 STD 640 160 FINE STD 101 00:00:00 [00:28:05] 1/30" 400 C:32:00 ±0.7EV Indication Image size (t step 4 in "Read This First") Self-diagnosis display (90) Date/Time (46) ISO number (33) Bracket Step value (35) D ...capacity (21) Recording time [maximum recordable time] (21) Multi Burst interval (35) Remaining number of recordable images (21) Self-timer (t step 5 in "Read This First") Image quality (33) Recording folder (50) • This does not appear when using a tripod or other means to reduce the picture noise. 125...
Enjoying the camera C Display 5M 3:2 3M 1M VGA 16:9 FINE 640 STD 640 160 FINE STD 101 00:00:00 [00:28:05] 1/30" 400 C:32:00 ±0.7EV Indication Image size (t step 4 in "Read This First") Self-diagnosis display (90) Date/Time (46) ISO number (33) Bracket Step value (35) D ...capacity (21) Recording time [maximum recordable time] (21) Multi Burst interval (35) Remaining number of recordable images (21) Self-timer (t step 5 in "Read This First") Image quality (33) Recording folder (50) • This does not appear when using a tripod or other means to reduce the picture noise. 125...

User Guide
Page 18
...Step 12/16 Indication Battery remaining (t step 1 in "Read This First") Image size (t step 4 in "Read This First") Recording mode (24, 33) Playback (t step 6 in "Read This First") Volume (t step 6 in "Read This First") 18 Zoom scaling (t step 6 in "Read This First") Frame by frame playback (33) B Display... 101-0012 Indication Folder-file number (37) Playback bar (t step 6 in "Read This First") Protect (38) Print order...
...Step 12/16 Indication Battery remaining (t step 1 in "Read This First") Image size (t step 4 in "Read This First") Recording mode (24, 33) Playback (t step 6 in "Read This First") Volume (t step 6 in "Read This First") 18 Zoom scaling (t step 6 in "Read This First") Frame by frame playback (33) B Display... 101-0012 Indication Folder-file number (37) Playback bar (t step 6 in "Read This First") Protect (38) Print order...

User Guide
Page 19
...(21) Remaining "Memory Stick" capacity (21) Image number/Number of the playback image (46) Menu/Guide menu (26) Playing back Multi Burst images in "Read This First") E Display 2005 1 1 9:30 AM DPOF z PAUSE z PLAY BACK/ NEXT VOLUME Indication Histogram (20, 29) • appears when histogram ...display is disabled. Enjoying the camera C Display 101 101 8/8 12/12 C:32:00 00:00:12 D Display +2.0EV WB 500 F3.5 Indication PictBridge connecting (71) Recording folder (50) •...
...(21) Remaining "Memory Stick" capacity (21) Image number/Number of the playback image (46) Menu/Guide menu (26) Playing back Multi Burst images in "Read This First") E Display 2005 1 1 9:30 AM DPOF z PAUSE z PLAY BACK/ NEXT VOLUME Indication Histogram (20, 29) • appears when histogram ...display is disabled. Enjoying the camera C Display 101 101 8/8 12/12 C:32:00 00:00:12 D Display +2.0EV WB 500 F3.5 Indication PictBridge connecting (71) Recording folder (50) •...

User Guide
Page 24
... image shooting modes : Auto: Auto adjustment mode Allows easy shooting with preset settings according to the scene. t step 5 in "Read This First" Program: Program auto shooting mode Allows you to shoot with the settings adjusted automatically. Using the mode switch Set the ...exposure adjusted automatically (both the shutter speed and the aperture value). Mode switch Control button : Shooting movies t step 5 in "Read This First" : Playback/Edit t step 6 in "Read This First" 24 Also you can select various settings using the menu. (For details on the functions available t page 27) :...
... image shooting modes : Auto: Auto adjustment mode Allows easy shooting with preset settings according to the scene. t step 5 in "Read This First" Program: Program auto shooting mode Allows you to shoot with the settings adjusted automatically. Using the mode switch Set the ...exposure adjusted automatically (both the shutter speed and the aperture value). Mode switch Control button : Shooting movies t step 5 in "Read This First" : Playback/Edit t step 6 in "Read This First" 24 Also you can select various settings using the menu. (For details on the functions available t page 27) :...

User Guide
Page 25
SL - Center AF 0.5m/1.0m/ 3.0m/7.0m - - - - / / / / - - - - - 25 Auto/ WB - - Enjoying the camera Scene Selection For details t step 5 in "Read This First" For shooting an image appropriately according to the scene condition, a combination of functions is determined by the camera. ( : you can select the desired setting) Macro Flash AF range finder Focus preset Bracket Step White Balance Burst/ Flash level Exposure Bracket/ Multi Burst - / - - - - - - -
SL - Center AF 0.5m/1.0m/ 3.0m/7.0m - - - - / / / / - - - - - 25 Auto/ WB - - Enjoying the camera Scene Selection For details t step 5 in "Read This First" For shooting an image appropriately according to the scene condition, a combination of functions is determined by the camera. ( : you can select the desired setting) Macro Flash AF range finder Focus preset Bracket Step White Balance Burst/ Flash level Exposure Bracket/ Multi Burst - / - - - - - - -

User Guide
Page 29
...the exposure adjustment may not be set to and adjust EV while checking the exposure with . (Camera) Select the still image camera mode. z Adjusting EV (Exposure Value) by the camera. The graph display indicates a bright image when skewed to the right side, and a dark ...to [Auto] - Toward - The exposure is determined automatically by displaying a histogram 60min A histogram is being shot in "Read This First" (EV) Manually adjusts the exposure. When (Camera) is set in 1/3EV increments. • If a subject is a graph showing the brightness of pixels B Brightness ...
...the exposure adjustment may not be set to and adjust EV while checking the exposure with . (Camera) Select the still image camera mode. z Adjusting EV (Exposure Value) by the camera. The graph display indicates a bright image when skewed to the right side, and a dark ...to [Auto] - Toward - The exposure is determined automatically by displaying a histogram 60min A histogram is being shot in "Read This First" (EV) Manually adjusts the exposure. When (Camera) is set in 1/3EV increments. • If a subject is a graph showing the brightness of pixels B Brightness ...

User Guide
Page 35
... Scene modes. Sepia ( ) Records the image in monochrome (black and white). Normal - ( -) Toward -: Makes the flash level lower. • To change flash mode t step 5 in "Read This First" • You may not be made when [Mode] (REC Mode) in some Scene modes. (Flash Level) Adjusts the amount of three images with...
... Scene modes. Sepia ( ) Records the image in monochrome (black and white). Normal - ( -) Toward -: Makes the flash level lower. • To change flash mode t step 5 in "Read This First" • You may not be made when [Mode] (REC Mode) in some Scene modes. (Flash Level) Adjusts the amount of three images with...

User Guide
Page 40
...it as a new file. The resized image is recorded in the recording folder as the newest file. • For details on [Image Size] t step 4 in "Read This First" VGA Cancel Cancels resizing. 1 Display the image you want to resize. 2 Press MENU to display the menu. 3 Select [ ] (Resize) with b/B. ...• The interval time is just a guideline. 1M t step 4 in "Read This First" • You cannot change the size of movies or Multi Burst images. • When you change from a small size to a large size, the...
...it as a new file. The resized image is recorded in the recording folder as the newest file. • For details on [Image Size] t step 4 in "Read This First" VGA Cancel Cancels resizing. 1 Display the image you want to resize. 2 Press MENU to display the menu. 3 Select [ ] (Resize) with b/B. ...• The interval time is just a guideline. 1M t step 4 in "Read This First" • You cannot change the size of movies or Multi Burst images. • When you change from a small size to a large size, the...

User Guide
Page 43
... selected recording folder, and the original image is cut. • The cut movies are assigned new numbers, and then recorded as the newest files in "Read This First") as a new file. The playback of 3:2 or 16:9. • You cannot trim images displayed with Quick Review. 43 Trimming See the following kinds...
... selected recording folder, and the original image is cut. • The cut movies are assigned new numbers, and then recorded as the newest files in "Read This First") as a new file. The playback of 3:2 or 16:9. • You cannot trim images displayed with Quick Review. 43 Trimming See the following kinds...

User Guide
Page 46
... this before shooting. Red Eye Reduction Reduces the red-eye phenomenon when using the digital zoom. Does not use Red Eye Reduction. • Because it takes about a second until the shutter clicks, hold the camera firmly to superimpose the date or time onto the image. Date Superimposes the year,... month and day. • The date is inserted in the order you select. (t step 2 in "Read This First") Off Does not superimpose the date and ...
... this before shooting. Red Eye Reduction Reduces the red-eye phenomenon when using the digital zoom. Does not use Red Eye Reduction. • Because it takes about a second until the shutter clicks, hold the camera firmly to superimpose the date or time onto the image. Date Superimposes the year,... month and day. • The date is inserted in the order you select. (t step 2 in "Read This First") Off Does not superimpose the date and ...

User Guide
Page 54
... signal to NTSC mode (e.g., for the USA, Japan). Cancels setting the clock. 54 Then, perform the procedure explained in "Set the clock" (t step 2 in "Read This First"). OK Cancel Select [OK] with v on a TV screen, check page 77 for Europe). NTSC Sets the video output signal to PAL mode (e.g., for... equipment. Different countries and regions use different TV color systems. If you want to the TV color system of the country or region where the camera is used. For details on the operation t page 44 Video Out Sets the video signal output according to view images on the control button,...
... signal to NTSC mode (e.g., for the USA, Japan). Cancels setting the clock. 54 Then, perform the procedure explained in "Set the clock" (t step 2 in "Read This First"). OK Cancel Select [OK] with v on a TV screen, check page 77 for Europe). NTSC Sets the video output signal to PAL mode (e.g., for... equipment. Different countries and regions use different TV color systems. If you want to the TV color system of the country or region where the camera is used. For details on the operation t page 44 Video Out Sets the video signal output according to view images on the control button,...
User Guide
Page 65
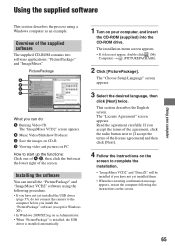
... screen. Installing the software You can do not connect the camera to start up the functions: Click one of A-D, then click the button at the lower right of the supplied software The supplied CD-ROM contains two software applications: "PicturePackage" and "ImageMixer." Read the agreement carefully. PicturePackage A B C D What you install the "PicturePackage...
... screen. Installing the software You can do not connect the camera to start up the functions: Click one of A-D, then click the button at the lower right of the supplied software The supplied CD-ROM contains two software applications: "PicturePackage" and "ImageMixer." Read the agreement carefully. PicturePackage A B C D What you install the "PicturePackage...

User Guide
Page 72
... you can print a set of the same images as an index image. 2 Select print settings with v/V/b/B. 3 Select [OK] with v/ V, then press z. When you connect the camera to turn off the print menu, then proceed as follows. 1 Press (Index). Select [Cancel] to a printer, the print menu appears. This function may not all... with the following. Print All In This Folder DPOF image Select Cancel 72 The image will be inserted in the order you select (t step 2 in "Read This First"). When [Index] is set to [On]: Select the number of sets of the printing sheet. [Date] Select [Day&Time] or [Date] ...
... you can print a set of the same images as an index image. 2 Select print settings with v/V/b/B. 3 Select [OK] with v/ V, then press z. When you connect the camera to turn off the print menu, then proceed as follows. 1 Press (Index). Select [Cancel] to a printer, the print menu appears. This function may not all... with the following. Print All In This Folder DPOF image Select Cancel 72 The image will be inserted in the order you select (t step 2 in "Read This First"). When [Index] is set to [On]: Select the number of sets of the printing sheet. [Date] Select [Day&Time] or [Date] ...