
Instruction Manual
Page 7
.../Macro/Display 16 Viewing/deleting images 19 Learning the various functions - HOME/Menu 22 Using the HOME screen 22 HOME items 23 Using the menu items 24 Menu items 25 Enjoying your camera 8 Getting started 9 Checking the accessories supplied 9 1 Preparing the battery pack 10 2 Inserting the ...battery pack/a "Memory Stick Duo" (not supplied) ........ 11 3 Turning the camera on the screen 28 Battery life and memory capacity 32 Battery life and number of images that you can record/view 32 Number of still images and recording...
.../Macro/Display 16 Viewing/deleting images 19 Learning the various functions - HOME/Menu 22 Using the HOME screen 22 HOME items 23 Using the menu items 24 Menu items 25 Enjoying your camera 8 Getting started 9 Checking the accessories supplied 9 1 Preparing the battery pack 10 2 Inserting the ...battery pack/a "Memory Stick Duo" (not supplied) ........ 11 3 Turning the camera on the screen 28 Battery life and memory capacity 32 Battery life and number of images that you can record/view 32 Number of still images and recording...
Instruction Manual
Page 8
... in sandy or dusty locations may be copyrighted. Leaving liquids on the LCD screen. Water entering the inside of DSC-T200 unless noted otherwise. 8 In addition to malfunctions and an inability to record or play back properly. • Using the camera in any way. • If water droplets or other bright light. Unauthorized recording...
... in sandy or dusty locations may be copyrighted. Leaving liquids on the LCD screen. Water entering the inside of DSC-T200 unless noted otherwise. 8 In addition to malfunctions and an inability to record or play back properly. • Using the camera in any way. • If water droplets or other bright light. Unauthorized recording...
Instruction Manual
Page 12
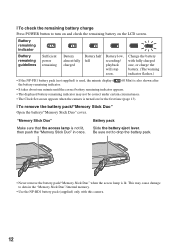
... to data in once. Slide the battery eject lever. This may not be correct under certain circumstances. • The Clock Set screen appears when the camera is turned on the LCD screen. Battery remaining indicator Battery remaining guidelines Sufficient power remaining Battery almost fully charged Battery half full Battery low, recording/ playback will... lit, then push the "Memory Stick Duo" in the "Memory Stick Duo"/internal memory. • Use the NP-BD1 battery pack (supplied) only with this camera. 12
... to data in once. Slide the battery eject lever. This may not be correct under certain circumstances. • The Clock Set screen appears when the camera is turned on the LCD screen. Battery remaining indicator Battery remaining guidelines Sufficient power remaining Battery almost fully charged Battery half full Battery low, recording/ playback will... lit, then push the "Memory Stick Duo" in the "Memory Stick Duo"/internal memory. • Use the NP-BD1 battery pack (supplied) only with this camera. 12

Instruction Manual
Page 13
... touching [BACK]. • Touching [?] displays the guide about the touched item. On the touch panel buttons Perform settings on the screen with your finger off the screen will momentarily disappear. To hide this camera by lightly touching the buttons or icons on this guide, touch [?] again. • When you want to the previous...
... touching [BACK]. • Touching [?] displays the guide about the touched item. On the touch panel buttons Perform settings on the screen with your finger off the screen will momentarily disappear. To hide this camera by lightly touching the buttons or icons on this guide, touch [?] again. • When you want to the previous...

Instruction Manual
Page 16
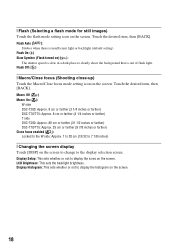
...for display on TV Shoot at a small image size for still images E Shooting close-up F Changing the screen display [ Changing the image size Touch the image size setting icon on the screen. Image size/Self-timer/Shooting mode/Flash/Macro/Display A Changing the image size B Using the self-timer... C Changing the shooting mode D Selecting a flash mode for e-mail attachments [ Using the self-timer Touch the self-timer setting icon on the screen.
...for display on TV Shoot at a small image size for still images E Shooting close-up F Changing the screen display [ Changing the image size Touch the image size setting icon on the screen. Image size/Self-timer/Shooting mode/Flash/Macro/Display A Changing the image size B Using the self-timer... C Changing the shooting mode D Selecting a flash mode for e-mail attachments [ Using the self-timer Touch the self-timer setting icon on the screen.
Instruction Manual
Page 17
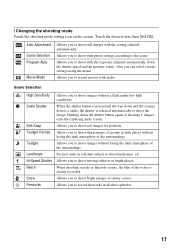
... you to shoot soft images for portraits. When shooting seaside or lakeside scenes, the blue of the surroundings. Focuses only on the screen. Allows you to record movies with preset settings according to the scene. Allows you to record fireworks in dark places without losing the...scenes. Allows you to shoot images without losing the dark atmosphere of the water is released automatically to shoot the image. Holding down and the camera detects a smile, the shutter is clearly recorded. [ Changing the shooting mode Touch the shooting mode setting icon on a distant subject to ...
... you to shoot soft images for portraits. When shooting seaside or lakeside scenes, the blue of the surroundings. Focuses only on the screen. Allows you to record movies with preset settings according to the scene. Allows you to record fireworks in dark places without losing the...scenes. Allows you to shoot images without losing the dark atmosphere of the water is released automatically to shoot the image. Holding down and the camera detects a smile, the shutter is clearly recorded. [ Changing the shooting mode Touch the shooting mode setting icon on a distant subject to ...
Instruction Manual
Page 18
...flash light. Macro Off ( ) Macro On ( ): W side DSC-T200: Approx. 8 cm or farther (3 1/4 inches or farther) DSC-T70/T75: Approx. 8 cm or farther (3 1/4 inches or farther) T side DSC-T200: Approx. 80 cm or farther (31 1/2 inches or farther) DSC-T70/T75: Approx. 25 cm or farther (9 7/8 inches or ...farther) Close focus enabled ( ): Locked to the W side: Approx. 1 to 20 cm (13/32 to 7 7/8 inches) [ Changing the screen display Touch [DISP] on ) ( ...
...flash light. Macro Off ( ) Macro On ( ): W side DSC-T200: Approx. 8 cm or farther (3 1/4 inches or farther) DSC-T70/T75: Approx. 8 cm or farther (3 1/4 inches or farther) T side DSC-T200: Approx. 80 cm or farther (31 1/2 inches or farther) DSC-T70/T75: Approx. 25 cm or farther (9 7/8 inches or ...farther) Close focus enabled ( ): Locked to the W side: Approx. 1 to 20 cm (13/32 to 7 7/8 inches) [ Changing the screen display Touch [DISP] on ) ( ...

Instruction Manual
Page 19
...the corresponding area. Touch out. Viewing/deleting images DSC-T70/T75 (Playback) button Zoom (W/T) lever Speaker Speaker Multi connector (bottom) 1 Press (Playback) button. to select an image. To switch to the shooting mode, press (Playback) again. 2 Touch (previous) / (next) on the screen to zoom 19 Movie: Touch B to playback mode...Cancels playback zoom. : Turns v/V/b/B on automatically and set to playback a movie. Stop: Touch x. [ To delete images 1 Display the image you press (Playback) when the camera is powered off . • You can also enlarge the image with / .
...the corresponding area. Touch out. Viewing/deleting images DSC-T70/T75 (Playback) button Zoom (W/T) lever Speaker Speaker Multi connector (bottom) 1 Press (Playback) button. to select an image. To switch to the shooting mode, press (Playback) again. 2 Touch (previous) / (next) on the screen to zoom 19 Movie: Touch B to playback mode...Cancels playback zoom. : Turns v/V/b/B on automatically and set to playback a movie. Stop: Touch x. [ To delete images 1 Display the image you press (Playback) when the camera is powered off . • You can also enlarge the image with / .

Instruction Manual
Page 20
... delete images in index mode 1 Touch while the index screen is required. To the multi connector To audio/video input jacks Cable for multi-use terminal When viewing on a high definition TV, an HD output adaptor cable (DSC-T75 only) is displayed. 2 Touch the thumbnail images to add a check... mark to the images you can also access the index screen by selecting [ Image Index] in screen. (View Images) on TV screen Connect the camera to the TV with the image size set the...
... delete images in index mode 1 Touch while the index screen is required. To the multi connector To audio/video input jacks Cable for multi-use terminal When viewing on a high definition TV, an HD output adaptor cable (DSC-T75 only) is displayed. 2 Touch the thumbnail images to add a check... mark to the images you can also access the index screen by selecting [ Image Index] in screen. (View Images) on TV screen Connect the camera to the TV with the image size set the...

Instruction Manual
Page 22
HOME/Menu Using the HOME screen The HOME screen is the gateway screen for all the functions of whether the camera is in the category you want to set. [ When you select the (Manage Memory) or (Settings) category 1 Touch the category you want to change , and ...then touch the desired setting value to set . 3Touch the item in shooting mode or playback mode. 1Touch [HOME] to display the HOME screen. Touch...
HOME/Menu Using the HOME screen The HOME screen is the gateway screen for all the functions of whether the camera is in the category you want to set. [ When you select the (Manage Memory) or (Settings) category 1 Touch the category you want to change , and ...then touch the desired setting value to set . 3Touch the item in shooting mode or playback mode. 1Touch [HOME] to display the HOME screen. Touch...

Instruction Manual
Page 23
... 1 page 22 HOME items Touching [HOME] displays the following items. Details on the items are displayed on the screen by the guide. Folder Copy Function Guide Calibration COMPONENT TV TYPE Grid Line Digital Zoom Auto Review 23 Category Shooting View Images Printing, Other Manage Memory Settings Items Auto Adjustment Scene Selection Program...
... 1 page 22 HOME items Touching [HOME] displays the following items. Details on the items are displayed on the screen by the guide. Folder Copy Function Guide Calibration COMPONENT TV TYPE Grid Line Digital Zoom Auto Review 23 Category Shooting View Images Printing, Other Manage Memory Settings Items Auto Adjustment Scene Selection Program...

Instruction Manual
Page 24
Touch [?] to hide this guide. [MENU] • Different items will become visible depending on the selected mode. 2Touch the desired menu item. • If the desired item is hidden, keep touching v/V until the item appears on the screen. 3Touch the desired setting item. 4Touch [BACK] to display the menu. Using the menu items 1Touch [MENU] to turn off the menu. 24
Touch [?] to hide this guide. [MENU] • Different items will become visible depending on the selected mode. 2Touch the desired menu item. • If the desired item is hidden, keep touching v/V until the item appears on the screen. 3Touch the desired setting item. 4Touch [BACK] to display the menu. Using the menu items 1Touch [MENU] to turn off the menu. 24

Instruction Manual
Page 25
... adjusts focus, etc. Deletes images. Rotates a still image. For details on the operation 1 page 24 Menu items The available menu items vary depending on the screen. Menu for viewing (Retouch) (Paint) (Multi Resizing) (Wide Zoom Display) (Slideshow) (Delete) (Protect) (Print) (Rotate) (Select Folder) (Volume Settings) Retouches still images. Focus Changes the...
... adjusts focus, etc. Deletes images. Rotates a still image. For details on the operation 1 page 24 Menu items The available menu items vary depending on the screen. Menu for viewing (Retouch) (Paint) (Multi Resizing) (Wide Zoom Display) (Slideshow) (Delete) (Protect) (Print) (Rotate) (Select Folder) (Volume Settings) Retouches still images. Focus Changes the...
Instruction Manual
Page 27
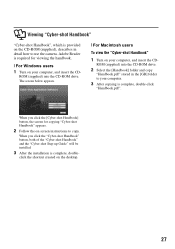
..., double- When you click the [Cyber-shot Handbook] button, the screen for viewing the handbook. [ For Windows users 1 Turn on the desktop. 27 The screen below appears. [ For Macintosh users To view the "Cyber-shot Handbook" 1 Turn on -screen instructions to use the camera. When you click the "Cyber-shot Handbook" button, both of...
..., double- When you click the [Cyber-shot Handbook] button, the screen for viewing the handbook. [ For Windows users 1 Turn on the desktop. 27 The screen below appears. [ For Macintosh users To view the "Cyber-shot Handbook" 1 Turn on -screen instructions to use the camera. When you click the "Cyber-shot Handbook" button, both of...

Instruction Manual
Page 28
...-timer settings Shooting mode settings Shooting mode (Scene Selection) settings • Touch in the DSC-T70/T75 only. This cancels the focusing on the screen to change the settings by the touch operation. A Display HOME Indication Displays the HOME screen. To hide this guide, touch [?] (page 13). Flash mode settings Macro/Close focus...
...-timer settings Shooting mode settings Shooting mode (Scene Selection) settings • Touch in the DSC-T70/T75 only. This cancels the focusing on the screen to change the settings by the touch operation. A Display HOME Indication Displays the HOME screen. To hide this guide, touch [?] (page 13). Flash mode settings Macro/Close focus...
Instruction Manual
Page 29
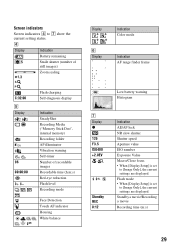
Standby a movie/Recording a movie Recording time (m:s) 29 Screen indicators Screen indicators 4 to [Image Only], the current settings are displayed. Flash mode • When [Display Setup] is set to [Image Only], the current settings are displayed. D ...
Standby a movie/Recording a movie Recording time (m:s) 29 Screen indicators Screen indicators 4 to [Image Only], the current settings are displayed. Flash mode • When [Display Setup] is set to [Image Only], the current settings are displayed. D ...

Instruction Manual
Page 30
... current setting status. Displays the previous/next image. Returns to index mode. Fast forward/Rewind Changes the screen display. Deletes the image. Screen indicators Screen indicators 3 to the previous screen. Changes to the single image screen from the index screen. Selects the playback folder. [ When playing back still images [ When playing back movies B Display BACK x N m M DISP...
... current setting status. Displays the previous/next image. Returns to index mode. Fast forward/Rewind Changes the screen display. Deletes the image. Screen indicators Screen indicators 3 to the previous screen. Changes to the single image screen from the index screen. Selects the playback folder. [ When playing back still images [ When playing back movies B Display BACK x N m M DISP...
Instruction Manual
Page 34
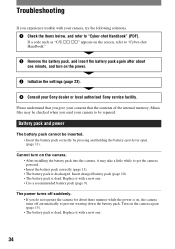
... If a code such as "C/E:ss:ss" appears on the screen, refer to get the camera powered. • Insert the battery pack correctly (page 11). • The battery pack is on the camera. • After installing the battery pack into the camera, it with a new one. • Use a recommended battery... the camera again (page 13). • The battery pack is dead. Insert charged battery pack (page 10). • The battery pack is dead. Battery pack and power The battery pack cannot be repaired. Troubleshooting If you experience trouble with your Sony dealer or local authorized Sony service...
... If a code such as "C/E:ss:ss" appears on the screen, refer to get the camera powered. • Insert the battery pack correctly (page 11). • The battery pack is on the camera. • After installing the battery pack into the camera, it with a new one. • Use a recommended battery... the camera again (page 13). • The battery pack is dead. Insert charged battery pack (page 10). • The battery pack is dead. Battery pack and power The battery pack cannot be repaired. Troubleshooting If you experience trouble with your Sony dealer or local authorized Sony service...
Instruction Manual
Page 36
...°F). Charging method of whether the power is on your trousers or skirt, as this may cause malfunction or damage the camera. [ On cleaning Cleaning the LCD screen Wipe the screen surface with the power off. 36 To prevent damage to the finish or casing: • Do not expose the... camera to chemical products such as thinner, benzine, alcohol, disposable cloths, insect repellent, sunscreen or insecticide. • Do not touch the camera with any of...
...°F). Charging method of whether the power is on your trousers or skirt, as this may cause malfunction or damage the camera. [ On cleaning Cleaning the LCD screen Wipe the screen surface with the power off. 36 To prevent damage to the finish or casing: • Do not expose the... camera to chemical products such as thinner, benzine, alcohol, disposable cloths, insect repellent, sunscreen or insecticide. • Do not touch the camera with any of...
Instruction Manual
Page 37
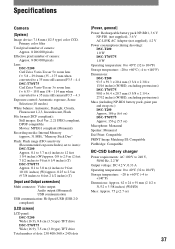
... filter Total pixel number of camera: Approx. 8 286 000 pixels Effective pixel number of camera: Approx. 8 083 000 pixels Lens: DSC-T200 Carl Zeiss Vario-Tessar 5× zoom lens f = 5.8 - 29.0 mm (35 - 175 mm when converted to a 35 mm still camera)F3.5 - 4.4 DSC-T70/T75 Carl Zeiss Vario... connectors] Multi connector: Video output Audio output (Monaural) USB communication USB communication: Hi-Speed USB (USB 2.0 compliant) [LCD screen] LCD panel: DSC-T200 Wide (16:9), 8.8 cm (3.5 type) TFT drive DSC-T70/T75 Wide (16:9), 7.5 cm (3.0 type) TFT drive Total number of dots: 230 400 (960 × 240) ...
... filter Total pixel number of camera: Approx. 8 286 000 pixels Effective pixel number of camera: Approx. 8 083 000 pixels Lens: DSC-T200 Carl Zeiss Vario-Tessar 5× zoom lens f = 5.8 - 29.0 mm (35 - 175 mm when converted to a 35 mm still camera)F3.5 - 4.4 DSC-T70/T75 Carl Zeiss Vario... connectors] Multi connector: Video output Audio output (Monaural) USB communication USB communication: Hi-Speed USB (USB 2.0 compliant) [LCD screen] LCD panel: DSC-T200 Wide (16:9), 8.8 cm (3.5 type) TFT drive DSC-T70/T75 Wide (16:9), 7.5 cm (3.0 type) TFT drive Total number of dots: 230 400 (960 × 240) ...


