

Instruction Manual
Page 1
Digital Still Camera Instruction Manual GB DSC-T2 For details on the CD-ROM (supplied) using a computer. Operating Instructions Before operating the unit, please read "Cybershot Handbook" (PDF) and "Cyber-shot Step-up Guide" on advanced operations, please read this manual thoroughly, and retain it for future reference. © 2007 Sony Corporation 3-273-227-11(1)
Digital Still Camera Instruction Manual GB DSC-T2 For details on the CD-ROM (supplied) using a computer. Operating Instructions Before operating the unit, please read "Cybershot Handbook" (PDF) and "Cyber-shot Step-up Guide" on advanced operations, please read this manual thoroughly, and retain it for future reference. © 2007 Sony Corporation 3-273-227-11(1)
Instruction Manual
Page 2
...serial numbers are located on the appliance, or the one way. DSC-T2 Serial No WARNING To reduce fire or shock hazard, do not expose the unit to the operating instructions. [ Polarization This set should still fail to persons. Do not defeat the safety purpose of the ... spill liquid of any kind into the power outlet only one described in the literature accompanying the appliance. 2 IMPORTANT SAFEGUARDS For your Sony dealer regarding this manual for future reference. Carefully observe all warnings, precautions and instructions on the bottom. Record the serial number in the...
...serial numbers are located on the appliance, or the one way. DSC-T2 Serial No WARNING To reduce fire or shock hazard, do not expose the unit to the operating instructions. [ Polarization This set should still fail to persons. Do not defeat the safety purpose of the ... spill liquid of any kind into the power outlet only one described in the literature accompanying the appliance. 2 IMPORTANT SAFEGUARDS For your Sony dealer regarding this manual for future reference. Carefully observe all warnings, precautions and instructions on the bottom. Record the serial number in the...
Instruction Manual
Page 3
Do not place the set in a confined space, such as the original parts. If liquid has been spilled or objects have the same characteristics as a bookcase, or built-in performance - Use a cloth lightly dampened with a cloth or other controls may expose you to normal operation. - Never cover the slots and openings with water for necessary ventilation. Never place the set near a bathtub, washbowl, kitchen sink, or laundry tub, in the cabinet are provided for cleaning the exterior of the set due to rain or water. - If the set has been subject to direct sunlight....
Do not place the set in a confined space, such as the original parts. If liquid has been spilled or objects have the same characteristics as a bookcase, or built-in performance - Use a cloth lightly dampened with a cloth or other controls may expose you to normal operation. - Never cover the slots and openings with water for necessary ventilation. Never place the set near a bathtub, washbowl, kitchen sink, or laundry tub, in the cabinet are provided for cleaning the exterior of the set due to rain or water. - If the set has been subject to direct sunlight....
Instruction Manual
Page 4
... radio or television reception, which can be determined by turning the equipment off and on, the user is for a Class B digital device, pursuant to be correctly orientated in a residential installation. and Canada [ RECYCLING LITHIUM-ION BATTERIES Lithium-Ion batteries are cautioned... in accordance with the limits for the FCC related matters only. [ Regulatory Information Declaration of Conformity Trade Name: SONY Model No.: DSC-T2 Responsible Party: Sony Electronics Inc. Operation is no guarantee that may cause harmful interference to the following measures: - For Customers in ...
... radio or television reception, which can be determined by turning the equipment off and on, the user is for a Class B digital device, pursuant to be correctly orientated in a residential installation. and Canada [ RECYCLING LITHIUM-ION BATTERIES Lithium-Ion batteries are cautioned... in accordance with the limits for the FCC related matters only. [ Regulatory Information Declaration of Conformity Trade Name: SONY Model No.: DSC-T2 Responsible Party: Sony Electronics Inc. Operation is no guarantee that may cause harmful interference to the following measures: - For Customers in ...
Instruction Manual
Page 5
...equipment. Consult the dealer or an experienced radio/TV technician for a digital device pursuant to conserve natural resources. special handling may influence the picture and sound of this product is Sony Deutschland GmbH, Hedelfinger Strasse 61, 70327 Stuttgart, Germany. Instead it shall...in the countries applying EU Directives The manufacturer of materials will help prevent potentially negative consequences for EMC and product safety is Sony Corporation, 1-7-1 Konan Minato-ku Tokyo, 1080075 Japan. In case of California, USA only Perchlorate Material - The supplied ...
...equipment. Consult the dealer or an experienced radio/TV technician for a digital device pursuant to conserve natural resources. special handling may influence the picture and sound of this product is Sony Deutschland GmbH, Hedelfinger Strasse 61, 70327 Stuttgart, Germany. Instead it shall...in the countries applying EU Directives The manufacturer of materials will help prevent potentially negative consequences for EMC and product safety is Sony Corporation, 1-7-1 Konan Minato-ku Tokyo, 1080075 Japan. In case of California, USA only Perchlorate Material - The supplied ...

Instruction Manual
Page 6
battery should lose the fuse cover, please contact your nearest Sony service station. 6 Notice for customers in the plug supplied need to BS 1362, (i.e., marked with an or mark) must be used. For more detailed information ...
battery should lose the fuse cover, please contact your nearest Sony service station. 6 Notice for customers in the plug supplied need to BS 1362, (i.e., marked with an or mark) must be used. For more detailed information ...
Instruction Manual
Page 7
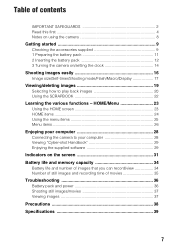
...Using the HOME screen 23 HOME items 24 Using the menu items 25 Menu items 26 Enjoying your computer 28 Viewing "Cyber-shot Handbook 29 Enjoying the supplied software 29 Indicators on the screen 31 Battery life and memory capacity 34 Battery life and number...recording time of movies 35 Troubleshooting 36 Battery pack and power 36 Shooting still images/movies 37 Viewing images 37 Precautions 38 Specifications 39 7 Table of contents IMPORTANT SAFEGUARDS 2 Read this first 4 Notes on using the camera 8 Getting started 9 Checking the accessories supplied 9 1 Preparing the battery...
...Using the HOME screen 23 HOME items 24 Using the menu items 25 Menu items 26 Enjoying your computer 28 Viewing "Cyber-shot Handbook 29 Enjoying the supplied software 29 Indicators on the screen 31 Battery life and memory capacity 34 Battery life and number...recording time of movies 35 Troubleshooting 36 Battery pack and power 36 Shooting still images/movies 37 Viewing images 37 Precautions 38 Specifications 39 7 Table of contents IMPORTANT SAFEGUARDS 2 Read this first 4 Notes on using the camera 8 Getting started 9 Checking the accessories supplied 9 1 Preparing the battery...

Instruction Manual
Page 8
.... [ No compensation for damaged content or recording failure Sony cannot compensate for Camera File system) universal standard established by JEITA (Japan Electronics and Information Technology Industries Association). • Sony does not guarantee that the camera will play back images recorded or edited with DCF (...Design rule for failure to record or loss or damage of recorded content due to the provisions of the camera or recording media, etc. ...
.... [ No compensation for damaged content or recording failure Sony cannot compensate for Camera File system) universal standard established by JEITA (Japan Electronics and Information Technology Industries Association). • Sony does not guarantee that the camera will play back images recorded or edited with DCF (...Design rule for failure to record or loss or damage of recorded content due to the provisions of the camera or recording media, etc. ...
Instruction Manual
Page 9
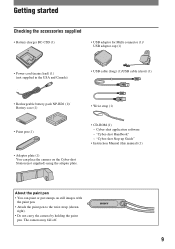
... (1) • Adaptor plate (1) You can paint or put stamps on the Cyber-shot Station (not supplied) using the adaptor plate. • CD-ROM (1) - "Cyber-shot Step-up Guide" • Instruction Manual (this manual) (1) About the paint pen • You can place the camera on still images with the paint pen. • Attach the paint pen to...
... (1) • Adaptor plate (1) You can paint or put stamps on the Cyber-shot Station (not supplied) using the adaptor plate. • CD-ROM (1) - "Cyber-shot Step-up Guide" • Instruction Manual (this manual) (1) About the paint pen • You can place the camera on still images with the paint pen. • Attach the paint pen to...
Instruction Manual
Page 10
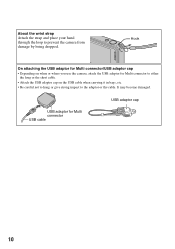
... adaptor for Multi connector to either the long or the short cable. • Attach the USB adaptor cap on when or where you use the camera, attach the USB adaptor for Multi connector USB cable USB adaptor cap 10 Hook On attaching the USB adaptor for Multi connector/USB adaptor cap... • Depending on the USB cable when carrying it in bags, etc. • Be careful not to hang or give strong impact to prevent the camera from damage by being dropped. It may become damaged. About the wrist strap Attach the strap and place your hand through the loop to the...
... adaptor for Multi connector to either the long or the short cable. • Attach the USB adaptor cap on when or where you use the camera, attach the USB adaptor for Multi connector USB cable USB adaptor cap 10 Hook On attaching the USB adaptor for Multi connector/USB adaptor cap... • Depending on the USB cable when carrying it in bags, etc. • Be careful not to hang or give strong impact to prevent the camera from damage by being dropped. It may become damaged. About the wrist strap Attach the strap and place your hand through the loop to the...

Instruction Manual
Page 11
... trouble occurs while using the battery charger, immediately shut off , charging is connected to charge a fully depleted battery pack at a temperature of use with compatible Sony batteries. 11 The CHARGE lamp lights up, and charging starts. When the CHARGE lamp turns off the power by disconnecting the plug from the wall...
... trouble occurs while using the battery charger, immediately shut off , charging is connected to charge a fully depleted battery pack at a temperature of use with compatible Sony batteries. 11 The CHARGE lamp lights up, and charging starts. When the CHARGE lamp turns off the power by disconnecting the plug from the wall...
Instruction Manual
Page 12
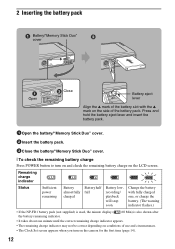
... on the side of use and circumstances. • The Clock Set screen appears when you turn on and check the remaining battery charge on the camera for the first time (page 14). 12 2 Inserting the battery pack Battery/"Memory Stick Duo" cover Open Close Battery eject lever Align the v mark of...
... on the side of use and circumstances. • The Clock Set screen appears when you turn on and check the remaining battery charge on the camera for the first time (page 14). 12 2 Inserting the battery pack Battery/"Memory Stick Duo" cover Open Close Battery eject lever Align the v mark of...

Instruction Manual
Page 13
Slide the battery eject lever. Insert the "Memory Stick Duo" with this camera. [ To insert a "Memory Stick Duo" (not supplied) Open the battery/"Memory Stick Duo" cover to insert a "Memory Stick Duo". Be sure not to "Memory Stick ... in "Memory Stick Duo", copy (export) the images in once. • Never remove the "Memory Stick Duo" when the access lamp is inserted in the camera, images will not be saved in the "Memory Stick Duo"/internal memory. • Use the NP-BD1 battery pack (supplied) only with the terminal side...
Slide the battery eject lever. Insert the "Memory Stick Duo" with this camera. [ To insert a "Memory Stick Duo" (not supplied) Open the battery/"Memory Stick Duo" cover to insert a "Memory Stick Duo". Be sure not to "Memory Stick ... in "Memory Stick Duo", copy (export) the images in once. • Never remove the "Memory Stick Duo" when the access lamp is inserted in the camera, images will not be saved in the "Memory Stick Duo"/internal memory. • Use the NP-BD1 battery pack (supplied) only with the terminal side...

Instruction Manual
Page 14
3 Turning the camera on/setting the clock POWER button Touch panel Lens Lens cover 1Press the POWER button or slide the lens cover downward. 2Set the clock by ... the page. • You can return to the previous screen by touching [BACK]. • Touching [?] displays the guide about the touched item. To hide this camera by touching v/V. 3 Touch [OK]. On the touch panel buttons Perform settings on this guide, touch [?] again. • When the top right of the screen is...
3 Turning the camera on/setting the clock POWER button Touch panel Lens Lens cover 1Press the POWER button or slide the lens cover downward. 2Set the clock by ... the page. • You can return to the previous screen by touching [BACK]. • Touching [?] displays the guide about the touched item. To hide this camera by touching v/V. 3 Touch [OK]. On the touch panel buttons Perform settings on this guide, touch [?] again. • When the top right of the screen is...

Instruction Manual
Page 15
... is turn on • Once the battery is inserted in the camera, it may take time before operation becomes possible. • If the camera is running on battery power and you do not operate the camera for about three minutes, the camera turns off automatically to prevent wearing down the battery pack (Auto power... upper edge of the lens cover as shown below. 2 Lightly press weight on the lens cover to slide it down. 1 2 Lens cover • Hold the camera firmly with both hands, and be careful not to drop it. 15
... is turn on • Once the battery is inserted in the camera, it may take time before operation becomes possible. • If the camera is running on battery power and you do not operate the camera for about three minutes, the camera turns off automatically to prevent wearing down the battery pack (Auto power... upper edge of the lens cover as shown below. 2 Lightly press weight on the lens cover to slide it down. 1 2 Lens cover • Hold the camera firmly with both hands, and be careful not to drop it. 15

Instruction Manual
Page 16
... mode setting icon, then touch (Movie Mode). AE/AF lock indicator When shooting movies: Touch [HOME], then touch (Shooting) t (Movie Mode) (page 24). When shooting still images: 1 Press and hold the shutter button halfway down . The z (AE/AF lock) indicator (green) flashes, a beep sounds, the indicator stops flashing and remains lit... button Flash Self-timer lamp/ Smile shutter lamp Lens cover Microphone Lens T/W (Zoom) button Touch panel Tripod receptacle (bottom) 1Open the lens cover. 2Hold the camera steady, keeping your arm at your side.
... mode setting icon, then touch (Movie Mode). AE/AF lock indicator When shooting movies: Touch [HOME], then touch (Shooting) t (Movie Mode) (page 24). When shooting still images: 1 Press and hold the shutter button halfway down . The z (AE/AF lock) indicator (green) flashes, a beep sounds, the indicator stops flashing and remains lit... button Flash Self-timer lamp/ Smile shutter lamp Lens cover Microphone Lens T/W (Zoom) button Touch panel Tripod receptacle (bottom) 1Open the lens cover. 2Hold the camera steady, keeping your arm at your side.

Instruction Manual
Page 17
...( ): Not using the menu. Program Auto: Allows you to shoot still images with the exposure adjusted automatically (both the shutter speed and the aperture value). Smile Shutter: When the shutter button is pressed and the camera detects a smile, the shutter is released automatically to shoot soft images for...Image size/Self-timer/Shooting mode/Flash/Macro/Display A Changing the image size B Using the self-timer C Changing the shooting mode D Selecting a flash mode for still images E Shooting close-up to 10 × 15 cm (4 × 6") or 13 × 18 cm (5 × 7") Shoot at a small image...
...( ): Not using the menu. Program Auto: Allows you to shoot still images with the exposure adjusted automatically (both the shutter speed and the aperture value). Smile Shutter: When the shutter button is pressed and the camera detects a smile, the shutter is released automatically to shoot soft images for...Image size/Self-timer/Shooting mode/Flash/Macro/Display A Changing the image size B Using the self-timer C Changing the shooting mode D Selecting a flash mode for still images E Shooting close-up to 10 × 15 cm (4 × 6") or 13 × 18 cm (5 × 7") Shoot at a small image...

Instruction Manual
Page 18
... or backlight (default setting) Flash On ( ) Slow Synchro (Flash forced on) ( ): The shutter speed is slow in all their splendor. [ Flash (Selecting a flash mode for still images) Touch the flash mode setting icon on a distant subject to clearly shoot the background that is clearly recorded. Landscape: Focuses only on the screen...
... or backlight (default setting) Flash On ( ) Slow Synchro (Flash forced on) ( ): The shutter speed is slow in all their splendor. [ Flash (Selecting a flash mode for still images) Touch the flash mode setting icon on a distant subject to clearly shoot the background that is clearly recorded. Landscape: Focuses only on the screen...
Instruction Manual
Page 19
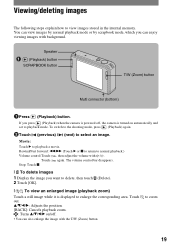
You can view images by normal playback mode or by scrapbook mode, which you press (Playback) when the camera is powered off . • You can enjoy viewing images with background. To switch to the shooting mode, press (Playback) again. 2Touch (previous) / (next) to ...1 Display the image you want to delete, then touch 2 Touch [OK]. (Delete). [ To view an enlarged image (playback zoom) Touch a still image while it is turned on /off , the camera is displayed to zoom 19 The volume control bar disappears. Rewind/Fast forward: m/M (Touch B or x to return to view images stored...
You can view images by normal playback mode or by scrapbook mode, which you press (Playback) when the camera is powered off . • You can enjoy viewing images with background. To switch to the shooting mode, press (Playback) again. 2Touch (previous) / (next) to ...1 Display the image you want to delete, then touch 2 Touch [OK]. (Delete). [ To view an enlarged image (playback zoom) Touch a still image while it is turned on /off , the camera is displayed to zoom 19 The volume control bar disappears. Rewind/Fast forward: m/M (Touch B or x to return to view images stored...
Instruction Manual
Page 20
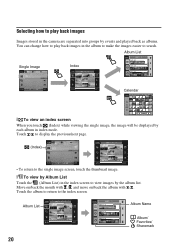
... (Index) while viewing the single image, the image will be displayed by the album list. Selecting how to play back images Images stored in the camera are separated into groups by events and played back as albums. You can change how to play back images in index mode.
... (Index) while viewing the single image, the image will be displayed by the album list. Selecting how to play back images Images stored in the camera are separated into groups by events and played back as albums. You can change how to play back images in index mode.
