
Instruction Manual
Page 1
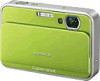
Digital Still Camera Instruction Manual GB DSC-T2 For details on advanced operations, please read this manual thoroughly, and retain it for future reference. © 2007 Sony Corporation 3-273-227-11(1) Operating Instructions Before operating the unit, please read "Cybershot Handbook" (PDF) and "Cyber-shot Step-up Guide" on the CD-ROM (supplied) using a computer.
Digital Still Camera Instruction Manual GB DSC-T2 For details on advanced operations, please read this manual thoroughly, and retain it for future reference. © 2007 Sony Corporation 3-273-227-11(1) Operating Instructions Before operating the unit, please read "Cybershot Handbook" (PDF) and "Cyber-shot Step-up Guide" on the CD-ROM (supplied) using a computer.
Instruction Manual
Page 7
...the HOME screen 23 HOME items 24 Using the menu items 25 Menu items 26 Enjoying your computer 28 Connecting the camera to your computer 28 Viewing "Cyber-shot Handbook 29 Enjoying the supplied software 29 Indicators on /setting the clock 14 Shooting images easily 16 Image size/Self-timer...Preparing the battery pack 11 2 Inserting the battery pack 12 3 Turning the camera on the screen 31 Battery life and memory capacity 34 Battery life and number of images that you can record/view 34 Number of still images and recording time of movies 35 Troubleshooting 36 Battery pack and power...
...the HOME screen 23 HOME items 24 Using the menu items 25 Menu items 26 Enjoying your computer 28 Connecting the camera to your computer 28 Viewing "Cyber-shot Handbook 29 Enjoying the supplied software 29 Indicators on /setting the clock 14 Shooting images easily 16 Image size/Self-timer...Preparing the battery pack 11 2 Inserting the battery pack 12 3 Turning the camera on the screen 31 Battery life and memory capacity 34 Battery life and number of images that you can record/view 34 Number of still images and recording time of movies 35 Troubleshooting 36 Battery pack and power...

Instruction Manual
Page 8
...[ On image data compatibility • This camera conforms with DCF (Design rule for Camera File system) universal standard established by JEITA (Japan Electronics and Information Technology Industries Association). • Sony does not guarantee that the camera will play back images recorded or edited with... other equipment, or that other equipment will play back images. • Using the camera in insufficient light emission. [ Notes on ...
...[ On image data compatibility • This camera conforms with DCF (Design rule for Camera File system) universal standard established by JEITA (Japan Electronics and Information Technology Industries Association). • Sony does not guarantee that the camera will play back images recorded or edited with... other equipment, or that other equipment will play back images. • Using the camera in insufficient light emission. [ Notes on ...
Instruction Manual
Page 9
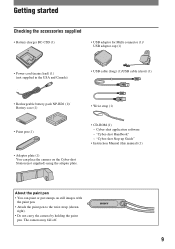
...; Adaptor plate (1) You can paint or put stamps on the Cyber-shot Station (not supplied) using the adaptor plate. • CD-ROM (1) - Cyber-shot application software - "Cyber-shot Handbook" - "Cyber-shot Step-up Guide" • Instruction Manual (this manual) (1) About the paint pen • You can place the camera on still images with the paint pen. • Attach the paint...
...; Adaptor plate (1) You can paint or put stamps on the Cyber-shot Station (not supplied) using the adaptor plate. • CD-ROM (1) - Cyber-shot application software - "Cyber-shot Handbook" - "Cyber-shot Step-up Guide" • Instruction Manual (this manual) (1) About the paint pen • You can place the camera on still images with the paint pen. • Attach the paint...
Instruction Manual
Page 10
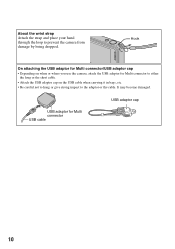
It may become damaged. USB adaptor for Multi connector to either the long or the short cable. • Attach the USB adaptor cap on the USB cable when carrying it in bags, etc. • Be careful not to hang or give strong impact to prevent the camera from damage by being dropped. Hook On attaching the USB adaptor for Multi connector/USB adaptor cap • Depending on when or where you use the camera, attach the USB adaptor for Multi connector USB cable USB adaptor cap 10 About the wrist strap Attach the strap and place your hand through the loop to the adaptor or the cable.
It may become damaged. USB adaptor for Multi connector to either the long or the short cable. • Attach the USB adaptor cap on the USB cable when carrying it in bags, etc. • Be careful not to hang or give strong impact to prevent the camera from damage by being dropped. Hook On attaching the USB adaptor for Multi connector/USB adaptor cap • Depending on when or where you use the camera, attach the USB adaptor for Multi connector USB cable USB adaptor cap 10 About the wrist strap Attach the strap and place your hand through the loop to the adaptor or the cable.
Instruction Manual
Page 12
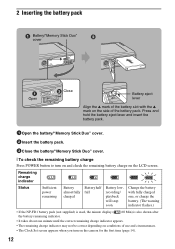
... on the side of use and circumstances. • The Clock Set screen appears when you turn on and check the remaining battery charge on the camera for the first time (page 14). 12 2 Inserting the battery pack Battery/"Memory Stick Duo" cover Open Close Battery eject lever Align the v mark of...
... on the side of use and circumstances. • The Clock Set screen appears when you turn on and check the remaining battery charge on the camera for the first time (page 14). 12 2 Inserting the battery pack Battery/"Memory Stick Duo" cover Open Close Battery eject lever Align the v mark of...

Instruction Manual
Page 13
... lit. [ To remove the battery pack Open the battery/"Memory Stick Duo" cover and remove the battery pack. Insert the "Memory Stick Duo" with this camera. [ To insert a "Memory Stick Duo" (not supplied) Open the battery/"Memory Stick Duo" cover to data in the "Memory Stick Duo"/internal memory. • ...Even if "Memory Stick Duo" is inserted in the camera, images will not be saved in once. • Never remove the "Memory Stick Duo" when the access lamp is full. This may cause damage to...
... lit. [ To remove the battery pack Open the battery/"Memory Stick Duo" cover and remove the battery pack. Insert the "Memory Stick Duo" with this camera. [ To insert a "Memory Stick Duo" (not supplied) Open the battery/"Memory Stick Duo" cover to data in the "Memory Stick Duo"/internal memory. • ...Even if "Memory Stick Duo" is inserted in the camera, images will not be saved in once. • Never remove the "Memory Stick Duo" when the access lamp is full. This may cause damage to...

Instruction Manual
Page 14
3 Turning the camera on/setting the clock POWER button Touch panel Lens Lens cover 1Press the POWER button or slide the lens cover downward. 2Set the clock by ... date display format, then touch . 2 Touch each item, then set is touched while shooting, the icons will make the icons reappear. 14 To hide this camera by lightly touching the buttons or icons on the screen, touch v/V to change the page. • You can return to set its numeric value by...
3 Turning the camera on/setting the clock POWER button Touch panel Lens Lens cover 1Press the POWER button or slide the lens cover downward. 2Set the clock by ... date display format, then touch . 2 Touch each item, then set is touched while shooting, the icons will make the icons reappear. 14 To hide this camera by lightly touching the buttons or icons on the screen, touch v/V to change the page. • You can return to set its numeric value by...

Instruction Manual
Page 15
... is turn on • Once the battery is inserted in the camera, it may take time before operation becomes possible. • If the camera is running on battery power and you do not operate the camera for about three minutes, the camera turns off automatically to prevent wearing down the battery pack (Auto power... upper edge of the lens cover as shown below. 2 Lightly press weight on the lens cover to slide it down. 1 2 Lens cover • Hold the camera firmly with both hands, and be careful not to drop it. 15
... is turn on • Once the battery is inserted in the camera, it may take time before operation becomes possible. • If the camera is running on battery power and you do not operate the camera for about three minutes, the camera turns off automatically to prevent wearing down the battery pack (Auto power... upper edge of the lens cover as shown below. 2 Lightly press weight on the lens cover to slide it down. 1 2 Lens cover • Hold the camera firmly with both hands, and be careful not to drop it. 15

Instruction Manual
Page 16
When shooting still images: 1 Press and hold the shutter button halfway down . Touch to undo the zoom. 16 The z (AE/AF lock) indicator (green) flashes, a beep sounds, the ... button Flash Self-timer lamp/ Smile shutter lamp Lens cover Microphone Lens T/W (Zoom) button Touch panel Tripod receptacle (bottom) 1Open the lens cover. 2Hold the camera steady, keeping your arm at your side. Using the zoom: Press T to zoom, press W to cancel this function. 3Shoot with the shutter button. AE/AF...
When shooting still images: 1 Press and hold the shutter button halfway down . Touch to undo the zoom. 16 The z (AE/AF lock) indicator (green) flashes, a beep sounds, the ... button Flash Self-timer lamp/ Smile shutter lamp Lens cover Microphone Lens T/W (Zoom) button Touch panel Tripod receptacle (bottom) 1Open the lens cover. 2Hold the camera steady, keeping your arm at your side. Using the zoom: Press T to zoom, press W to cancel this function. 3Shoot with the shutter button. AE/AF...

Instruction Manual
Page 17
... screen. Touch the desired item, then [BACK]. Auto Adjustment: Allows you to shoot soft images for still images E Shooting close-up to shoot still images with audio. Smile Shutter: When the shutter button is pressed and the camera detects a smile, the shutter is released automatically to shoot images without a flash under low light...
... screen. Touch the desired item, then [BACK]. Auto Adjustment: Allows you to shoot soft images for still images E Shooting close-up to shoot still images with audio. Smile Shutter: When the shutter button is pressed and the camera detects a smile, the shutter is released automatically to shoot images without a flash under low light...
Instruction Manual
Page 19
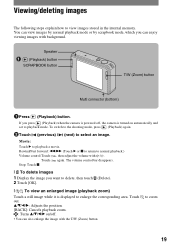
... control bar disappears. Touch again. You can view images by normal playback mode or by scrapbook mode, which you press (Playback) when the camera is powered off . • You can enjoy viewing images with background. Stop: Touch x. [ To delete images 1 Display the image you... want to delete, then touch 2 Touch [OK]. (Delete). [ To view an enlarged image (playback zoom) Touch a still image while it is turned on /off , the camera is displayed to enlarge the corresponding area. Speaker (Playback) button SCRAPBOOK button T/W (Zoom) button Multi connector (bottom) 1Press (Playback...
... control bar disappears. Touch again. You can view images by normal playback mode or by scrapbook mode, which you press (Playback) when the camera is powered off . • You can enjoy viewing images with background. Stop: Touch x. [ To delete images 1 Display the image you... want to delete, then touch 2 Touch [OK]. (Delete). [ To view an enlarged image (playback zoom) Touch a still image while it is turned on /off , the camera is displayed to enlarge the corresponding area. Speaker (Playback) button SCRAPBOOK button T/W (Zoom) button Multi connector (bottom) 1Press (Playback...
Instruction Manual
Page 20
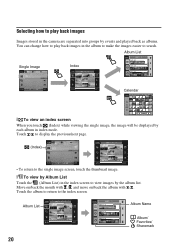
... image, the image will be displayed by events and played back as albums. You can change how to play back images Images stored in the camera are separated into groups by each album in the index screen to view images by the album list. Album List Album Name Album/ Favorites/ Sharemark...
... image, the image will be displayed by events and played back as albums. You can change how to play back images Images stored in the camera are separated into groups by each album in the index screen to view images by the album list. Album List Album Name Album/ Favorites/ Sharemark...
Instruction Manual
Page 21
.... Then select [Music Tool] t [Download Music] in [Printing, Other] (page 24). 2 Install the software included in the supplied CD-ROM to your computer. 3 Connect the camera and a computer with USB cable. 4 Start up "Music Transfer" installed to your desired music. To transfer and change the music, take the following steps. 1 Touch...
.... Then select [Music Tool] t [Download Music] in [Printing, Other] (page 24). 2 Install the software included in the supplied CD-ROM to your computer. 3 Connect the camera and a computer with USB cable. 4 Start up "Music Transfer" installed to your desired music. To transfer and change the music, take the following steps. 1 Touch...
Instruction Manual
Page 22
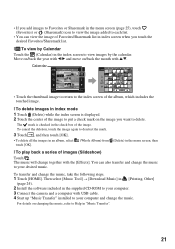
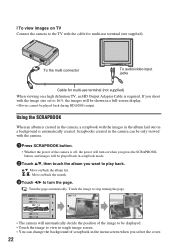
... the menu screen when you select the cover. 22 If you want to play back. Using the SCRAPBOOK When an album is created in the camera, a scrapbook with the images in the album laid out on a background is off, the power will turn the page. : Turn the page automatically. Touch the... image to stop turning the page. • The camera will be shown in single image screen. • You can be played back during HD(1080i) output. v/V: Move on/back the album list. / : Move on...
... the menu screen when you select the cover. 22 If you want to play back. Using the SCRAPBOOK When an album is created in the camera, a scrapbook with the images in the album laid out on a background is off, the power will turn the page. : Turn the page automatically. Touch the... image to stop turning the page. • The camera will be shown in single image screen. • You can be played back during HD(1080i) output. v/V: Move on/back the album list. / : Move on...
Instruction Manual
Page 23
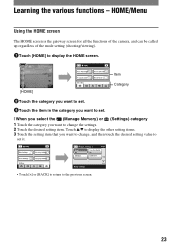
HOME/Menu Using the HOME screen The HOME screen is the gateway screen for all the functions of the camera, and can be called up regardless of the mode setting (shooting/viewing). 1Touch [HOME] to change , and then touch the desired setting value to set . [ ...
HOME/Menu Using the HOME screen The HOME screen is the gateway screen for all the functions of the camera, and can be called up regardless of the mode setting (shooting/viewing). 1Touch [HOME] to change , and then touch the desired setting value to set . [ ...
Instruction Manual
Page 28
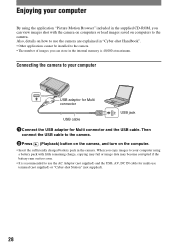
...cable USB jack 1Connect the USB adaptor for multi-use the camera are explained in "Cyber-shot Handbook". • Other applications cannot be installed to the camera. • The number of images you can view images shot with the camera on computers or load images saved on the computer. •...using the application "Picture Motion Browser" included in the supplied CD-ROM, you can store in the camera. Also, details on how to use terminal (not supplied) or "Cyber-shot Station" (not supplied). 28 Enjoying your computer By using a battery pack with little remaining charge, copying...
...cable USB jack 1Connect the USB adaptor for multi-use the camera are explained in "Cyber-shot Handbook". • Other applications cannot be installed to the camera. • The number of images you can view images shot with the camera on computers or load images saved on the computer. •...using the application "Picture Motion Browser" included in the supplied CD-ROM, you can store in the camera. Also, details on how to use terminal (not supplied) or "Cyber-shot Station" (not supplied). 28 Enjoying your computer By using a battery pack with little remaining charge, copying...

Instruction Manual
Page 29
...Reader is required for copying "Cyber-shot Handbook" appears. 2 Follow the on-screen instructions to use the camera. Enjoying the supplied software [ Recommended environment for you click the "Cyber-shot Handbook" button, both of words that can import images shot with the camera more efficiently. By using "...8226; You can name the album. When you to enjoy the still images and movies shot with the camera by albums and view them. • You can adjust, print, upload on the operating environment, refer to "Cyber-shot Handbook" or "Picture Motion Browser Guide". [ Using "Picture Motion...
...Reader is required for copying "Cyber-shot Handbook" appears. 2 Follow the on-screen instructions to use the camera. Enjoying the supplied software [ Recommended environment for you click the "Cyber-shot Handbook" button, both of words that can import images shot with the camera more efficiently. By using "...8226; You can name the album. When you to enjoy the still images and movies shot with the camera by albums and view them. • You can adjust, print, upload on the operating environment, refer to "Cyber-shot Handbook" or "Picture Motion Browser Guide". [ Using "Picture Motion...
Instruction Manual
Page 30
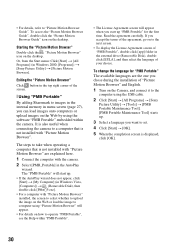
... the agreement carefully. If you accept the terms of "Picture Motion Browser" and English. 1 Turn on the Camera, and connect it to the computer using the USB cable. 2 Click [Start] t [All Programs] t [Sony Picture Utility] t [Tools] t [PMB Portable Maintenance Tool]. [PMB Portable Maintenance Tool] starts up "PMB Portable" for "PMB Portable" The...
... the agreement carefully. If you accept the terms of "Picture Motion Browser" and English. 1 Turn on the Camera, and connect it to the computer using the USB cable. 2 Click [Start] t [All Programs] t [Sony Picture Utility] t [Tools] t [PMB Portable Maintenance Tool]. [PMB Portable Maintenance Tool] starts up "PMB Portable" for "PMB Portable" The...
Instruction Manual
Page 34
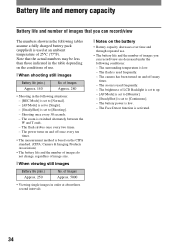
... at an ambient temperature of 25°C (77°F). The Face Detect function is low. - The surrounding temperature is activated. 34 The camera has been turned on and off once every ten times. • The measurement method is set to [Shooting]. - Shooting once every 30 ... set to [Monitor]. - [SteadyShot] is based on the CIPA standard. (CIPA: Camera & Imaging Products Association) • The battery life and the number of images do not change, regardless of image size. [ When viewing still images Battery life (min.) Approx. 250 No. Battery life and memory capacity Battery life...
... at an ambient temperature of 25°C (77°F). The Face Detect function is low. - The surrounding temperature is activated. 34 The camera has been turned on and off once every ten times. • The measurement method is set to [Shooting]. - Shooting once every 30 ... set to [Monitor]. - [SteadyShot] is based on the CIPA standard. (CIPA: Camera & Imaging Products Association) • The battery life and the number of images do not change, regardless of image size. [ When viewing still images Battery life (min.) Approx. 250 No. Battery life and memory capacity Battery life...


