Instruction Manual
Page 3
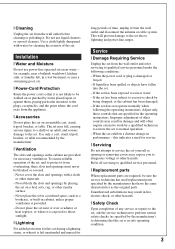
... slots and openings with water for cleaning the exterior of the set, and to protect it from the wall outlet and disconnect the antenna or cable system. This will often require extensive work by a qualified technician to restore the set to normal operation. - If liquid has been spilled or objects have...
... slots and openings with water for cleaning the exterior of the set, and to protect it from the wall outlet and disconnect the antenna or cable system. This will often require extensive work by a qualified technician to restore the set to normal operation. - If liquid has been spilled or objects have...

Instruction Manual
Page 5
...causes data transfer to discontinue midway (fail), restart the application or disconnect and connect the communication cable (USB, etc.) again. [ Disposal of FCC Rules. The recycling of materials will help prevent.... For the State of this product, please contact your local Civic Office, your nearest Sony service station. 5 Connect the equipment into an outlet on its packaging indicates that to... which could otherwise be handed over to the applicable collection point for a digital device pursuant to be used with the equipment in the European Union and other European ...
...causes data transfer to discontinue midway (fail), restart the application or disconnect and connect the communication cable (USB, etc.) again. [ Disposal of FCC Rules. The recycling of materials will help prevent.... For the State of this product, please contact your local Civic Office, your nearest Sony service station. 5 Connect the equipment into an outlet on its packaging indicates that to... which could otherwise be handed over to the applicable collection point for a digital device pursuant to be used with the equipment in the European Union and other European ...
Instruction Manual
Page 8
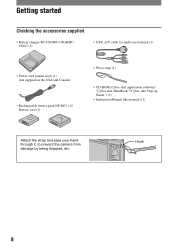
Getting started Checking the accessories supplied • Battery charger BC-CSG/BC-CSGB/BCCSGC (1) • USB, A/V cable for multi-use terminal (1) • Power cord (mains lead) (1) (not supplied in the USA and Canada) • Rechargeable battery pack NP-BG1 (1)/ Battery case (1) • Wrist strap (1) • CD-ROM (Cyber-shot application software/ "Cyber-shot Handbook"/"Cyber-shot Step-up Guide") (1) • Instruction Manual (this manual) (1) Attach the strap and pass your hand through it, to prevent the camera from damage by being dropped, etc. Hook 8
Getting started Checking the accessories supplied • Battery charger BC-CSG/BC-CSGB/BCCSGC (1) • USB, A/V cable for multi-use terminal (1) • Power cord (mains lead) (1) (not supplied in the USA and Canada) • Rechargeable battery pack NP-BG1 (1)/ Battery case (1) • Wrist strap (1) • CD-ROM (Cyber-shot application software/ "Cyber-shot Handbook"/"Cyber-shot Step-up Guide") (1) • Instruction Manual (this manual) (1) Attach the strap and pass your hand through it, to prevent the camera from damage by being dropped, etc. Hook 8
Instruction Manual
Page 16
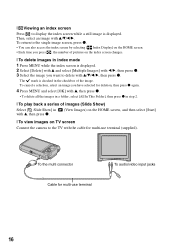
...16 To cancel a selection, select an image you have selected for multi-use terminal (supplied). To the multi connector Cable for deletion, then press z again. 4 Press MENU and select [OK] with v, then press z. • ...Index Display] on the HOME screen. • Each time you want to display the index screen while a still image is displayed. The mark is checked in index mode 1 Press MENU while the index screen is displayed. ... v, then press z. [ To view images on TV screen Connect the camera to the TV with v/V/b/B. [ Viewing an index screen Press to delete with v/V/b/B, then press z.
...16 To cancel a selection, select an image you have selected for multi-use terminal (supplied). To the multi connector Cable for deletion, then press z again. 4 Press MENU and select [OK] with v, then press z. • ...Index Display] on the HOME screen. • Each time you want to display the index screen while a still image is displayed. The mark is checked in index mode 1 Press MENU while the index screen is displayed. ... v, then press z. [ To view images on TV screen Connect the camera to the TV with v/V/b/B. [ Viewing an index screen Press to delete with v/V/b/B, then press z.

Sony® Guide to Digital Photography (Spring 2007)
Page 4
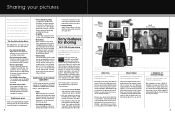
... taken with a Sony® digital camera. Aperture f5.6. Thanks to your digital pictures. Option 2: HD Cradle Solution Option 3: HD Camera/Printer Bundle Solution Result: HD Photo Sharing 5 especially your HDTV in HD resolution! FULL HD 1080 Enjoy High Definition using the optional VMC-MHC1 cable, optional CSS-HD1 Cyber-shot® Station cradle or the DSC-W80HDPR bundle connected...
... taken with a Sony® digital camera. Aperture f5.6. Thanks to your digital pictures. Option 2: HD Cradle Solution Option 3: HD Camera/Printer Bundle Solution Result: HD Photo Sharing 5 especially your HDTV in HD resolution! FULL HD 1080 Enjoy High Definition using the optional VMC-MHC1 cable, optional CSS-HD1 Cyber-shot® Station cradle or the DSC-W80HDPR bundle connected...
Sony® Guide to Digital Photography (Spring 2007)
Page 24
...: • Connect via USB cable. Sony features for sharing Full HD 1080 still image viewing Your HDTV just got your camera, you did on -board (1.86 GB net available for keeps! Full HD 1080 still image viewing is still worth the proverbial 1,000 words. Most Cyber-shot models are not just pictures....optional VMC-MHC1 cable, which goes right to the Y/Pb/Pr component video inputs of an HDTV. • Dock your camera in the digital age, a picture is a great way to manage. 45 Album feature The DSC-N2 and G1 aren't just cameras; So you connect your Sony camera to a Sony BRAVIA™ ...
...: • Connect via USB cable. Sony features for sharing Full HD 1080 still image viewing Your HDTV just got your camera, you did on -board (1.86 GB net available for keeps! Full HD 1080 still image viewing is still worth the proverbial 1,000 words. Most Cyber-shot models are not just pictures....optional VMC-MHC1 cable, which goes right to the Y/Pb/Pr component video inputs of an HDTV. • Dock your camera in the digital age, a picture is a great way to manage. 45 Album feature The DSC-N2 and G1 aren't just cameras; So you connect your Sony camera to a Sony BRAVIA™ ...
Sony® Guide to Digital Photography (Spring 2007)
Page 25
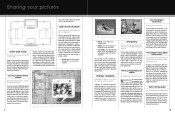
...USB. You can print even without a computer. That's the concept behind Sony's home digital photo printers. Printing from our earlier DSC-F828, V3 and R1 Cyber-shot® digital cameras. At the push of the camera and bringing it to a photo printer or retail store print kiosk, .... PictBridge™ compatibility Print without a cable in about 45 seconds from the a100 Digital SLR. PC-free printing is easy when you to upload your pictures with Cyber-shot cameras, enables you connect a PictBridge™ compatible Sony camera to the typical home computer is that beach...
...USB. You can print even without a computer. That's the concept behind Sony's home digital photo printers. Printing from our earlier DSC-F828, V3 and R1 Cyber-shot® digital cameras. At the push of the camera and bringing it to a photo printer or retail store print kiosk, .... PictBridge™ compatibility Print without a cable in about 45 seconds from the a100 Digital SLR. PC-free printing is easy when you to upload your pictures with Cyber-shot cameras, enables you connect a PictBridge™ compatible Sony camera to the typical home computer is that beach...
Sony® Guide to Digital Photography (Spring 2007)
Page 27
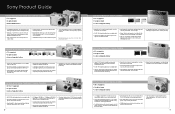
...may vary upon usage patterns, product settings, battery and environmental conditions. Sony Product Guide DSC-S650 & DSC-S700 CYBER-SHOT® DIGITAL CAMERAS • 7.2 megapixels • 3x optical zoom • Alkaline/NiMH batteries &#...DSC-T100 CYBER-SHOT® DIGITAL CAMERA • 8.1 megapixels • 5x optical zoom • Li-Ion rechargeable battery DSC-T100 also available in: Black Red • Large 3.0" LCD monitor (viewable area measured diagonally) with 230K pixels makes framing and reviewing pictures easy. • Full HD 1080 output using optional accessory adaptor cable...
...may vary upon usage patterns, product settings, battery and environmental conditions. Sony Product Guide DSC-S650 & DSC-S700 CYBER-SHOT® DIGITAL CAMERAS • 7.2 megapixels • 3x optical zoom • Alkaline/NiMH batteries &#...DSC-T100 CYBER-SHOT® DIGITAL CAMERA • 8.1 megapixels • 5x optical zoom • Li-Ion rechargeable battery DSC-T100 also available in: Black Red • Large 3.0" LCD monitor (viewable area measured diagonally) with 230K pixels makes framing and reviewing pictures easy. • Full HD 1080 output using optional accessory adaptor cable...
Sony® Guide to Digital Photography (Spring 2007)
Page 28
...camera shake further still. • Sony Super HAD™ CCD enables more light to take automatically goes into the album! • World's biggest, highest-resolution digital camera ...1.86 GB. Sony Product Guide DSC-G1 CYBER-SHOT® DIGITAL CAMERA • 6.0 megapixels • 3x optical zoom • InfoLITHIUM® rechargeable battery The world's biggest digital camera monitor (as 1985...shot. • Super SteadyShot® optical image stabilization fights motion blur, even during longer exposures at full zoom. • Full HD 1080 output using optional accessory adaptor cable...
...camera shake further still. • Sony Super HAD™ CCD enables more light to take automatically goes into the album! • World's biggest, highest-resolution digital camera ...1.86 GB. Sony Product Guide DSC-G1 CYBER-SHOT® DIGITAL CAMERA • 6.0 megapixels • 3x optical zoom • InfoLITHIUM® rechargeable battery The world's biggest digital camera monitor (as 1985...shot. • Super SteadyShot® optical image stabilization fights motion blur, even during longer exposures at full zoom. • Full HD 1080 output using optional accessory adaptor cable...
Sony® Guide to Digital Photography (Spring 2007)
Page 29
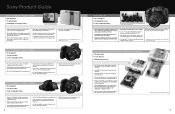
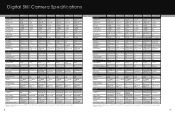
...N/A 7 mode 8"-21'8" (0.2-6.6 m) ISO 3200 7 Preset f2.8-8 Auto, 1/4-1/1600 Adj. Digital Still Camera Specifications DSC-S650 DSC-S700 DSC-W55 DSC-W80 DSC-W90 DSC-W200 DSC-T20 Lens & Imager Sony Image Sensor Megapixel Lens / Optical Zoom Aperture Focal Length 35mm Equivalency Smart Zoom® Function ...Optical, True Zoom Yes 56 MB MS Duo 7, 5, 3, 2 MP, VGA, 3:2, 16:9 4-shot / 1.1 fps (7 MP) N/A B&W, Sepia, Rich, Natural VX Fin/Std, VM N/A AV/USB via multi-cable Battery Compatibility PictBridge™ Compatibility Album / Slide Show Dimensions Weight (with battery & media)**** 2 ...
...N/A 7 mode 8"-21'8" (0.2-6.6 m) ISO 3200 7 Preset f2.8-8 Auto, 1/4-1/1600 Adj. Digital Still Camera Specifications DSC-S650 DSC-S700 DSC-W55 DSC-W80 DSC-W90 DSC-W200 DSC-T20 Lens & Imager Sony Image Sensor Megapixel Lens / Optical Zoom Aperture Focal Length 35mm Equivalency Smart Zoom® Function ...Optical, True Zoom Yes 56 MB MS Duo 7, 5, 3, 2 MP, VGA, 3:2, 16:9 4-shot / 1.1 fps (7 MP) N/A B&W, Sepia, Rich, Natural VX Fin/Std, VM N/A AV/USB via multi-cable Battery Compatibility PictBridge™ Compatibility Album / Slide Show Dimensions Weight (with battery & media)**** 2 ...

Cyber-shot® Handbook
Page 16
...) mark (94) PictBridge connecting (92) Zoom scaling (24) PictBridge connecting (93) • Do not disconnect the cable for multi-use terminal while the icon is disabled. 16 Indicators on the screen When playing back still images When playing back movies A Display Indication Battery remaining Image size (35) VOL. Indication Playback (24) Playback...
...) mark (94) PictBridge connecting (92) Zoom scaling (24) PictBridge connecting (93) • Do not disconnect the cable for multi-use terminal while the icon is disabled. 16 Indicators on the screen When playing back still images When playing back movies A Display Indication Battery remaining Image size (35) VOL. Indication Playback (24) Playback...

Cyber-shot® Handbook
Page 19
... data on a "Memory Stick Duo" to the internal memory. • By connecting the camera and a computer with the image size set to [640(Fine)] cannot be recorded using this internal memory. • Movies with a cable for multi-use terminal, you can be performed on images on the "Memory Stick Duo... Stick Duo" with a capacity of the following methods. To copy (back up ) data on a hard disk of internal memory. Using the internal memory The camera has approximately 31 MB of your computer Perform the procedure on pages 74 to the internal memory. 19 This memory is no "Memory Stick Duo...
... data on a "Memory Stick Duo" to the internal memory. • By connecting the camera and a computer with the image size set to [640(Fine)] cannot be recorded using this internal memory. • Movies with a cable for multi-use terminal, you can be performed on images on the "Memory Stick Duo... Stick Duo" with a capacity of the following methods. To copy (back up ) data on a hard disk of internal memory. Using the internal memory The camera has approximately 31 MB of your computer Perform the procedure on pages 74 to the internal memory. 19 This memory is no "Memory Stick Duo...

Cyber-shot® Handbook
Page 61
... be used when connecting the camera to [PictBridge]. • If the camera and a computer or other USB device (page 75). Customizing the settings 61 USB Connect Selects the USB mode to be connected when set to [Auto], change the setting to a computer or a PictBridge compliant printer using the cable for multi-use terminal...
... be used when connecting the camera to [PictBridge]. • If the camera and a computer or other USB device (page 75). Customizing the settings 61 USB Connect Selects the USB mode to be connected when set to [Auto], change the setting to a computer or a PictBridge compliant printer using the cable for multi-use terminal...

Cyber-shot® Handbook
Page 68
... (page 62). 68 Images shot with the TV. 3 Press to turn on the TV screen. Press b/B on a TV screen by connecting your camera to a TV with the supplied cable Turn off both your camera and the TV before connecting the camera and the TV. 1 Connect the camera to the TV. 1 To... audio/video input jacks VIDEO AUDIO Yellow Black (Playback) button Cable for multi-use terminal (supplied) Control button...
... (page 62). 68 Images shot with the TV. 3 Press to turn on the TV screen. Press b/B on a TV screen by connecting your camera to a TV with the supplied cable Turn off both your camera and the TV before connecting the camera and the TV. 1 Connect the camera to the TV. 1 To... audio/video input jacks VIDEO AUDIO Yellow Black (Playback) button Cable for multi-use terminal (supplied) Control button...

Cyber-shot® Handbook
Page 69
... AUDIO PY Pb Pr White/Red Green/Blue/Red (Playback) button Control button Component cable (not supplied) 2 To the multi connector HOME button • Place the camera with the screen facing upwards. • The cable for video jacks (Green/Blue/Red) is the same color as the respective jacks.... the TV. 3 Press to turn on the TV screen. Images shot with the component cable (not supplied). Press b/B on a TV Viewing images by connecting the camera to an HD (High Definition) TV with the camera appear on the camera. Viewing images on the control button to select the desired image....
... AUDIO PY Pb Pr White/Red Green/Blue/Red (Playback) button Control button Component cable (not supplied) 2 To the multi connector HOME button • Place the camera with the screen facing upwards. • The cable for video jacks (Green/Blue/Red) is the same color as the respective jacks.... the TV. 3 Press to turn on the TV screen. Images shot with the component cable (not supplied). Press b/B on a TV Viewing images by connecting the camera to an HD (High Definition) TV with the camera appear on the camera. Viewing images on the control button to select the desired image....

Cyber-shot® Handbook
Page 70
On TV color systems If you need a TV with a video input jack and the cable for the TV color system of the country or region where the camera is used. The color system of the TV must match that of your TV system (page 62). NTSC system Bahama Islands, Bolivia, Canada, Central ... images on a TV • Set [COMPONENT] to [HD(1080i)] in [ Main Settings 2] by selecting (Settings) on the HOME screen (page 61). • When using your camera abroad, it may be necessary to switch the video signal output to view images on a TV screen, you want to match that of your digital still camera.
On TV color systems If you need a TV with a video input jack and the cable for the TV color system of the country or region where the camera is used. The color system of the TV must match that of your TV system (page 62). NTSC system Bahama Islands, Bolivia, Canada, Central ... images on a TV • Set [COMPONENT] to [HD(1080i)] in [ Main Settings 2] by selecting (Settings) on the HOME screen (page 61). • When using your camera abroad, it may be necessary to switch the video signal output to view images on a TV screen, you want to match that of your digital still camera.

Cyber-shot® Handbook
Page 74
...Duo" is unnecessary. 2 Insert the sufficiently charged battery pack in the camera, or connect the camera to a wall outlet (wall socket) with the AC Adaptor (not supplied) and the USB, A/V, DC IN cable for copying images from the camera and insert it in the internal memory to your computer, copy the ... screen displays shown in this step is not recognized, see page 101. To copy images in the Memory Stick Duo Adaptor. Stage 1: Preparing the camera and the computer 1 Insert a "Memory Stick Duo" with little remaining charge, copying may fail or image data may become corrupted if the battery ...
...Duo" is unnecessary. 2 Insert the sufficiently charged battery pack in the camera, or connect the camera to a wall outlet (wall socket) with the AC Adaptor (not supplied) and the USB, A/V, DC IN cable for copying images from the camera and insert it in the internal memory to your computer, copy the ... screen displays shown in this step is not recognized, see page 101. To copy images in the Memory Stick Duo Adaptor. Stage 1: Preparing the camera and the computer 1 Insert a "Memory Stick Duo" with little remaining charge, copying may fail or image data may become corrupted if the battery ...

Cyber-shot® Handbook
Page 75
... connection is established for the first time, your computer 75 Copying images to your computer Stage 2: Connecting the camera and your computer Connect the camera to your computer. 2 To the multi connector 1 To a USB jack Cable for multi-use terminal • With Windows XP, the Auto Play wizard appears on the screen of...
... connection is established for the first time, your computer 75 Copying images to your computer Stage 2: Connecting the camera and your computer Connect the camera to your computer. 2 To the multi connector 1 To a USB jack Cable for multi-use terminal • With Windows XP, the Auto Play wizard appears on the screen of...

Cyber-shot® Handbook
Page 77
...to copy are copied to the "My Documents" folder. • When an image with the same file name exists in "Stage 2: Connecting the camera and your camera. However, note that image with a new one, the original file data is not displayed, see (page 79). 3 Double-click the [My... Documents] folder. Using your computer 6 Click [Finish]. Copying images to your computer 77 The wizard screen closes. • To continue copying other images, disconnect the cable...
...to copy are copied to the "My Documents" folder. • When an image with the same file name exists in "Stage 2: Connecting the camera and your camera. However, note that image with a new one, the original file data is not displayed, see (page 79). 3 Double-click the [My... Documents] folder. Using your computer 6 Click [Finish]. Copying images to your computer 77 The wizard screen closes. • To continue copying other images, disconnect the cable...

Cyber-shot® Handbook
Page 78
...multi-use terminal • Removing a "Memory Stick Duo" • Inserting a "Memory Stick Duo" into the camera after copying images from the internal memory • Turning off the camera 1 Double-click on the tasktray. The device is disconnected. • Step 4 is displayed. 78 Copying images ...not using Windows XP, double-click [My Documents] on the confirmation window, then click [OK]. 4 Click [OK]. Double-click here 2 Click (Sony DSC) t [Stop]. 3 Confirm the device on the desktop. 2 Double-click the desired image file. To delete the USB connection Perform the procedures listed ...
...multi-use terminal • Removing a "Memory Stick Duo" • Inserting a "Memory Stick Duo" into the camera after copying images from the internal memory • Turning off the camera 1 Double-click on the tasktray. The device is disconnected. • Step 4 is displayed. 78 Copying images ...not using Windows XP, double-click [My Documents] on the confirmation window, then click [OK]. 4 Click [OK]. Double-click here 2 Click (Sony DSC) t [Stop]. 3 Confirm the device on the desktop. 2 Double-click the desired image file. To delete the USB connection Perform the procedures listed ...


