
Instruction Manual
Page 6
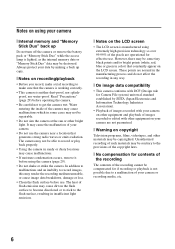
...to become discolored or to stick to the flash surface, resulting in any way. [ On image data compatibility • This camera conforms with other equipment on your camera are not guaranteed. [ Warning on copyright Television programs, films, videotapes, and other bright light. Always protect your data by... a trial recording to make sure that generates strong radio waves or emits radiation. In addition to malfunctions and an inability to get the camera wet. However, there may render the recording medium unusable, or cause image data breakdown, damage or loss. • Clean the flash ...
...to become discolored or to stick to the flash surface, resulting in any way. [ On image data compatibility • This camera conforms with other equipment on your camera are not guaranteed. [ Warning on copyright Television programs, films, videotapes, and other bright light. Always protect your data by... a trial recording to make sure that generates strong radio waves or emits radiation. In addition to malfunctions and an inability to get the camera wet. However, there may render the recording medium unusable, or cause image data breakdown, damage or loss. • Clean the flash ...
Instruction Manual
Page 7
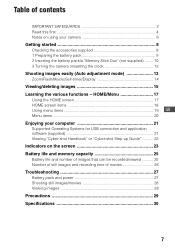
...menu items 19 GB Menu items 20 Enjoying your camera 6 Getting started 8 Checking the accessories supplied 8 1 Preparing the battery pack 9 2 Inserting the battery pack/a "Memory Stick Duo" (not supplied) ........ 10 3 Turning the camera on the screen 23 Battery life and memory ...viewed .......... 25 Number of still images and recording time of contents IMPORTANT SAFEGUARDS 2 Read this first 4 Notes on using your computer 21 Supported Operating Systems for USB connection and application software (supplied 21 Viewing "Cyber-shot Handbook" or "Cyber-shot Step-up Guide 22 Indicators ...
...menu items 19 GB Menu items 20 Enjoying your camera 6 Getting started 8 Checking the accessories supplied 8 1 Preparing the battery pack 9 2 Inserting the battery pack/a "Memory Stick Duo" (not supplied) ........ 10 3 Turning the camera on the screen 23 Battery life and memory ...viewed .......... 25 Number of still images and recording time of contents IMPORTANT SAFEGUARDS 2 Read this first 4 Notes on using your computer 21 Supported Operating Systems for USB connection and application software (supplied 21 Viewing "Cyber-shot Handbook" or "Cyber-shot Step-up Guide 22 Indicators ...
Instruction Manual
Page 8
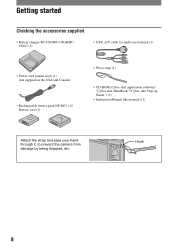
Hook 8 Getting started Checking the accessories supplied • Battery charger BC-CSG/BC-CSGB/BCCSGC (1) • USB, A/V cable for multi-use terminal (1) • Power cord (mains lead) (1) (not supplied in the USA and Canada) • Rechargeable battery pack NP-BG1 (1)/ Battery case (1) • Wrist strap (1) • CD-ROM (Cyber-shot application software/ "Cyber-shot Handbook"/"Cyber-shot Step-up Guide") (1) • Instruction Manual (this manual) (1) Attach the strap and pass your hand through it, to prevent the camera from damage by being dropped, etc.
Hook 8 Getting started Checking the accessories supplied • Battery charger BC-CSG/BC-CSGB/BCCSGC (1) • USB, A/V cable for multi-use terminal (1) • Power cord (mains lead) (1) (not supplied in the USA and Canada) • Rechargeable battery pack NP-BG1 (1)/ Battery case (1) • Wrist strap (1) • CD-ROM (Cyber-shot application software/ "Cyber-shot Handbook"/"Cyber-shot Step-up Guide") (1) • Instruction Manual (this manual) (1) Attach the strap and pass your hand through it, to prevent the camera from damage by being dropped, etc.
Instruction Manual
Page 10
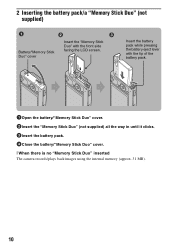
... way in until it clicks. 3Insert the battery pack. 4Close the battery/"Memory Stick Duo" cover. [ When there is no "Memory Stick Duo" inserted The camera records/plays back images using the internal memory (approx. 31 MB). 10 Insert the battery pack while pressing the battery eject lever with the front...
... way in until it clicks. 3Insert the battery pack. 4Close the battery/"Memory Stick Duo" cover. [ When there is no "Memory Stick Duo" inserted The camera records/plays back images using the internal memory (approx. 31 MB). 10 Insert the battery pack while pressing the battery eject lever with the front...
Instruction Manual
Page 11
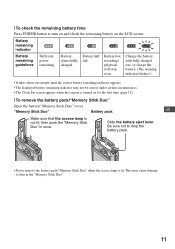
... half full Battery low, recording/ playback will stop soon. This may not be correct under certain circumstances. • The Clock Set screen appears when the camera is turned on the LCD screen. "Memory Stick Duo" Battery pack GB Make sure that the access lamp is lit. Change the battery with fully...
... half full Battery low, recording/ playback will stop soon. This may not be correct under certain circumstances. • The Clock Set screen appears when the camera is turned on the LCD screen. "Memory Stick Duo" Battery pack GB Make sure that the access lamp is lit. Change the battery with fully...
Instruction Manual
Page 12
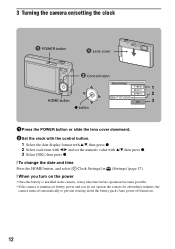
3 Turning the camera on/setting the clock POWER button Lens cover ɟ Control button 1 2 HOME button 3 z button 1Press the POWER button or slide the lens cover downward. 2Set ... on the power • Once the battery is installed in the camera, it may take time before operation becomes possible. • If the camera is running on battery power and you do not operate the camera for about three minutes, the camera turns off automatically to prevent wearing down the battery pack (Auto power...
3 Turning the camera on/setting the clock POWER button Lens cover ɟ Control button 1 2 HOME button 3 z button 1Press the POWER button or slide the lens cover downward. 2Set ... on the power • Once the battery is installed in the camera, it may take time before operation becomes possible. • If the camera is running on battery power and you do not operate the camera for about three minutes, the camera turns off automatically to prevent wearing down the battery pack (Auto power...
Instruction Manual
Page 13
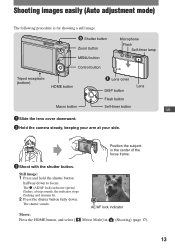
...remains lit. 2 Press the shutter button fully down to focus. Shooting images easily (Auto adjustment mode) The following procedure is for shooting a still image. ɠ Shutter button Zoom button MENU button Control button Microphone Flash Self-timer lamp Tripod receptacle (bottom) HOME button Lens cover DISP... button Lens Flash button Macro button Self-timer button GB 1 Slide the lens cover downward. 2 Hold the camera steady, keeping your arm at your side. AE/AF lock indicator Movie: Press the HOME button, and select [ Movie Mode] in the ...
...remains lit. 2 Press the shutter button fully down to focus. Shooting images easily (Auto adjustment mode) The following procedure is for shooting a still image. ɠ Shutter button Zoom button MENU button Control button Microphone Flash Self-timer lamp Tripod receptacle (bottom) HOME button Lens cover DISP... button Lens Flash button Macro button Self-timer button GB 1 Slide the lens cover downward. 2 Hold the camera steady, keeping your arm at your side. AE/AF lock indicator Movie: Press the HOME button, and select [ Movie Mode] in the ...
Instruction Manual
Page 15
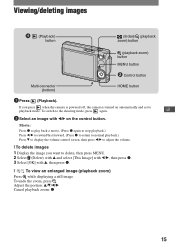
GB 2 Select an image with v, then press z. [ To view an enlarged image (playback zoom) Press while displaying a still image. Movie: Press z to play back a movie. (Press z again to stop playback.) Press b/B to rewind/fast forward. (Press z to return to normal playback.)...V to display the volume control screen, then press b/B to adjust the volume. [ To delete images 1 Display the image you press when the camera is powered off, the camera is turned on the control button. Viewing/deleting images (Playback) button (Index)/ (playback zoom) button (playback zoom) button MENU button ɟ ...
GB 2 Select an image with v, then press z. [ To view an enlarged image (playback zoom) Press while displaying a still image. Movie: Press z to play back a movie. (Press z again to stop playback.) Press b/B to rewind/fast forward. (Press z to return to normal playback.)...V to display the volume control screen, then press b/B to adjust the volume. [ To delete images 1 Display the image you press when the camera is powered off, the camera is turned on the control button. Viewing/deleting images (Playback) button (Index)/ (playback zoom) button (playback zoom) button MENU button ɟ ...
Instruction Manual
Page 16
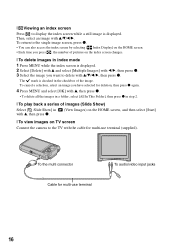
... by selecting [ Index Display] on the HOME screen. • Each time you press , the number of pictures on TV screen Connect the camera to delete with v/V/b/B, then press z. To the multi connector Cable for multi-use terminal To audio/video input jacks 16 Then, select an image... with the cable for multi-use terminal (supplied). [ Viewing an index screen Press to display the index screen while a still image is displayed. 2 Select [Delete] with v and select [Multiple Images] with b/B, then press z. 3 Select the image you want to the TV with v/V/b/B....
... by selecting [ Index Display] on the HOME screen. • Each time you press , the number of pictures on TV screen Connect the camera to delete with v/V/b/B, then press z. To the multi connector Cable for multi-use terminal To audio/video input jacks 16 Then, select an image... with the cable for multi-use terminal (supplied). [ Viewing an index screen Press to display the index screen while a still image is displayed. 2 Select [Delete] with v and select [Multiple Images] with b/B, then press z. 3 Select the image you want to the TV with v/V/b/B....
Instruction Manual
Page 17
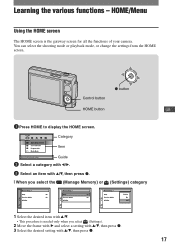
... with B and select a setting with v/V, then press z. 3 Select the desired setting with v/V. • This procedure is the gateway screen for all the functions of your camera. Learning the various functions - Control button z button HOME button GB 1 Press HOME to display the HOME screen.
... with B and select a setting with v/V, then press z. 3 Select the desired setting with v/V. • This procedure is the gateway screen for all the functions of your camera. Learning the various functions - Control button z button HOME button GB 1 Press HOME to display the HOME screen.
Instruction Manual
Page 19
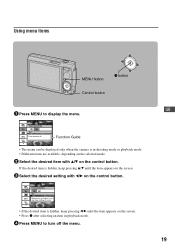
Function Guide • The menu can be displayed only when the camera is in playback mode. 4 Press MENU to display the menu. If the desired item is hidden, keep pressing b/B until the item appears on the screen. 3 ...
Function Guide • The menu can be displayed only when the camera is in playback mode. 4 Press MENU to display the menu. If the desired item is hidden, keep pressing b/B until the item appears on the screen. 3 ...

Instruction Manual
Page 20
...mode. White Bal Adjusts the color tones. Plays back a series of the image or adds special effects. Image Size Selects the still image quality. EV Adjusts Exposure. Flash Level Adjusts the amount of flash light. Also, different items are available depending on the... selected shooting mode (such as Auto Adjustment, Scene Selection, Program Auto, Movie Mode) on the camera mode. Prevents accidental erasure. Prints images using flash. REC Mode Selects the continuous shooting method. For details on the operation 1 page...
...mode. White Bal Adjusts the color tones. Plays back a series of the image or adds special effects. Image Size Selects the still image quality. EV Adjusts Exposure. Flash Level Adjusts the amount of flash light. Also, different items are available depending on the... selected shooting mode (such as Auto Adjustment, Scene Selection, Program Auto, Movie Mode) on the camera mode. Prevents accidental erasure. Prints images using flash. REC Mode Selects the continuous shooting method. For details on the operation 1 page...
Instruction Manual
Page 21
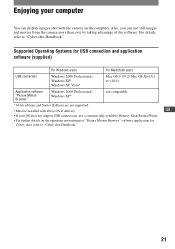
... connections, use still images and movies from the camera more than ever by taking advantage of "Picture Motion Browser" software application for USB connection and application software (supplied) For Windows users For Macintosh users USB connection Windows 2000 Professional, Windows XP*, Windows XP Vista* Mac OS 9.1/9.2/ Mac OS X(v10.1 to "Cyber-shot Handbook." For...
... connections, use still images and movies from the camera more than ever by taking advantage of "Picture Motion Browser" software application for USB connection and application software (supplied) For Windows users For Macintosh users USB connection Windows 2000 Professional, Windows XP*, Windows XP Vista* Mac OS 9.1/9.2/ Mac OS X(v10.1 to "Cyber-shot Handbook." For...
Instruction Manual
Page 25
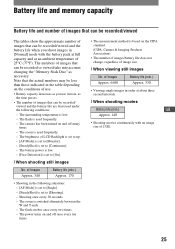
...°C (77°F). Shooting once every 30 seconds. - The flash strobes once every two times. - The camera has been turned on the CIPA standard. (CIPA: Camera & Imaging Products Association) • The number of images/battery life does not change, regardless of image size. ...[ When viewing still images No. The surrounding temperature is switched alternately between the W and T ends. - The zoom is low. - The ...
...°C (77°F). Shooting once every 30 seconds. - The flash strobes once every two times. - The camera has been turned on the CIPA standard. (CIPA: Camera & Imaging Products Association) • The number of images/battery life does not change, regardless of image size. ...[ When viewing still images No. The surrounding temperature is switched alternately between the W and T ends. - The zoom is low. - The ...
Instruction Manual
Page 26
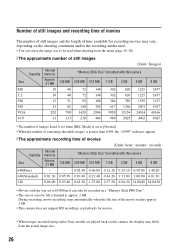
... time available for recording movies may vary, depending on this camera, the display may differ from the menu (page 19, 20). [ The approximate number of still images (Units: Images) Internal Capacity memory "Memory Stick Duo" formatted with this camera Size Approx. 31 MB 128 MB 256 MB 512 MB ...Stick PRO Duo". • The size of the movie reaches approx. 2 GB. • This camera does not support HD recordings or playbacks for movies. • When images recorded using earlier Sony models are played back on the shooting conditions and/or the recording media used. • You can ...
... time available for recording movies may vary, depending on this camera, the display may differ from the menu (page 19, 20). [ The approximate number of still images (Units: Images) Internal Capacity memory "Memory Stick Duo" formatted with this camera Size Approx. 31 MB 128 MB 256 MB 512 MB ...Stick PRO Duo". • The size of the movie reaches approx. 2 GB. • This camera does not support HD recordings or playbacks for movies. • When images recorded using earlier Sony models are played back on the shooting conditions and/or the recording media used. • You can ...
Instruction Manual
Page 27
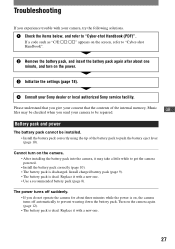
... screen, refer to "Cyber-shot Handbook". 2 Remove the battery pack, and insert the battery pack again after about three minutes while the power is discharged. Turn on the power. 3 Initialize the settings (page 18). 4 Consult your Sony dealer or local authorized Sony service facility. Replace it...not operate the camera for about one minute, and turn on the camera. • After installing the battery pack into the camera, it may be checked when you experience trouble with your camera, try the following solutions. 1 Check the items below, and refer to "Cyber-shot Handbook (PDF)". ...
... screen, refer to "Cyber-shot Handbook". 2 Remove the battery pack, and insert the battery pack again after about three minutes while the power is discharged. Turn on the power. 3 Initialize the settings (page 18). 4 Consult your Sony dealer or local authorized Sony service facility. Replace it...not operate the camera for about one minute, and turn on the camera. • After installing the battery pack into the camera, it may be checked when you experience trouble with your camera, try the following solutions. 1 Check the items below, and refer to "Cyber-shot Handbook (PDF)". ...
Instruction Manual
Page 28
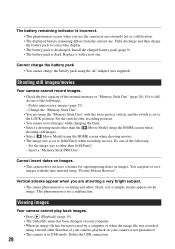
...mode other than that of your camera, playback on your camera is not guaranteed. • The camera is full, do one . Vertical streaks appear when you use the camera in USB mode. The battery remaining indicator is not a malfunction. Shooting still images/movies Your camera cannot record images. • ...charge the battery pack to other than the [ Movie Mode] using the HOME screen when shooting still images. • Select [ Movie Mode] using a model other than [640(Fine)]. - Viewing images Your camera cannot play back images. • Press (Playback) (page 15). • The folder/...
...mode other than that of your camera, playback on your camera is not guaranteed. • The camera is full, do one . Vertical streaks appear when you use the camera in USB mode. The battery remaining indicator is not a malfunction. Shooting still images/movies Your camera cannot record images. • ...charge the battery pack to other than the [ Movie Mode] using the HOME screen when shooting still images. • Select [ Movie Mode] using a model other than [640(Fine)]. - Viewing images Your camera cannot play back images. • Press (Playback) (page 15). • The folder/...
Instruction Manual
Page 29
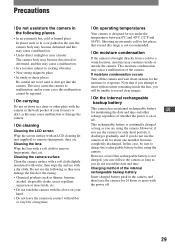
... or hot places that if you attempt to let sand or dust get into the camera. However, even if this range is not recommended. [ On moisture condensation If the camera is not charged, you can still use the following places • In an extremely hot, cold or humid place In... places such as this malfunction cannot be unable to remove fingerprints, dust, etc. Cleaning the camera surface Clean the camera surface with a soft cloth slightly ...
... or hot places that if you attempt to let sand or dust get into the camera. However, even if this range is not recommended. [ On moisture condensation If the camera is not charged, you can still use the following places • In an extremely hot, cold or humid place In... places such as this malfunction cannot be unable to remove fingerprints, dust, etc. Cleaning the camera surface Clean the camera surface with a soft cloth slightly ...

Instruction Manual
Page 30
... - 175 mm when converted to a 35 mm still camera) F3.5 - 4.4 Exposure control: Automatic exposure, Scene Selection (9 modes) White balance: Automatic, Daylight, Cloudy, Fluorescent 1, Fluorescent 2, Fluorescent 3, Incandescent, Flash File format (DCF compliant): Still images: Exif Ver. 2.21 JPEG compliant, DPOF ... 3/4 inches) (W)/ approx. 0.8 to 2.9 m (2 feet 7 1/2 inches to change without notice. Trademarks • is a trademark of Sony Corporation. • "Memory Stick", , "Memory Stick PRO", , "Memory Stick Duo", , "Memory Stick PRO Duo", , "Memory Stick Micro", "MagicGate", ...
... - 175 mm when converted to a 35 mm still camera) F3.5 - 4.4 Exposure control: Automatic exposure, Scene Selection (9 modes) White balance: Automatic, Daylight, Cloudy, Fluorescent 1, Fluorescent 2, Fluorescent 3, Incandescent, Flash File format (DCF compliant): Still images: Exif Ver. 2.21 JPEG compliant, DPOF ... 3/4 inches) (W)/ approx. 0.8 to 2.9 m (2 feet 7 1/2 inches to change without notice. Trademarks • is a trademark of Sony Corporation. • "Memory Stick", , "Memory Stick PRO", , "Memory Stick Duo", , "Memory Stick PRO Duo", , "Memory Stick Micro", "MagicGate", ...
Sony® Guide to Digital Photography (Spring 2007)
Page 2
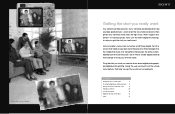
... really want . CONTENTS Getting the shot you 're looking for. even when the circumstances are distant. Sony uses the latest digital technology to know about digital photography and digital photo printing. Sony® cameras are designed to create digital cameras that change the way you really ... it to the battery that help you really want 2 Shooting the digital way: Camera systems 16 Taking your best shot: Camera control 34 Sharing your pictures 44 Sony product guide 50 Digital still camera specifications 54 Index 56 Television and monitor pictures simulated. Getting the...
... really want . CONTENTS Getting the shot you 're looking for. even when the circumstances are distant. Sony uses the latest digital technology to know about digital photography and digital photo printing. Sony® cameras are designed to create digital cameras that change the way you really ... it to the battery that help you really want 2 Shooting the digital way: Camera systems 16 Taking your best shot: Camera control 34 Sharing your pictures 44 Sony product guide 50 Digital still camera specifications 54 Index 56 Television and monitor pictures simulated. Getting the...


