Instruction Manual
Page 9
"Cyber-shot Handbook" GB - "Cyber-shot Step-up Guide" • Instruction Manual (this manual) (1) Attach the strap to prevent the camera from damage by being dropped. Hook 9 Getting started Checking the accessories supplied • Battery charger BC-CSK/BC-CSKA (1) • Dedicated USB cable (1) • Power cord (mains lead) (1) (not supplied in the USA and Canada) • Dedicated A/V cable (1) • Wrist strap (1) • CD-ROM (1) • Rechargeable battery pack NP-BK1 (1) - Cyber-shot application software -
"Cyber-shot Handbook" GB - "Cyber-shot Step-up Guide" • Instruction Manual (this manual) (1) Attach the strap to prevent the camera from damage by being dropped. Hook 9 Getting started Checking the accessories supplied • Battery charger BC-CSK/BC-CSKA (1) • Dedicated USB cable (1) • Power cord (mains lead) (1) (not supplied in the USA and Canada) • Dedicated A/V cable (1) • Wrist strap (1) • CD-ROM (1) • Rechargeable battery pack NP-BK1 (1) - Cyber-shot application software -

Instruction Manual
Page 19
...DSC-S980. • is displayed. 19 Zoom scaling Color mode PictBridge connecting Protect Print order (DPOF) mark Volume PictBridge connecting • Do not disconnect the dedicated USB cable...shooting still images [ When shooting movies [ When playing back VOL. However, we recommend that you from shooting clear images due to stabilize the camera.... Scene Selection Mode dial White balance Burst mode Metering mode Face Detection GB SteadyShot Vibration warning • Indicates vibration may prevent you set the anti-blur function to [Auto], using the flash for the DSC-S950...
...DSC-S980. • is displayed. 19 Zoom scaling Color mode PictBridge connecting Protect Print order (DPOF) mark Volume PictBridge connecting • Do not disconnect the dedicated USB cable...shooting still images [ When shooting movies [ When playing back VOL. However, we recommend that you from shooting clear images due to stabilize the camera.... Scene Selection Mode dial White balance Burst mode Metering mode Face Detection GB SteadyShot Vibration warning • Indicates vibration may prevent you set the anti-blur function to [Auto], using the flash for the DSC-S950...

Instruction Manual
Page 24
For details on the screen for approximately two seconds immediately after shooting a still image. Displays the recorded image on the operation 1 page 21 Setup items Main Settings - Change REC.Folder Changes the folder currently used ...Stick Duo" media for recording images. Shooting Settings Grid Line Digital Zoom Auto Review Displays lines to a computer or a PictBridge compliant printer using the dedicated USB cable. Main Settings - Main Settings 1 Beep Selects the sound produced when you operate the camera. Language Setting Language Setting Selects the language to the TV ...
For details on the screen for approximately two seconds immediately after shooting a still image. Displays the recorded image on the operation 1 page 21 Setup items Main Settings - Change REC.Folder Changes the folder currently used ...Stick Duo" media for recording images. Shooting Settings Grid Line Digital Zoom Auto Review Displays lines to a computer or a PictBridge compliant printer using the dedicated USB cable. Main Settings - Main Settings 1 Beep Selects the sound produced when you operate the camera. Language Setting Language Setting Selects the language to the TV ...
Cyber-shot® Handbook
Page 16
...Print order (DPOF) mark (85) Zoom scaling (30) Volume (30) PictBridge connecting (84) • Do not disconnect the dedicated USB cable while the mark is displayed only for the DSC-S950. B Display N 00:00:12 101-0012 2009 1 1 9:30 AM z STOP z PLAY BACK/ NEXT V VOLUME Indication Battery remaining... Selecting images Adjusting volume Histogram (18) • appears when histogram display is disabled. 16 Indicators on the screen When playing back still images When playing back movies A Display VOL. Indication Playback (30) Playback bar Counter Folder-file number (54) Recorded date/time...
...Print order (DPOF) mark (85) Zoom scaling (30) Volume (30) PictBridge connecting (84) • Do not disconnect the dedicated USB cable while the mark is displayed only for the DSC-S950. B Display N 00:00:12 101-0012 2009 1 1 9:30 AM z STOP z PLAY BACK/ NEXT V VOLUME Indication Battery remaining... Selecting images Adjusting volume Histogram (18) • appears when histogram display is disabled. 16 Indicators on the screen When playing back still images When playing back movies A Display VOL. Indication Playback (30) Playback bar Counter Folder-file number (54) Recorded date/time...
Cyber-shot® Handbook
Page 19
...On image data stored in the internal memory We recommend that you copy (back up) data without "Memory Stick Duo" media inserted in the camera, you can be performed on images on images in the internal memory. B Internal memory When there is inserted B [Recording]: Images are ...) data on "Memory Stick Duo" media Prepare "Memory Stick Duo" media with a dedicated USB cable, you cannot copy data on "Memory Stick Duo" media to the internal memory. • By connecting the camera and a computer with sufficient free capacity, then perform the procedure explained in the internal memory ...
...On image data stored in the internal memory We recommend that you copy (back up) data without "Memory Stick Duo" media inserted in the camera, you can be performed on images on images in the internal memory. B Internal memory When there is inserted B [Recording]: Images are ...) data on "Memory Stick Duo" media Prepare "Memory Stick Duo" media with a dedicated USB cable, you cannot copy data on "Memory Stick Duo" media to the internal memory. • By connecting the camera and a computer with sufficient free capacity, then perform the procedure explained in the internal memory ...
Cyber-shot® Handbook
Page 57
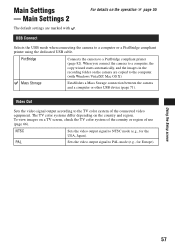
... the computer. (with . The TV color systems differ depending on the operation 1 page 55 USB Connect Selects the USB mode when connecting the camera to a computer or a PictBridge compliant printer using the dedicated USB cable. NTSC Sets the video output signal to PAL mode (e.g., for the USA, Japan). Using the Setup screen 57 For details...
... the computer. (with . The TV color systems differ depending on the operation 1 page 55 USB Connect Selects the USB mode when connecting the camera to a computer or a PictBridge compliant printer using the dedicated USB cable. NTSC Sets the video output signal to PAL mode (e.g., for the USA, Japan). Using the Setup screen 57 For details...
Cyber-shot® Handbook
Page 71
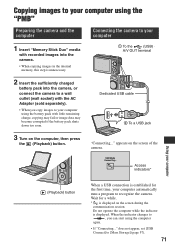
... Stick Duo" media with recorded images into the camera. • When copying images in the internal memory, this step is unnecessary. 1 To the (USB) · A/V OUT terminal 2 Insert the sufficiently charged battery pack into the camera, or connect the camera to a wall outlet (wall socket) with the...become corrupted if the battery pack shuts down too soon. does not appear, set [USB Connect] to [Mass Storage] (page 57). 71 Dedicated USB cable 2 To a USB jack 3 Turn on the screen of the camera. "Connecting..." Wait for the first time, your computer automatically runs a program to...
... Stick Duo" media with recorded images into the camera. • When copying images in the internal memory, this step is unnecessary. 1 To the (USB) · A/V OUT terminal 2 Insert the sufficiently charged battery pack into the camera, or connect the camera to a wall outlet (wall socket) with the...become corrupted if the battery pack shuts down too soon. does not appear, set [USB Connect] to [Mass Storage] (page 57). 71 Dedicated USB cable 2 To a USB jack 3 Turn on the screen of the camera. "Connecting..." Wait for the first time, your computer automatically runs a program to...
Cyber-shot® Handbook
Page 73
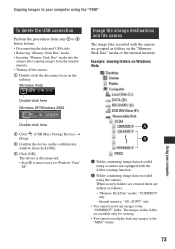
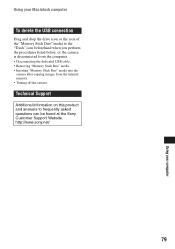
... using the "PMB" To delete the USB connection Perform the procedures from step 1 to 4 below before: • Disconnecting the dedicated USB cable. • Removing "Memory Stick Duo" media. • Inserting "Memory Stick Duo" media into the camera after copying images from the internal memory.... • Turning off the camera. 1 Double-click the disconnect icon on the tasktray....
... using the "PMB" To delete the USB connection Perform the procedures from step 1 to 4 below before: • Disconnecting the dedicated USB cable. • Removing "Memory Stick Duo" media. • Inserting "Memory Stick Duo" media into the camera after copying images from the internal memory.... • Turning off the camera. 1 Double-click the disconnect icon on the tasktray....

Cyber-shot® Handbook
Page 75
...of the Windows operating system. For a computer without a "Memory Stick" media slot Make a USB connection and follow Stages to copy images. • The screen displays shown in "Connecting the camera to your computer with Windows 95/ 98/98 SecondEdition/NT/Me of copying images to a "Documents... the camera and a computer. Copying images to a computer without "PMB" You can copy images by inserting the "Memory Stick Duo" media into the "Memory Stick" media slot on page 71. • If "PMB" is already installed, then [Import Media Files] is not compatible with the dedicated USB cable.
...of the Windows operating system. For a computer without a "Memory Stick" media slot Make a USB connection and follow Stages to copy images. • The screen displays shown in "Connecting the camera to your computer with Windows 95/ 98/98 SecondEdition/NT/Me of copying images to a "Documents... the camera and a computer. Copying images to a computer without "PMB" You can copy images by inserting the "Memory Stick Duo" media into the "Memory Stick" media slot on page 71. • If "PMB" is already installed, then [Import Media Files] is not compatible with the dedicated USB cable.
Cyber-shot® Handbook
Page 78
...Hi-Speed USB (USB 2.0 compliant) allows advanced transfer (high speed transfer) as described in "Connecting the camera to your computer" on connecting the camera to ...when using a USB hub. • Connecting the camera using a USB interface that image file. 78 Perform the same procedure as the camera is compatible with HiSpeed USB (USB 2.0 compliant). &#...same time, some devices, including your camera, may not recover at the same time. Double-click the hard...• For details on the storage location of USB devices you connect two or more USB devices to the hard disk icon. Using your ...
...Hi-Speed USB (USB 2.0 compliant) allows advanced transfer (high speed transfer) as described in "Connecting the camera to your computer" on connecting the camera to ...when using a USB hub. • Connecting the camera using a USB interface that image file. 78 Perform the same procedure as the camera is compatible with HiSpeed USB (USB 2.0 compliant). &#...same time, some devices, including your camera, may not recover at the same time. Double-click the hard...• For details on the storage location of USB devices you connect two or more USB devices to the hard disk icon. Using your ...
Cyber-shot® Handbook
Page 79
... the procedures listed below, or the camera is disconnected from the computer. • Disconnecting the dedicated USB cable. • Removing "Memory Stick Duo" media. • Inserting "Memory Stick Duo" media into the camera after copying images from the internal memory. • Turning off the camera. Using your computer http://www.sony.net/ 79 Using your Macintosh...
... the procedures listed below, or the camera is disconnected from the computer. • Disconnecting the dedicated USB cable. • Removing "Memory Stick Duo" media. • Inserting "Memory Stick Duo" media into the camera after copying images from the internal memory. • Turning off the camera. Using your computer http://www.sony.net/ 79 Using your Macintosh...
Cyber-shot® Handbook
Page 82
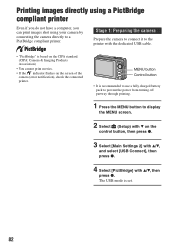
... press z. 3 Select [Main Settings 2] with v/V, and select [USB Connect], then press z. 4 Select [PictBridge] with the dedicated USB cable. • "PictBridge" is set. 82 Printing images directly using a PictBridge compliant printer Even if you do not have a computer, you can print images shot using your camera by connecting the camera directly to display the MENU screen. 2 Select...
... press z. 3 Select [Main Settings 2] with v/V, and select [USB Connect], then press z. 4 Select [PictBridge] with the dedicated USB cable. • "PictBridge" is set. 82 Printing images directly using a PictBridge compliant printer Even if you do not have a computer, you can print images shot using your camera by connecting the camera directly to display the MENU screen. 2 Select...

Cyber-shot® Handbook
Page 83
The camera is made, the indicator appears. 3 Press the MENU button, select [Print] with v/V on the screen. When you select [This Image] You can print multiple selected ... Stage 2: Connecting the camera to the printer 1 Connect the camera to print with v/ V/b/B, then press z. When you want to the printer. 1 To the (USB) · A/V OUT terminal Dedicated USB cable 2 To the USB jack 2 Turn on the camera. After the connection is set to print Select [This Image] or [Multiple Images] with v/V, then press z. Printing still images 83
The camera is made, the indicator appears. 3 Press the MENU button, select [Print] with v/V on the screen. When you select [This Image] You can print multiple selected ... Stage 2: Connecting the camera to the printer 1 Connect the camera to print with v/ V/b/B, then press z. When you want to the printer. 1 To the (USB) · A/V OUT terminal Dedicated USB cable 2 To the USB jack 2 Turn on the camera. After the connection is set to print Select [This Image] or [Multiple Images] with v/V, then press z. Printing still images 83

Cyber-shot® Handbook
Page 84
... by side on a sheet. [Size] Select the size of the printing sheet. [Date] Select [Day&Time] or [Date] to Stage 2, and disconnect the dedicated USB cable from the camera. 84 This function may not be provided depending on images. • When you choose [Date], the date will be printed. • The designated number... on the quantity of images. [Layout] Selects the number of image you select (page 63). The image is printed. • Do not disconnect the dedicated USB cable while the (PictBridge Connecting) indicator appears on the screen.
... by side on a sheet. [Size] Select the size of the printing sheet. [Date] Select [Day&Time] or [Date] to Stage 2, and disconnect the dedicated USB cable from the camera. 84 This function may not be provided depending on images. • When you choose [Date], the date will be printed. • The designated number... on the quantity of images. [Layout] Selects the number of image you select (page 63). The image is printed. • Do not disconnect the dedicated USB cable while the (PictBridge Connecting) indicator appears on the screen.
Cyber-shot® Handbook
Page 92
... [Video Out] to see if the video output signal of your camera is set to the color system of your computer. • Connect the camera directly to your computer without passing through a USB hub or other than Sony should contact those manufacturers. • If "Memory Stick PRO Duo"...after playback starts. • This may happen due to [Mass Storage] (page 57). • Use the dedicated USB cable (supplied) (page 71). • Disconnect the dedicated USB cable from both the computer and the camera, and connect it again firmly. • Disconnect all equipment other device (page 71). 92
... [Video Out] to see if the video output signal of your camera is set to the color system of your computer. • Connect the camera directly to your computer without passing through a USB hub or other than Sony should contact those manufacturers. • If "Memory Stick PRO Duo"...after playback starts. • This may happen due to [Mass Storage] (page 57). • Use the dedicated USB cable (supplied) (page 71). • Disconnect the dedicated USB cable from both the computer and the camera, and connect it again firmly. • Disconnect all equipment other device (page 71). 92
Cyber-shot® Handbook
Page 95
... printer are properly connected using cameras other than this camera or images modified with the printer. • If you still cannot print your images, disconnect the dedicated USB cable, turn the printer off and then on, then connect the dedicated USB cable again. • Movies cannot be printed. • Images shot using the dedicated USB cable. • Turn on the...
... printer are properly connected using cameras other than this camera or images modified with the printer. • If you still cannot print your images, disconnect the dedicated USB cable, turn the printer off and then on, then connect the dedicated USB cable again. • Movies cannot be printed. • Images shot using the dedicated USB cable. • Turn on the...
Cyber-shot® Handbook
Page 96
...screen appears when you turn on the camera. • Set the date and time again (page 63). However, the data on the printer. You want to the camera, disconnect and then reconnect the dedicated USB cable. • The print setting of either the camera (page 84) or the printer.... Cannot operate the camera after connecting the printer to change the date or time. • Set...
...screen appears when you turn on the camera. • Set the date and time again (page 63). However, the data on the printer. You want to the camera, disconnect and then reconnect the dedicated USB cable. • The print setting of either the camera (page 84) or the printer.... Cannot operate the camera after connecting the printer to change the date or time. • Set...
Cyber-shot® Handbook
Page 98
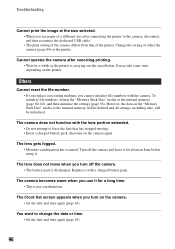
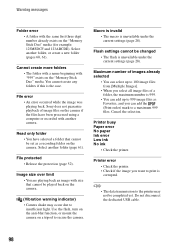
...camera. Cancel the selection. Do not disconnect the dedicated USB cable. 98 File protected • Release the protection (page 52). Macro is invalid • The macro is unavailable under the current settings (page 28). Cannot create more folders • The folder with a name beginning with the same first three digit... can add up to secure the camera. Image size over limit • You are playing back an image with another camera. Warning messages Folder error • A folder with "999" exists on the "Memory Stick Duo" media. Sony does not guarantee playback of a ...
...camera. Cancel the selection. Do not disconnect the dedicated USB cable. 98 File protected • Release the protection (page 52). Macro is invalid • The macro is unavailable under the current settings (page 28). Cannot create more folders • The folder with a name beginning with the same first three digit... can add up to secure the camera. Image size over limit • You are playing back an image with another camera. Warning messages Folder error • A folder with "999" exists on the "Memory Stick Duo" media. Sony does not guarantee playback of a ...
Cyber-shot® Handbook
Page 105
Folder 60 D Date 63 Daylight 44 Dedicated A/V cable 65 Dedicated USB cable ..... 71, 83 Delete 32 Format 60, 62 Digital Zoom 58 DirectX 69 DISP 18 DPOF 53, 85 E Easy Shooting mode 22 EV 39 Exposure 8 Extension 77 F Face Detection 38 File name 73 File ... 42 Folder Changing 61 Creating 60 Selecting 54 Format 60, 62 Function Guide 56 G Grid Line 58 H High Sensitivity mode ..........29 Histogram 18 Holding the camera 21 I Identifying parts 12 Image file storage destinations and file names 73 Image quality 10 Image size 10, 25 Incandescent 44 Index screen 31 Indicator...
Folder 60 D Date 63 Daylight 44 Dedicated A/V cable 65 Dedicated USB cable ..... 71, 83 Delete 32 Format 60, 62 Digital Zoom 58 DirectX 69 DISP 18 DPOF 53, 85 E Easy Shooting mode 22 EV 39 Exposure 8 Extension 77 F Face Detection 38 File name 73 File ... 42 Folder Changing 61 Creating 60 Selecting 54 Format 60, 62 Function Guide 56 G Grid Line 58 H High Sensitivity mode ..........29 Histogram 18 Holding the camera 21 I Identifying parts 12 Image file storage destinations and file names 73 Image quality 10 Image size 10, 25 Incandescent 44 Index screen 31 Indicator...
Marketing Specifications (Black Model)
Page 2
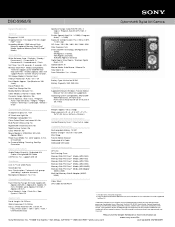
...support up to 16GB Memory Stick DUO PROTM media capacity; BC-CSK / BC-CSKA Wrist Strap Picture Motion Browser Dedicated A/V Cable Dedicated USB Cable Optional Accessories GPS Unit Soft Carrying Case Memory Stick PRO Duo™ Media (MSX-256S) Memory Stick PRO Duo™ ... •16530 Via Esprillo •San Diego, CA 92127 •1.800.222.7669 •www.sony.com Last Updated: 05/06/2009 Viewable area, measured diagonally. 2. DSC-S950/B Cyber-shot® Digital Still Camera Specifications General Megapixel: 10.1MP Imaging Device: 1/2.3 type(7.70 mm) Super HAD™ CCD Recording...
...support up to 16GB Memory Stick DUO PROTM media capacity; BC-CSK / BC-CSKA Wrist Strap Picture Motion Browser Dedicated A/V Cable Dedicated USB Cable Optional Accessories GPS Unit Soft Carrying Case Memory Stick PRO Duo™ Media (MSX-256S) Memory Stick PRO Duo™ ... •16530 Via Esprillo •San Diego, CA 92127 •1.800.222.7669 •www.sony.com Last Updated: 05/06/2009 Viewable area, measured diagonally. 2. DSC-S950/B Cyber-shot® Digital Still Camera Specifications General Megapixel: 10.1MP Imaging Device: 1/2.3 type(7.70 mm) Super HAD™ CCD Recording...


