
Instruction Manual
Page 2
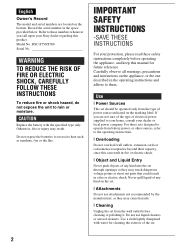
... voltage points or short out parts that could result in the space provided below. Use a cloth lightly dampened with the specified type only. DSC-S750/S780 Serial No WARNING TO REDUCE THE RISK OF FIRE OR ELECTRIC SHOCK, CAREFULLY FOLLOW THESE INSTRUCTIONS To reduce fire or shock hazard, do ...No. Carefully observe all warnings, precautions and instructions on the set through openings as sunshine, fire or the like. If you call upon your Sony dealer regarding this can result in fire or electric shock. [ Object and Liquid Entry Never push objects of any kind on the appliance, or ...
... voltage points or short out parts that could result in the space provided below. Use a cloth lightly dampened with the specified type only. DSC-S750/S780 Serial No WARNING TO REDUCE THE RISK OF FIRE OR ELECTRIC SHOCK, CAREFULLY FOLLOW THESE INSTRUCTIONS To reduce fire or shock hazard, do ...No. Carefully observe all warnings, precautions and instructions on the set through openings as sunshine, fire or the like. If you call upon your Sony dealer regarding this can result in fire or electric shock. [ Object and Liquid Entry Never push objects of any kind on the appliance, or ...
Instruction Manual
Page 3
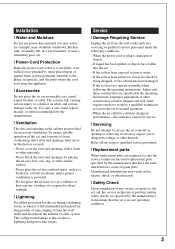
Never cover the slots and openings with a cloth or other hazards. If liquid has been spilled or objects have the same characteristics as specified by a qualified technician to restore the set is in a wet basement, or near a swimming pool, etc. [ Power-Cord Protection Route the power cord so that the set to normal operation. - Unauthorized substitutions may result in fire, electric shock, or other hazards. [ Safety Check Upon completion of other similar surface. - for example, near a bathtub, washbowl, kitchen sink, or laundry tub, in safe operating condition. 3 ...
Never cover the slots and openings with a cloth or other hazards. If liquid has been spilled or objects have the same characteristics as specified by a qualified technician to restore the set is in a wet basement, or near a swimming pool, etc. [ Power-Cord Protection Route the power cord so that the set to normal operation. - Unauthorized substitutions may result in fire, electric shock, or other hazards. [ Safety Check Upon completion of other similar surface. - for example, near a bathtub, washbowl, kitchen sink, or laundry tub, in safe operating condition. 3 ...
Instruction Manual
Page 4
... authority to operate this equipment. [ Note: This equipment has been tested and found to comply with the limits for a digital device pursuant to Part 15 of the proper configuration for a Class B digital device, pursuant to Subpart B of Part 15 of the FCC Rules. If this manual could void your country, use an...
... authority to operate this equipment. [ Note: This equipment has been tested and found to comply with the limits for a digital device pursuant to Part 15 of the proper configuration for a Class B digital device, pursuant to Subpart B of Part 15 of the FCC Rules. If this manual could void your country, use an...
Instruction Manual
Page 5
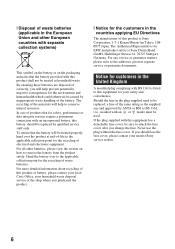
By ensuring this product is disposed of correctly, you purchased the product. 5 For the State of this product. For Customers in Europe This product has been tested and found compliant with the limits set out in the European Union and other European countries with separate collection systems) This symbol on the product or on its packaging indicates that this product shall not be caused by inappropriate waste GB handling of California, USA only Perchlorate Material - Instead it shall be handed over to the applicable collection point for the recycling of Old Electrical & ...
By ensuring this product is disposed of correctly, you purchased the product. 5 For the State of this product. For Customers in Europe This product has been tested and found compliant with the limits set out in the European Union and other European countries with separate collection systems) This symbol on the product or on its packaging indicates that this product shall not be caused by inappropriate waste GB handling of California, USA only Perchlorate Material - Instead it shall be handed over to the applicable collection point for the recycling of Old Electrical & ...
Instruction Manual
Page 6
... If the plug supplied with an incorporated battery, this product or battery, please contact your local Civic Office, your nearest Sony service station. 6 Hand the battery over the product at end-of-life to the applicable collection point for EMC and product safety ... disposed of correctly, you purchased the product. [ Notice for safety, performance or data integrity reasons require a permanent connection with this product is Sony Deutschland GmbH, Hedelfinger Strasse 61, 70327 Stuttgart, Germany. To ensure that for the customers in the plug supplied need to BS 1362, (i.e., ...
... If the plug supplied with an incorporated battery, this product or battery, please contact your local Civic Office, your nearest Sony service station. 6 Hand the battery over the product at end-of-life to the applicable collection point for EMC and product safety ... disposed of correctly, you purchased the product. [ Notice for safety, performance or data integrity reasons require a permanent connection with this product is Sony Deutschland GmbH, Hedelfinger Strasse 61, 70327 Stuttgart, Germany. To ensure that for the customers in the plug supplied need to BS 1362, (i.e., ...
Instruction Manual
Page 7
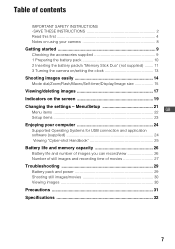
... this first 4 Notes on the screen 19 Changing the settings - Menu/Setup 21 GB Menu items 22 Setup items 23 Enjoying your camera 8 Getting started 9 Checking the accessories supplied 9 1 Preparing the battery pack 10 2 Inserting the battery pack/a "Memory Stick Duo" (not supplied...the camera on/setting the clock 13 Shooting images easily 14 Mode dial/Zoom/Flash/Macro/Self-timer/Display/Image size 15 Viewing/deleting images 17 Indicators on using your computer 24 Supported Operating Systems for USB connection and application software (supplied 24 Viewing "Cyber-shot Handbook...
... this first 4 Notes on the screen 19 Changing the settings - Menu/Setup 21 GB Menu items 22 Setup items 23 Enjoying your camera 8 Getting started 9 Checking the accessories supplied 9 1 Preparing the battery pack 10 2 Inserting the battery pack/a "Memory Stick Duo" (not supplied...the camera on/setting the clock 13 Shooting images easily 14 Mode dial/Zoom/Flash/Macro/Self-timer/Display/Image size 15 Viewing/deleting images 17 Indicators on using your computer 24 Supported Operating Systems for USB connection and application software (supplied 24 Viewing "Cyber-shot Handbook...

Instruction Manual
Page 8
...other equipment will play back images recorded or edited with DCF (Design rule for Camera File system) universal standard established by JEITA (Japan Electronics and Information Technology Industries Association). • Sony does not guarantee that other materials may be copyrighted. The heat of flash emission... of the copyright laws. [ No compensation for damaged content or recording failure Sony cannot compensate for failure to record or loss or damage of recorded content due to a malfunction of the camera or recording media, etc. [ On illustrations Illustrations used in this manual are...
...other equipment will play back images recorded or edited with DCF (Design rule for Camera File system) universal standard established by JEITA (Japan Electronics and Information Technology Industries Association). • Sony does not guarantee that other materials may be copyrighted. The heat of flash emission... of the copyright laws. [ No compensation for damaged content or recording failure Sony cannot compensate for failure to record or loss or damage of recorded content due to a malfunction of the camera or recording media, etc. [ On illustrations Illustrations used in this manual are...
Instruction Manual
Page 9
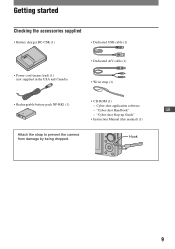
"Cyber-shot Step-up Guide" • Instruction Manual (this manual) (1) Attach the strap to prevent the camera from damage by being dropped. Hook 9 "Cyber-shot Handbook" GB - Getting started Checking the accessories supplied • Battery charger BC-CSK (1) • Dedicated USB cable (1) • Power cord (mains lead) (1) (not supplied in the USA and Canada) • Dedicated A/V cable (1) • Wrist strap (1) • CD-ROM (1) • Rechargeable battery pack NP-BK1 (1) - Cyber-shot application software -
"Cyber-shot Step-up Guide" • Instruction Manual (this manual) (1) Attach the strap to prevent the camera from damage by being dropped. Hook 9 "Cyber-shot Handbook" GB - Getting started Checking the accessories supplied • Battery charger BC-CSK (1) • Dedicated USB cable (1) • Power cord (mains lead) (1) (not supplied in the USA and Canada) • Dedicated A/V cable (1) • Wrist strap (1) • CD-ROM (1) • Rechargeable battery pack NP-BK1 (1) - Cyber-shot application software -
Instruction Manual
Page 10
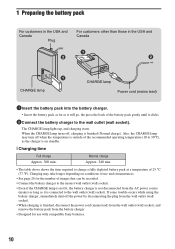
... power source (mains) as long as it will go, the press the back of use and circumstances. • See page 26 for use with compatible Sony batteries. 10 If some trouble occurs while using the battery charger, immediately shut off , charging is on conditions of the battery pack gently until it...
... power source (mains) as long as it will go, the press the back of use and circumstances. • See page 26 for use with compatible Sony batteries. 10 If some trouble occurs while using the battery charger, immediately shut off , charging is on conditions of the battery pack gently until it...
Instruction Manual
Page 11
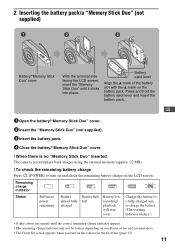
... Sufficient power remaining Battery almost fully charged Battery half full Battery low, recording/ playback will stop soon. Change the battery to turn on the camera for the first time (page 13). 11 GB 1 Open the battery/"Memory Stick Duo" cover. 2 Insert the "Memory Stick Duo" (not... supplied). 3 Insert the battery pack. 4 Close the battery/"Memory Stick Duo" cover. [ When there is no "Memory Stick Duo" inserted The camera records/plays back images using the internal memory (approx. 22 MB). [ To check the remaining battery charge Press (POWER) to a fully charged one, ...
... Sufficient power remaining Battery almost fully charged Battery half full Battery low, recording/ playback will stop soon. Change the battery to turn on the camera for the first time (page 13). 11 GB 1 Open the battery/"Memory Stick Duo" cover. 2 Insert the "Memory Stick Duo" (not... supplied). 3 Insert the battery pack. 4 Close the battery/"Memory Stick Duo" cover. [ When there is no "Memory Stick Duo" inserted The camera records/plays back images using the internal memory (approx. 22 MB). [ To check the remaining battery charge Press (POWER) to a fully charged one, ...

Instruction Manual
Page 12
This may cause damage to drop the battery pack. • Never remove the battery pack/"Memory Stick Duo" when the access lamp is not lit, then push the "Memory Stick Duo" in the "Memory Stick Duo"/internal memory. 12 Slide the battery eject lever. "Memory Stick Duo" Battery pack Make sure that the access lamp is lit. Be sure not to data in once. [ To remove the battery pack/"Memory Stick Duo" Open the battery/"Memory Stick Duo" cover.
This may cause damage to drop the battery pack. • Never remove the battery pack/"Memory Stick Duo" when the access lamp is not lit, then push the "Memory Stick Duo" in the "Memory Stick Duo"/internal memory. 12 Slide the battery eject lever. "Memory Stick Duo" Battery pack Make sure that the access lamp is lit. Be sure not to data in once. [ To remove the battery pack/"Memory Stick Duo" Open the battery/"Memory Stick Duo" cover.
Instruction Manual
Page 13
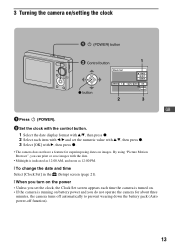
... for superimposing dates on battery power and you set the clock, the Clock Set screen appears each time the camera is turned on. • If the camera is running on images. 3 Turning the camera on/setting the clock (POWER) button ɟ Control button 1 z button 2 3 GB 1 Press (POWER). 2 Set the clock with the ...date and time Select [Clock Set] in the (Setup) screen (page 21). [ When you turn on the power • Unless you do not operate the camera for about three minutes, the camera turns off automatically to prevent wearing down the battery pack (Auto power-off function). 13
... for superimposing dates on battery power and you set the clock, the Clock Set screen appears each time the camera is turned on. • If the camera is running on images. 3 Turning the camera on/setting the clock (POWER) button ɟ Control button 1 z button 2 3 GB 1 Press (POWER). 2 Set the clock with the ...date and time Select [Clock Set] in the (Setup) screen (page 21). [ When you turn on the power • Unless you do not operate the camera for about three minutes, the camera turns off automatically to prevent wearing down the battery pack (Auto power-off function). 13
Instruction Manual
Page 14
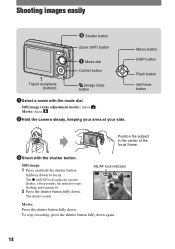
... flashing and remains lit. 2 Press the shutter button fully down . AE/AF lock indicator Movie: Press the shutter button fully down . Movie: Select . 2Hold the camera steady, keeping your arms at your side. The shutter sounds. Shooting images easily ɠ Shutter button Zoom (W/T) button Mode dial Control button Tripod receptacle (bottom...
... flashing and remains lit. 2 Press the shutter button fully down . AE/AF lock indicator Movie: Press the shutter button fully down . Movie: Select . 2Hold the camera steady, keeping your arms at your side. The shutter sounds. Shooting images easily ɠ Shutter button Zoom (W/T) button Mode dial Control button Tripod receptacle (bottom...

Instruction Manual
Page 15
High Sensitivity Shoots images without losing the nighttime atmosphere. Program Auto Allows you to the desired function. Landscape Shoots with the exposure adjusted automatically (both the shutter speed and the aperture value). Movie Allows you to clearly shoot the background that is out of flash light. : Flash forced off GB [ Macro (Shooting close-up) Press b ( ) on the control button repeatedly until the desired mode is selected. (No indicator): Flash Auto Strobes when there is insufficient light (default setting). : Flash forced on : Slow synchro (Flash forced on) The ...
High Sensitivity Shoots images without losing the nighttime atmosphere. Program Auto Allows you to the desired function. Landscape Shoots with the exposure adjusted automatically (both the shutter speed and the aperture value). Movie Allows you to clearly shoot the background that is out of flash light. : Flash forced off GB [ Macro (Shooting close-up) Press b ( ) on the control button repeatedly until the desired mode is selected. (No indicator): Flash Auto Strobes when there is insufficient light (default setting). : Flash forced on : Slow synchro (Flash forced on) The ...
Instruction Manual
Page 16
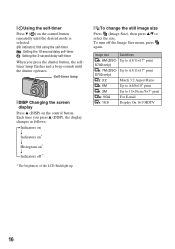
...Press v (DISP) on * r Indicators off the Image Size menu, press again. Image size Guidelines 8M: 8M (DSC- [ Using the self-timer Press V ( ) on the control button repeatedly until the desired mode is selected. (...VGA : VGA For E-mail 16:9: 16:9 Display On 16:9 HDTV 16 Up to A3/11×17" print S750 only) 3:2: 3:2 Match 3:2 Aspect Ratio 5M : 5M Up to A4/8×10" print 3M : 3M Up to... A3/11×17" print S780 only) 7M: 7M (DSC- Each time you press the shutter button, the selftimer lamp flashes and a beep sounds until the shutter operates. ...
...Press v (DISP) on * r Indicators off the Image Size menu, press again. Image size Guidelines 8M: 8M (DSC- [ Using the self-timer Press V ( ) on the control button repeatedly until the desired mode is selected. (...VGA : VGA For E-mail 16:9: 16:9 Display On 16:9 HDTV 16 Up to A3/11×17" print S750 only) 3:2: 3:2 Match 3:2 Aspect Ratio 5M : 5M Up to A4/8×10" print 3M : 3M Up to... A3/11×17" print S780 only) 7M: 7M (DSC- Each time you press the shutter button, the selftimer lamp flashes and a beep sounds until the shutter operates. ...
Instruction Manual
Page 17
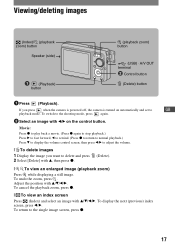
....) Press V to display the volume control screen, then press b/B to adjust the volume. [ To delete images 1 Display the image you press when the camera is powered off, the camera is turned on the control button. Viewing/deleting images (Index)/ (playback zoom) button Speaker (side) (Playback) button (playback zoom) button (USB) · A/V OUT...
....) Press V to display the volume control screen, then press b/B to adjust the volume. [ To delete images 1 Display the image you press when the camera is powered off, the camera is turned on the control button. Viewing/deleting images (Index)/ (playback zoom) button Speaker (side) (Playback) button (playback zoom) button (USB) · A/V OUT...
Instruction Manual
Page 18
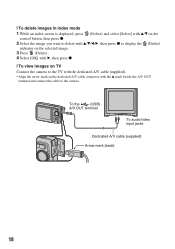
... v/V/b/B, then press z to display the (Delete) indicator on the selected image. 3 Press (Delete). 4 Select [OK] with B, then press z. [ To view images on TV Connect the camera to the TV with the dedicated A/V cable (supplied). • Align the arrow mark on the dedicated A/V cable connector with the v mark beside the A/V OUT terminal...
... v/V/b/B, then press z to display the (Delete) indicator on the selected image. 3 Press (Delete). 4 Select [OK] with B, then press z. [ To view images on TV Connect the camera to the TV with the dedicated A/V cable (supplied). • Align the arrow mark on the dedicated A/V cable connector with the v mark beside the A/V OUT terminal...
Instruction Manual
Page 19
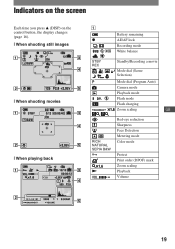
N Red-eye reduction Sharpness Face Detection Metering mode Color mode Protect Print order (DPOF) mark Zoom scaling Playback Volume 19 Indicators on the screen Each time you press v (DISP) on the control button, the display changes (page 16). [ When shooting still images [ When shooting movies [ When playing back A Battery remaining z AE/AF lock Recording mode White balance STBY REC Standby/Recording a movie Mode dial (Scene Selection) Mode dial (Program Auto) Camera mode Playback mode Flash mode Flash charging Zoom scaling GB RICH NATURAL SEPIA B&W -
N Red-eye reduction Sharpness Face Detection Metering mode Color mode Protect Print order (DPOF) mark Zoom scaling Playback Volume 19 Indicators on the screen Each time you press v (DISP) on the control button, the display changes (page 16). [ When shooting still images [ When shooting movies [ When playing back A Battery remaining z AE/AF lock Recording mode White balance STBY REC Standby/Recording a movie Mode dial (Scene Selection) Mode dial (Program Auto) Camera mode Playback mode Flash mode Flash charging Zoom scaling GB RICH NATURAL SEPIA B&W -
Instruction Manual
Page 20
... 3M VGA 16:9 101 0:12 [00:00:40] 12 12/12 00:00:12 PictBridge connecting Image size • 8M is displayed only for the DSC-S780. • 7M is displayed only for the DSC-S750.
... 3M VGA 16:9 101 0:12 [00:00:40] 12 12/12 00:00:12 PictBridge connecting Image size • 8M is displayed only for the DSC-S780. • 7M is displayed only for the DSC-S750.

Instruction Manual
Page 21
... (Playback). Select the item to set with v/V. Menu/Setup ɟ MENU button Mode dial ɠ Control button (Playback) button z button GB 1 Recording: Turn on the camera, then set . 5 Press MENU to display the menu. 3 Select the desired menu item with b/B on the position of the mode dial and Recording/Playback mode...
... (Playback). Select the item to set with v/V. Menu/Setup ɟ MENU button Mode dial ɠ Control button (Playback) button z button GB 1 Recording: Turn on the camera, then set . 5 Press MENU to display the menu. 3 Select the desired menu item with b/B on the position of the mode dial and Recording/Playback mode...
