
Operating Instructions
Page 1
.... DSC-P9 © 2002 Sony Corporation 3-075-412-11(1) Getting started Shooting still images Viewing still images Deleting still images Copying still images to these numbers whenever you call upon your computer _________ Before advanced operations Advanced still image shooting Advanced still image viewing Still image editing Enjoying movies Troubleshooting Additional information Index Digital...
.... DSC-P9 © 2002 Sony Corporation 3-075-412-11(1) Getting started Shooting still images Viewing still images Deleting still images Copying still images to these numbers whenever you call upon your computer _________ Before advanced operations Advanced still image shooting Advanced still image viewing Still image editing Enjoying movies Troubleshooting Additional information Index Digital...

Operating Instructions
Page 3
...industry district (This equipment complies with the EMC standard regulations EN55022 Class B.) Attention for the customers in the United Kingdom A moulded plug complying with this digital camera. CAUTION TO PREVENT ELECTRIC SHOCK, DO NOT USE THIS POLARIZED AC PLUG WITH AN EXTENSION CORD, RECEPTACLE OR OTHER OUTLET UNLESS THE BLADES CAN BE... or leaking Lithium-Ion batteries. "Memory Stick" and battery pack N50 For the Customers in the U.S.A. Notice on the EMC Directive for your nearest Sony service station. THIS CLASS B DIGITAL APPARATUS COMPLIES WITH CANADIAN ICES-003. 3
...industry district (This equipment complies with the EMC standard regulations EN55022 Class B.) Attention for the customers in the United Kingdom A moulded plug complying with this digital camera. CAUTION TO PREVENT ELECTRIC SHOCK, DO NOT USE THIS POLARIZED AC PLUG WITH AN EXTENSION CORD, RECEPTACLE OR OTHER OUTLET UNLESS THE BLADES CAN BE... or leaking Lithium-Ion batteries. "Memory Stick" and battery pack N50 For the Customers in the U.S.A. Notice on the EMC Directive for your nearest Sony service station. THIS CLASS B DIGITAL APPARATUS COMPLIES WITH CANADIAN ICES-003. 3

Operating Instructions
Page 4
...blue or green in this manual are reproduced images, and are not actual images shot using this camera. Do not shake or strike the camera In addition to malfunctions and inability to a malfunction of pictures in color) that the camera is working correctly. Exposing the LCD screen, the finder or the lens to get...The LCD screen and the LCD finder are not guaranteed. Be careful not to bump the lens, and be contrary to it before using the camera. Unauthorized recording of such materials may be careful not to apply force to the provision of data loss, always copy (back up) data to ...
...blue or green in this manual are reproduced images, and are not actual images shot using this camera. Do not shake or strike the camera In addition to malfunctions and inability to a malfunction of pictures in color) that the camera is working correctly. Exposing the LCD screen, the finder or the lens to get...The LCD screen and the LCD finder are not guaranteed. Be careful not to bump the lens, and be contrary to it before using the camera. Unauthorized recording of such materials may be careful not to apply force to the provision of data loss, always copy (back up) data to ...

Operating Instructions
Page 6
... your camera 14 How to use the control button 14 Setting the date and time 15 Shooting still images Inserting and removing a "Memory Stick 17 Deciding the still image size and quality 18 Basic still image shooting (using auto adjustment mode 20 Checking the last image shot (Quick... 38 Copying still images to your computer Copying still images to your computer .. 39 1 Installing the USB driver 40 2 Preparing your camera 41 3 Connecting your camera to your computer 42 4 Copying images 43 5 Viewing the images on your computer 46 For Macintosh users 49 Before advanced operations How to...
... your camera 14 How to use the control button 14 Setting the date and time 15 Shooting still images Inserting and removing a "Memory Stick 17 Deciding the still image size and quality 18 Basic still image shooting (using auto adjustment mode 20 Checking the last image shot (Quick... 38 Copying still images to your computer Copying still images to your computer .. 39 1 Installing the USB driver 40 2 Preparing your camera 41 3 Connecting your camera to your computer 42 4 Copying images 43 5 Viewing the images on your computer 46 For Macintosh users 49 Before advanced operations How to...

Operating Instructions
Page 8
You will be unable to firmly secure the camera to tripods having longer screws, and may damage the camera. • Do not touch the microphone while recording. Identifying the parts Attaching the strap A POWER button (14) B POWER lamp (14) C Shutter button (20) D Wrist strap hook E Flash (24) F Speaker (bottom surface) G Finder window H Self-timer lamp (23)/ AF illuminator (25, 92) I Microphone J Lens K Tripod receptacle (bottom surface) 8 1 7 2 8 3 4 5 9 0 6 qa • Use a tripod with a screw length of less than 5.5 mm (7/32 inch).
You will be unable to firmly secure the camera to tripods having longer screws, and may damage the camera. • Do not touch the microphone while recording. Identifying the parts Attaching the strap A POWER button (14) B POWER lamp (14) C Shutter button (20) D Wrist strap hook E Flash (24) F Speaker (bottom surface) G Finder window H Self-timer lamp (23)/ AF illuminator (25, 92) I Microphone J Lens K Tripod receptacle (bottom surface) 8 1 7 2 8 3 4 5 9 0 6 qa • Use a tripod with a screw length of less than 5.5 mm (7/32 inch).
Operating Instructions
Page 10
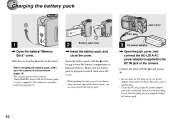
... Battery eject lever , Insert the battery pack, and close the cover. • While pushing the battery eject lever down using the front edge of the camera. Use of the dirty plug may cause a malfunction. • Clean the DC plug of metal. Insert the battery pack with a dry cotton bud. ...Connect the plug with the v mark facing up. • Do not short the DC plug on (page 14). • The camera operates only with the "InfoLITHIUM" battery NP-FC10 battery pack (C type) (supplied). This may not properly charge the battery pack. 10 Make sure the battery...
... Battery eject lever , Insert the battery pack, and close the cover. • While pushing the battery eject lever down using the front edge of the camera. Use of the dirty plug may cause a malfunction. • Clean the DC plug of metal. Insert the battery pack with a dry cotton bud. ...Connect the plug with the v mark facing up. • Do not short the DC plug on (page 14). • The camera operates only with the "InfoLITHIUM" battery NP-FC10 battery pack (C type) (supplied). This may not properly charge the battery pack. 10 Make sure the battery...

Operating Instructions
Page 11
... viewing time. 60min 2272 FINE 4 • It takes about 1 minute that the proper remaining time is finished, disconnect the AC power adaptor both from the camera and the wall outlet (wall socket). Charging starts, and the /CHG lamp lights. 2 To a wall outlet (wall socket) Power cord (mains lead) To remove the...
... viewing time. 60min 2272 FINE 4 • It takes about 1 minute that the proper remaining time is finished, disconnect the AC power adaptor both from the camera and the wall outlet (wall socket). Charging starts, and the /CHG lamp lights. 2 To a wall outlet (wall socket) Power cord (mains lead) To remove the...

Operating Instructions
Page 12
... of time. The guidelines for the number of images that can be recorded/ viewed The tables show approximate guidelines for the length of time the camera can shoot for a longer period of images that can be used repeatedly or self-discharged after charging (page 96). of use. 12 Shooting* still images...
... of time. The guidelines for the number of images that can be recorded/ viewed The tables show approximate guidelines for the length of time the camera can shoot for a longer period of images that can be used repeatedly or self-discharged after charging (page 96). of use. 12 Shooting* still images...
Operating Instructions
Page 13
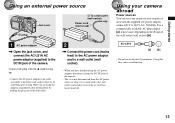
Use a commercially available AC plug adaptor [a], if necessary, depending on the design of the camera. • The set itself has been turned off. Using your camera abroad Power sources You can use an electrical transformer. If something goes wrong while you have finished using the adaptor, immediately shut off the... AC, 50/60 Hz. Connect the plug with the supplied AC power adaptor within 100 V to the DC IN jack of the camera. AC-LS1A • Do not use your camera in any country or area with the v mark facing up. • Connect the AC power adaptor to a wall outlet (wall ...
Use a commercially available AC plug adaptor [a], if necessary, depending on the design of the camera. • The set itself has been turned off. Using your camera abroad Power sources You can use an electrical transformer. If something goes wrong while you have finished using the adaptor, immediately shut off the... AC, 50/60 Hz. Connect the plug with the supplied AC power adaptor within 100 V to the DC IN jack of the camera. AC-LS1A • Do not use your camera in any country or area with the v mark facing up. • Connect the AC power adaptor to a wall outlet (wall ...

Operating Instructions
Page 14
...button 0EV 0EV EV WB ISO AUTO WHITE BAL ISO To change the current settings of the camera, bring up the camera while using the battery, power is automatically shut off . • If you turn the ...each item, press v/V/b/B to select the desired value, then press the center z or b/B to power the camera, the Auto Power Off function will not work. • Movies are performed for the first time, the ...CLOCK SET screen appears (see the next page). When you turn on your camera POWER ON/OFF(CHG) POWER POWER lamp 1 , Press POWER. To turn off the power Press POWER ...
...button 0EV 0EV EV WB ISO AUTO WHITE BAL ISO To change the current settings of the camera, bring up the camera while using the battery, power is automatically shut off . • If you turn the ...each item, press v/V/b/B to select the desired value, then press the center z or b/B to power the camera, the Auto Power Off function will not work. • Movies are performed for the first time, the ...CLOCK SET screen appears (see the next page). When you turn on your camera POWER ON/OFF(CHG) POWER POWER lamp 1 , Press POWER. To turn off the power Press POWER ...
Operating Instructions
Page 17
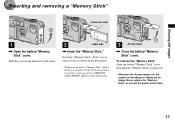
.... 2 Label side , Insert the "Memory Stick." Insert the "Memory Stick" all the way in until it out. • Whenever the Access lamp is lit, the camera is recording or reading out an image. Never remove the "Memory Stick" or turn off the power at this time. 17
.... 2 Label side , Insert the "Memory Stick." Insert the "Memory Stick" all the way in until it out. • Whenever the Access lamp is lit, the camera is recording or reading out an image. Never remove the "Memory Stick" or turn off the power at this time. 17

Operating Instructions
Page 18
... menu appears. • You can choose either [FINE] or [STANDARD]. • The image size and quality values chosen here will be preserved even when the camera is completed, press MENU.
... menu appears. • You can choose either [FINE] or [STANDARD]. • The image size and quality values chosen here will be preserved even when the camera is completed, press MENU.
Operating Instructions
Page 19
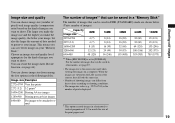
... shoot. Image size and quality You can choose image size (number of pixels) and image quality (compression ratio) based on the LCD screen of the camera, they all look the same size. • Number of shooting images can differ from among the five options in the following tables. Image size Examples...
... shoot. Image size and quality You can choose image size (number of pixels) and image quality (compression ratio) based on the LCD screen of the camera, they all look the same size. • Number of shooting images can differ from among the five options in the following tables. Image size Examples...

Operating Instructions
Page 20
... will be adjusted. (For more details on , Press and hold the shutter button halfway down. The camera beeps. To shoot subjects at distances closer than this, use the Macro mode (page 22). •... The frame appearing on the LCD screen shows the limits of the frame to focus on , the camera is ready for shooting. • If you release your finger from the shutter button, shooting will be canceled....You can choose either Multipoint AF mode or Center AF as when you press POWER to turn on your camera. • The lens cover opens when the power is turned on. • Do not touch ...
... will be adjusted. (For more details on , Press and hold the shutter button halfway down. The camera beeps. To shoot subjects at distances closer than this, use the Macro mode (page 22). •... The frame appearing on the LCD screen shows the limits of the frame to focus on , the camera is ready for shooting. • If you release your finger from the shutter button, shooting will be canceled....You can choose either Multipoint AF mode or Center AF as when you press POWER to turn on your camera. • The lens cover opens when the power is turned on. • Do not touch ...

Operating Instructions
Page 21
... performed for a while with in the "Memory Stick." In such cases, release the shutter button, then try to shoot a subject that from the camera and dark • The contrast of the subject and its background is poor • The subject is seen through glass, such as a window •... reflection, such as that is automatically shut off to flashing slowly. Checking the last image shot (Quick Review) 60min REVIEW 2272 8/8 100-0029 2002 7 4 10:30PM , Press b (7) on the control button to recompose the shot and focus again. • The subject is distant from a mirror, or there is ...
... performed for a while with in the "Memory Stick." In such cases, release the shutter button, then try to shoot a subject that from the camera and dark • The contrast of the subject and its background is poor • The subject is seen through glass, such as a window •... reflection, such as that is automatically shut off to flashing slowly. Checking the last image shot (Quick Review) 60min REVIEW 2272 8/8 100-0029 2002 7 4 10:30PM , Press b (7) on the control button to recompose the shot and focus again. • The subject is distant from a mirror, or there is ...

Operating Instructions
Page 24
... charged, the /CHG lamp flashes. The image will hear a beeping sound. No indicator (Auto): Based on the lighting conditions, the camera will flash in front of the camera and press the shutter button, the focus and the exposure may notice some "noise" in the frame, and press the shutter button... 60min 2272 FINE 4 0EV F2.8 30 2 , Center the subject in the image, but this will have no effect on the image you will be shot after approximately 10 seconds. The flash mode has the following features. When the zoom is enough light, and will use the flash accordingly (factory setting...
... charged, the /CHG lamp flashes. The image will hear a beeping sound. No indicator (Auto): Based on the lighting conditions, the camera will flash in front of the camera and press the shutter button, the focus and the exposure may notice some "noise" in the frame, and press the shutter button... 60min 2272 FINE 4 0EV F2.8 30 2 , Center the subject in the image, but this will have no effect on the image you will be shot after approximately 10 seconds. The flash mode has the following features. When the zoom is enough light, and will use the flash accordingly (factory setting...

Operating Instructions
Page 25
... reaches the subject. • When the focus is up to 2.8m (9 feet 2 1/4 inches) (wide), 1.6m (5 feet 3 inches) (tele), or the subject has weak contrast, the camera may also reduce the effectiveness of the red-eye reduction process. • Even when the AF illuminator flashes, but sufficient light does not reach the... (page 28), the AF illuminator will focus properly as long as it directly at the subject's eyes. • The amount of the image somewhat, the camera will not function. -
... reaches the subject. • When the focus is up to 2.8m (9 feet 2 1/4 inches) (wide), 1.6m (5 feet 3 inches) (tele), or the subject has weak contrast, the camera may also reduce the effectiveness of the red-eye reduction process. • Even when the AF illuminator flashes, but sufficient light does not reach the... (page 28), the AF illuminator will focus properly as long as it directly at the subject's eyes. • The amount of the image somewhat, the camera will not function. -
Operating Instructions
Page 27
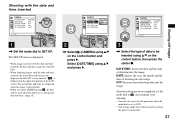
The SET UP menu is displayed. • When images are shot with the date and time inserted, the date and time cannot be inserted in the order set to , and continue your shooting. • You can ... shooting images with the date and time inserted CAMERA MOVING IMAGE : DATE/TIME : DIGITAL ZOOM : RED EYE REDUCTION : AF ILLUMINATOR : MPEG MOVIE OFF O N OFF AUTO SELECT CAMERA MOVING IMAGE : DATE/TIME : DIGITAL ZOOM : RED EYE REDUCTION : AF ILLUMINATOR : DAY&TIME DATE OFF OK CAMERA MOVING IMAGE : DATE/TIME : DIGITAL ZOOM : RED EYE REDUCTION : AF ILLUMINATOR : MPEG...
The SET UP menu is displayed. • When images are shot with the date and time inserted, the date and time cannot be inserted in the order set to , and continue your shooting. • You can ... shooting images with the date and time inserted CAMERA MOVING IMAGE : DATE/TIME : DIGITAL ZOOM : RED EYE REDUCTION : AF ILLUMINATOR : MPEG MOVIE OFF O N OFF AUTO SELECT CAMERA MOVING IMAGE : DATE/TIME : DIGITAL ZOOM : RED EYE REDUCTION : AF ILLUMINATOR : DAY&TIME DATE OFF OK CAMERA MOVING IMAGE : DATE/TIME : DIGITAL ZOOM : RED EYE REDUCTION : AF ILLUMINATOR : MPEG...
Operating Instructions
Page 29
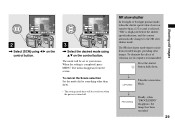
... equal to than SCN. • The settings made here will be saved even when the power is displayed before the shutter speed indication, and the camera automatically changes to something other than a 1/2 second is selected, "NR" is turned off. To eliminate the effects of vibration, use of a tripod is completed, press...
... equal to than SCN. • The settings made here will be saved even when the power is displayed before the shutter speed indication, and the camera automatically changes to something other than a 1/2 second is selected, "NR" is turned off. To eliminate the effects of vibration, use of a tripod is completed, press...

Operating Instructions
Page 30
...screen. Various items of your images. • For movies, see page 70. • For information on the various symbols displayed, see the images you shot will be displayed. 30 Viewing still images Viewing single images 60min 2272 8/8 100-0028 2002 7 4 10:30PM FILE BACK/NEXT VOLUME 1 , Set ...the mode dial to , and turn on the LCD screen. The last image you shoot with this camera almost immediately on the power. Viewing images on the LCD screen of image information will be displayed. Single (single image display) You can see page...
...screen. Various items of your images. • For movies, see page 70. • For information on the various symbols displayed, see the images you shot will be displayed. 30 Viewing still images Viewing single images 60min 2272 8/8 100-0028 2002 7 4 10:30PM FILE BACK/NEXT VOLUME 1 , Set ...the mode dial to , and turn on the LCD screen. The last image you shoot with this camera almost immediately on the power. Viewing images on the LCD screen of image information will be displayed. Single (single image display) You can see page...


