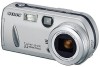

Operating Instructions
Page 3
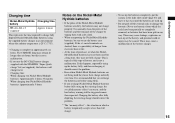
...equipment in order to correct the interference by one or more information regarding recycling of this digital camera. The supplied interface cable must be sure to operate this equipment. Notice on a ...(i.e., marked with the instructions, may influence the picture and sound of rechargeable batteries, call toll free 1-800-822-8837, or visit http://www.rbrc.org/ Caution: Do...cautioned that any changes or modifications not expressly approved in this manual could void your nearest Sony service station. If you should lose the fuse cover, please contact your authority to attach...
...equipment in order to correct the interference by one or more information regarding recycling of this digital camera. The supplied interface cable must be sure to operate this equipment. Notice on a ...(i.e., marked with the instructions, may influence the picture and sound of rechargeable batteries, call toll free 1-800-822-8837, or visit http://www.rbrc.org/ Caution: Do...cautioned that any changes or modifications not expressly approved in this manual could void your nearest Sony service station. If you should lose the fuse cover, please contact your authority to attach...

Operating Instructions
Page 4
... recording medium, etc. "Memory Stick" N50 For the Customers in any way. • Be careful when placing the camera near a window or outdoors. and Canada THIS CLASS B DIGITAL DEVICE COMPLIES WITH PART 15 OF THE FCC RULES AND THE CANADIAN ICES-003 OPERATION IS SUBJECT TO THE FOLLOWING TWO CONDITIONS: (1) ... on your local authority. Be careful not to bump the lens, and be uneven and that the camera is not possible due to a malfunction of the battery used to it. Do not shake or strike the camera In addition to malfunctions and inability to direct sunlight for the DSCP72 only) This...
... recording medium, etc. "Memory Stick" N50 For the Customers in any way. • Be careful when placing the camera near a window or outdoors. and Canada THIS CLASS B DIGITAL DEVICE COMPLIES WITH PART 15 OF THE FCC RULES AND THE CANADIAN ICES-003 OPERATION IS SUBJECT TO THE FOLLOWING TWO CONDITIONS: (1) ... on your local authority. Be careful not to bump the lens, and be uneven and that the camera is not possible due to a malfunction of the battery used to it. Do not shake or strike the camera In addition to malfunctions and inability to direct sunlight for the DSCP72 only) This...

Operating Instructions
Page 6
... your camera 4 Identifying the parts 8 Getting started Preparing batteries 14 Charging the batteries 14 Inserting the batteries 16 Using an external power source 19 Using your camera abroad 19 Turning your camera 45 ...Setting the distance to the subject - Flash level ....53 Shooting multiple frames - Macro (DSC-P72 only 30 Using the self-timer 31 Selecting a flash mode 32 Shooting with audio... operations How to setup and operate your camera on the LCD screen of contents Before using auto mode 26 Checking the last image shot - EV adjustment 50 Selecting a metering mode...
... your camera 4 Identifying the parts 8 Getting started Preparing batteries 14 Charging the batteries 14 Inserting the batteries 16 Using an external power source 19 Using your camera abroad 19 Turning your camera 45 ...Setting the distance to the subject - Flash level ....53 Shooting multiple frames - Macro (DSC-P72 only 30 Using the self-timer 31 Selecting a flash mode 32 Shooting with audio... operations How to setup and operate your camera on the LCD screen of contents Before using auto mode 26 Checking the last image shot - EV adjustment 50 Selecting a metering mode...
Operating Instructions
Page 7
...images to your computer - Playback zoom 62 Recording an enlarged image - Rotate 64 Playing back images shot in Multi Burst mode 65 Playing back continuously 65 Playing back frame by frame - For Windows users ...78 Installing the USB driver 79 Installing "Image Transfer 80 Installing "ImageMixer 81 Connecting the camera to your computer 82 Copying images using "Image Transfer" 83 Changing "Image Transfer" settings .. 84 ...Memory Stick 109 The nickel-metal hydride batteries ........110 The battery charger 111 Specifications 111 The LCD screen 113 Index Index 116 7
...images to your computer - Playback zoom 62 Recording an enlarged image - Rotate 64 Playing back images shot in Multi Burst mode 65 Playing back continuously 65 Playing back frame by frame - For Windows users ...78 Installing the USB driver 79 Installing "Image Transfer 80 Installing "ImageMixer 81 Connecting the camera to your computer 82 Copying images using "Image Transfer" 83 Changing "Image Transfer" settings .. 84 ...Memory Stick 109 The nickel-metal hydride batteries ........110 The battery charger 111 Specifications 111 The LCD screen 113 Index Index 116 7
Operating Instructions
Page 9
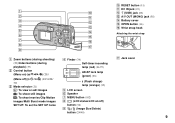
J RESET button (91) K DC IN jack (19) 1 q; L (USB) jack (82) 2 qa M A/V OUT (MONO) jack (38) 3 4 N Battery cover qs O OPEN button (16) qd P Wrist strap hook 5 qf Attaching the wrist strap 6 qg 7 qh 8 qj 9 A Zoom buttons (during shooting) D Finder (34) Q Jack cover (...
J RESET button (91) K DC IN jack (19) 1 q; L (USB) jack (82) 2 qa M A/V OUT (MONO) jack (38) 3 4 N Battery cover qs O OPEN button (16) qd P Wrist strap hook 5 qf Attaching the wrist strap 6 qg 7 qh 8 qj 9 A Zoom buttons (during shooting) D Finder (34) Q Jack cover (...

Operating Instructions
Page 11
L (USB) jack (82) 2 qa M A/V OUT (MONO) jack (38) 3 4 N Battery cover qs O OPEN button (16) qd P Wrist strap hook 5 qf Attaching the wrist strap 6 qg 7 qh 8 qj 9 A Zoom buttons (during shooting) D Finder (34) Q Jack cover (...
L (USB) jack (82) 2 qa M A/V OUT (MONO) jack (38) 3 4 N Battery cover qs O OPEN button (16) qd P Wrist strap hook 5 qf Attaching the wrist strap 6 qg 7 qh 8 qj 9 A Zoom buttons (during shooting) D Finder (34) Q Jack cover (...

Operating Instructions
Page 13
J RESET button (91) K DC IN jack (19) 1 q; L (USB) jack (82) 2 qa M A/V OUT (MONO) jack (38) 3 4 N Battery cover qs O OPEN button (16) qd P Wrist strap hook 5 qf Attaching the wrist strap 6 qg 7 qh 8 qj 9 A Zoom buttons (during shooting) D Finder (34) Q Jack cover (...
J RESET button (91) K DC IN jack (19) 1 q; L (USB) jack (82) 2 qa M A/V OUT (MONO) jack (38) 3 4 N Battery cover qs O OPEN button (16) qd P Wrist strap hook 5 qf Attaching the wrist strap 6 qg 7 qh 8 qj 9 A Zoom buttons (during shooting) D Finder (34) Q Jack cover (...
Operating Instructions
Page 14
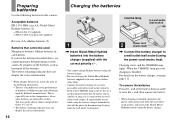
...-pack (not supplied) R6 (size AA) alkaline batteries (2) Batteries that cannot be able to charge the Nickel-Metal Hydride batteries supplied with your camera before using the power cord (mains lead). To remove the batteries Press the - NH-AA-DA (2) (supplied) ...wall socket) 1 , Insert Nickel-Metal Hydride batteries into the battery charger (supplied) with the correct polarity +/−. • You cannot charge alkaline batteries using the battery charger. • Be sure to shoot in this camera. Preparing batteries Use the following information. - This is finished,...
...-pack (not supplied) R6 (size AA) alkaline batteries (2) Batteries that cannot be able to charge the Nickel-Metal Hydride batteries supplied with your camera before using the power cord (mains lead). To remove the batteries Press the - NH-AA-DA (2) (supplied) ...wall socket) 1 , Insert Nickel-Metal Hydride batteries into the battery charger (supplied) with the correct polarity +/−. • You cannot charge alkaline batteries using the battery charger. • Be sure to shoot in this camera. Preparing batteries Use the following information. - This is finished,...
Operating Instructions
Page 15
... If you recharge Nickel-Metal Hydride batteries before fully using up of the Nickel-Metal Hydride batteries are shorted, there is not a malfunction. This is typical of this happens, repeatedly using up the batteries completely, put the camera in any way. Never use batteries from excessive heat or fire. &#...8226; At the time of the charger by wiping them . • If you use the BC-CSQ2 battery charger supplied with a dry cloth. •...
... If you recharge Nickel-Metal Hydride batteries before fully using up of the Nickel-Metal Hydride batteries are shorted, there is not a malfunction. This is typical of this happens, repeatedly using up the batteries completely, put the camera in any way. Never use batteries from excessive heat or fire. &#...8226; At the time of the charger by wiping them . • If you use the BC-CSQ2 battery charger supplied with a dry cloth. •...
Operating Instructions
Page 16
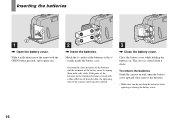
... clicks. Slide it in . To remove the batteries Stand the camera on end, open the battery cover upward, then remove the batteries. • Make sure you do not drop the batteries when opening or closing the battery cover. 16 Inserting the batteries 2 1 2 1 , Open the battery cover. Match the +/− poles of the batteries to the +/ − marks inside the...
... clicks. Slide it in . To remove the batteries Stand the camera on end, open the battery cover upward, then remove the batteries. • Make sure you do not drop the batteries when opening or closing the battery cover. 16 Inserting the batteries 2 1 2 1 , Open the battery cover. Match the +/− poles of the batteries to the +/ − marks inside the...
Operating Instructions
Page 17
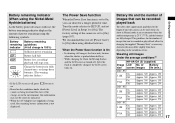
... show approximate guidelines for fully charged ones, or charge these , depending on the conditions under which the camera is set [Power Save] to [On] when using the following symbols. Battery Battery remaining remaining guidelines indicator (A full charge is turned off , press to On, you can be correctly ...recorded or played back allow for a longer period of Battery size screen images life (min.) DSC-P72 3.1M On Off Approx. 300 Approx. 150 Approx. 500 Approx. 250 VGA On Off Approx. 300 Approx. 150 Approx. 500 Approx. 250 DSC-P52 3.1M On Off Approx. 320 Approx. 160 Approx...
... show approximate guidelines for fully charged ones, or charge these , depending on the conditions under which the camera is set [Power Save] to [On] when using the following symbols. Battery Battery remaining remaining guidelines indicator (A full charge is turned off , press to On, you can be correctly ...recorded or played back allow for a longer period of Battery size screen images life (min.) DSC-P72 3.1M On Off Approx. 300 Approx. 150 Approx. 500 Approx. 250 VGA On Off Approx. 300 Approx. 150 Approx. 500 Approx. 250 DSC-P52 3.1M On Off Approx. 320 Approx. 160 Approx...
Operating Instructions
Page 18
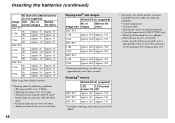
... off once in every two shots. - Turning the camera on and off frequently. - When [LCD Backlight] is set to [Fine]. - Inserting the batteries (continued) R6 (Size AA) alkaline battery (2) (not supplied) Image LCD No. The image quality is set to [Bright]. - Using the zoom heavily (DSC-P72/P52 only) - After using Sony alkaline batteries 1) Shooting under the following...
... off once in every two shots. - Turning the camera on and off frequently. - When [LCD Backlight] is set to [Fine]. - Inserting the batteries (continued) R6 (Size AA) alkaline battery (2) (not supplied) Image LCD No. The image quality is set to [Bright]. - Using the zoom heavily (DSC-P72/P52 only) - After using Sony alkaline batteries 1) Shooting under the following...

Operating Instructions
Page 19
... sure to use an electrical transformer (travel converter), as it from the DC IN jack of the camera. • The set is not disconnected from the AC power source (mains) as long as this camera. • Connect the AC Adaptor to an easily accessible wall outlet (wall socket) close by disconnecting ... IN jack of the wall outlet (wall socket) [b]. If some trouble occurs while using the adaptor, immediately shut off . Connect the plug with the supplied battery charger or AC Adaptor (not supplied) within 100 V to 240 V AC, 50/60 Hz. Other AC adaptors cannot be used with this may cause a ...
... sure to use an electrical transformer (travel converter), as it from the DC IN jack of the camera. • The set is not disconnected from the AC power source (mains) as long as this camera. • Connect the AC Adaptor to an easily accessible wall outlet (wall socket) close by disconnecting ... IN jack of the wall outlet (wall socket) [b]. If some trouble occurs while using the adaptor, immediately shut off . Connect the plug with the supplied battery charger or AC Adaptor (not supplied) within 100 V to 240 V AC, 50/60 Hz. Other AC adaptors cannot be used with this may cause a ...

Operating Instructions
Page 20
... power Press POWER again, the POWER lamp goes out, and the camera turns off. • Do not remove the batteries or AC Adaptor with the mode selector set to or , the lens begins to move (DSC-P72 only). This may cause a malfunction (DSC-P72 only). • When you turn on with the lens portion... pulled out. Turning your camera on/off POWER lamp POWER POWER , Press ...
... power Press POWER again, the POWER lamp goes out, and the camera turns off. • Do not remove the batteries or AC Adaptor with the mode selector set to or , the lens begins to move (DSC-P72 only). This may cause a malfunction (DSC-P72 only). • When you turn on with the lens portion... pulled out. Turning your camera on/off POWER lamp POWER POWER , Press ...
Operating Instructions
Page 21
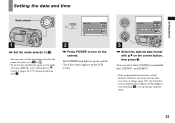
You can carry out this happens, start from [Y/M/D] (year/month/ day), [M/D/Y], and [D/M/Y]. • If the rechargeable button battery, which provides the power for saving the time data, ever loses its charge (page 109), the Clock Set screen automatically reappears. The POWER lamp lights ... to turn on the control button, then press z. Clock Set Y/M/D M/D/Y D/M/Y 2003 / OK 1/ 1 12 : 00 OK AM Cancel 3 , Select the desired date format with v/V on the camera. If this operation even when the mode selector is set to or . • To set the time and the date again, set up the date...
You can carry out this happens, start from [Y/M/D] (year/month/ day), [M/D/Y], and [D/M/Y]. • If the rechargeable button battery, which provides the power for saving the time data, ever loses its charge (page 109), the Clock Set screen automatically reappears. The POWER lamp lights ... to turn on the control button, then press z. Clock Set Y/M/D M/D/Y D/M/Y 2003 / OK 1/ 1 12 : 00 OK AM Cancel 3 , Select the desired date format with v/V on the camera. If this operation even when the mode selector is set to or . • To set the time and the date again, set up the date...

Operating Instructions
Page 27
..., and the still image is automatically shut off to preserve battery power (page 20). To change the camera mode 1 Set the mode selector to . 2 Press MENU. 3 Select (Camera) with b on the control button. 4 Select the desired camera mode with the camera turned on the mode selector When the mode selector is set... is set to [Fine], the AF range finder is set to [Multi AF], and the metering mode is set to the (Camera) setting in the "Memory Stick." The menu items you are shooting with the batteries, if no tasks are limited to , the functions that can shoot your shooting condition.
..., and the still image is automatically shut off to preserve battery power (page 20). To change the camera mode 1 Set the mode selector to . 2 Press MENU. 3 Select (Camera) with b on the control button. 4 Select the desired camera mode with the camera turned on the mode selector When the mode selector is set... is set to [Fine], the AF range finder is set to [Multi AF], and the metering mode is set to the (Camera) setting in the "Memory Stick." The menu items you are shooting with the batteries, if no tasks are limited to , the functions that can shoot your shooting condition.
Operating Instructions
Page 34
.... VGA 101 98 • The image through the finder does not indicate the actual recordable range. The finder is convenient when you want to save battery power, or when it is turned off, the smart zoom does not function (page 29). • If you press (Flash mode)/ (Self-timer)/ (Macro...) (DSC-P72) or (Spot meter) (DSCP52/P32) with the LCD screen turned off, the image will be displayed on the screen for approximately two seconds so ...
.... VGA 101 98 • The image through the finder does not indicate the actual recordable range. The finder is convenient when you want to save battery power, or when it is turned off, the smart zoom does not function (page 29). • If you press (Flash mode)/ (Self-timer)/ (Macro...) (DSC-P72) or (Spot meter) (DSCP52/P32) with the LCD screen turned off, the image will be displayed on the screen for approximately two seconds so ...

Operating Instructions
Page 82
...computer, connect the USB cable to the USB connector on the rear panel. • When using weak batteries, copying may fail or the data may be corrupted if the camera shuts off due to weak batteries. • For further details on the AC Adaptor, see page 19. • For further details ...When a USB connection is set to use fully charged nickel-metal hydride batteries or the AC Adaptor (not supplied). USB MODE NORMAL Access indicators* "USB MODE NORMAL" appears on your computer and the camera. When you want to copy into the camera. • Be sure to [Normal] in the SET UP settings ...
...computer, connect the USB cable to the USB connector on the rear panel. • When using weak batteries, copying may fail or the data may be corrupted if the camera shuts off due to weak batteries. • For further details on the AC Adaptor, see page 19. • For further details ...When a USB connection is set to use fully charged nickel-metal hydride batteries or the AC Adaptor (not supplied). USB MODE NORMAL Access indicators* "USB MODE NORMAL" appears on your computer and the camera. When you want to copy into the camera. • Be sure to [Normal] in the SET UP settings ...
Operating Instructions
Page 91
... and time settings, etc.) RESET Troubleshooting 3 Consult your camera (page 19). • The batteries are discharged. p Install charged batteries (page 14). p Replace the batteries with new ones. 91 p Connect it securely to your Sony dealer or local authorized Sony service facility. p Install charged batteries (page 14). • The batteries are not installed properly. Troubleshooting If you have used...
... and time settings, etc.) RESET Troubleshooting 3 Consult your camera (page 19). • The batteries are discharged. p Install charged batteries (page 14). p Replace the batteries with new ones. 91 p Connect it securely to your Sony dealer or local authorized Sony service facility. p Install charged batteries (page 14). • The batteries are not installed properly. Troubleshooting If you have used...
Operating Instructions
Page 92
... (MPEG movie). • The LCD screen is [Off], after three minutes.) (page 17). • The batteries are shooting a subject with the LCD screen p Turn on , the camera turns off . settings (DSC-P52/P72 only). The image is too low. The image is out of focus. • The subject is too ...close. • While shooting still images, (Camera) is set the focus preset distance. Smart zoom does not function...
... (MPEG movie). • The LCD screen is [Off], after three minutes.) (page 17). • The batteries are shooting a subject with the LCD screen p Turn on , the camera turns off . settings (DSC-P52/P72 only). The image is too low. The image is out of focus. • The subject is too ...close. • While shooting still images, (Camera) is set the focus preset distance. Smart zoom does not function...


