Instruction Manual
Page 11
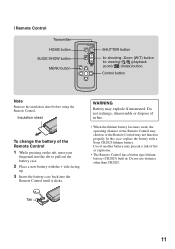
...not recharge, disassemble or dispose of in . Use of another battery may present a risk of fire or explosion. • The Remote Control has a button type lithium battery (CR2025) built in fire. • When the lithium battery becomes weak, the operating distance of the Remote Control 1 While pressing on ...the tab, inset your fingernail into the slit to pull out the battery case. 2 Place a new battery with a Sony CR2025 lithium battery. Insulation sheet To change the battery of the Remote Control may shorten, or the Remote Control may explode if mistreated. In this...
...not recharge, disassemble or dispose of in . Use of another battery may present a risk of fire or explosion. • The Remote Control has a button type lithium battery (CR2025) built in fire. • When the lithium battery becomes weak, the operating distance of the Remote Control 1 While pressing on ...the tab, inset your fingernail into the slit to pull out the battery case. 2 Place a new battery with a Sony CR2025 lithium battery. Insulation sheet To change the battery of the Remote Control may shorten, or the Remote Control may explode if mistreated. In this...

Instruction Manual
Page 13
... correct under certain circumstances. • The Clock Set screen appears when the camera is no "Memory Stick Duo" inserted The camera records/plays back images using the internal memory (approx. 31 MB). [ To check the remaining battery time Press POWER button to turn on and check the remaining battery on for the first...
... correct under certain circumstances. • The Clock Set screen appears when the camera is no "Memory Stick Duo" inserted The camera records/plays back images using the internal memory (approx. 31 MB). [ To check the remaining battery time Press POWER button to turn on and check the remaining battery on for the first...
Instruction Manual
Page 15
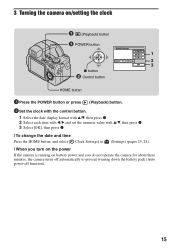
3 Turning the camera on/setting the clock (Playback) button POWER button 1 2 3 z button ɟ Control button HOME button 1 Press the POWER button or press (Playback) button. 2 Set the clock with the control button. 1 Select the date display format with v/V, then press z. 2 Select each item with b/B and set the numeric value with v/V, then press... Press the HOME button, and select [ Clock Settings] in (Settings) (pages 23, 24). [ When you turn on the power If the camera is running on battery power and you do not operate the camera for about three minutes, the camera turns off automatically...
3 Turning the camera on/setting the clock (Playback) button POWER button 1 2 3 z button ɟ Control button HOME button 1 Press the POWER button or press (Playback) button. 2 Set the clock with the control button. 1 Select the date display format with v/V, then press z. 2 Select each item with b/B and set the numeric value with v/V, then press... Press the HOME button, and select [ Clock Settings] in (Settings) (pages 23, 24). [ When you turn on the power If the camera is running on battery power and you do not operate the camera for about three minutes, the camera turns off automatically...
Instruction Manual
Page 16
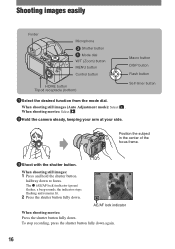
... shooting movies: Press the shutter button fully down again. 16 To stop recording, press the shutter button fully down . Position the subject in the center of the focus frame. 3Shoot with the shutter button. When shooting still images (Auto Adjustment mode): Select . When shooting movies: Select . 2Hold the camera steady, keeping your arm at...
... shooting movies: Press the shutter button fully down again. 16 To stop recording, press the shutter button fully down . Position the subject in the center of the focus frame. 3Shoot with the shutter button. When shooting still images (Auto Adjustment mode): Select . When shooting movies: Select . 2Hold the camera steady, keeping your arm at...
Instruction Manual
Page 17
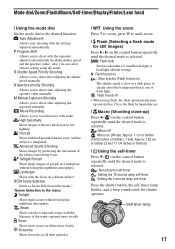
...value manually. Movie Recording Allows you to undo zoom. [ Flash (Selecting a flash mode for still images) Press B ( ) on the control button repeatedly until the desired mode is selected. : Flash Auto Strobes when there is insufficient light or backlight (default setting) : Flash forced on : ...Using the zoom Press T to zoom, press W to shoot with audio. Auto Adjustment Allows easy shooting with the focus on the control button repeatedly until the shutter operates. Fireworks Shoot fireworks in low lighting. S Shutter Speed Priority Shooting Allows you can select various setting using ...
...value manually. Movie Recording Allows you to undo zoom. [ Flash (Selecting a flash mode for still images) Press B ( ) on the control button repeatedly until the desired mode is selected. : Flash Auto Strobes when there is insufficient light or backlight (default setting) : Flash forced on : ...Using the zoom Press T to zoom, press W to shoot with audio. Auto Adjustment Allows easy shooting with the focus on the control button repeatedly until the shutter operates. Fireworks Shoot fireworks in low lighting. S Shutter Speed Priority Shooting Allows you can select various setting using ...

Instruction Manual
Page 18
... LCD screen. Each time you use the finder, the image does not appear on the LCD screen. FINDER/LCD button Finder Adjustment dial [ Adjusting the angle of the LCD screen (DSC-H9 only) You can choose to your eyesight so that the image appears clearly within the finder, then shoot the... image. Brightness of LCD backlight up r Histogram on r Indicators off r Indicators on the control button. When you press v (DISP) button, the LCD screen or the ...
... LCD screen. Each time you use the finder, the image does not appear on the LCD screen. FINDER/LCD button Finder Adjustment dial [ Adjusting the angle of the LCD screen (DSC-H9 only) You can choose to your eyesight so that the image appears clearly within the finder, then shoot the... image. Brightness of LCD backlight up r Histogram on r Indicators off r Indicators on the control button. When you press v (DISP) button, the LCD screen or the ...

Instruction Manual
Page 20
... the yellow indication V to set. AF range finder frame indicator Exposure value Aperture value Shutter speed ISO value Select Set Wheel dial Control button To select the item 1 Turn the wheel dial to select the item you want to select the item. 3 To set by using the...value • Exposure value (EV) • AF range finder frame indicator - The displayed value is set is set . 2 Press z on the control button. Items that cannot be selected are displayed in yellow, the values can change the following operations. Shooting with manual adjustment [ Using the wheel dial You...
... the yellow indication V to set. AF range finder frame indicator Exposure value Aperture value Shutter speed ISO value Select Set Wheel dial Control button To select the item 1 Turn the wheel dial to select the item you want to select the item. 3 To set by using the...value • Exposure value (EV) • AF range finder frame indicator - The displayed value is set is set . 2 Press z on the control button. Items that cannot be selected are displayed in yellow, the values can change the following operations. Shooting with manual adjustment [ Using the wheel dial You...
Instruction Manual
Page 21
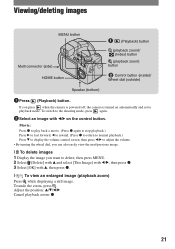
.... • By turning the wheel dial, you can also easily view the next/previous image. [ To delete images 1 Display the image you press when the camera is powered off, the camera is turned on the control button. To undo the zoom, press . Adjust the position: v/V/b/B Cancel playback zoom: z 21
.... • By turning the wheel dial, you can also easily view the next/previous image. [ To delete images 1 Display the image you press when the camera is powered off, the camera is turned on the control button. To undo the zoom, press . Adjust the position: v/V/b/B Cancel playback zoom: z 21
Instruction Manual
Page 22
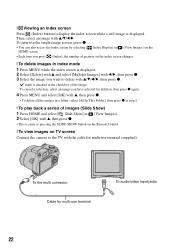
... want to delete with v/V/b/B. To the multi connector Cable for multi-use terminal To audio/video input jacks 22 [ Viewing an index screen Press (Index) button to display the index screen while a still image is checked in (View Images). 2 Select [OK] with v, then press z. • This is same... as pressing the SLIDE SHOW button on the Remote Control. [ To view images on TV screen Connect the camera to the TV with the cable for multi-use terminal (supplied). Then, select an image with v/V/b/B, then press z.
... want to delete with v/V/b/B. To the multi connector Cable for multi-use terminal To audio/video input jacks 22 [ Viewing an index screen Press (Index) button to display the index screen while a still image is checked in (View Images). 2 Select [OK] with v, then press z. • This is same... as pressing the SLIDE SHOW button on the Remote Control. [ To view images on TV screen Connect the camera to the TV with the cable for multi-use terminal (supplied). Then, select an image with v/V/b/B, then press z.

Instruction Manual
Page 23
... setting with v/V, then press z. • The camera is the gateway screen for all the functions of your camera. HOME/Menu Using the HOME screen The HOME screen is set to the shooting mode by pressing the shutter button halfway down. 23 Category Item z button Guide 2 Select a category with b/B on the... control button. 3 Select an item with v/V, then ...
... setting with v/V, then press z. • The camera is the gateway screen for all the functions of your camera. HOME/Menu Using the HOME screen The HOME screen is set to the shooting mode by pressing the shutter button halfway down. 23 Category Item z button Guide 2 Select a category with b/B on the... control button. 3 Select an item with v/V, then ...

Instruction Manual
Page 24
... Connect Video Out Shooting Settings Shooting Settings 1 AF Illuminator AF Mode Conversion Lens Shooting Settings 2 Flash Sync. Folder Copy Function Guide COMPONENT Grid Line Digital Zoom Auto Orientation Expanded Focus Category Shooting View Images Printing, Other Manage Memory Settings 24 Items Shooting Single Image Index Display Slide Show Print Music... Tool Download Music Memory Tool Memory Stick Tool Format Change REC. For details on the operation 1 page 23 HOME items Press HOME button displays the following items. Details on the items are displayed on the screen by the guide.
... Connect Video Out Shooting Settings Shooting Settings 1 AF Illuminator AF Mode Conversion Lens Shooting Settings 2 Flash Sync. Folder Copy Function Guide COMPONENT Grid Line Digital Zoom Auto Orientation Expanded Focus Category Shooting View Images Printing, Other Manage Memory Settings 24 Items Shooting Single Image Index Display Slide Show Print Music... Tool Download Music Memory Tool Memory Stick Tool Format Change REC. For details on the operation 1 page 23 HOME items Press HOME button displays the following items. Details on the items are displayed on the screen by the guide.

Instruction Manual
Page 25
... shooting and playback mode. • Different items will become visible depending on the selected mode. 2 Select the desired item with v/V on the control button. • If the desired item is hidden, keep pressing v/V until the item appears on the screen. 3 Select the desired setting with b/B on the... control button. • If the desired item is hidden, keep pressing b/B until the item appears on the screen. • Press z after selecting an item in ...
... shooting and playback mode. • Different items will become visible depending on the selected mode. 2 Select the desired item with v/V on the control button. • If the desired item is hidden, keep pressing v/V until the item appears on the screen. 3 Select the desired setting with b/B on the... control button. • If the desired item is hidden, keep pressing b/B until the item appears on the screen. • Press z after selecting an item in ...
Instruction Manual
Page 26
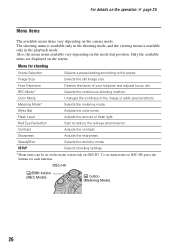
...method. SteadyShot Selects the anti-blur mode. To set on the menu screen only on DSC-H7. Metering Mode* Selects the metering mode. The shooting menu is available only in the shooting...items vary depending on the mode dial position. Also, the menu items available vary depending on the camera mode. Face Detection Detects the faces of the image or adds special effects. Sharpness Adjusts the sharpness... light. Only the available items are displayed on DSC-H9, press the buttons for shooting Scene Selection Selects a preset setting according to reduce the red-eye phenomenon...
...method. SteadyShot Selects the anti-blur mode. To set on the menu screen only on DSC-H7. Metering Mode* Selects the metering mode. The shooting menu is available only in the shooting...items vary depending on the mode dial position. Also, the menu items available vary depending on the camera mode. Face Detection Detects the faces of the image or adds special effects. Sharpness Adjusts the sharpness... light. Only the available items are displayed on DSC-H9, press the buttons for shooting Scene Selection Selects a preset setting according to reduce the red-eye phenomenon...

Instruction Manual
Page 29
When you click the [Cyber-shot Handbook] button, the screen for HQX file is not installed, install the Stuffit Expander. 29 click the shortcut created on the desktop. [ For Macintosh users Turn on ... 1 Turn on -screen instructions to copy. ROM (supplied) into the CD-ROM drive. Follow the instructions below appears. When you click the "Cyber-shot Handbook" button, the both of the "Cyber-shot Handbook" and the "Cyber-shot Step-up Guide" will be installed. 3 After the installation is complete, double-
When you click the [Cyber-shot Handbook] button, the screen for HQX file is not installed, install the Stuffit Expander. 29 click the shortcut created on the desktop. [ For Macintosh users Turn on ... 1 Turn on -screen instructions to copy. ROM (supplied) into the CD-ROM drive. Follow the instructions below appears. When you click the "Cyber-shot Handbook" button, the both of the "Cyber-shot Handbook" and the "Cyber-shot Step-up Guide" will be installed. 3 After the installation is complete, double-

Instruction Manual
Page 30
Indicators on the screen Each time you press v (DISP) button, the display changes (page 18). [ When shooting still images [ When shooting movies [ When playing back A E Battery remaining Low battery warning Image size P S A M Mode dial/Menu (Scene Selection) Mode dial Night Shot (DSC-H9 only) White balance VOL. Recording mode Metering mode Face Detection SteadyShot Vibration warning Self-timer Zoom scaling Color mode Contrast Sharpness PictBridge connecting Protect Volume Print order (DPOF) mark Zoom scaling PictBridge connecting 30
Indicators on the screen Each time you press v (DISP) button, the display changes (page 18). [ When shooting still images [ When shooting movies [ When playing back A E Battery remaining Low battery warning Image size P S A M Mode dial/Menu (Scene Selection) Mode dial Night Shot (DSC-H9 only) White balance VOL. Recording mode Metering mode Face Detection SteadyShot Vibration warning Self-timer Zoom scaling Color mode Contrast Sharpness PictBridge connecting Protect Volume Print order (DPOF) mark Zoom scaling PictBridge connecting 30

Instruction Manual
Page 35
...hot or cold location. • The displayed battery remaining differs from the current one of the following : - Viewing images Your camera cannot play back images. • Press (Playback) button (page 21). • The folder/file name has been changed on your computer. • When an image file has been... processed by a computer or when the image file was recorded using a model other than that of your camera, playback on images. The battery ...
...hot or cold location. • The displayed battery remaining differs from the current one of the following : - Viewing images Your camera cannot play back images. • Press (Playback) button (page 21). • The folder/file name has been changed on your computer. • When an image file has been... processed by a computer or when the image file was recorded using a model other than that of your camera, playback on images. The battery ...


