
Operating Instructions
Page 1
...Troubleshooting Additional information © 2009 Sony Corporation Please read "Read This First" and "About the Print Packs" supplied and this manual, "Operating Instructions," thoroughly and retain them for future reference. 4-129-145-11 (2) Digital Photo Printer DPP-FP67/FP77 Operating Instructions Before ...operating this unit, please read the supplied "Read This First" and "About the Print Packs." Before you call upon your Sony dealer regarding this product. Record the serial...
...Troubleshooting Additional information © 2009 Sony Corporation Please read "Read This First" and "About the Print Packs" supplied and this manual, "Operating Instructions," thoroughly and retain them for future reference. 4-129-145-11 (2) Digital Photo Printer DPP-FP67/FP77 Operating Instructions Before ...operating this unit, please read the supplied "Read This First" and "About the Print Packs." Before you call upon your Sony dealer regarding this product. Record the serial...
Operating Instructions
Page 2
...Via Esprillo, San Diego, CA 92127 U.S.A. Telephone No.: 858-942-2230 This device complies with the instructions, may influence the picture of this digital photo printer. This equipment generates, uses, and can be determined by one or more of the FCC Rules. Increase the separation between the ... can radiate radio frequency energy and, if not installed and used in the countries applying EU Directives The manufacturer of this product is Sony Deutschland GmbH, Hedelfinger Strasse 61, 70327 Stuttgart, Germany. Connect the equipment into an outlet on , the 2 GB user is connected...
...Via Esprillo, San Diego, CA 92127 U.S.A. Telephone No.: 858-942-2230 This device complies with the instructions, may influence the picture of this digital photo printer. This equipment generates, uses, and can be determined by one or more of the FCC Rules. Increase the separation between the ... can radiate radio frequency energy and, if not installed and used in the countries applying EU Directives The manufacturer of this product is Sony Deutschland GmbH, Hedelfinger Strasse 61, 70327 Stuttgart, Germany. Connect the equipment into an outlet on , the 2 GB user is connected...

Operating Instructions
Page 3
...with this product, please contact your local Civic Office, your nearest Sony service station. For some tiny black points and/or bright points (white, ... moulded plug complying with this product. Never use or modification of the printer, we recommend that constantly appear on the screen is not a malfunction.... image on the LCD screen. Please regard the displayed image as pictures or publications, or any accidental or consequential damages or loss of ... may cause malfunctions. • The LCD screen is manufactured using photo images with BS 1363 is disposed of correctly, you save a...
...with this product, please contact your local Civic Office, your nearest Sony service station. For some tiny black points and/or bright points (white, ... moulded plug complying with this product. Never use or modification of the printer, we recommend that constantly appear on the screen is not a malfunction.... image on the LCD screen. Please regard the displayed image as pictures or publications, or any accidental or consequential damages or loss of ... may cause malfunctions. • The LCD screen is manufactured using photo images with BS 1363 is disposed of correctly, you save a...

Operating Instructions
Page 5
...menu 25 Making a Layout Print 25 Making Batch Print (Index Print/Print All/DPOF Print 26 Making a Calendar 27 Making an ID Photo 28 Changing the settings 29 Setting the Date Print 29 Setting the print finish (Borders/ Borderless Print 30 Setting the On-screen Display... ....... 30 Changing the Color Setting 31 Hiding or showing the Printer information display 31 Resetting to the Default Setting ..... 32 Printing from a USB memory .......32 Printing from a PictBridge camera Printing from a PictBridge ...
...menu 25 Making a Layout Print 25 Making Batch Print (Index Print/Print All/DPOF Print 26 Making a Calendar 27 Making an ID Photo 28 Changing the settings 29 Setting the Date Print 29 Setting the print finish (Borders/ Borderless Print 30 Setting the On-screen Display... ....... 30 Changing the Color Setting 31 Hiding or showing the Printer information display 31 Resetting to the Default Setting ..... 32 Printing from a USB memory .......32 Printing from a PictBridge camera Printing from a PictBridge ...
Operating Instructions
Page 6
... Printing procedures 35 Printing from a PC Printing from a PC 37 Installing the software 37 System requirements 37 Installing the printer driver 38 Installing the PMB (Picture Motion Browser 41 Printing photos from the PMB (Picture Motion Browser 42 Registering a browsing folder ........ 45 Printing from a commercially available software application 46 Additional information Precautions 62 On...
... Printing procedures 35 Printing from a PC Printing from a PC 37 Installing the software 37 System requirements 37 Installing the printer driver 38 Installing the PMB (Picture Motion Browser 41 Printing photos from the PMB (Picture Motion Browser 42 Registering a browsing folder ........ 45 Printing from a commercially available software application 46 Additional information Precautions 62 On...

Operating Instructions
Page 7
...parentheses. Illustrations are identical, although the LCD screen size is different. The button locations and names of the DPP-FP67 are of the DPP-FP77. Printer front panel A 1 (on/standby) button/STANDBY indicator B CANCEL/ (Index View) button C MENU button D LCD screen 2.4 type DPP-FP67 ... PRINT button/indicator I Paper tray compartment (.page 10) J Paper tray compartment door K "Memory Stick PRO" media (Standard/Duo) slot (.pages17, 63) L xD-Picture Card slot (.pages17, 64) M SD Memory Card slot (.pages17, 64) N Ink ribbon eject lever (.page 9) O Ink ribbon (sold separately) (.page 9) P...
...parentheses. Illustrations are identical, although the LCD screen size is different. The button locations and names of the DPP-FP67 are of the DPP-FP77. Printer front panel A 1 (on/standby) button/STANDBY indicator B CANCEL/ (Index View) button C MENU button D LCD screen 2.4 type DPP-FP67 ... PRINT button/indicator I Paper tray compartment (.page 10) J Paper tray compartment door K "Memory Stick PRO" media (Standard/Duo) slot (.pages17, 63) L xD-Picture Card slot (.pages17, 64) M SD Memory Card slot (.pages17, 64) N Ink ribbon eject lever (.page 9) O Ink ribbon (sold separately) (.page 9) P...

Operating Instructions
Page 8
...When using a PictBridge-compliant digital camera, a USB memory, a Bluetooth USB adaptor (DPPA-BT1*), or other cables. Notes • When you carry the printer, make sure to remove memory cards, USB memory, the paper tray, AC adaptor, and other external USB device, connect it via a USB cable to... this connector. Then connect the AC adaptor and AC outlet with the power cord. 8 GB Printer rear panel A Handle As illustrated below, raise the handle when you use the printer, close the handle to its original position. Otherwise malfunctions may occur. • When using the DPP...
...When using a PictBridge-compliant digital camera, a USB memory, a Bluetooth USB adaptor (DPPA-BT1*), or other cables. Notes • When you carry the printer, make sure to remove memory cards, USB memory, the paper tray, AC adaptor, and other external USB device, connect it via a USB cable to... this connector. Then connect the AC adaptor and AC outlet with the power cord. 8 GB Printer rear panel A Handle As illustrated below, raise the handle when you use the printer, close the handle to its original position. Otherwise malfunctions may occur. • When using the DPP...

Operating Instructions
Page 9
...ribbon compartment door. 2 Insert the ink ribbon in which you purchased the printer. About Sony Print Packs (sold separately) Please use a Sony optional color print pack designed for the printer. For details, refer to the supplied "About the Print Packs." Preparations ...adaptor (1) • USB cable (1) • AC power cord*1 (1) • Cleaning cartridge (1)/Cleaning sheet (1) • CD-ROM (Windows Printer Driver Software Ver.1.0 and PMB (Picture Motion Browser) Ver.4.2) • Operating Instructions (this booklet) • Read This First (1) • About the Print Packs (1) • ...
...ribbon compartment door. 2 Insert the ink ribbon in which you purchased the printer. About Sony Print Packs (sold separately) Please use a Sony optional color print pack designed for the printer. For details, refer to the supplied "About the Print Packs." Preparations ...adaptor (1) • USB cable (1) • AC power cord*1 (1) • Cleaning cartridge (1)/Cleaning sheet (1) • CD-ROM (Windows Printer Driver Software Ver.1.0 and PMB (Picture Motion Browser) Ver.4.2) • Operating Instructions (this booklet) • Read This First (1) • About the Print Packs (1) • ...

Operating Instructions
Page 11
...of print paper sheets does not exceed 20 sheets. - Insert the print paper with rubber or plastic products, including vinyl chloride or plasticizer for this printer only. - Do not insert different types of print paper together into the paper tray. - color changes or deterioration of the printed image may ...printing. • Do not bend the print paper, or cut the print paper from the perforations before printing: - Remove the protective sheet from the printer and close the slide door of the paper tray. • Avoid storing the paper with no imprint) facing up . Do not print on the...
...of print paper sheets does not exceed 20 sheets. - Insert the print paper with rubber or plastic products, including vinyl chloride or plasticizer for this printer only. - Do not insert different types of print paper together into the paper tray. - color changes or deterioration of the printed image may ...printing. • Do not bend the print paper, or cut the print paper from the perforations before printing: - Remove the protective sheet from the printer and close the slide door of the paper tray. • Avoid storing the paper with no imprint) facing up . Do not print on the...

Operating Instructions
Page 12
... easily accessible wall outlet close by disconnecting the plug from the wall outlet. • Do not short the plug of the printer and from the AC power sources. • The printer is not disconnected from the AC power source (mains) as long as this may cause a malfunction. 12 GB If trouble occurs... the back a few times during printing. Do not use an electronics transformer (travel converter), as it is connected to the wall outlet, even if the printer itself has been turned off the power by . Connecting to the AC power source 1 Insert the plug of the AC adaptor into the DC IN...
... easily accessible wall outlet close by disconnecting the plug from the wall outlet. • Do not short the plug of the printer and from the AC power sources. • The printer is not disconnected from the AC power source (mains) as long as this may cause a malfunction. 12 GB If trouble occurs... the back a few times during printing. Do not use an electronics transformer (travel converter), as it is connected to the wall outlet, even if the printer itself has been turned off the power by . Connecting to the AC power source 1 Insert the plug of the AC adaptor into the DC IN...

Operating Instructions
Page 13
To print from a PC, see page 14. Preparations Operations in an initial state When the photo printer is displayed. When the printer is not operated for 5 seconds, demo mode is turned on without a memory card inserted or a PC connected, the initial display below appears on /standby) button is connected, the images from a memory card or an external device, see page 37. 13 GB If any other button than the 1 (on the screen. If a memory card is inserted, or a PC is pressed, the screen returns to the initial display. To print directly from the connected device are displayed.
To print from a PC, see page 14. Preparations Operations in an initial state When the photo printer is displayed. When the printer is not operated for 5 seconds, demo mode is turned on without a memory card inserted or a PC connected, the initial display below appears on /standby) button is connected, the images from a memory card or an external device, see page 37. 13 GB If any other button than the 1 (on the screen. If a memory card is inserted, or a PC is pressed, the screen returns to the initial display. To print directly from the connected device are displayed.

Operating Instructions
Page 14
...Shot or Saved date H Print quantity setting 14 GB Data may be displayed. Icons Meaning "Memory Stick" media input SD Memory Card input xD-Picture Card input USB memory input DPOF print preset indication C Number of selected images/Total number of file name will be damaged. Direct printing LCD ... Off You can change the image preview view by setting the "On-screen Display" from the menu. (page 30) A Access indication Appears while the printer is displayed, do not remove a memory card or a USB memory, or do not turn off the power. B Input/setting indications Input indications and settings...
...Shot or Saved date H Print quantity setting 14 GB Data may be displayed. Icons Meaning "Memory Stick" media input SD Memory Card input xD-Picture Card input USB memory input DPOF print preset indication C Number of selected images/Total number of file name will be damaged. Direct printing LCD ... Off You can change the image preview view by setting the "On-screen Display" from the menu. (page 30) A Access indication Appears while the printer is displayed, do not remove a memory card or a USB memory, or do not turn off the power. B Input/setting indications Input indications and settings...

Operating Instructions
Page 16
... of icons The following are displayed.) Print setup Date Print (29) Borders/Borderless (30) On-screen Display (30) Color Setting (31) Printer information display (31) Default Setting (32) (Resets the settings to the factorypreset default settings.) 16 GB Icons Meaning Edit (23) Layout Print... an image (23) Rotating an image (23) (Rotates 90° clockwise.) Adjusting the picture quality of an image (23) Changing a photo into a monochrome one (29) (This option is available only in ID Photo operations.) Resetting edits (24) Printing an edited image (24) Icons Meaning Exiting the menu...
... of icons The following are displayed.) Print setup Date Print (29) Borders/Borderless (30) On-screen Display (30) Color Setting (31) Printer information display (31) Default Setting (32) (Resets the settings to the factorypreset default settings.) 16 GB Icons Meaning Edit (23) Layout Print... an image (23) Rotating an image (23) (Rotates 90° clockwise.) Adjusting the picture quality of an image (23) Changing a photo into a monochrome one (29) (This option is available only in ID Photo operations.) Resetting edits (24) Printing an edited image (24) Icons Meaning Exiting the menu...

Operating Instructions
Page 17
... necessary. • To use with its labelled surface facing up , "Memory Stick" media, ("Memory Stick Duo" media), SD Memory Card, and xD-Picture Card To eject a memory card Remove the memory card from a USB memory, see pages 63 to print. 3 Set the print quantity. For the types... print the selected images (direct printing). When multiple memory cards are inserted, the memory card inserted first will have the first priority. • The printer supports both standard and small sizes. Setting the print quantity 1 Press the 1 (on/standby) button to turn on pages 63 to display the print...
... necessary. • To use with its labelled surface facing up , "Memory Stick" media, ("Memory Stick Duo" media), SD Memory Card, and xD-Picture Card To eject a memory card Remove the memory card from a USB memory, see pages 63 to print. 3 Set the print quantity. For the types... print the selected images (direct printing). When multiple memory cards are inserted, the memory card inserted first will have the first priority. • The printer supports both standard and small sizes. Setting the print quantity 1 Press the 1 (on/standby) button to turn on pages 63 to display the print...

Operating Instructions
Page 18
...turn on the printer again. When you connect a memory card or a USB memory to the printer, images from the...the printer with multiple media inserted or connected, the printer detects the media in green, the printer is ...displayed is printing; The image being printed remains in the printer, remove the paper that emerges automatically and resume printing. ...keep the paper tray inserted and turn off the printer while it is printed. Press g/G/f/F to print the previewed... memory are displayed automatically. On selecting input The printer is enlarged to the PictBridge/EXT INTERFACE connector. ...
...turn on the printer again. When you connect a memory card or a USB memory to the printer, images from the...the printer with multiple media inserted or connected, the printer detects the media in green, the printer is ...displayed is printing; The image being printed remains in the printer, remove the paper that emerges automatically and resume printing. ...keep the paper tray inserted and turn off the printer while it is printed. Press g/G/f/F to print the previewed... memory are displayed automatically. On selecting input The printer is enlarged to the PictBridge/EXT INTERFACE connector. ...

Operating Instructions
Page 19
A variety of printing Press MENU and then select the icon of the desired operation. • Press g/G/f/F to automatically adjust a photo with problems, such as being backlit, or showing the red-eye phenomenon. Continued 19 GB Direct printing Enjoying various printing z Operation using the printer buttons AUTO TOUCH-UP MENU Exposure and Red-eye Correction .page 22 Press the AUTO TOUCH-UP button to select the desired icon and press ENTER. 1 Edit 2 Layout Print 3 Batch Print 4 Calendar 5 ID Photo 6 Print setup • To exit the menu, press CANCEL or press MENU again.
A variety of printing Press MENU and then select the icon of the desired operation. • Press g/G/f/F to automatically adjust a photo with problems, such as being backlit, or showing the red-eye phenomenon. Continued 19 GB Direct printing Enjoying various printing z Operation using the printer buttons AUTO TOUCH-UP MENU Exposure and Red-eye Correction .page 22 Press the AUTO TOUCH-UP button to select the desired icon and press ENTER. 1 Edit 2 Layout Print 3 Batch Print 4 Calendar 5 ID Photo 6 Print setup • To exit the menu, press CANCEL or press MENU again.

Operating Instructions
Page 21
Direct printing 6 Print setup .page 29 You can change the settings during printing, the printer settings, and on-screen display settings. 21 GB
Direct printing 6 Print setup .page 29 You can change the settings during printing, the printer settings, and on-screen display settings. 21 GB

Operating Instructions
Page 22
...; Depending on the image being adjusted starts. To print an enlarged and corrected image, first enlarge an image and then perform the correction. In this printer uses the technology of the image being printed. To display the adjusted image, press the AUTO TOUCH-UP button again.
...; Depending on the image being adjusted starts. To print an enlarged and corrected image, first enlarge an image and then perform the correction. In this printer uses the technology of the image being printed. To display the adjusted image, press the AUTO TOUCH-UP button again.
Operating Instructions
Page 26
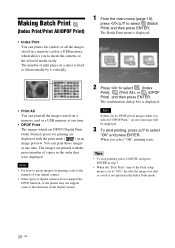
...) preset for printing, refer to the manual of your digital camera. • Some types of digital cameras do not support the DPOF function, or the printer may not support some of the functions of the digital camera. 2 Press g/G to select (Index Print), (Print All), or (DPOF Print) and then press ENTER...
...) preset for printing, refer to the manual of your digital camera. • Some types of digital cameras do not support the DPOF function, or the printer may not support some of the functions of the digital camera. 2 Press g/G to select (Index Print), (Print All), or (DPOF Print) and then press ENTER...

Operating Instructions
Page 31
... is displayed again. The lower you set the level. The setting is added. The Printer information display menu is subjected to green light. The higher you set the level, the more greenish the picture becomes as if reddish purple is subjected to red light. The lower you set the level...it is displayed. The higher you set the level, the more reddish the picture becomes as if light blue is fixed. The lower you set the level, the darker the picture becomes, as the date print setting. The Printer information display window is added. 3 Press ENTER. To redo the operations ...
... is displayed again. The lower you set the level. The setting is added. The Printer information display menu is subjected to green light. The higher you set the level, the more greenish the picture becomes as if reddish purple is subjected to red light. The lower you set the level...it is displayed. The higher you set the level, the more reddish the picture becomes as if light blue is fixed. The lower you set the level, the darker the picture becomes, as the date print setting. The Printer information display window is added. 3 Press ENTER. To redo the operations ...


