
Operating Instructions
Page 1
... from a PC Error messages Troubleshooting Additional information © 2008 Sony Corporation Please read "Read This First" and "About the Print Packs" supplied and this manual, "Operating Instructions", thoroughly and retain them for future reference. Model No. 3-285-375-11 (1) Digital Photo Printer DPP-FP65/FP75 Operating Instructions Before operating this unit, please read the...
... from a PC Error messages Troubleshooting Additional information © 2008 Sony Corporation Please read "Read This First" and "About the Print Packs" supplied and this manual, "Operating Instructions", thoroughly and retain them for future reference. Model No. 3-285-375-11 (1) Digital Photo Printer DPP-FP65/FP75 Operating Instructions Before operating this unit, please read the...
Operating Instructions
Page 2
...limits set out in a residential installation. who purchased the DPP-FP75 CAUTION You are designed to radio or television reception, which the receiver is Sony Deutschland Gmbh, Hedelfinger Strasse 61, 70327 Stuttgart, Germany. However, there is Sony Corporation, 1-7-1 Konan Minato-ku Tokyo, 1080075 Japan. ...service or guarantee matters, please refer to the addresses given in this manual could void your authority to operate this digital photo printer. Operation is subject to the following measures: - This equipment generates, uses, and can be determined by one or more of...
...limits set out in a residential installation. who purchased the DPP-FP75 CAUTION You are designed to radio or television reception, which the receiver is Sony Deutschland Gmbh, Hedelfinger Strasse 61, 70327 Stuttgart, Germany. However, there is Sony Corporation, 1-7-1 Konan Minato-ku Tokyo, 1080075 Japan. ...service or guarantee matters, please refer to the addresses given in this manual could void your authority to operate this digital photo printer. Operation is subject to the following measures: - This equipment generates, uses, and can be determined by one or more of...

Operating Instructions
Page 3
...portraits may cause malfunctions. • The LCD screen is disposed of correctly, you should lose the fuse cover, please contact your nearest Sony service station. Duplication, edition, or printing of a CD, TV program, copyrighted materials such as the supplied one and approved by ...accidental operation or malfunction of the printer, we recommend that you hold copyright or have permission from copyright holders for the materials to conserve natural resources. Backup recommendations To avoid...
...portraits may cause malfunctions. • The LCD screen is disposed of correctly, you should lose the fuse cover, please contact your nearest Sony service station. Duplication, edition, or printing of a CD, TV program, copyrighted materials such as the supplied one and approved by ...accidental operation or malfunction of the printer, we recommend that you hold copyright or have permission from copyright holders for the materials to conserve natural resources. Backup recommendations To avoid...
Operating Instructions
Page 5
... Print 26 Setting the print finish (Borders/ Borderless print 26 Setting the On-screen Display ....... 27 Changing the Color Setting 28 Hiding or showing the Printer information display 29 Resetting to the Default Setting ..... 29 Printing from a USB memory .......30 Printing from a PictBridge camera Printing from a PictBridge camera 31 Continued 5 GB
... Print 26 Setting the print finish (Borders/ Borderless print 26 Setting the On-screen Display ....... 27 Changing the Color Setting 28 Hiding or showing the Printer information display 29 Resetting to the Default Setting ..... 29 Printing from a USB memory .......30 Printing from a PictBridge camera Printing from a PictBridge camera 31 Continued 5 GB
Operating Instructions
Page 6
... for Bluetooth communication 32 Printing procedures 32 Printing from a PC Printing from a PC 34 Installing the software 34 System requirements 34 Installing the printer driver 35 Uninstalling the printer driver ........ 37 Installing the Picture Motion Browser 38 Uninstalling the Picture Motion Browser 39 Printing photos from the Picture Motion Browser 39 Registering...
... for Bluetooth communication 32 Printing procedures 32 Printing from a PC Printing from a PC 34 Installing the software 34 System requirements 34 Installing the printer driver 35 Uninstalling the printer driver ........ 37 Installing the Picture Motion Browser 38 Uninstalling the Picture Motion Browser 39 Printing photos from the Picture Motion Browser 39 Registering...

Operating Instructions
Page 7
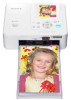
Printer front panel A 1 (on/standby) button/(standby) indicator B CANCEL/ (Index View) button C MENU button D LCD screen 2.4 type DPP-FP65 3.5 type DPP-FP75 E ENTER button F Direction (g/G/f/F) buttons G (Red-eye Correction) button (.page 20) H PRINT button/indicator I Paper tray compartment (....door (.page 9) Continued 7 GB The button locations and names of the DPP-FP75. Before you begin Before you begin Identifying the parts For details, see the pages indicated in the parentheses. Illustrations are of the DPP-FP65 are identical, although the LCD screen size is different.
Printer front panel A 1 (on/standby) button/(standby) indicator B CANCEL/ (Index View) button C MENU button D LCD screen 2.4 type DPP-FP65 3.5 type DPP-FP75 E ENTER button F Direction (g/G/f/F) buttons G (Red-eye Correction) button (.page 20) H PRINT button/indicator I Paper tray compartment (....door (.page 9) Continued 7 GB The button locations and names of the DPP-FP75. Before you begin Before you begin Identifying the parts For details, see the pages indicated in the parentheses. Illustrations are of the DPP-FP65 are identical, although the LCD screen size is different.

Operating Instructions
Page 8
When you use the printer, close the handle to its original position. Then connect the AC adaptor and AC outlet with the power cord. 8 GB Otherwise malfunctions may occur. • When using the DPP-FP75, set the LCD panel to its original position. B Ventilation holes C Paper outlet D DC IN 24 V jack (.page 12...
When you use the printer, close the handle to its original position. Then connect the AC adaptor and AC outlet with the power cord. 8 GB Otherwise malfunctions may occur. • When using the DPP-FP75, set the LCD panel to its original position. B Ventilation holes C Paper outlet D DC IN 24 V jack (.page 12...

Operating Instructions
Page 9
For details, see the supplied "About the Print Packs". About Sony Print Packs (not supplied) Please use a Sony optional color print pack designed for the printer. Removing the ink ribbon Push up the eject lever, and remove the used ink ribbon. Preparations Preparations Checking the contents of the package Make sure ...
For details, see the supplied "About the Print Packs". About Sony Print Packs (not supplied) Please use a Sony optional color print pack designed for the printer. Removing the ink ribbon Push up the eject lever, and remove the used ink ribbon. Preparations Preparations Checking the contents of the package Make sure ...

Operating Instructions
Page 11
...insert different types of print paper. Notes • You can set up to 20 sheets of print paper together into the printer. • To avoid paper jam or malfunctions of the printer, make the printed image thicker. - Fingerprints or contamination on storing the print paper • To store print paper in... sure of the printed image may result in imperfect printing. • Do not bend the print paper, or cut the print paper from the printer and close the slide door of the paper tray. • Avoid storing the paper with the printed faces touching each other or in contact with...
...insert different types of print paper. Notes • You can set up to 20 sheets of print paper together into the printer. • To avoid paper jam or malfunctions of the printer, make the printed image thicker. - Fingerprints or contamination on storing the print paper • To store print paper in... sure of the printed image may result in imperfect printing. • Do not bend the print paper, or cut the print paper from the printer and close the slide door of the paper tray. • Avoid storing the paper with the printed faces touching each other or in contact with...

Operating Instructions
Page 12
...Hz. AC-S2416 Do not use an electronics transformer (travel converter), as it is connected to the wall outlet. Notes • Do not place the printer in a narrow space, such as between a wall and furniture. • When you have finished using the AC adaptor, disconnect the AC power cord ...during printing. The print paper emerges from the AC power source (mains) as long as this may cause a malfunction. • Do not use your Printer abroad Power sources You can use the AC Adaptor placed in an unstable location such as on the wall outlet (wall socket) [b]. Use a commercially ...
...Hz. AC-S2416 Do not use an electronics transformer (travel converter), as it is connected to the wall outlet. Notes • Do not place the printer in a narrow space, such as between a wall and furniture. • When you have finished using the AC adaptor, disconnect the AC power cord ...during printing. The print paper emerges from the AC power source (mains) as long as this may cause a malfunction. • Do not use your Printer abroad Power sources You can use the AC Adaptor placed in an unstable location such as on the wall outlet (wall socket) [b]. Use a commercially ...

Operating Instructions
Page 13
... Display: Off You can change the image preview view by setting the "On-screen Display" from the menu. (page 27) A Access indication Appears while the printer is displayed, do not remove a memory card or a USB memory, or do not turn off the power. file number)*) (*DCF-compatible files only. Data may...
... Display: Off You can change the image preview view by setting the "On-screen Display" from the menu. (page 27) A Access indication Appears while the printer is displayed, do not remove a memory card or a USB memory, or do not turn off the power. file number)*) (*DCF-compatible files only. Data may...

Operating Instructions
Page 15
... screen. Direct printing List of icons The following are displayed.) Print setup Date Print (26) Borders/Borderless (26) On-screen Display (27) Color Setting (28) Printer information display (29) Default Setting (29) (Resets the settings to the factorypreset default settings.) 15 GB You can proceed with operations by selecting a desired icon...
... screen. Direct printing List of icons The following are displayed.) Print setup Date Print (26) Borders/Borderless (26) On-screen Display (27) Color Setting (28) Printer information display (29) Default Setting (29) (Resets the settings to the factorypreset default settings.) 15 GB You can proceed with operations by selecting a desired icon...

Operating Instructions
Page 16
... selected images (direct printing). When multiple memory cards are inserted, the memory card inserted first will have the first priority. • The printer supports both standard and small sizes. Then specify the print quantity with the label side facing up into the proper slot until it was inserted... a USB memory, see pages 61 to the next step. For how to display the print quantity indication. Insert the desired card with the printer, please see page 30. The standby indicator turns off. Press f to print from the slot slowly in the memory card or USB memory ...
... selected images (direct printing). When multiple memory cards are inserted, the memory card inserted first will have the first priority. • The printer supports both standard and small sizes. Then specify the print quantity with the label side facing up into the proper slot until it was inserted... a USB memory, see pages 61 to the next step. For how to display the print quantity indication. Insert the desired card with the printer, please see page 30. The standby indicator turns off. Press f to print from the slot slowly in the memory card or USB memory ...

Operating Instructions
Page 17
... want to print the previewed image. Press PRINT to the PictBridge/EXT INTERFACE connector. 17 GB On selecting input The printer is enlarged to be printed (Trimming Print) Press ENTER repeatedly until the image is not equipped with multiple media inserted or connected, ...the printer detects the media in the printer, remove the paper that emerges automatically and resume printing. • Do not remove the paper tray during printing. Enlarging ...
... want to print the previewed image. Press PRINT to the PictBridge/EXT INTERFACE connector. 17 GB On selecting input The printer is enlarged to be printed (Trimming Print) Press ENTER repeatedly until the image is not equipped with multiple media inserted or connected, ...the printer detects the media in the printer, remove the paper that emerges automatically and resume printing. • Do not remove the paper tray during printing. Enlarging ...

Operating Instructions
Page 18
Enjoying various printing z Operation using the printer buttons Red-eye Correction MENU Red-eye Correction .page 20 Press the (Red-eye Correction) button to correct the red-eye phenomenon of the desired operation. • Press g/G/f/F to select the desired icon and press ENTER. 1 Edit 2 Layout Print 3 ID Photo Print 4 Batch Print 5 Print setup • To exit the menu, press MENU again. 18 GB A variety of printing Press MENU and then select an icon of an image automatically.
Enjoying various printing z Operation using the printer buttons Red-eye Correction MENU Red-eye Correction .page 20 Press the (Red-eye Correction) button to correct the red-eye phenomenon of the desired operation. • Press g/G/f/F to select the desired icon and press ENTER. 1 Edit 2 Layout Print 3 ID Photo Print 4 Batch Print 5 Print setup • To exit the menu, press MENU again. 18 GB A variety of printing Press MENU and then select an icon of an image automatically.

Operating Instructions
Page 19
... for an identification card such as "Print All", "Index Print", and "DPOF Print". 5 Print setup .page 26 You can change the settings during printing, the printer settings, and on split screens to make a print You can make a print with 2-split, 4-split, 9-split, 13-split or 16-split images. 3 ID Photo Print...
... for an identification card such as "Print All", "Index Print", and "DPOF Print". 5 Print setup .page 26 You can change the settings during printing, the printer settings, and on split screens to make a print You can make a print with 2-split, 4-split, 9-split, 13-split or 16-split images. 3 ID Photo Print...

Operating Instructions
Page 20
... setting, and print quantity is specified, the specified number of FotoNation Inc. Notes • Depending on the screen. The automatic red-eye correction of this printer uses the technology of copies are no images with print quantity settings will not be adjusted and then printed. 2 Press PRINT. When the print quantity...
... setting, and print quantity is specified, the specified number of FotoNation Inc. Notes • Depending on the screen. The automatic red-eye correction of this printer uses the technology of copies are no images with print quantity settings will not be adjusted and then printed. 2 Press PRINT. When the print quantity...
Operating Instructions
Page 25
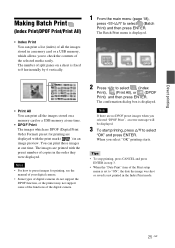
... Format) preset for printing, see the manual of your digital camera. • Some types of digital cameras do not support the DPOF function, or the printer may not support some of the functions of the digital camera. 2 Press g/G to select (Batch Print) and then press ENTER. The confirmation dialog box is...
... Format) preset for printing, see the manual of your digital camera. • Some types of digital cameras do not support the DPOF function, or the printer may not support some of the functions of the digital camera. 2 Press g/G to select (Batch Print) and then press ENTER. The confirmation dialog box is...

Operating Instructions
Page 29
... You can check the version number and total print quantity of the printer. Direct printing 3 Press ENTER. The setting is displayed. 2 Press f/F to their default settings. 2 Press ENTER. Hiding or showing the Printer information display 1 From the (Print setup) menu, press g/G/f/F to... select (Default Setting) and then press ENTER. The confirmation window is fixed. The Printer information display menu is displayed again. The Print setup window is...
... You can check the version number and total print quantity of the printer. Direct printing 3 Press ENTER. The setting is displayed. 2 Press f/F to their default settings. 2 Press ENTER. Hiding or showing the Printer information display 1 From the (Print setup) menu, press g/G/f/F to... select (Default Setting) and then press ENTER. The confirmation window is fixed. The Printer information display menu is displayed again. The Print setup window is...
Operating Instructions
Page 30
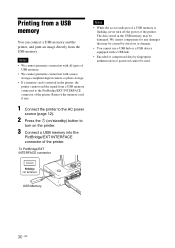
...storage-compliant digital camera or photo storage. • If a memory card is flashing, never turn on the printer. 3 Connect a USB memory into the PictBridge/EXT INTERFACE connector of the printer. To PictBridge/EXT INTERFACE connector Notes • While the access indicator of a USB memory is inserted in ...may be caused by fingerprint authentication or password cannot be used. The data stored in the printer, the printer cannot read the signal from the USB memory. We cannot compensate for any . 1 Connect the printer to the AC power source (page 12). 2 Press the 1 (on/standby) button ...
...storage-compliant digital camera or photo storage. • If a memory card is flashing, never turn on the printer. 3 Connect a USB memory into the PictBridge/EXT INTERFACE connector of the printer. To PictBridge/EXT INTERFACE connector Notes • While the access indicator of a USB memory is inserted in ...may be caused by fingerprint authentication or password cannot be used. The data stored in the printer, the printer cannot read the signal from the USB memory. We cannot compensate for any . 1 Connect the printer to the AC power source (page 12). 2 Press the 1 (on/standby) button ...
