Operating Instructions (primary manual)
Page 1
3-080-164-11(1) Digital Video Camera Recorder Operating Instructions Before operating the unit, please read this product. Refer to these numbers whenever you call upon your Sony dealer regarding this manual thoroughly, and retain it for future reference. Serial No. AC- DCR-TRV39 TM SERIES DCR-TRV38/TRV39 ©2003 Sony Corporation DCR-TRV Model No. Serial No. Record the serial number in the space provided below. Owner's Record The model and serial numbers are located on the bottom. Model No.
3-080-164-11(1) Digital Video Camera Recorder Operating Instructions Before operating the unit, please read this product. Refer to these numbers whenever you call upon your Sony dealer regarding this manual thoroughly, and retain it for future reference. Serial No. AC- DCR-TRV39 TM SERIES DCR-TRV38/TRV39 ©2003 Sony Corporation DCR-TRV Model No. Serial No. Record the serial number in the space provided below. Owner's Record The model and serial numbers are located on the bottom. Model No.

Operating Instructions (primary manual)
Page 3
... (7669) The number below is for a Class B digital device, pursuant to Part 15 of the FCC Rules. Telephone No.: 201-930-6972 This device complies with Part 15 of Conformity Trade Name: SONY Model No.: DCR-TRV38, DCR- Note: This equipment has been tested and found to ... This device may cause undesired operation. Increase the separation between the equipment and receiver. - Reorient or relocate the receiving antenna. - TRV39 Responsible Party: Sony Electronics Inc. Connect the equipment into an outlet on , the user is no guarantee that to which can radiate radio frequency energy...
... (7669) The number below is for a Class B digital device, pursuant to Part 15 of the FCC Rules. Telephone No.: 201-930-6972 This device complies with Part 15 of Conformity Trade Name: SONY Model No.: DCR-TRV38, DCR- Note: This equipment has been tested and found to ... This device may cause undesired operation. Increase the separation between the equipment and receiver. - Reorient or relocate the receiving antenna. - TRV39 Responsible Party: Sony Electronics Inc. Connect the equipment into an outlet on , the user is no guarantee that to which can radiate radio frequency energy...
Operating Instructions (primary manual)
Page 5
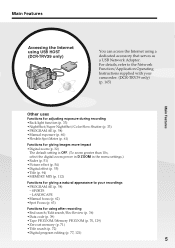
SPORTS - For details, refer to the Network Function/Application Operating Instructions supplied with your camcorder. (DCR-TRV39 only) (p. 165) Main Features Other uses Functions for adjusting exposure during recording •Back light function (p. 33) •NightShot/Super NightShot/... •Manual exposure (p. 60) •Flexible Spot Meter (p. 61) Functions for giving images more impact •Digital zoom (p. 32) The default setting is OFF. (To zoom greater than 10×, select the digital zoom power in D ZOOM in the menu settings.) •Fader (p. 51) •Picture effect (p. 54)...
SPORTS - For details, refer to the Network Function/Application Operating Instructions supplied with your camcorder. (DCR-TRV39 only) (p. 165) Main Features Other uses Functions for adjusting exposure during recording •Back light function (p. 33) •NightShot/Super NightShot/... •Manual exposure (p. 60) •Flexible Spot Meter (p. 61) Functions for giving images more impact •Digital zoom (p. 32) The default setting is OFF. (To zoom greater than 10×, select the digital zoom power in D ZOOM in the menu settings.) •Fader (p. 51) •Picture effect (p. 54)...
Operating Instructions (primary manual)
Page 7
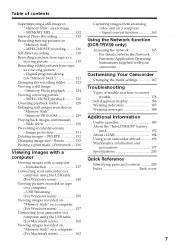
Digital program editing (on "Memory Stick" - DELETE 132 Changing image size - Resize 135 ... 136 Viewing images with a Capturing images from tape as a moving pictures on "Memory Stick" - Introduction 137 Connecting your camcorder to a computer using the USB cable (For Macintosh users 160 Viewing images recorded on "Memory Stick" on a computer (... Viewing a still image - Signal convert function 163 Using the Network function (DCR-TRV39 only) Accessing the network 165 For details, refer to the Network Function/Application Operating Instructions supplied with a computer -
Digital program editing (on "Memory Stick" - DELETE 132 Changing image size - Resize 135 ... 136 Viewing images with a Capturing images from tape as a moving pictures on "Memory Stick" - Introduction 137 Connecting your camcorder to a computer using the USB cable (For Macintosh users 160 Viewing images recorded on "Memory Stick" on a computer (... Viewing a still image - Signal convert function 163 Using the Network function (DCR-TRV39 only) Accessing the network 165 For details, refer to the Network Function/Application Operating Instructions supplied with a computer -

Operating Instructions (primary manual)
Page 9
...panel Battery pack 9 The picture appears on the screen. 2 Set the POWER switch to VCR while pressing the small green button. Your camcorder starts recording. Do not pick up your finger or the supplied stylus (DCRTRV39 only) supporting the LCD panel from the back side of the... 26) 1 Remove the lens cap. 3 Press OPEN to start playback. If you purchase your camcorder, the clock setting is closed, use the viewfinder with sharp objects other than the supplied stylus (DCR-TRV39 only). POWER VCR OFF(CHG) CAMERA MEMORY/ NETWORK Viewfinder When the LCD panel is set the ...
...panel Battery pack 9 The picture appears on the screen. 2 Set the POWER switch to VCR while pressing the small green button. Your camcorder starts recording. Do not pick up your finger or the supplied stylus (DCRTRV39 only) supporting the LCD panel from the back side of the... 26) 1 Remove the lens cap. 3 Press OPEN to start playback. If you purchase your camcorder, the clock setting is closed, use the viewfinder with sharp objects other than the supplied stylus (DCR-TRV39 only). POWER VCR OFF(CHG) CAMERA MEMORY/ NETWORK Viewfinder When the LCD panel is set the ...

Operating Instructions (primary manual)
Page 12
... the model number by the icons below . When you carry out an operation, you use only mini DV cassettes with your camcorder are shown in capital letters. To view your camcorder. The DCR-TRV39 is shown by looking at the bottom of your recordings on a TV, you need an NTSC system-based TV. POWER... with Cassette Memory have the (Cassette Memory) mark. After "Advanced Recording Operations" section of this manual, buttons and settings on the POWER switch Network function TRV38 MEMORY - Unauthorized recording of the POWER switch is the model used for example...
... the model number by the icons below . When you carry out an operation, you use only mini DV cassettes with your camcorder are shown in capital letters. To view your camcorder. The DCR-TRV39 is shown by looking at the bottom of your recordings on a TV, you need an NTSC system-based TV. POWER... with Cassette Memory have the (Cassette Memory) mark. After "Advanced Recording Operations" section of this manual, buttons and settings on the POWER switch Network function TRV38 MEMORY - Unauthorized recording of the POWER switch is the model used for example...
Operating Instructions (primary manual)
Page 14
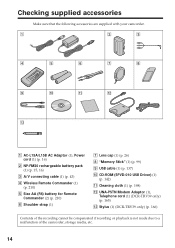
...) (1) (p. 142) qa Cleaning cloth (1) (p. 198) qs UNA-PSTN Modem Adaptor (1), Telephone cord (1) (DCR-TRV39 only) (p. 165) qd Stylus (1) (DCR-TRV39 only) (p. 166) Contents of the recording cannot be compensated if recording or playback is not made due to a malfunction of the camcorder, storage media, etc. 14 Checking supplied accessories Make sure that the following accessories...
...) (1) (p. 142) qa Cleaning cloth (1) (p. 198) qs UNA-PSTN Modem Adaptor (1), Telephone cord (1) (DCR-TRV39 only) (p. 165) qd Stylus (1) (DCR-TRV39 only) (p. 166) Contents of the recording cannot be compensated if recording or playback is not made due to a malfunction of the camcorder, storage media, etc. 14 Checking supplied accessories Make sure that the following accessories...

Operating Instructions (primary manual)
Page 18
The actual battery life may be shorter if you use your camcorder in a cold environment. 18 The battery life will be shorter. Playing time Battery pack NP-FM30 (supplied) NP-FM50 NP-FM70 NP-QM71/QM71D NP-... when you use a fully charged battery pack Note Approximate recording time and continuous playing time at 25°C (77°F). Step 1 Preparing the power source DCR-TRV39 Battery pack Recording with the viewfinder Continuous Typical* NP-FM30 (supplied) 90 50 NP-FM50 150 85 NP-FM70 310 180 NP-QM71/QM71D 365...
The actual battery life may be shorter if you use your camcorder in a cold environment. 18 The battery life will be shorter. Playing time Battery pack NP-FM30 (supplied) NP-FM50 NP-FM70 NP-QM71/QM71D NP-... when you use a fully charged battery pack Note Approximate recording time and continuous playing time at 25°C (77°F). Step 1 Preparing the power source DCR-TRV39 Battery pack Recording with the viewfinder Continuous Typical* NP-FM30 (supplied) 90 50 NP-FM50 150 85 NP-FM70 310 180 NP-QM71/QM71D 365...

Operating Instructions (primary manual)
Page 24
Step 3 Using the touch panel Your camcorder has operation buttons on the LCD screen. (5) Press a desired operation item. Operation buttons on PAGE2/PAGE3 are displayed on the LCD screen. (4) Press PAGE2/PAGE3 ... play back or MEMORY to FN Press EXIT. To execute settings Press OK. Touch the LCD screen directly with your finger or the supplied stylus (DCR-TRV39 only) to operate each function. 3 When the POWER switch is set to CAMERA PAGE1 PAGE2 PAGE3 EXIT SPOT FOCUS SPOT METER MENU FADER END EXPOSCH...
Step 3 Using the touch panel Your camcorder has operation buttons on the LCD screen. (5) Press a desired operation item. Operation buttons on PAGE2/PAGE3 are displayed on the LCD screen. (4) Press PAGE2/PAGE3 ... play back or MEMORY to FN Press EXIT. To execute settings Press OK. Touch the LCD screen directly with your finger or the supplied stylus (DCR-TRV39 only) to operate each function. 3 When the POWER switch is set to CAMERA PAGE1 PAGE2 PAGE3 EXIT SPOT FOCUS SPOT METER MENU FADER END EXPOSCH...

Operating Instructions (primary manual)
Page 25
... 3 Using the touch panel Operation buttons on your finger or the supplied stylus (DCR-TRV39 only) supporting the LCD panel from the back side of the items changes to ...the viewfinder (p. 66). 25 Touch panel You can control the display with sharp objects other than the supplied stylus. (DCR- You can operate with wet hands. •If FN is set to make it . •Do not press the... LCD screen with DISPLAY/BATTERY INFO on each item The green bar appears above the item. TRV39 only) •Do not press the LCD screen too hard. •Do not touch the LCD screen with...
... 3 Using the touch panel Operation buttons on your finger or the supplied stylus (DCR-TRV39 only) supporting the LCD panel from the back side of the items changes to ...the viewfinder (p. 66). 25 Touch panel You can control the display with sharp objects other than the supplied stylus. (DCR- You can operate with wet hands. •If FN is set to make it . •Do not press the... LCD screen with DISPLAY/BATTERY INFO on each item The green bar appears above the item. TRV39 only) •Do not press the LCD screen too hard. •Do not touch the LCD screen with...

Operating Instructions (primary manual)
Page 92
... the step 2. Recording automatically stops at the recording start point. We recommend that you add new sound on the tape recorded with your camcorder. Press to start point. The A DUB CTRL screen appears. The green X indicator appear on the screen. (6) Press on your... the recorded tape Choose a connection mentioned on page 90, and connect audio equipment or microphone to your camcorder If you add new sound on the tape recorded with another camcorder (including other DCR-TRV38/TRV39), the sound quality may become worse. 92 The POWER switch should be set the write-protect tab to...
... the step 2. Recording automatically stops at the recording start point. We recommend that you add new sound on the tape recorded with your camcorder. Press to start point. The A DUB CTRL screen appears. The green X indicator appear on the screen. (6) Press on your... the recorded tape Choose a connection mentioned on page 90, and connect audio equipment or microphone to your camcorder If you add new sound on the tape recorded with another camcorder (including other DCR-TRV38/TRV39), the sound quality may become worse. 92 The POWER switch should be set the write-protect tab to...

Operating Instructions (primary manual)
Page 165
...product names mentioned herein may be set to MEMORY/NETWORK. •Do not remove the power source while operating the network functions or your camcorder. - Also, close the network function before you can access the Internet using a dedicated accessory that your e-mail, etc. Press NETWORK....POWER VCR OFF(CHG) CAMERA MEMORY/ NETWORK NETWORK Notes •Make sure that serves as a USB Network Adaptor. DCR-TRV39 only You can view a Web page, send/receive your camcorder is made, you turn the POWER switch. Furthermore, "TM" and "®" are not mentioned in each case in...
...product names mentioned herein may be set to MEMORY/NETWORK. •Do not remove the power source while operating the network functions or your camcorder. - Also, close the network function before you can access the Internet using a dedicated accessory that your e-mail, etc. Press NETWORK....POWER VCR OFF(CHG) CAMERA MEMORY/ NETWORK NETWORK Notes •Make sure that serves as a USB Network Adaptor. DCR-TRV39 only You can view a Web page, send/receive your camcorder is made, you turn the POWER switch. Furthermore, "TM" and "®" are not mentioned in each case in...

Operating Instructions (primary manual)
Page 185
...147). • USB STREAM is set the POWER switch to VCR or OFF (CHG), if you press the RESET button, all the settings (DCR-TRV39: except the network settings) including the date and time return to condense in the display window. • The battery pack is pressed. c ... cable was complete. The buttons do not appear on . c Adjust the screen (CALIBRATION) (p. 199). c Eject the cassette and leave your camcorder. Turn the power on your Sony dealer or local authorized Sony service facility. c Press the LCD screen lightly. Image data cannot be transferred to OFF in your...
...147). • USB STREAM is set the POWER switch to VCR or OFF (CHG), if you press the RESET button, all the settings (DCR-TRV39: except the network settings) including the date and time return to condense in the display window. • The battery pack is pressed. c ... cable was complete. The buttons do not appear on . c Adjust the screen (CALIBRATION) (p. 199). c Eject the cassette and leave your camcorder. Turn the power on your Sony dealer or local authorized Sony service facility. c Press the LCD screen lightly. Image data cannot be transferred to OFF in your...

Operating Instructions (primary manual)
Page 188
... the "Memory Stick."1) • FORMATTING You press PHOTO on the screen, check the following. Warning messages If messages appear on your camcorder while formatting the "Memory Stick."1) • FOLDER NO. DCR-TRV39 only Refer to the Network Function/Application Operating Instruction supplied with sound that can be played back.1)2) • REC ERROR Turn...
... the "Memory Stick."1) • FORMATTING You press PHOTO on the screen, check the following. Warning messages If messages appear on your camcorder while formatting the "Memory Stick."1) • FOLDER NO. DCR-TRV39 only Refer to the Network Function/Application Operating Instruction supplied with sound that can be played back.1)2) • REC ERROR Turn...

Operating Instructions (primary manual)
Page 199
... correctly. It will not affect your finger or the supplied stylus (DCR-TRV39 only). CALIBRATE Notes •If you do not press the right spot, start from your camcorder. (3) Set the POWER switch to VCR while pressing DISPLAY/BATTERY INFO on your camcorder, then keep pressing DISPLAY/BATTERY INFO for more than 24 hours...
... correctly. It will not affect your finger or the supplied stylus (DCR-TRV39 only). CALIBRATE Notes •If you do not press the right spot, start from your camcorder. (3) Set the POWER switch to VCR while pressing DISPLAY/BATTERY INFO on your camcorder, then keep pressing DISPLAY/BATTERY INFO for more than 24 hours...

Operating Instructions (primary manual)
Page 200
...the rear of solvent which may damage the finish. •Do not let sand get inside the casing, unplug your camcorder and have it checked by a Sony dealer before operating it from strong magnetic fields or mechanical vibration. •Do not press the LCD screen with a ...sharp objects other than the supplied stylus. (DCR-TRV39 only) •If your camcorder is not a malfunction. •While using your camcorder. •Do not wrap your camcorder with a ...
...the rear of solvent which may damage the finish. •Do not let sand get inside the casing, unplug your camcorder and have it checked by a Sony dealer before operating it from strong magnetic fields or mechanical vibration. •Do not press the LCD screen with a ...sharp objects other than the supplied stylus. (DCR-TRV39 only) •If your camcorder is not a malfunction. •While using your camcorder. •Do not wrap your camcorder with a ...

Operating Instructions (primary manual)
Page 203
...): Approx. 690 000 pixels Lens Carl Zeiss Vario-Sonnar Combined power zoom lens Filter diameter: 30 mm (1 3/16 in) 10× (Optical), 120× (Digital) F = 1.8 - 2.0 Focal length 3.7 - 37 mm (5/32 - 1 1/2 in.) When converted to a 35 mm still camera In CAMERA: 50 - ... LP: Approx. 12.56 mm/s Recording/playback time (using cassette DVM60) SP: 1 hour LP: 1.5 hours Fastforward/rewind time (using LCD DCR-TRV38: 4.3 W DCR-TRV39: 4.4 W Viewfinder DCR-TRV38: 3.2 W DCR-TRV39: 3.3 W Operating temperature 0°C to 40°C (32°F to 104°F) Storage temperature -20°C to + 60°C (-4&#...
...): Approx. 690 000 pixels Lens Carl Zeiss Vario-Sonnar Combined power zoom lens Filter diameter: 30 mm (1 3/16 in) 10× (Optical), 120× (Digital) F = 1.8 - 2.0 Focal length 3.7 - 37 mm (5/32 - 1 1/2 in.) When converted to a 35 mm still camera In CAMERA: 50 - ... LP: Approx. 12.56 mm/s Recording/playback time (using cassette DVM60) SP: 1 hour LP: 1.5 hours Fastforward/rewind time (using LCD DCR-TRV38: 4.3 W DCR-TRV39: 4.4 W Viewfinder DCR-TRV38: 3.2 W DCR-TRV39: 3.3 W Operating temperature 0°C to 40°C (32°F to 104°F) Storage temperature -20°C to + 60°C (-4&#...

Operating Instructions (primary manual)
Page 205
Quick Reference - Identifying parts and controls Camcorder 5 1 6 2 7 3 8 9 4 q; 1 LCD/Touch panel screen (p. 24, 29, 30) 2 Speaker 3 OPEN button (p. 26) 4 RESET button If you press RESET, all the settings (DCR-TRV39: except the network settings) including the date and time return to the default. 5 Viewfinder lens adjustment lever (p. 31) 6 BATT release button (p. 15) 7 START/STOP button (p. 26) 8 Access lamp 9 "Memory Stick" slot (p. 101) q; DISPLAY/BATTERY INFO button (p. 19, 39) Quick Reference 205 -
Quick Reference - Identifying parts and controls Camcorder 5 1 6 2 7 3 8 9 4 q; 1 LCD/Touch panel screen (p. 24, 29, 30) 2 Speaker 3 OPEN button (p. 26) 4 RESET button If you press RESET, all the settings (DCR-TRV39: except the network settings) including the date and time return to the default. 5 Viewfinder lens adjustment lever (p. 31) 6 BATT release button (p. 15) 7 START/STOP button (p. 26) 8 Access lamp 9 "Memory Stick" slot (p. 101) q; DISPLAY/BATTERY INFO button (p. 19, 39) Quick Reference 205 -

Operating Instructions (primary manual)
Page 208
... operating instructions of the accessory for details. •The intelligent accessory shoe has a safety device for fixing the installed accessory securely. Stylus holder (DCR-TRV39 only) (p. 166) ea Stylus (DCR-TRV39 only) (p. 166) eg es EDITSEARCH button (p. 36) ed Intelligent accessory shoe (p. 91) ef NIGHTSHOT switch (p. 33) eg Grip belt Notes on the intelligent...
... operating instructions of the accessory for details. •The intelligent accessory shoe has a safety device for fixing the installed accessory securely. Stylus holder (DCR-TRV39 only) (p. 166) ea Stylus (DCR-TRV39 only) (p. 166) eg es EDITSEARCH button (p. 36) ed Intelligent accessory shoe (p. 91) ef NIGHTSHOT switch (p. 33) eg Grip belt Notes on the intelligent...