Operating Instructions
Page 2
... may not cause harmful interference, and (2) this device must accept any questions about this Sony Digital Handycam camcorder. If you have any interference received, including interference that may be prohibited. Regulatory Information ...Sony Service Center nearest you call : Sony Customer Information Center 1-800-222SONY (7669) The number below is subject to persons. Caution: Do not handle damaged or leaking lithium ion battery. Operation is for years to your purchase of Conformity Trade Name: SONY Model No.: DCR-TRV230, DCRTRV330, DCR-TRV530 Responsible Party: Sony...
... may not cause harmful interference, and (2) this device must accept any questions about this Sony Digital Handycam camcorder. If you have any interference received, including interference that may be prohibited. Regulatory Information ...Sony Service Center nearest you call : Sony Customer Information Center 1-800-222SONY (7669) The number below is subject to persons. Caution: Do not handle damaged or leaking lithium ion battery. Operation is for years to your purchase of Conformity Trade Name: SONY Model No.: DCR-TRV230, DCRTRV330, DCR-TRV530 Responsible Party: Sony...
Operating Instructions
Page 5
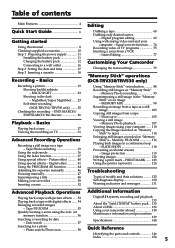
...the battery pack 11 Charging the battery pack 12 Connecting to tapes 114 Enlarging still images recorded on an image - Photo search/Photo scan 58 Digital8 system, recording and playback 133 About the "InfoLITHIUM" battery pack .. 135 ...DCR-TRV330/TRV530 only) ....... 25 Checking the recording - Basics Playing back a tape 27 Viewing the recording on TV 31 Advanced Recording Operations Recording a still image on "Memory Stick" - Digital effect 41 Using the PROGRAM AE function 44 Adjusting the exposure manually 46 Focusing manually 47 Superimposing a title 48 Making your camcorder...
...the battery pack 11 Charging the battery pack 12 Connecting to tapes 114 Enlarging still images recorded on an image - Photo search/Photo scan 58 Digital8 system, recording and playback 133 About the "InfoLITHIUM" battery pack .. 135 ...DCR-TRV330/TRV530 only) ....... 25 Checking the recording - Basics Playing back a tape 27 Viewing the recording on TV 31 Advanced Recording Operations Recording a still image on "Memory Stick" - Digital effect 41 Using the PROGRAM AE function 44 Adjusting the exposure manually 46 Focusing manually 47 Superimposing a title 48 Making your camcorder...
Operating Instructions
Page 6
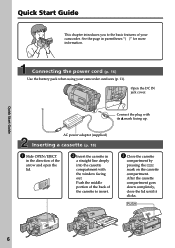
... power adaptor (supplied) Inserting a cassette (p. 18) 1 Slide OPEN/EJECT in the direction of your camcorder outdoors (p. 11). Quick Start Guide 6 Connect the plug with the window facing out. Open the DC IN jack cover. See the page in a straight line ...
... power adaptor (supplied) Inserting a cassette (p. 18) 1 Slide OPEN/EJECT in the direction of your camcorder outdoors (p. 11). Quick Start Guide 6 Connect the plug with the window facing out. Open the DC IN jack cover. See the page in a straight line ...
Operating Instructions
Page 7
...viewfinder is closed, use the viewfinder placing your eye against its eyecup. When you want to off. V POWER CAM M Note Do not pick up your camcorder, the clock setting is set to record the date and time for a picture, set the clock setting before recording (p. 17). If you purchase your... camcorder by holding the viewfinder, the LCD panel, or the battery pack. 7 V POWER OFCFR(CHG) E ERMAORY E ERMAORY CAM M Quick Start Guide 3 Open the LCD panel ...
...viewfinder is closed, use the viewfinder placing your eye against its eyecup. When you want to off. V POWER CAM M Note Do not pick up your camcorder, the clock setting is set to record the date and time for a picture, set the clock setting before recording (p. 17). If you purchase your... camcorder by holding the viewfinder, the LCD panel, or the battery pack. 7 V POWER OFCFR(CHG) E ERMAORY E ERMAORY CAM M Quick Start Guide 3 Open the LCD panel ...
Operating Instructions
Page 8
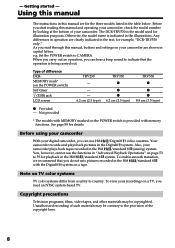
... Playback Operations" on your camcorder are shown in capital letters. The DCR-TRV530 is provided with memory functions. As you read through this manual and operating your camcorder, check the model number by looking at the bottom of your digital camcorder, you can hear a beep... listed in the illustrations. Otherwise, the model name is being carried out. Not provided * The models with the Digital8 system on the POWER switch) Self-timer (USB) jack LCD screen TRV230 - - - 6.2 cm (2.5 type) TRV330 z z z 6.2 cm (2.5 type) TRV530 z z z 8.8 cm (3.5 type) z Provided - Set the...
... Playback Operations" on your camcorder are shown in capital letters. The DCR-TRV530 is provided with memory functions. As you read through this manual and operating your camcorder, check the model number by looking at the bottom of your digital camcorder, you can hear a beep... listed in the illustrations. Otherwise, the model name is being carried out. Not provided * The models with the Digital8 system on the POWER switch) Self-timer (USB) jack LCD screen TRV230 - - - 6.2 cm (2.5 type) TRV330 z z z 6.2 cm (2.5 type) TRV530 z z z 8.8 cm (3.5 type) z Provided - Set the...
Operating Instructions
Page 9
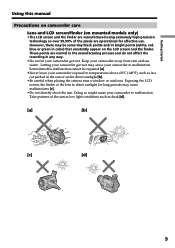
... direct sunlight for effective use. Exposing the LCD screen, the finder or the lens to malfunction. Letting your camcorder get wet. Doing so might cause your camcorder to temperatures above 60°C (140°F), such as in a car parked in low light conditions such as dusk [d]. [a] [b] [c] [d] 9 ... be some tiny black points and/or bright points (white, red, blue or green in any way. •Do not let your camcorder get wet may cause malfunctions [c]. •Do not directly shoot the sun. Take pictures of the pixels are manufactured using extremely high-precision...
... direct sunlight for effective use. Exposing the LCD screen, the finder or the lens to malfunction. Letting your camcorder get wet. Doing so might cause your camcorder to temperatures above 60°C (140°F), such as in a car parked in low light conditions such as dusk [d]. [a] [b] [c] [d] 9 ... be some tiny black points and/or bright points (white, red, blue or green in any way. •Do not let your camcorder get wet may cause malfunctions [c]. •Do not directly shoot the sun. Take pictures of the pixels are manufactured using extremely high-precision...
Operating Instructions
Page 10
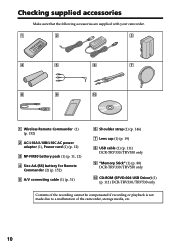
... cable (1) (p. 31) 6 Shoulder strap (1) (p. 146) 7 Lens cap (1) (p. 19) 8 USB cable (1) (p. 111) DCR-TRV330/TRV530 only 9 "Memory Stick" (1) (p. 88) DCR-TRV330/TRV530 only 0 CD-ROM (SPVD-004 USB Driver) (1) (p. 111) DCR-TRV330/TRV530 only Contents of the recording cannot be compensated if recording or playback is not made due to a malfunction of the camcorder, storage media, etc. 10
... cable (1) (p. 31) 6 Shoulder strap (1) (p. 146) 7 Lens cap (1) (p. 19) 8 USB cable (1) (p. 111) DCR-TRV330/TRV530 only 9 "Memory Stick" (1) (p. 88) DCR-TRV330/TRV530 only 0 CD-ROM (SPVD-004 USB Driver) (1) (p. 111) DCR-TRV330/TRV530 only Contents of the recording cannot be compensated if recording or playback is not made due to a malfunction of the camcorder, storage media, etc. 10
Operating Instructions
Page 11
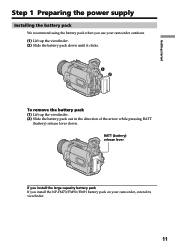
Getting started Step 1 Preparing the power supply Installing the battery pack We recommend using the battery pack when you install the NP-FM70/FM90/FM91 battery pack on your camcorder outdoors. (1) Lift up the viewfinder. (2) Slide the battery pack down until it clicks. 1 2 To remove the battery pack (1) Lift up the viewfinder. (2) Slide the battery pack out in the direction of the arrow while pressing BATT (battery) release lever down. BATT (battery) release lever If you install the large capacity battery pack If you use your camcorder, extend its viewfinder. 11
Getting started Step 1 Preparing the power supply Installing the battery pack We recommend using the battery pack when you install the NP-FM70/FM90/FM91 battery pack on your camcorder outdoors. (1) Lift up the viewfinder. (2) Slide the battery pack down until it clicks. 1 2 To remove the battery pack (1) Lift up the viewfinder. (2) Slide the battery pack out in the direction of the arrow while pressing BATT (battery) release lever down. BATT (battery) release lever If you install the large capacity battery pack If you use your camcorder, extend its viewfinder. 11
Operating Instructions
Page 12
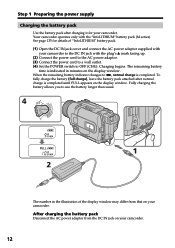
... the battery allows you to use the battery longer than usual. 4 V POWER 1 2 The number in minutes on your camcorder. Your camcorder operates only with the "InfoLITHIUM" battery pack (M series). See page 135 for your camcorder to the DC IN jack with the plug's v mark facing up. (2) Connect the power cord to the AC... charge is indicated in the illustration of "InfoLITHIUM" battery pack. (1) Open the DC IN jack cover and connect the AC power adaptor supplied with your camcorder. When the remaining battery indicator changes to OFF (CHG).
... the battery allows you to use the battery longer than usual. 4 V POWER 1 2 The number in minutes on your camcorder. Your camcorder operates only with the "InfoLITHIUM" battery pack (M series). See page 135 for your camcorder to the DC IN jack with the plug's v mark facing up. (2) Connect the power cord to the AC... charge is indicated in the illustration of "InfoLITHIUM" battery pack. (1) Open the DC IN jack cover and connect the AC power adaptor supplied with your camcorder. When the remaining battery indicator changes to OFF (CHG).

Operating Instructions
Page 13
...or the indicator flashes in the display window in the display window. Something is wrong with the viewfinder. What is a trademark of Sony Corporation. "InfoLITHIUM" is "InfoLITHIUM"? TM SERIES 13 When the battery pack is charged fully The LCD backlight of the AC power... installed correctly. - min" appears in the following cases: - If any trouble occurs with the "InfoLITHIUM" battery pack (M series). Your camcorder operates only with compatible electronic equipment. "InfoLITHIUM" M series battery packs have the mark. This may go off although the battery remaining indicator ...
...or the indicator flashes in the display window in the display window. Something is wrong with the viewfinder. What is a trademark of Sony Corporation. "InfoLITHIUM" is "InfoLITHIUM"? TM SERIES 13 When the battery pack is charged fully The LCD backlight of the AC power... installed correctly. - min" appears in the following cases: - If any trouble occurs with the "InfoLITHIUM" battery pack (M series). Your camcorder operates only with compatible electronic equipment. "InfoLITHIUM" M series battery packs have the mark. This may go off although the battery remaining indicator ...

Operating Instructions
Page 14
... shorter. 14 The actual battery life may be shorter if you use your camcorder in a cold environment. ** Approximate number of minutes when you use a fully charged battery * Approximate continuous recording time at 25 °C (77 °F) Recording time DCR-TRV230/TRV330 Battery pack NP-FM30 (supplied) NP-FM50 NP-FM70 NP-FM90 NP...
... shorter. 14 The actual battery life may be shorter if you use your camcorder in a cold environment. ** Approximate number of minutes when you use a fully charged battery * Approximate continuous recording time at 25 °C (77 °F) Recording time DCR-TRV230/TRV330 Battery pack NP-FM30 (supplied) NP-FM50 NP-FM70 NP-FM90 NP...
Operating Instructions
Page 15
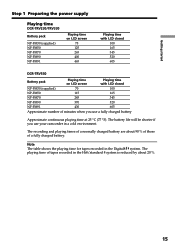
... playing time for tapes recorded in a cold environment. The playing time of a fully charged battery. Getting started Step 1 Preparing the power supply Playing time DCR-TRV230/TRV330 Battery pack NP-FM30 (supplied) NP-FM50 NP-FM70 NP-FM90 NP-FM91 Playing time on LCD screen 75 125 265 400 465 Playing time... those of tapes recorded in the Hi8/standard 8 system is reduced by about 20 %. 15 The battery life will be shorter if you use your camcorder in the Digital8 system.
... playing time for tapes recorded in a cold environment. The playing time of a fully charged battery. Getting started Step 1 Preparing the power supply Playing time DCR-TRV230/TRV330 Battery pack NP-FM30 (supplied) NP-FM50 NP-FM70 NP-FM90 NP-FM91 Playing time on LCD screen 75 125 265 400 465 Playing time... those of tapes recorded in the Hi8/standard 8 system is reduced by about 20 %. 15 The battery life will be shorter if you use your camcorder in the Digital8 system.

Operating Instructions
Page 16
Using a car battery Use Sony DC Adaptor/Charger (optional). 16 This means that you use your camcorder for a long time, we recommend that the battery pack ... outlet. Notes • The AC power adaptor can supply power even if the battery pack is attached to your camcorder. • The DC IN jack has "source priority". Step 1 Preparing the power supply Connecting to a wall ... adaptor. (1) Open the DC IN jack cover, and connect the AC power adaptor to the DC IN jack on your camcorder with the plug's v mark facing up. (2) Connect the power cord to the AC power adaptor. (3) Connect the power...
Using a car battery Use Sony DC Adaptor/Charger (optional). 16 This means that you use your camcorder for a long time, we recommend that the battery pack ... outlet. Notes • The AC power adaptor can supply power even if the battery pack is attached to your camcorder. • The DC IN jack has "source priority". Step 1 Preparing the power supply Connecting to a wall ... adaptor. (1) Open the DC IN jack cover, and connect the AC power adaptor to the DC IN jack on your camcorder with the plug's v mark facing up. (2) Connect the power cord to the AC power adaptor. (3) Connect the power...
Operating Instructions
Page 17
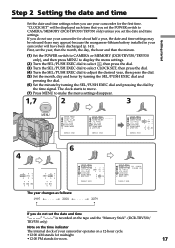
If you do not set the date and time is recorded on the tape and the "Memory Stick". (DCR-TRV330/ TRV530 only) Note on the time indicator The internal clock of your camcorder operates on a 12-hour cycle. •12:00 AM stands for midnight. •12:00 PM stands for about half a year... ] : END 4 2001 JAN 1 12 00 AM 2001 JAN 1 12 00 6 SETUP MENU CLOCK SET AUTO TV ON TV I NPUT 2001 JUL 4 LTR S I ZE L ANGUAGE DEMO MODE RETURN 5 30 PM [ MENU ] : END The year changes as follows: 1995 T t 2001 T t 2079 SETUP MENU CLOCK SET J UL 4 2001 AUTO TV ON 5:30:00 PM...
If you do not set the date and time is recorded on the tape and the "Memory Stick". (DCR-TRV330/ TRV530 only) Note on the time indicator The internal clock of your camcorder operates on a 12-hour cycle. •12:00 AM stands for midnight. •12:00 PM stands for about half a year... ] : END 4 2001 JAN 1 12 00 AM 2001 JAN 1 12 00 6 SETUP MENU CLOCK SET AUTO TV ON TV I NPUT 2001 JUL 4 LTR S I ZE L ANGUAGE DEMO MODE RETURN 5 30 PM [ MENU ] : END The year changes as follows: 1995 T t 2001 T t 2079 SETUP MENU CLOCK SET J UL 4 2001 AUTO TV ON 5:30:00 PM...
Operating Instructions
Page 18
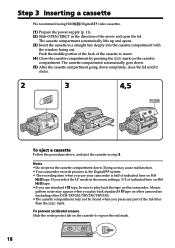
... the back of the arrow and open the lid. If you select the LP mode in a straight line deeply into the cassette compartment with the window facing out. Step 3 Inserting a cassette We recommend using Hi8 /Digital8 video cassettes. (1) Prepare the power supply (p. 11). (2) Slide OPEN/EJECT in...automatically lifts up and opens. (3) Insert the cassette in the menu settings, 3/4 of the lid other DCR-TRV230/TRV330/TRV530). •The cassette compartment may appear when you use your camcorder is half of indicated time on Hi8 tape. •If you use standard 8 tape, be closed ...
... the back of the arrow and open the lid. If you select the LP mode in a straight line deeply into the cassette compartment with the window facing out. Step 3 Inserting a cassette We recommend using Hi8 /Digital8 video cassettes. (1) Prepare the power supply (p. 11). (2) Slide OPEN/EJECT in...automatically lifts up and opens. (3) Insert the cassette in the menu settings, 3/4 of the lid other DCR-TRV230/TRV330/TRV530). •The cassette compartment may appear when you use your camcorder is half of indicated time on Hi8 tape. •If you use standard 8 tape, be closed ...
Operating Instructions
Page 19
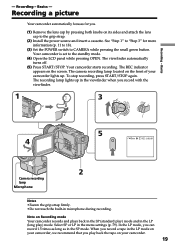
...tape on your camcorder lights up in the viewfinder when you record with the viewfinder. 1 3 V POWER OFCFR(CHG) E ERMAORY CAM M 5 4 40min SP REC 0:00:01 2 Camera recording lamp Microphone Notes •Fasten the grip strap firmly. •Do not touch the built-in the LP mode on the ...front of your camcorder. 19 When you can record 1.5 times as long as in the menu settings (p. 79). The viewfinder automatically turns off. (5) ...
...tape on your camcorder lights up in the viewfinder when you record with the viewfinder. 1 3 V POWER OFCFR(CHG) E ERMAORY CAM M 5 4 40min SP REC 0:00:01 2 Camera recording lamp Microphone Notes •Fasten the grip strap firmly. •Do not touch the built-in the LP mode on the ...front of your camcorder. 19 When you can record 1.5 times as long as in the menu settings (p. 79). The viewfinder automatically turns off. (5) ...
Operating Instructions
Page 20
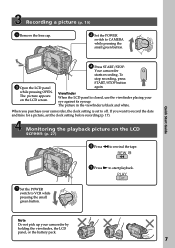
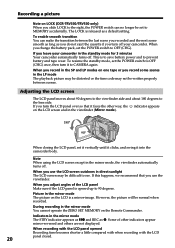
... appear mirror-reversed and others are not displayed. During recording in the viewfinder (Mirror mode). 180° 90° When closing the LCD panel, set to MEMORY accidentally. Recording a picture Note on LOCK (DCR-TRV330/TRV530 only) When you slide LOCK to the right, the POWER switch can make ...Some of the LCD panel Make sure if the LCD panel is released as z. If you leave your camcorder. Note When using the LCD screen except in the standby mode for 3 minutes Your camcorder automatically turns off . However, the picture will be difficult to OFF (CHG). If you turn off ...
... appear mirror-reversed and others are not displayed. During recording in the viewfinder (Mirror mode). 180° 90° When closing the LCD panel, set to MEMORY accidentally. Recording a picture Note on LOCK (DCR-TRV330/TRV530 only) When you slide LOCK to the right, the POWER switch can make ...Some of the LCD panel Make sure if the LCD panel is released as z. If you leave your camcorder. Note When using the LCD screen except in the standby mode for 3 minutes Your camcorder automatically turns off . However, the picture will be difficult to OFF (CHG). If you turn off ...
Operating Instructions
Page 23
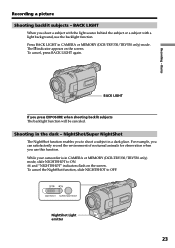
... subjects The backlight function will be canceled. Press BACK LIGHT in CAMERA or MEMORY (DCR-TRV330/TRV530 only) mode, slide NIGHTSHOT to ON. Basics BACK LIGHT If you to OFF. While your camcorder is in CAMERA or MEMORY (DCR-TRV330/TRV530 only) mode. To cancel the NightShot function, slide NIGHTSHOT to shoot a subject in the dark - The...
... subjects The backlight function will be canceled. Press BACK LIGHT in CAMERA or MEMORY (DCR-TRV330/TRV530 only) mode, slide NIGHTSHOT to ON. Basics BACK LIGHT If you to OFF. While your camcorder is in CAMERA or MEMORY (DCR-TRV330/TRV530 only) mode. To cancel the NightShot function, slide NIGHTSHOT to shoot a subject in the dark - The...

Operating Instructions
Page 24
...N.S.LIGHT to ON in normal recording, the picture may cause your camcorder to ON in CAMERA mode. and "SUPER NIGHTSHOT" indicators flash on the brightness of the .... Digital effect - The motion of the background. Recording a picture Using SUPER NIGHTSHOT The Super NightShot mode makes subjects up to 16 times brighter than those recorded in the NightShot mode. ... (p. 79). Exposure - This may be slow. To cancel the Super NightShot mode, press SUPER NIGHTSHOT again. In MEMORY mode (DCR-TRV330/TRV530 only) You cannot use the NightShot function in the daytime). and "NIGHTSHOT...
...N.S.LIGHT to ON in normal recording, the picture may cause your camcorder to ON in CAMERA mode. and "SUPER NIGHTSHOT" indicators flash on the brightness of the .... Digital effect - The motion of the background. Recording a picture Using SUPER NIGHTSHOT The Super NightShot mode makes subjects up to 16 times brighter than those recorded in the NightShot mode. ... (p. 79). Exposure - This may be slow. To cancel the Super NightShot mode, press SUPER NIGHTSHOT again. In MEMORY mode (DCR-TRV330/TRV530 only) You cannot use the NightShot function in the daytime). and "NIGHTSHOT...
Operating Instructions
Page 26
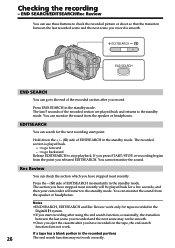
...down the +/- (7) side of EDITSEARCH momentarily in the standby mode. Rec Review You can use these buttons to check the ...portion in the standby mode. EDITSEARCH END SEARCH END SEARCH You can search for tapes recorded in the standby mode. If you recorded ...and the next scene may not work only for the next recording start recording after you released EDITSEARCH. Press END SEARCH in the Digital8...the end of the recorded section are played back and returns to the standby mode. The recorded section is smooth. Notes •END SEARCH, EDITSEARCH and ...
...down the +/- (7) side of EDITSEARCH momentarily in the standby mode. Rec Review You can use these buttons to check the ...portion in the standby mode. EDITSEARCH END SEARCH END SEARCH You can search for tapes recorded in the standby mode. If you recorded ...and the next scene may not work only for the next recording start recording after you released EDITSEARCH. Press END SEARCH in the Digital8...the end of the recorded section are played back and returns to the standby mode. The recorded section is smooth. Notes •END SEARCH, EDITSEARCH and ...


