Operating Instructions
Page 5
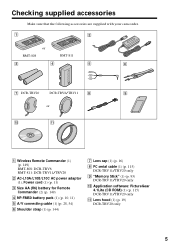
... Checking supplied accessories Make sure that the following accessories are supplied with your camcorder. 1 2 or RMT-808 RMT-811 3 4 5 6 7 DCR-TRV20 DCR-TRV6/TRV11 8 9 or 0 qa 1 Wireless Remote Commander (1) (p. 149) RMT-808: DCR-TRV6 RMT-811: DCR-TRV11/TRV20 2 AC-L10A/L10B/L10C AC power adaptor (1), Power cord (1) (p. 11) 3 Size AA (R6) battery for Remote Commander (2) (p. 149) 4 NP-FM50 battery...
... Checking supplied accessories Make sure that the following accessories are supplied with your camcorder. 1 2 or RMT-808 RMT-811 3 4 5 6 7 DCR-TRV20 DCR-TRV6/TRV11 8 9 or 0 qa 1 Wireless Remote Commander (1) (p. 149) RMT-808: DCR-TRV6 RMT-811: DCR-TRV11/TRV20 2 AC-L10A/L10B/L10C AC power adaptor (1), Power cord (1) (p. 11) 3 Size AA (R6) battery for Remote Commander (2) (p. 149) 4 NP-FM50 battery...
Operating Instructions
Page 6
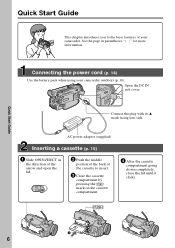
Connecting the power cord (p. 14) Use the battery pack when using your camcorder. Open the DC IN jack cover. EJECT 2 Push the middle portion of the back of your camcorder outdoors (p. 10). Connect the plug with its v mark facing lens side. Quick Start Guide 6 See the page in the ...direction of the arrow and open the lid. AC power adaptor (supplied) Inserting a cassette (p. 15) 1 Slide OPEN/...
Connecting the power cord (p. 14) Use the battery pack when using your camcorder. Open the DC IN jack cover. EJECT 2 Push the middle portion of the back of your camcorder outdoors (p. 10). Connect the plug with its v mark facing lens side. Quick Start Guide 6 See the page in the ...direction of the arrow and open the lid. AC power adaptor (supplied) Inserting a cassette (p. 15) 1 Slide OPEN/...
Operating Instructions
Page 11
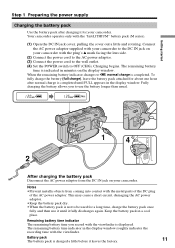
... display window. Notes •Prevent metallic objects from the DC IN jack on your camcorder with the plug's v mark facing the lens side. (2) Connect the power cord to the AC power adaptor. (3) Connect the power cord to the wall outlet. (4) Set the POWER switch to , normal charge is completed. Battery pack The battery pack is charged a little...
... display window. Notes •Prevent metallic objects from the DC IN jack on your camcorder with the plug's v mark facing the lens side. (2) Connect the power cord to the AC power adaptor. (3) Connect the power cord to the wall outlet. (4) Set the POWER switch to , normal charge is completed. Battery pack The battery pack is charged a little...

Operating Instructions
Page 14
... Use Sony DC Adaptor/Charger (not supplied). 14 Notes •The AC power adaptor can supply power even if the battery pack is attached to the DC IN jack, even when the power cord is not plugged into a wall outlet. Connect the AC power adaptor supplied with your camcorder to .... This means that you use your camcorder for a long time, we recommend that the battery pack cannot supply any power if the power cord is connected to your camcorder with the plug's v mark facing the lens side. (2) Connect the power cord to the AC power adaptor. (3) Connect the power cord to a wall outlet. 1 2, ...
... Use Sony DC Adaptor/Charger (not supplied). 14 Notes •The AC power adaptor can supply power even if the battery pack is attached to the DC IN jack, even when the power cord is not plugged into a wall outlet. Connect the AC power adaptor supplied with your camcorder to .... This means that you use your camcorder for a long time, we recommend that the battery pack cannot supply any power if the power cord is connected to your camcorder with the plug's v mark facing the lens side. (2) Connect the power cord to the AC power adaptor. (3) Connect the power cord to a wall outlet. 1 2, ...

Operating Instructions
Page 133
... the cassette and leave your camcorder. • The AC power adaptor is not a malfunction. c Contact your Sony dealer or local authorized Sony service facility. • Disconnect the power cord of the AC power adaptor or remove the battery, then reconnect it again, then operate your camcorder for five seconds. If the functions still do not work, open the... the battery pack, no indicator appears or the indicator flashes in about one hour to VCR or OFF (CHG), if you move your camcorder, you set the POWER switch to acclimatize. (p. 138) • Some troubles has occurred in your...
... the cassette and leave your camcorder. • The AC power adaptor is not a malfunction. c Contact your Sony dealer or local authorized Sony service facility. • Disconnect the power cord of the AC power adaptor or remove the battery, then reconnect it again, then operate your camcorder for five seconds. If the functions still do not work, open the... the battery pack, no indicator appears or the indicator flashes in about one hour to VCR or OFF (CHG), if you move your camcorder, you set the POWER switch to acclimatize. (p. 138) • Some troubles has occurred in your...

Operating Instructions
Page 134
... displayed, check the following code chart. After reconnecting the power source, operate your Sony dealer or local authorized Sony service facility. 134 c Disconnect the power cord of the 5-digit code. (example: E:61:10) If you can service your camcorder yourself. •E:ss:ss Contact your Sony dealer or local authorized Sony service facility and inform them of the AC...
... displayed, check the following code chart. After reconnecting the power source, operate your Sony dealer or local authorized Sony service facility. 134 c Disconnect the power cord of the 5-digit code. (example: E:61:10) If you can service your camcorder yourself. •E:ss:ss Contact your Sony dealer or local authorized Sony service facility and inform them of the AC...

Operating Instructions
Page 140
... damaging the terminals. These holes are not using your camcorder. • Do not wrap your camcorder with a damaged cord or if the unit has been dropped or damaged. • Do not bend the power cord forcibly, or place a heavy object on it out by a Sony dealer before operating it . Sand or dust may cause... your camcorder is in a dusty place, protect it from coming into the small holes on the rear ...
... damaging the terminals. These holes are not using your camcorder. • Do not wrap your camcorder with a damaged cord or if the unit has been dropped or damaged. • Do not bend the power cord forcibly, or place a heavy object on it out by a Sony dealer before operating it . Sand or dust may cause... your camcorder is in a dusty place, protect it from coming into the small holes on the rear ...

Operating Instructions
Page 143
...cord: 5.2 feet (1.6 m) Battery pack Output voltage DC 7.2 V Capacity 8.5 Wh (1,180 mA) Dimensions (approx.) 1 9/16 × 13/16 × 2 1/4 in. (38.2 × 20.5 × 55.6 mm) (w/h/d) Mass (approx.) 2.7 oz (76 g) Type Lithium ion "Memory Stick" (DCR-TRV11/TRV20 only) Memory Flash memory 4MB: MSA-4A Operating voltage 2.7-3.6V Power consumption Approx. 45mA in the operating mode... Approx. 130µA in the standby mode Dimensions (approx.) 2 ...
...cord: 5.2 feet (1.6 m) Battery pack Output voltage DC 7.2 V Capacity 8.5 Wh (1,180 mA) Dimensions (approx.) 1 9/16 × 13/16 × 2 1/4 in. (38.2 × 20.5 × 55.6 mm) (w/h/d) Mass (approx.) 2.7 oz (76 g) Type Lithium ion "Memory Stick" (DCR-TRV11/TRV20 only) Memory Flash memory 4MB: MSA-4A Operating voltage 2.7-3.6V Power consumption Approx. 45mA in the operating mode... Approx. 130µA in the standby mode Dimensions (approx.) 2 ...


