Operating Instructions
Page 7
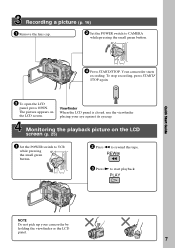
... eye against its eyecup. Viewfinder When the LCD panel is closed, use the viewfinder placing your camcorder by holding the viewfinder or the LCD panel. 7 The picture appears on the LCD screen (p. 25) 1 Set the POWER switch to CAMERA while pressing the small green button. REW ...3 Press N to rewind the tape. POWER MEMORY CAMERA VCR OFF(CHG) 2 Press m to start playback. Your camcorder starts recording. Recording a picture (p. 16) 1 Remove...
... eye against its eyecup. Viewfinder When the LCD panel is closed, use the viewfinder placing your camcorder by holding the viewfinder or the LCD panel. 7 The picture appears on the LCD screen (p. 25) 1 Set the POWER switch to CAMERA while pressing the small green button. REW ...3 Press N to rewind the tape. POWER MEMORY CAMERA VCR OFF(CHG) 2 Press m to start playback. Your camcorder starts recording. Recording a picture (p. 16) 1 Remove...
Operating Instructions
Page 9
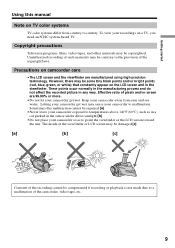
... car parked in the viewfinder. Effective ratio of pixels and/or screen are manufactured using high-precision technology. Sometimes this manual Note on the LCD screen and in the sun or under direct sunlight [b]. •Do not place your camcorder exposed to temperatures above 140°F (60°C), such as ... normally in the manufacturing process and do not affect the recorded picture in any way. The inside of the viewfinder or LCD screen may cause your camcorder away from country to malfunction. Precautions on a TV, you need an NTSC system-based TV. To view your recordings on...
... car parked in the viewfinder. Effective ratio of pixels and/or screen are manufactured using high-precision technology. Sometimes this manual Note on the LCD screen and in the sun or under direct sunlight [b]. •Do not place your camcorder exposed to temperatures above 140°F (60°C), such as ... normally in the manufacturing process and do not affect the recorded picture in any way. The inside of the viewfinder or LCD screen may cause your camcorder away from country to malfunction. Precautions on a TV, you need an NTSC system-based TV. To view your recordings on...
Operating Instructions
Page 12
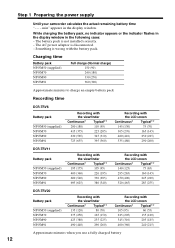
...630 (565) 345 (310) 725 (655) 395 (360) Recording with the LCD screen Continuous* Typical** 145 (130) 75 (70) 305 (270) 165 (145) 460 (410) 250 (225) 535 (480) 290 (260) DCR-TRV11 Battery pack NP-FM50 (supplied) NP-FM70 NP-FM90 NP-FM91 Recording with the viewfinder ...290 (260) Recording with the battery pack. Step 1 Preparing the power supply Until your camcorder calculates the actual remaining battery time "- - - The AC power adaptor is not installed correctly. - Something is wrong with the LCD screen Continuous* Typical** 105 (95) 60 (55) 225 (205) 135 (120) 345 ...
...630 (565) 345 (310) 725 (655) 395 (360) Recording with the LCD screen Continuous* Typical** 145 (130) 75 (70) 305 (270) 165 (145) 460 (410) 250 (225) 535 (480) 290 (260) DCR-TRV11 Battery pack NP-FM50 (supplied) NP-FM70 NP-FM90 NP-FM91 Recording with the viewfinder ...290 (260) Recording with the battery pack. Step 1 Preparing the power supply Until your camcorder calculates the actual remaining battery time "- - - The AC power adaptor is not installed correctly. - Something is wrong with the LCD screen Continuous* Typical** 105 (95) 60 (55) 225 (205) 135 (120) 345 ...
Operating Instructions
Page 13
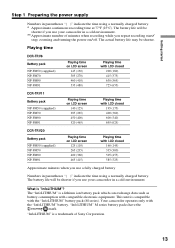
... time on LCD screen 125 (110) 265 (235) 400 (360) 465 (415) Playing time with the "InfoLITHIUM" battery pack (M series). The battery life will be shorter if you use your camcorder in a cold environment. ** Approximate number of Sony Corporation. 13 Your camcorder operates only with ...camcorder in a cold environment. The battery life will be shorter. Playing time DCR-TRV6 Battery pack NP-FM50 (supplied) NP-FM70 NP-FM90 NP-FM91 Playing time on LCD screen 145 (130) 305 (270) 460 (410) 535 (480) Playing time with LCD closed 200 (180) 415 (375) 630 (565) 725 (655) DCR-TRV11...
... time on LCD screen 125 (110) 265 (235) 400 (360) 465 (415) Playing time with the "InfoLITHIUM" battery pack (M series). The battery life will be shorter if you use your camcorder in a cold environment. ** Approximate number of Sony Corporation. 13 Your camcorder operates only with ...camcorder in a cold environment. The battery life will be shorter. Playing time DCR-TRV6 Battery pack NP-FM50 (supplied) NP-FM70 NP-FM90 NP-FM91 Playing time on LCD screen 145 (130) 305 (270) 460 (410) 535 (480) Playing time with LCD closed 200 (180) 415 (375) 630 (565) 725 (655) DCR-TRV11...
Operating Instructions
Page 17
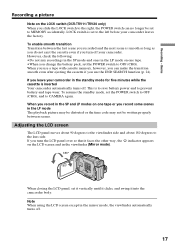
... viewfinder automatically turns off . However, check the following: •Do not mix recordings in the SP mode and ones in the LP mode on the LCD screen and in the viewfinder (Mirror mode). 180° 90° When closing the LCD panel, set it vertically until it clicks, and swing...leave your comcorder leaves the factory. When you record in the SP and LP modes on the LOCK switch (DCR-TRV11/TRV20 only) When you change the battery pack, set to MEMORY accidentally. LOCK switch is inserted Your camcorder automatically turns off . 17 Basics Recording a picture Note on one tape. &#...
... viewfinder automatically turns off . However, check the following: •Do not mix recordings in the SP mode and ones in the LP mode on the LCD screen and in the viewfinder (Mirror mode). 180° 90° When closing the LCD panel, set it vertically until it clicks, and swing...leave your comcorder leaves the factory. When you record in the SP and LP modes on the LOCK switch (DCR-TRV11/TRV20 only) When you change the battery pack, set to MEMORY accidentally. LOCK switch is inserted Your camcorder automatically turns off . 17 Basics Recording a picture Note on one tape. &#...
Operating Instructions
Page 18
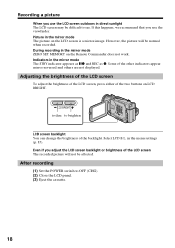
However, the picture will not be affected. During recording in the mirror mode ZERO SET MEMORY on the LCD screen is a mirror-image. If this happens, we recommend that you adjust the LCD screen backlight or brightness of the other indicators appear mirror-reversed and others are not displayed.... Adjusting the brightness of the LCD screen To adjust the brightness of the LCD screen, press either of the backlight. in the mirror mode The STBY indicator appears as Xz and REC as z. Select LCD B.L. Even if you ...
However, the picture will not be affected. During recording in the mirror mode ZERO SET MEMORY on the LCD screen is a mirror-image. If this happens, we recommend that you adjust the LCD screen backlight or brightness of the other indicators appear mirror-reversed and others are not displayed.... Adjusting the brightness of the LCD screen To adjust the brightness of the LCD screen, press either of the backlight. in the mirror mode The STBY indicator appears as Xz and REC as z. Select LCD B.L. Even if you ...
Operating Instructions
Page 19
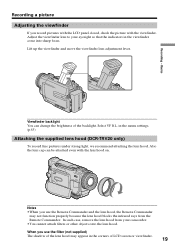
in the corners of LCD screen or viewfinder. 19 Lift up the viewfinder and move the viewfinder lens adjustment lever. In... pictures with the LCD panel closed, check the picture with the lens hood on. Adjust the viewfinder lens to your camcorder. •You cannot attach filters or other objects onto the lens hood. Basics Recording a picture Adjusting the viewfinder If... Remote Commander may appear in the menu settings. (p.85) Attaching the supplied lens hood (DCR-TRV20 only) To record fine pictures under strong light, we recommend attaching the lens hood. Select VF B.L. Recording -
in the corners of LCD screen or viewfinder. 19 Lift up the viewfinder and move the viewfinder lens adjustment lever. In... pictures with the LCD panel closed, check the picture with the lens hood on. Adjust the viewfinder lens to your camcorder. •You cannot attach filters or other objects onto the lens hood. Basics Recording a picture Adjusting the viewfinder If... Remote Commander may appear in the menu settings. (p.85) Attaching the supplied lens hood (DCR-TRV20 only) To record fine pictures under strong light, we recommend attaching the lens hood. Select VF B.L. Recording -
Operating Instructions
Page 21
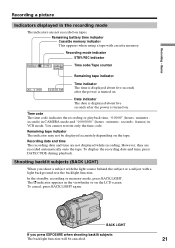
Basics Recording a picture Indicators displayed in VCR mode. Date indicator The date is displayed about five seconds after the power is turned on the LCD screen. Remaining tape indicator The indicator may not be canceled. 21 However, they are not displayed while recording. Shooting backlit subjects (BACK LIGHT) When you press ...
Basics Recording a picture Indicators displayed in VCR mode. Date indicator The date is displayed about five seconds after the power is turned on the LCD screen. Remaining tape indicator The indicator may not be canceled. 21 However, they are not displayed while recording. Shooting backlit subjects (BACK LIGHT) When you press ...
Operating Instructions
Page 22
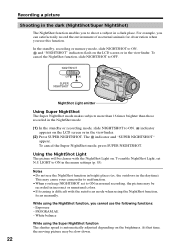
...the NightShot Light on the brightness. While using the NightShot function, focus manually. At that time, the moving picture may cause your camcorder to malfunction. •When you use this function. To cancel the NightShot function, slide NIGHTSHOT to ON. NIGHTSHOT OFF ON SUPER... enables you cannot use the following functions: - In the standby, recording or memory mode, slide NIGHTSHOT to ON in the viewfinder. (2) Press SUPER NIGHTSHOT. and "NIGHTSHOT" indicators flash on the LCD screen or in the menu settings (p. 85). LIGHT to ON. the outdoors in bright places...
...the NightShot Light on the brightness. While using the NightShot function, focus manually. At that time, the moving picture may cause your camcorder to malfunction. •When you use this function. To cancel the NightShot function, slide NIGHTSHOT to ON. NIGHTSHOT OFF ON SUPER... enables you cannot use the following functions: - In the standby, recording or memory mode, slide NIGHTSHOT to ON in the viewfinder. (2) Press SUPER NIGHTSHOT. and "NIGHTSHOT" indicators flash on the LCD screen or in the menu settings (p. 85). LIGHT to ON. the outdoors in bright places...
Operating Instructions
Page 23
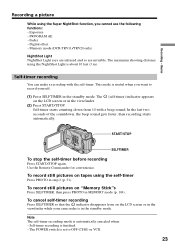
...Digital effect - In the last two seconds of the countdown, the beep sound gets faster, then recording starts automatically. To record still pictures on the LCD screen or in MEMORY mode (p. 104). Note The self-timer recording mode...VCR. 23 To record still pictures on the LCD screen or in the viewfinder while your camcorder is set to record yourself. (1) Press SELFTIMER in the standby mode. Fader - Self-timer... Press PHOTO in the standby mode. Memory mode (DCR-TRV11/TRV20 only) NightShot Light NightShot Light rays are infrared and so are invisible. This mode is about 10 feet (3 ...
...Digital effect - In the last two seconds of the countdown, the beep sound gets faster, then recording starts automatically. To record still pictures on the LCD screen or in MEMORY mode (p. 104). Note The self-timer recording mode...VCR. 23 To record still pictures on the LCD screen or in the viewfinder while your camcorder is set to record yourself. (1) Press SELFTIMER in the standby mode. Fader - Self-timer... Press PHOTO in the standby mode. Memory mode (DCR-TRV11/TRV20 only) NightShot Light NightShot Light rays are infrared and so are invisible. This mode is about 10 feet (3 ...
Operating Instructions
Page 25
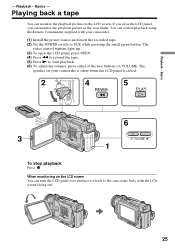
...the LCD panel, you can monitor the playback picture on your camcorder. (1) Install the power source and insert the recorded tape. (2) Set the POWER switch to VCR while pressing the small green button. The speaker on the LCD screen. Basics - Playing back a tape You can monitor the ...can control playback using the Remote Commander supplied with the LCD screen facing out. 25 The video control buttons light up. (3) To open the LCD panel, press OPEN. (4) Press m to rewind the tape. (5) Press N to the camcorder body with your camcorder is silent when the LCD panel is closed. 2 POWER ...
...the LCD panel, you can monitor the playback picture on your camcorder. (1) Install the power source and insert the recorded tape. (2) Set the POWER switch to VCR while pressing the small green button. The speaker on the LCD screen. Basics - Playing back a tape You can monitor the ...can control playback using the Remote Commander supplied with the LCD screen facing out. 25 The video control buttons light up. (3) To open the LCD panel, press OPEN. (4) Press m to rewind the tape. (5) Press N to the camcorder body with your camcorder is silent when the LCD panel is closed. 2 POWER ...
Operating Instructions
Page 26
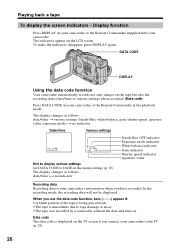
... tape is being played back. •The tape is your camcorder's information when you connect your camcorder or the Remote Commander in the menu settings (p. 85). In the recording mode, the recording data will not be displayed. Playing back a tape To display the screen indicators - Press DATA CODE on the tape but also the...
... tape is being played back. •The tape is your camcorder's information when you connect your camcorder or the Remote Commander in the menu settings (p. 85). In the recording mode, the recording data will not be displayed. Playing back a tape To display the screen indicators - Press DATA CODE on the tape but also the...
Operating Instructions
Page 27
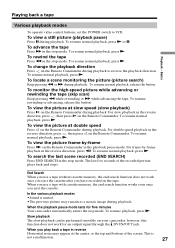
...still picture (playback pause) Press X during playback. To view the picture at double speed Press ×2 on your camcorder: however, this function does not work once you eject the cassette after you use a tape without cassette memory, the end search function does not work for five minutes Your camcorder automatically enters the stop mode...center, or the top and bottom of the recorded portion plays back and stops. The last five seconds of the screen. End Search When you use a tape with cassette memory, the end search function works even once you play back a tape in ...
...still picture (playback pause) Press X during playback. To view the picture at double speed Press ×2 on your camcorder: however, this function does not work once you eject the cassette after you use a tape without cassette memory, the end search function does not work for five minutes Your camcorder automatically enters the stop mode...center, or the top and bottom of the recorded portion plays back and stops. The last five seconds of the screen. End Search When you use a tape with cassette memory, the end search function works even once you play back a tape in ...
Operating Instructions
Page 28
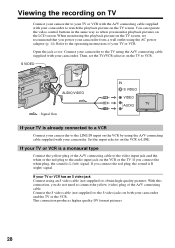
... to the TV using the AC power adaptor (p. 14). When monitoring the playback picture on the TV screen, we recommend that you connect the white plug, the sound is R (right) signal. Connect your camcorder to LINE. If your TV or VCR is already connected to a VCR Connect your...instructions of your TV or VCR. If you power your camcorder from a wall outlet using the A/V connecting cable supplied with your camcorder. With this connection, you monitor playback pictures on the LCD screen. Viewing the recording on TV Connect your camcorder to your TV or VCR with the A/V connecting cable ...
... to the TV using the AC power adaptor (p. 14). When monitoring the playback picture on the TV screen, we recommend that you connect the white plug, the sound is R (right) signal. Connect your camcorder to LINE. If your TV or VCR is already connected to a VCR Connect your...instructions of your TV or VCR. If you power your camcorder from a wall outlet using the A/V connecting cable supplied with your camcorder. With this connection, you monitor playback pictures on the LCD screen. Viewing the recording on TV Connect your camcorder to your TV or VCR with the A/V connecting cable ...
Operating Instructions
Page 30
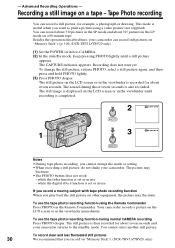
...recording is set or in the SP mode and about seven seconds. Besides the operation described here, your camcorder. The picture may fluctuate. while the digital effect function is set or in the viewfinder immediately. - You can record still pictures on other equipment, the picture ...play back the still picture on "Memory Stick"s (p. 100) (DCR-TRV11/TRV20 only). (1) Set the POWER switch to the standby mode. To use - Your camcorder records a picture on a tape - The still picture on the LCD screen or in the LP mode on the Remote Commander. The still picture is also...
...recording is set or in the SP mode and about seven seconds. Besides the operation described here, your camcorder. The picture may fluctuate. while the digital effect function is set or in the viewfinder immediately. - You can record still pictures on other equipment, the picture ...play back the still picture on "Memory Stick"s (p. 100) (DCR-TRV11/TRV20 only). (1) Set the POWER switch to the standby mode. To use - Your camcorder records a picture on a tape - The still picture on the LCD screen or in the LP mode on the Remote Commander. The still picture is also...

Operating Instructions
Page 31
...camcorder is set to CAMERA. (2) Press SELFTIMER. You cannot cancel the selftimer tape photo recording using the Remote Commander. Tape Photo recording Self-timer tape photo recording You can make a tape photo recording with a beep sound. Advanced Recording Operations Recording a still image on the LCD screen or in the standby mode.... The (self-timer) indicator appears on a tape - Note The self-timer tape photo recording mode is automatically canceled when: •...
...camcorder is set to CAMERA. (2) Press SELFTIMER. You cannot cancel the selftimer tape photo recording using the Remote Commander. Tape Photo recording Self-timer tape photo recording You can make a tape photo recording with a beep sound. Advanced Recording Operations Recording a still image on the LCD screen or in the standby mode.... The (self-timer) indicator appears on a tape - Note The self-timer tape photo recording mode is automatically canceled when: •...
Operating Instructions
Page 34
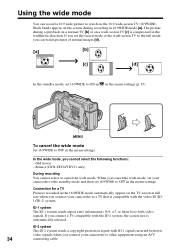
...other equipment using an A/V 34 connecting cable. Bounce (DCR-TRV6/TRV11 only) During recording You cannot select or cancel the wide mode. When you cancel the wide mode, set your camcorder to ON in in the menu settings (p. 85). In the wide mode, you cannot select the following functions: - ID-2 ... signal with the video ID (ID1/ID-2) system. If you set the screen mode of normal images [d]. [a] [b] 16:9WIDE [c] [d] In the standby mode, set 16:9WIDE to watch pictures of the wide-screen TV to the full mode, you can record a 16:9 wide picture to OFF in the menu settings...
...other equipment using an A/V 34 connecting cable. Bounce (DCR-TRV6/TRV11 only) During recording You cannot select or cancel the wide mode. When you cancel the wide mode, set your camcorder to ON in in the menu settings (p. 85). In the wide mode, you cannot select the following functions: - ID-2 ... signal with the video ID (ID1/ID-2) system. If you set the screen mode of normal images [d]. [a] [b] 16:9WIDE [c] [d] In the standby mode, set 16:9WIDE to watch pictures of the wide-screen TV to the full mode, you can record a 16:9 wide picture to OFF in the menu settings...
Operating Instructions
Page 39
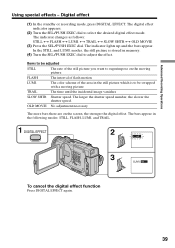
... MOVIE (3) Press the SEL/PUSH EXEC dial. Items to be swapped with a moving picture FLASH The interval of the still picture you want to select the desired digital effect mode. The digital effect indicator appears. (2) Turn the SEL/PUSH EXEC dial to superimpose on the screen, the stronger the digital effect. and TRAIL. 1 DIGITAL EFFECT 2 LUMI. 3 LUMI.
... MOVIE (3) Press the SEL/PUSH EXEC dial. Items to be swapped with a moving picture FLASH The interval of the still picture you want to select the desired digital effect mode. The digital effect indicator appears. (2) Turn the SEL/PUSH EXEC dial to superimpose on the screen, the stronger the digital effect. and TRAIL. 1 DIGITAL EFFECT 2 LUMI. 3 LUMI.

Operating Instructions
Page 41
...in the theater. Sunset & moon mode This mode allows you to suit your camcorder from focusing on glass or metal mesh in windows when you are recording sunsets, general night views, fireworks displays and neon signs. Soft portrait mode This mode brings out the subject while creating a... Operations Using the PROGRAM AE function You can select PROGRAM AE (Auto Exposure) mode to maintain atmosphere when you are recording a subject behind glass or a screen. Beach & ski mode This mode prevents people's faces from appearing excessively white when shooting subjects lit by strong light...
...in the theater. Sunset & moon mode This mode allows you to suit your camcorder from focusing on glass or metal mesh in windows when you are recording sunsets, general night views, fireworks displays and neon signs. Soft portrait mode This mode brings out the subject while creating a... Operations Using the PROGRAM AE function You can select PROGRAM AE (Auto Exposure) mode to maintain atmosphere when you are recording a subject behind glass or a screen. Beach & ski mode This mode prevents people's faces from appearing excessively white when shooting subjects lit by strong light...
Operating Instructions
Page 47
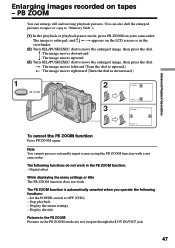
...title Pictures in the PB ZOOM Pictures in the PB ZOOM function: - You can enlarge still and moving playback pictures. R : The image moves downward r : The image moves ...tapes or copy to "Memory Stick"s. (1) In the playback or playback pause mode, press PB ZOOM on the LCD screen or in the viewfinder. (2) Turn SEL/PUSH EXEC dial to move the...camcorder. t : The image moves leftward (Turn the dial to upward.) T : The image moves rightward (Turn the dial to OFF (CHG) - Digital effect While displaying the menu settings or title The PB ZOOM function does not work in the PB ZOOM mode...
...title Pictures in the PB ZOOM Pictures in the PB ZOOM function: - You can enlarge still and moving playback pictures. R : The image moves downward r : The image moves ...tapes or copy to "Memory Stick"s. (1) In the playback or playback pause mode, press PB ZOOM on the LCD screen or in the viewfinder. (2) Turn SEL/PUSH EXEC dial to move the...camcorder. t : The image moves leftward (Turn the dial to upward.) T : The image moves rightward (Turn the dial to OFF (CHG) - Digital effect While displaying the menu settings or title The PB ZOOM function does not work in the PB ZOOM mode...


