Operating Instructions
Page 2
...harmful interference, and (2) this Sony Digital Handycam camcorder. You can capture life's precious moments with Part 15 of Conformity Trade Name: SONY Model No.: DCR-TRV20 Responsible Party:Sony Electronics Inc. For the Sony Factory Service Center nearest you call 1-800-222-SONY (United States only). (1) ...accept any questions about this product, you may call 416-499-SONY (Canada only). This device complies with Part 15 of Conformity Trade Name: SONY Model No.: DCR-TRV6, DCR-TRV11 Responsible Party:Sony Electronics Inc. Note: In some areas the disposal of this ...
...harmful interference, and (2) this Sony Digital Handycam camcorder. You can capture life's precious moments with Part 15 of Conformity Trade Name: SONY Model No.: DCR-TRV20 Responsible Party:Sony Electronics Inc. For the Sony Factory Service Center nearest you call 1-800-222-SONY (United States only). (1) ...accept any questions about this product, you may call 416-499-SONY (Canada only). This device complies with Part 15 of Conformity Trade Name: SONY Model No.: DCR-TRV6, DCR-TRV11 Responsible Party:Sony Electronics Inc. Note: In some areas the disposal of this ...
Operating Instructions
Page 4
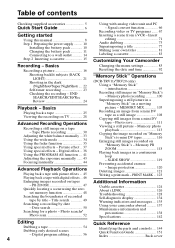
...DV tape as a still image 108 Copying still images from a VCR - SLIDE SHOW 119 Preventing accidental erasure - Image protection 120 Deleting images 121 Writing a print mark - Digital program editing 56 ...81 Labeling a cassette 83 Customizing Your Camcorder Recording - Tape Photo recording 30 Adjusting the white balance manually ... 33 Using the wide mode 34 Using the fader function 35 ..." Operations (DCR-TRV11/TRV20 only) Using a "Memory Stick" - Picture effect .. 37 Using special effects - Title search 49 Searching a recording by title - Photo save 111 Viewing a still picture - ...
...DV tape as a still image 108 Copying still images from a VCR - SLIDE SHOW 119 Preventing accidental erasure - Image protection 120 Deleting images 121 Writing a print mark - Digital program editing 56 ...81 Labeling a cassette 83 Customizing Your Camcorder Recording - Tape Photo recording 30 Adjusting the white balance manually ... 33 Using the wide mode 34 Using the fader function 35 ..." Operations (DCR-TRV11/TRV20 only) Using a "Memory Stick" - Picture effect .. 37 Using special effects - Title search 49 Searching a recording by title - Photo save 111 Viewing a still picture - ...
Operating Instructions
Page 5
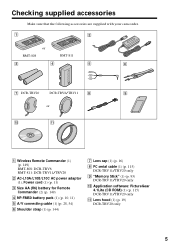
... Make sure that the following accessories are supplied with your camcorder. 1 2 or RMT-808 RMT-811 3 4 5 6 7 DCR-TRV20 DCR-TRV6/TRV11 8 9 or 0 qa 1 Wireless Remote Commander (1) (p. 149) RMT-808: DCR-TRV6 RMT-811: DCR-TRV11/TRV20 2 AC-L10A/L10B/L10C AC power adaptor (1), ...5 A/V connecting cable (1) (p. 28, 54) 6 Shoulder strap (1) (p. 144) 7 Lens cap (1) (p. 16) 8 PC serial cable (1) (p. 115) DCR-TRV11/TRV20 only 9 "Memory Stick" (1) (p. 93) DCR-TRV11/TRV20 only 0 Application software: PictureGear 4.1Lite (CD ROM) (1) (p. 115) DCR-TRV11/TRV20 only qa Lens hood (1) (p. 19...
... Make sure that the following accessories are supplied with your camcorder. 1 2 or RMT-808 RMT-811 3 4 5 6 7 DCR-TRV20 DCR-TRV6/TRV11 8 9 or 0 qa 1 Wireless Remote Commander (1) (p. 149) RMT-808: DCR-TRV6 RMT-811: DCR-TRV11/TRV20 2 AC-L10A/L10B/L10C AC power adaptor (1), ...5 A/V connecting cable (1) (p. 28, 54) 6 Shoulder strap (1) (p. 144) 7 Lens cap (1) (p. 16) 8 PC serial cable (1) (p. 115) DCR-TRV11/TRV20 only 9 "Memory Stick" (1) (p. 93) DCR-TRV11/TRV20 only 0 Application software: PictureGear 4.1Lite (CD ROM) (1) (p. 115) DCR-TRV11/TRV20 only qa Lens hood (1) (p. 19...
Operating Instructions
Page 6
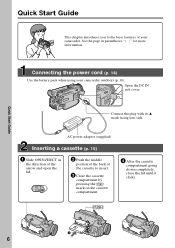
... on the cassette compartment. 4 After the cassette compartment going down completely, close the lid until it clicks. See the page in the direction of your camcorder outdoors (p. 10). Connecting the power cord (p. 14) Use the battery pack when using your...
... on the cassette compartment. 4 After the cassette compartment going down completely, close the lid until it clicks. See the page in the direction of your camcorder outdoors (p. 10). Connecting the power cord (p. 14) Use the battery pack when using your...
Operating Instructions
Page 7
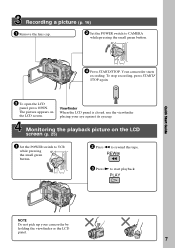
.... Recording a picture (p. 16) 1 Remove the lens cap. 2 Set the POWER switch to VCR while pressing the small green button. Your camcorder starts recording. PLAY Quick Start Guide NOTE Do not pick up your eye against its eyecup. VCR POWER OFF(CHG) CAMERA MEMORY 4 Press START.../STOP. Monitoring the playback picture on the LCD screen. Viewfinder When the LCD panel is closed, use the viewfinder placing your camcorder by holding the viewfinder or the LCD panel. 7 POWER MEMORY CAMERA VCR OFF(CHG) 2 Press m to start playback. REW 3 Press N ...
.... Recording a picture (p. 16) 1 Remove the lens cap. 2 Set the POWER switch to VCR while pressing the small green button. Your camcorder starts recording. PLAY Quick Start Guide NOTE Do not pick up your eye against its eyecup. VCR POWER OFF(CHG) CAMERA MEMORY 4 Press START.../STOP. Monitoring the playback picture on the LCD screen. Viewfinder When the LCD panel is closed, use the viewfinder placing your camcorder by holding the viewfinder or the LCD panel. 7 POWER MEMORY CAMERA VCR OFF(CHG) 2 Press m to start playback. REW 3 Press N ...
Operating Instructions
Page 8
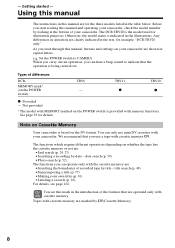
... in capital letters. Set the POWER switch to indicate that you use mini DV cassettes with your camcorder are operated only with cassette memory are for example, "DCR-TRV20 only". Types of the features that are shown in the text, for the three models listed... in the illustrations. TRV11 z TRV20 z z Provided - Note on Cassette Memory Your camcorder is provided with the cassette memory are : •End search (p. 24...
... in capital letters. Set the POWER switch to indicate that you use mini DV cassettes with your camcorder are operated only with cassette memory are for example, "DCR-TRV20 only". Types of the features that are shown in the text, for the three models listed... in the illustrations. TRV11 z TRV20 z z Provided - Note on Cassette Memory Your camcorder is provided with the cassette memory are : •End search (p. 24...
Operating Instructions
Page 9
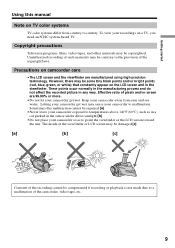
... process and do not affect the recorded picture in the sun or under direct sunlight [b]. •Do not place your camcorder to malfunction. Keep your camcorder away from country to country. Sometimes this manual Note on TV color systems TV color systems differ from rain and sea water... is not made due to a malfunction of the copyright laws. Getting started Using this malfunction cannot be repaired [a]. •Never leave your camcorder exposed to temperatures above 140°F (60°C), such as to point the viewfinder or the LCD screen toward the sun. Effective ratio ...
... process and do not affect the recorded picture in the sun or under direct sunlight [b]. •Do not place your camcorder to malfunction. Keep your camcorder away from country to country. Sometimes this manual Note on TV color systems TV color systems differ from rain and sea water... is not made due to a malfunction of the copyright laws. Getting started Using this malfunction cannot be repaired [a]. •Never leave your camcorder exposed to temperatures above 140°F (60°C), such as to point the viewfinder or the LCD screen toward the sun. Effective ratio ...
Operating Instructions
Page 10
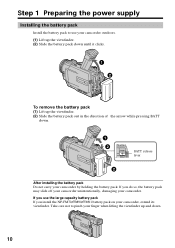
... clicks. 1 2 To remove the battery pack (1) Lift up and down . 1 2 BATT release lever 2 After installing the battery pack Do not carry your camcorder by holding the battery pack. Take care not to use the large capacity battery pack If you do so, the battery pack may slide off... your camcorder unintentionally, damaging your camcorder. Step 1 Preparing the power supply Installing the battery pack Install the battery pack to pinch your finger when lifting the viewfinder up...
... clicks. 1 2 To remove the battery pack (1) Lift up and down . 1 2 BATT release lever 2 After installing the battery pack Do not carry your camcorder by holding the battery pack. Take care not to use the large capacity battery pack If you do so, the battery pack may slide off... your camcorder unintentionally, damaging your camcorder. Step 1 Preparing the power supply Installing the battery pack Install the battery pack to pinch your finger when lifting the viewfinder up...
Operating Instructions
Page 11
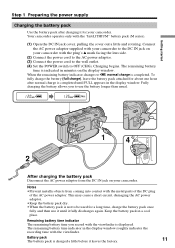
... the DC plug of the AC power adaptor. Fully charging the battery allows you record with the viewfinder is charged a little before it for your camcorder. Charging begins. This may cause a short-circuit, damaging the AC power adaptor. •Keep the battery pack dry. •When the battery ... the battery pack once fully and then use the battery longer than usual. Notes •Prevent metallic objects from the DC IN jack on your camcorder with the "InfoLITHIUM" battery pack (M series). (1) Open the DC IN jack cover, pulling the cover out a little and rotating. Keep the battery ...
... the DC plug of the AC power adaptor. Fully charging the battery allows you record with the viewfinder is charged a little before it for your camcorder. Charging begins. This may cause a short-circuit, damaging the AC power adaptor. •Keep the battery pack dry. •When the battery ... the battery pack once fully and then use the battery longer than usual. Notes •Prevent metallic objects from the DC IN jack on your camcorder with the "InfoLITHIUM" battery pack (M series). (1) Open the DC IN jack cover, pulling the cover out a little and rotating. Keep the battery ...
Operating Instructions
Page 12
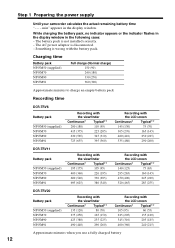
... the LCD screen Continuous* Typical** 145 (130) 75 (70) 305 (270) 165 (145) 460 (410) 250 (225) 535 (480) 290 (260) DCR-TRV11 Battery pack NP-FM50 (supplied) NP-FM70 NP-FM90 NP-FM91 Recording with the viewfinder Continuous* Typical** 195 (175) 105 (95) 400 (360) 220 (195... (250) 165 (150) 425 (380) 255 (225) 490 (440) 290 (260) Recording with the battery pack. Step 1 Preparing the power supply Until your camcorder calculates the actual remaining battery time "- - - Something is wrong with the LCD screen Continuous* Typical** 105 (95) 60 (55) 225 (205) 135 (120)...
... the LCD screen Continuous* Typical** 145 (130) 75 (70) 305 (270) 165 (145) 460 (410) 250 (225) 535 (480) 290 (260) DCR-TRV11 Battery pack NP-FM50 (supplied) NP-FM70 NP-FM90 NP-FM91 Recording with the viewfinder Continuous* Typical** 195 (175) 105 (95) 400 (360) 220 (195... (250) 165 (150) 425 (380) 255 (225) 490 (440) 290 (260) Recording with the battery pack. Step 1 Preparing the power supply Until your camcorder calculates the actual remaining battery time "- - - Something is wrong with the LCD screen Continuous* Typical** 105 (95) 60 (55) 225 (205) 135 (120)...
Operating Instructions
Page 13
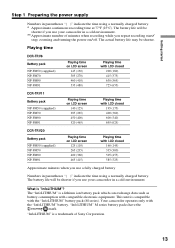
...InfoLITHIUM" is "InfoLITHIUM"? The battery life will be shorter if you use your camcorder in a cold environment. ** Approximate number of Sony Corporation. 13 Your camcorder operates only with LCD closed 195 (175) 400 (360) 600 (540) 695 (625) DCR-TRV20 Battery pack NP-FM50 (supplied) NP-FM70 NP-FM90 NP-FM91 Playing time...LCD screen 125 (110) 265 (235) 400 (360) 465 (415) Playing time with LCD closed 200 (180) 415 (375) 630 (565) 725 (655) DCR-TRV11 Battery pack NP-FM50 (supplied) NP-FM70 NP-FM90 NP-FM91 Playing time on LCD screen 140 (125) 295 (265) 450 (400) 520 (465) Playing...
...InfoLITHIUM" is "InfoLITHIUM"? The battery life will be shorter if you use your camcorder in a cold environment. ** Approximate number of Sony Corporation. 13 Your camcorder operates only with LCD closed 195 (175) 400 (360) 600 (540) 695 (625) DCR-TRV20 Battery pack NP-FM50 (supplied) NP-FM70 NP-FM90 NP-FM91 Playing time...LCD screen 125 (110) 265 (235) 400 (360) 465 (415) Playing time with LCD closed 200 (180) 415 (375) 630 (565) 725 (655) DCR-TRV11 Battery pack NP-FM50 (supplied) NP-FM70 NP-FM90 NP-FM91 Playing time on LCD screen 140 (125) 295 (265) 450 (400) 520 (465) Playing...

Operating Instructions
Page 14
... pack cannot supply any power if the power cord is connected to the DC IN jack, even when the power cord is connected to your camcorder with the plug's v mark facing the lens side. (2) Connect the power cord to the AC power adaptor. (3) Connect the power cord to a wall outlet. 1 2, 3 ...PRECAUTION The set itself has been turned off. Using a car battery Use Sony DC Adaptor/Charger (not supplied). 14 Notes •The AC power adaptor can supply power even if the battery pack is attached to the wall...
... pack cannot supply any power if the power cord is connected to the DC IN jack, even when the power cord is connected to your camcorder with the plug's v mark facing the lens side. (2) Connect the power cord to the AC power adaptor. (3) Connect the power cord to a wall outlet. 1 2, 3 ...PRECAUTION The set itself has been turned off. Using a car battery Use Sony DC Adaptor/Charger (not supplied). 14 Notes •The AC power adaptor can supply power even if the battery pack is attached to the wall...
Operating Instructions
Page 16
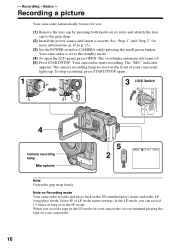
...you record a tape in the LP (long play ) mode and in the LP mode on your camcorder, we recommend playing the tape on the front of your camcorder. 16 The camera recording lamp located on your camcorder lights up. Your camcorder is set to CAMERA while pressing the small green button.... When you . (1) Remove the lens cap by pressing both knobs on Recording mode Your camcorder records and plays back in the SP (standard play ) mode. To stop recording, press START/STOP again. 1 3 LOCK Switch VCR POWER OFF(CHG) CAMERA MEMORY 4 Camera...
...you record a tape in the LP (long play ) mode and in the LP mode on your camcorder, we recommend playing the tape on the front of your camcorder. 16 The camera recording lamp located on your camcorder lights up. Your camcorder is set to CAMERA while pressing the small green button.... When you . (1) Remove the lens cap by pressing both knobs on Recording mode Your camcorder records and plays back in the SP (standard play ) mode. To stop recording, press START/STOP again. 1 3 LOCK Switch VCR POWER OFF(CHG) CAMERA MEMORY 4 Camera...
Operating Instructions
Page 17
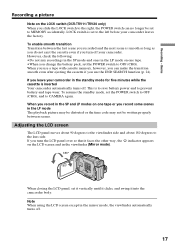
... to the left before your comcorder leaves the factory. Note When using the LCD screen except in the LP mode on the LOCK switch (DCR-TRV11/TRV20 only) When you slide the LOCK switch to MEMORY accidentally. To enable smooth transition Transition between scenes. Recording - Basics Recording a ... the time code may not be set it vertically until it clicks, and swing it into the camcorder body. LOCK switch is inserted Your camcorder automatically turns off your camcorder in the viewfinder (Mirror mode). 180° 90° When closing the LCD panel, set to the right, the POWER...
... to the left before your comcorder leaves the factory. Note When using the LCD screen except in the LP mode on the LOCK switch (DCR-TRV11/TRV20 only) When you slide the LOCK switch to MEMORY accidentally. To enable smooth transition Transition between scenes. Recording - Basics Recording a ... the time code may not be set it vertically until it clicks, and swing it into the camcorder body. LOCK switch is inserted Your camcorder automatically turns off your camcorder in the viewfinder (Mirror mode). 180° 90° When closing the LCD panel, set to the right, the POWER...
Operating Instructions
Page 19
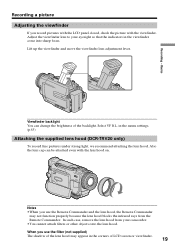
Adjust the viewfinder lens to your camcorder. •You cannot attach filters or other objects onto the lens hood. Viewfinder backlight You can be attached even with the viewfinder. When you record ... If you use the Remote Commander and the lens hood, the Remote Commander may appear in the menu settings. (p.85) Attaching the supplied lens hood (DCR-TRV20 only) To record fine pictures under strong light, we recommend attaching the lens hood. Recording - Notes •When you use the filter (not supplied...
Adjust the viewfinder lens to your camcorder. •You cannot attach filters or other objects onto the lens hood. Viewfinder backlight You can be attached even with the viewfinder. When you record ... If you use the Remote Commander and the lens hood, the Remote Commander may appear in the menu settings. (p.85) Attaching the supplied lens hood (DCR-TRV20 only) To record fine pictures under strong light, we recommend attaching the lens hood. Recording - Notes •When you use the filter (not supplied...
Operating Instructions
Page 22
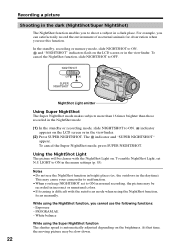
indicator appears on the LCD screen or in the viewfinder. Using the NightShot Light The picture will be clearer with the autofocus mode when using the NightShot function, focus manually. LIGHT to ON. PROGRAM AE - White balance While using the NightShot function, you use ... slide NIGHTSHOT to ON. At that time, the moving picture may be slow down. 22 In the standby, recording or memory mode, slide NIGHTSHOT to OFF. This may cause your camcorder to malfunction. •When you keep NIGHTSHOT set N.S. To enable NightShot Light, set to shoot a subject in a dark place....
indicator appears on the LCD screen or in the viewfinder. Using the NightShot Light The picture will be clearer with the autofocus mode when using the NightShot function, focus manually. LIGHT to ON. PROGRAM AE - White balance While using the NightShot function, you use ... slide NIGHTSHOT to ON. At that time, the moving picture may be slow down. 22 In the standby, recording or memory mode, slide NIGHTSHOT to OFF. This may cause your camcorder to malfunction. •When you keep NIGHTSHOT set N.S. To enable NightShot Light, set to shoot a subject in a dark place....
Operating Instructions
Page 23
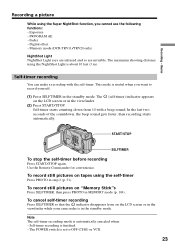
... the viewfinder. (2) Press START/STOP. To record still pictures on tapes using the self-timer Press PHOTO in the standby mode. The POWER switch is useful when you cannot use the following functions: - Memory mode (DCR-TRV11/TRV20 only) NightShot Light NightShot Light rays are infrared... Fader - PROGRAM AE - The (self-timer) indicator appears on the LCD screen or in the viewfinder while your camcorder is about 10 feet (3 m). Self-timer recording You can make a recording with a beep sound. Digital effect - Note The self-timer recording mode is finished. - Recording -
... the viewfinder. (2) Press START/STOP. To record still pictures on tapes using the self-timer Press PHOTO in the standby mode. The POWER switch is useful when you cannot use the following functions: - Memory mode (DCR-TRV11/TRV20 only) NightShot Light NightShot Light rays are infrared... Fader - PROGRAM AE - The (self-timer) indicator appears on the LCD screen or in the viewfinder while your camcorder is about 10 feet (3 m). Self-timer recording You can make a recording with a beep sound. Digital effect - Note The self-timer recording mode is finished. - Recording -
Operating Instructions
Page 25
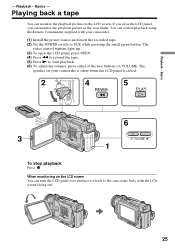
... and move it back to VCR while pressing the small green button. When monitoring on your camcorder. (1) Install the power source and insert the recorded tape. (2) Set the POWER switch to the camcorder body with your camcorder is silent when the LCD panel is closed. 2 POWER VCR 4 REW 5 PLAY OFF(CHG) CAMERA MEMORY...
... and move it back to VCR while pressing the small green button. When monitoring on your camcorder. (1) Install the power source and insert the recorded tape. (2) Set the POWER switch to the camcorder body with your camcorder is silent when the LCD panel is closed. 2 POWER VCR 4 REW 5 PLAY OFF(CHG) CAMERA MEMORY...
Operating Instructions
Page 26
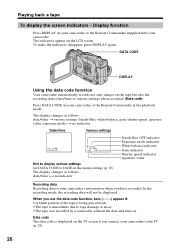
When you have recorded. Press DATA CODE on your camcorder. Playing back a tape To display the screen indicators - In the recording mode, the recording data will not be displayed. The indicators appear on the tape but also the recording data (date/time or various... OFF indicator Exposure mode indicator White balance indicator Gain indicator Shutter speed indicator Aperture value Recording data Recording data is unreadable due to DATE in the playback mode. Data code The data code is displayed on your camcorder or the Remote Commander supplied with your camcorder or the Remote ...
When you have recorded. Press DATA CODE on your camcorder. Playing back a tape To display the screen indicators - In the recording mode, the recording data will not be displayed. The indicators appear on the tape but also the recording data (date/time or various... OFF indicator Exposure mode indicator White balance indicator Gain indicator Shutter speed indicator Aperture value Recording data Recording data is unreadable due to DATE in the playback mode. Data code The data code is displayed on your camcorder or the Remote Commander supplied with your camcorder or the Remote ...
Operating Instructions
Page 27
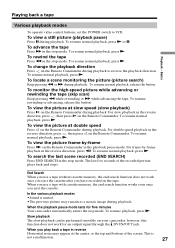
...POWER switch to reverse the playback direction. To view the picture at slow speed (slow playback) Press y on the Remote Commander. To view a still picture (playback pause) Press X during playback to VCR. For slow playback in the reverse direction, press , then press ×2 on the Remote... the button. When you use a tape without cassette memory, the end search function does not work for five minutes Your camcorder automatically enters the stop mode. To locate a scene monitoring the picture (picture search) Keep pressing m or M during playback. To resume playback, press N.
...POWER switch to reverse the playback direction. To view the picture at slow speed (slow playback) Press y on the Remote Commander. To view a still picture (playback pause) Press X during playback to VCR. For slow playback in the reverse direction, press , then press ×2 on the Remote... the button. When you use a tape without cassette memory, the end search function does not work for five minutes Your camcorder automatically enters the stop mode. To locate a scene monitoring the picture (picture search) Keep pressing m or M during playback. To resume playback, press N.


