Operating Instructions
Page 1
Model No. Serial No. DCR-IP Model No. Serial No. Owner's Record The model and serial numbers are located on the bottom. Record the serial number in the space provided below. 3-075-459-12 (1) Digital Video Camera Recorder Operating Instructions Before operating the unit, please read this product. AC- Refer to these numbers whenever you call upon your Sony dealer regarding this manual thoroughly, and retain it for future reference. DCR-IP45/IP55 ©2002 Sony Corporation
Model No. Serial No. DCR-IP Model No. Serial No. Owner's Record The model and serial numbers are located on the bottom. Record the serial number in the space provided below. 3-075-459-12 (1) Digital Video Camera Recorder Operating Instructions Before operating the unit, please read this product. AC- Refer to these numbers whenever you call upon your Sony dealer regarding this manual thoroughly, and retain it for future reference. DCR-IP45/IP55 ©2002 Sony Corporation
Operating Instructions
Page 2
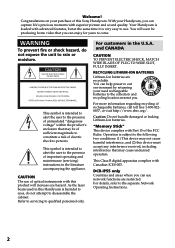
...you can help preserve our environment by returning your purchase of optical instruments with this Sony Handycam. "Memory Stick" This device complies with advanced features, but at the same ...Welcome! This symbol is loaded with Part 15 of electric shock to disassemble the cabinet. DCR-IP55 only Countries and areas where you can capture life's precious moments with Canadian ICES-003.... SHOCK, MATCH WIDE BLADE OF PLUG TO WIDE SLOT, FULLY INSERT. This Class B digital apparatus complies with superior picture and sound quality. Caution: Do not handle damaged or leaking Lithium...
...you can help preserve our environment by returning your purchase of optical instruments with this Sony Handycam. "Memory Stick" This device complies with advanced features, but at the same ...Welcome! This symbol is loaded with Part 15 of electric shock to disassemble the cabinet. DCR-IP55 only Countries and areas where you can capture life's precious moments with Canadian ICES-003.... SHOCK, MATCH WIDE BLADE OF PLUG TO WIDE SLOT, FULLY INSERT. This Class B digital apparatus complies with superior picture and sound quality. Caution: Do not handle damaged or leaking Lithium...
Operating Instructions
Page 3
...the antenna has been installed by turning the equipment off and on a circuit different from that to Part 15 of FCC Rules. DCR-IP55 only IMPORTANT NOTE To comply with FCC RF exposure compliance requirements, the following two conditions: (1) This device may not cause harmful... equipment. Telephone No.: 201-930-6972 This device complies with the limits for a digital device pursuant to comply with Part 15 of Conformity Trade Name: SONY Model No.: DCR-IP55 Responsible Party: Sony Electronics Inc. Increase the separation between the equipment and receiver. - Note: This equipment...
...the antenna has been installed by turning the equipment off and on a circuit different from that to Part 15 of FCC Rules. DCR-IP55 only IMPORTANT NOTE To comply with FCC RF exposure compliance requirements, the following two conditions: (1) This device may not cause harmful... equipment. Telephone No.: 201-930-6972 This device complies with the limits for a digital device pursuant to comply with Part 15 of Conformity Trade Name: SONY Model No.: DCR-IP55 Responsible Party: Sony Electronics Inc. Increase the separation between the equipment and receiver. - Note: This equipment...
Operating Instructions
Page 5
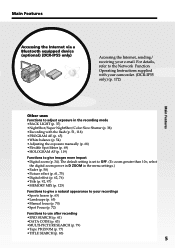
...(To zoom greater than 10×, select the digital zoom power in D ZOOM in the recording mode •BACK LIGHT (p. 37) •NightShot/Super NightShot/Color Slow Shutter (p. 38) •Recording with your camcorder. (DCR-IP55 only) (p. 172) Main Features Other uses Functions ...to adjust exposure in the menu settings.) •Fader (p. 58) •Picture effect (p. 61, 75) •Digital effect (p. 62, 76) •Title (p. 92, 97) •...
...(To zoom greater than 10×, select the digital zoom power in D ZOOM in the recording mode •BACK LIGHT (p. 37) •NightShot/Super NightShot/Color Slow Shutter (p. 38) •Recording with your camcorder. (DCR-IP55 only) (p. 172) Main Features Other uses Functions ...to adjust exposure in the menu settings.) •Fader (p. 58) •Picture effect (p. 61, 75) •Digital effect (p. 62, 76) •Title (p. 92, 97) •...
Operating Instructions
Page 7
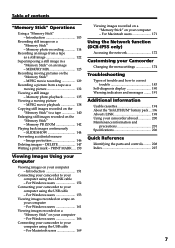
...messages ........ 191 Additional Information Usable cassettes 194 About the "InfoLITHIUM" battery pack .... 196 About i.LINK 198 Using your camcorder abroad 200 Maintenance information and precautions 201 Specifications 206 Quick Reference Identifying the parts and controls ......... 208 Index 215 Viewing...computer - MPEG movie playback 138 Copying still images recorded on an image - For Macintosh users 171 Using the Network function (DCR-IP55 only) Accessing the network 172 Customising your computer using the USB cable - MEMORY MIX 125 Recording moving pictures on a "...
...messages ........ 191 Additional Information Usable cassettes 194 About the "InfoLITHIUM" battery pack .... 196 About i.LINK 198 Using your camcorder abroad 200 Maintenance information and precautions 201 Specifications 206 Quick Reference Identifying the parts and controls ......... 208 Index 215 Viewing...computer - MPEG movie playback 138 Copying still images recorded on an image - For Macintosh users 171 Using the Network function (DCR-IP55 only) Accessing the network 172 Customising your computer using the USB cable - MEMORY MIX 125 Recording moving pictures on a "...

Operating Instructions
Page 8
... to turn on the power and select the mode To supply power for the camcorder, see "Step 1 Preparing the power supply" on page 17. 1,2 CAMERA MEMORY/ NET- MEMORY/NETWORK (DCR-IP55) MEMORY: Use this mode when you record on a "Memory Stick," or play back or edit an image recorded on a tape. ...you play back or edit an image in a "Memory Stick." For details, refer to operate the camcorder. How to the CAMERA mode so that the CAMERA lamp lights up . Each time you use the network (DCR-IP55 only) function. Introduction - VCR Use this mode when you slide it down, the mode changes ...
... to turn on the power and select the mode To supply power for the camcorder, see "Step 1 Preparing the power supply" on page 17. 1,2 CAMERA MEMORY/ NET- MEMORY/NETWORK (DCR-IP55) MEMORY: Use this mode when you record on a "Memory Stick," or play back or edit an image recorded on a tape. ...you play back or edit an image in a "Memory Stick." For details, refer to operate the camcorder. How to the CAMERA mode so that the CAMERA lamp lights up . Each time you use the network (DCR-IP55 only) function. Introduction - VCR Use this mode when you slide it down, the mode changes ...

Operating Instructions
Page 11
...the touch panel, press operation buttons lightly with sharp objects other than the stylus supplied (DCR-IP55 only). 11 The VCR lamp lights up . The CAMERA lamp lights up . START/STOP When you purchase your camcorder through the wrist strap. 5 Press START/ STOP. Set the clock setting before recording ...Start Guide Note Do not pick up your thumb or the supplied stylus (DCR-IP55 only) supporting the LCD screen from the rear of it. Your camcorder starts recording. Do not press the LCD screen with your camcorder by the LCD panel, the battery pack, the flash or the jack ...
...the touch panel, press operation buttons lightly with sharp objects other than the stylus supplied (DCR-IP55 only). 11 The VCR lamp lights up . The CAMERA lamp lights up . START/STOP When you purchase your camcorder through the wrist strap. 5 Press START/ STOP. Set the clock setting before recording ...Start Guide Note Do not pick up your thumb or the supplied stylus (DCR-IP55 only) supporting the LCD screen from the rear of it. Your camcorder starts recording. Do not press the LCD screen with your camcorder by the LCD panel, the battery pack, the flash or the jack ...

Operating Instructions
Page 13
The MEMORY/ NETWORK lamp lights up. 4 Slide OPEN in the direction of the B mark indicated on the camcorder to MEMORY/NETWORK (DCR-IP55 only) or VCR. PLAY PB Note Do not pick up . The picture appears on a "Memory Stick" (p. 114) Viewfinder When the LCD panel is ...last recorded image is not set the clock setting before recording (p. 22). 1 Remove the lens cap. 2 Turn the grip to MEMORY/ NETWORK (DCR-IP55 only). When you purchase your camcorder through the wrist strap. 5 Press PHOTO lightly. When the green z mark stops flashing, then lights up yet. CAMERA MEMORY/ NET- If ...
The MEMORY/ NETWORK lamp lights up. 4 Slide OPEN in the direction of the B mark indicated on the camcorder to MEMORY/NETWORK (DCR-IP55 only) or VCR. PLAY PB Note Do not pick up . The picture appears on a "Memory Stick" (p. 114) Viewfinder When the LCD panel is ...last recorded image is not set the clock setting before recording (p. 22). 1 Remove the lens cap. 2 Turn the grip to MEMORY/ NETWORK (DCR-IP55 only). When you purchase your camcorder through the wrist strap. 5 Press PHOTO lightly. When the green z mark stops flashing, then lights up yet. CAMERA MEMORY/ NET- If ...
Operating Instructions
Page 14
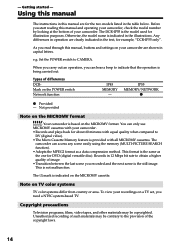
... two models listed in capital letters. e.g. IP55 MEMORY/NETWORK z z Provided - The camcorder can only use MICROMV cassettes with your camcorder are for about 60 minutes with equal quality when compared to CAMERA. The DCR-IP55 is the model used for DVD (digital versatile disc). Otherwise, the model name is...scene is indicated in the text, for example, "DCR-IP55 only". Not provided Note on the MICROMV format Your camcorder is the same as a data compression method. This format is based on the POWER switch Network function IP45 MEMORY - Records in 12 Mbps bit rate to ...
... two models listed in capital letters. e.g. IP55 MEMORY/NETWORK z z Provided - The camcorder can only use MICROMV cassettes with your camcorder are for about 60 minutes with equal quality when compared to CAMERA. The DCR-IP55 is the model used for DVD (digital versatile disc). Otherwise, the model name is...scene is indicated in the text, for example, "DCR-IP55 only". Not provided Note on the MICROMV format Your camcorder is the same as a data compression method. This format is based on the POWER switch Network function IP45 MEMORY - Records in 12 Mbps bit rate to ...

Operating Instructions
Page 16
...103) 8 USB cable (1) (p. 155) 9 CD-ROM (SPVD-008 USB Driver) (1) (p. 153) q; Checking supplied accessories Make sure that the following accessories are supplied with your camcorder. 1 2 3 4 5 6 7 8 9 0 qa qs qd 1 AC-L20A AC power adaptor (1), the power cord (1) (p. 18) 2 NP-FF50 battery pack (1)..., 85) 4 Wireless Remote Commander (1) (p. 212) 5 Size AA (R6) batteries for MICROMV) (1) (p. 152) qa Battery terminal cover (1) (p. 17) qs Cleaning cloth (1) (p. 202) qd Stylus (1) (DCR-IP55 only) Contents of the recording cannot be compensated if recording or playback is not made due ...
...103) 8 USB cable (1) (p. 155) 9 CD-ROM (SPVD-008 USB Driver) (1) (p. 153) q; Checking supplied accessories Make sure that the following accessories are supplied with your camcorder. 1 2 3 4 5 6 7 8 9 0 qa qs qd 1 AC-L20A AC power adaptor (1), the power cord (1) (p. 18) 2 NP-FF50 battery pack (1)..., 85) 4 Wireless Remote Commander (1) (p. 212) 5 Size AA (R6) batteries for MICROMV) (1) (p. 152) qa Battery terminal cover (1) (p. 17) qs Cleaning cloth (1) (p. 202) qd Stylus (1) (DCR-IP55 only) Contents of the recording cannot be compensated if recording or playback is not made due ...

Operating Instructions
Page 22
... month, the day, the hour and the minute. (1) Set the POWER switch to CAMERA or MEMORY/NETWORK (DCR-IP55 only). In this case, charge the built-in rechargeable battery, then set your area is in your camcorder for the first time. r R EXEC 6R r CLOCK SET AREA26 R GMT NewYork, Bogota r DST OFF ...Setting the date and time Set the date and time when you use your camcorder will be displayed each time you set the POWER switch to CAMERA or MEMORY/ NETWORK (DCR-IP55 only) unless you do not use your camcorder for about three months, the date and time settings may be released (...
... month, the day, the hour and the minute. (1) Set the POWER switch to CAMERA or MEMORY/NETWORK (DCR-IP55 only). In this case, charge the built-in rechargeable battery, then set your area is in your camcorder for the first time. r R EXEC 6R r CLOCK SET AREA26 R GMT NewYork, Bogota r DST OFF ...Setting the date and time Set the date and time when you use your camcorder will be displayed each time you set the POWER switch to CAMERA or MEMORY/ NETWORK (DCR-IP55 only) unless you do not use your camcorder for about three months, the date and time settings may be released (...
Operating Instructions
Page 27
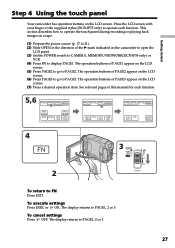
... (1) Prepare the power source (p. 17 to 21). (2) Slide OPEN in the direction of PAGE2 appear on the camcorder to open the LCD panel. (3) Set the POWER switch to CAMERA, MEMORY/NETWORK(DCR-IP55 only) or VCR. (4) Press FN to PAGE2. The display returns to PAGE3. The operation buttons of the B...on the LCD screen. Getting started Step 4 Using the touch panel Your camcorder has operation buttons on the LCD screen. (7) Press a desired operation item. Press the LCD screen with your finger or the supplied stylus (DCR-IP55 only) to operate each function. 5,6 PAGE1 PAGE2 PAGE3 EXIT SPOT FOCUS ...
... (1) Prepare the power source (p. 17 to 21). (2) Slide OPEN in the direction of PAGE2 appear on the camcorder to open the LCD panel. (3) Set the POWER switch to CAMERA, MEMORY/NETWORK(DCR-IP55 only) or VCR. (4) Press FN to PAGE2. The display returns to PAGE3. The operation buttons of the B...on the LCD screen. Getting started Step 4 Using the touch panel Your camcorder has operation buttons on the LCD screen. (7) Press a desired operation item. Press the LCD screen with your finger or the supplied stylus (DCR-IP55 only) to operate each function. 5,6 PAGE1 PAGE2 PAGE3 EXIT SPOT FOCUS ...
Operating Instructions
Page 28
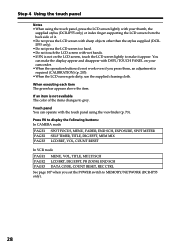
...the touch panel using the touch panel, press the LCD screen lightly with your camcorder. •When the operation buttons do not work even if you set the ...appear and disappear with DSPL/TOUCH PANEL on the LCD screen, touch the LCD screen lightly to MEMORY/NETWORK (DCR-IP55 only). 28 Press FN to display the following buttons: In CAMERA mode PAGE1 PAGE2 PAGE3 SPOT FOCUS, MENU...CTRL See page 107 when you press them, an adjustment is not on your thumb, the supplied stylus (DCR-IP55 only) or index finger supporting the LCD screen from the back side of the items changes to grey. Step...
...the touch panel using the touch panel, press the LCD screen lightly with your camcorder. •When the operation buttons do not work even if you set the ...appear and disappear with DSPL/TOUCH PANEL on the LCD screen, touch the LCD screen lightly to MEMORY/NETWORK (DCR-IP55 only). 28 Press FN to display the following buttons: In CAMERA mode PAGE1 PAGE2 PAGE3 SPOT FOCUS, MENU...CTRL See page 107 when you press them, an adjustment is not on your thumb, the supplied stylus (DCR-IP55 only) or index finger supporting the LCD screen from the back side of the items changes to grey. Step...
Operating Instructions
Page 32
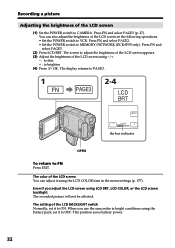
Even if you use the camcorder in bright conditions using the LCD COLOR item in the following operations. • Set the POWER switch to ON. Press FN and select PAGE3 (p. 27). ... also adjust the brightness of the LCD BACKLIGHT switch Normally, set it to VCR. LCD BRT + the bar indicator OPEN To return to MEMORY/NETWORK (DCR-IP55 only). This position saves battery power. 32 Press FN and select PAGE2. • Set the POWER switch to FN Press EXIT. The screen to adjust...
Even if you use the camcorder in bright conditions using the LCD COLOR item in the following operations. • Set the POWER switch to ON. Press FN and select PAGE3 (p. 27). ... also adjust the brightness of the LCD BACKLIGHT switch Normally, set it to VCR. LCD BRT + the bar indicator OPEN To return to MEMORY/NETWORK (DCR-IP55 only). This position saves battery power. 32 Press FN and select PAGE2. • Set the POWER switch to FN Press EXIT. The screen to adjust...
Operating Instructions
Page 33
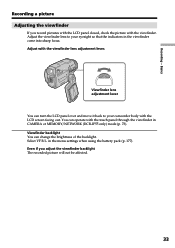
... adjustment lever. Viewfinder lens adjustment lever You can turn the LCD panel over and move it back to your camcorder body with the touch panel through the viewfinder in CAMERA or MEMORY/NETWORK (DCR-IP55 only) mode (p. 73). Recording - Viewfinder backlight You can operate with the LCD screen facing out. You can change...
... adjustment lever. Viewfinder lens adjustment lever You can turn the LCD panel over and move it back to your camcorder body with the touch panel through the viewfinder in CAMERA or MEMORY/NETWORK (DCR-IP55 only) mode (p. 73). Recording - Viewfinder backlight You can operate with the LCD screen facing out. You can change...

Operating Instructions
Page 34
...in the menu settings. When you shoot close to a subject If you move the power zoom lever to MEMORY/NETWORK (DCR-IP55 only) You cannot use the digital zoom. 34 Digital zoom •Digital zoom starts to OFF in the default setting (p. 176). Recording a picture Using the zoom feature Move the power zoom...in better-looking recordings. You can shoot a subject that is sharp. To zoom greater than 10× Zoom greater than 10× is performed digitally. •The picture quality deteriorates as you cannot get a sharp focus, move the power zoom lever toward the "T" side. Up to 20x or...
...in the menu settings. When you shoot close to a subject If you move the power zoom lever to MEMORY/NETWORK (DCR-IP55 only) You cannot use the digital zoom. 34 Digital zoom •Digital zoom starts to OFF in the default setting (p. 176). Recording a picture Using the zoom feature Move the power zoom...in better-looking recordings. You can shoot a subject that is sharp. To zoom greater than 10× Zoom greater than 10× is performed digitally. •The picture quality deteriorates as you cannot get a sharp focus, move the power zoom lever toward the "T" side. Up to 20x or...
Operating Instructions
Page 35
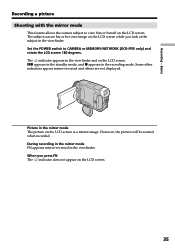
Basics Recording a picture Shooting with the mirror mode This feature allows the camera subject to CAMERA or MEMORY/NETWORK (DCR-IP55 only) and rotate the LCD screen 180 degrees. Xz appears in the standby mode, and z appears in the viewfinder and on the LCD screen. Set ...
Basics Recording a picture Shooting with the mirror mode This feature allows the camera subject to CAMERA or MEMORY/NETWORK (DCR-IP55 only) and rotate the LCD screen 180 degrees. Xz appears in the standby mode, and z appears in the viewfinder and on the LCD screen. Set ...
Operating Instructions
Page 37
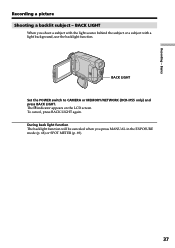
BACK LIGHT Set the POWER switch to CAMERA or MEMORY/NETWORK (DCR-IP55 only) and press BACK LIGHT. BACK LIGHT When you press MANUAL in the EXPOSURE mode (p. 68) or SPOT METER (p. 69). 37 To cancel, press BACK LIGHT again. During back light function The backlight function will be canceled when you shoot a subject with the light source behind the subject or a subject with a light background, use the backlight function. The . Recording - indicator appears on the LCD screen. Basics Recording a picture Shooting a backlit subject -
BACK LIGHT Set the POWER switch to CAMERA or MEMORY/NETWORK (DCR-IP55 only) and press BACK LIGHT. BACK LIGHT When you press MANUAL in the EXPOSURE mode (p. 68) or SPOT METER (p. 69). 37 To cancel, press BACK LIGHT again. During back light function The backlight function will be canceled when you shoot a subject with the light source behind the subject or a subject with a light background, use the backlight function. The . Recording - indicator appears on the LCD screen. Basics Recording a picture Shooting a backlit subject -
Operating Instructions
Page 38
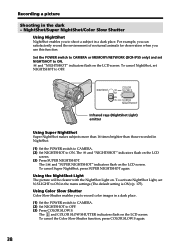
... and COLOR SLOW SHUTTER indicators flash on the LCD screen. Recording a picture Shooting in a dark place. Set the POWER switch to CAMERA or MEMORY/NETWORK (DCR-IP55 only) and set N.S.LIGHT to ON. Using Color Slow Shutter Color Slow Shutter enables you to record color images in a dark place. (1) Set the POWER...
... and COLOR SLOW SHUTTER indicators flash on the LCD screen. Recording a picture Shooting in a dark place. Set the POWER switch to CAMERA or MEMORY/NETWORK (DCR-IP55 only) and set N.S.LIGHT to ON. Using Color Slow Shutter Color Slow Shutter enables you to record color images in a dark place. (1) Set the POWER...
Operating Instructions
Page 39
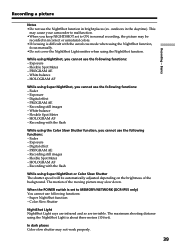
... slow down. Super NightShot function - Basics Recording a picture Notes •Do not use the following functions: - PROGRAM AE - Digital effect - Fader - Digital effect - PROGRAM AE - The motion of the background. HOLOGRAM AF - Recording with the autofocus mode when using the NightShot function,... and so are invisible. White balance - Recording still images - In dark places Color slow shutter may cause your camcorder to MEMORY/NETWORK (DCR-IP55 only) You cannot use the following functions: - This may not work properly. 39 Flexble Spot Meter - HOLOGRAM ...
... slow down. Super NightShot function - Basics Recording a picture Notes •Do not use the following functions: - PROGRAM AE - Digital effect - Fader - Digital effect - PROGRAM AE - The motion of the background. HOLOGRAM AF - Recording with the autofocus mode when using the NightShot function,... and so are invisible. White balance - Recording still images - In dark places Color slow shutter may cause your camcorder to MEMORY/NETWORK (DCR-IP55 only) You cannot use the following functions: - This may not work properly. 39 Flexble Spot Meter - HOLOGRAM ...