

Camera Operations Guide
Page 4
...camcorder, extend its viewfinder. • Be careful not to malfunction. However, there may be some tiny black points and/ or bright points (white, red, blue, or green in low light conditions, such as at the sun. Take pictures of recordings cannot be copyrighted. Viewfinder LCD panel Battery pack Flash (DCR... the LCD screen, the viewfinder, or the lens to support it. Note on your camcorder if necessary (p. 22). Unauthorized recording of the camcorder, storage media, etc. • TV color systems differ depending on the screen. Notes on using a digital still camera, and thus ...
...camcorder, extend its viewfinder. • Be careful not to malfunction. However, there may be some tiny black points and/ or bright points (white, red, blue, or green in low light conditions, such as at the sun. Take pictures of recordings cannot be copyrighted. Viewfinder LCD panel Battery pack Flash (DCR... the LCD screen, the viewfinder, or the lens to support it. Note on your camcorder if necessary (p. 22). Unauthorized recording of the camcorder, storage media, etc. • TV color systems differ depending on the screen. Notes on using a digital still camera, and thus ...
Camera Operations Guide
Page 5
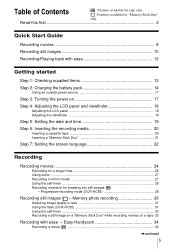
...Getting started Step 1: Checking supplied items 13 Step 2: Charging the battery pack 14 Using an outside power source 17 Step 3: Turning the power on 17 Step 4: Adjusting the LCD panel and viewfinder 18 Adjusting the LCD panel 18 Adjusting the viewfinder 18 Step 5: Setting the date and time 19 Step 6: ... images 10 Recording/Playing back with ease - Table of Contents : Features available for tape only. : Features available for breaking into still images - Easy Handycam 34 Recording a movie 34 ,continued 5 Progressive recording mode (DCR-HC85 28 Recording still images -
...Getting started Step 1: Checking supplied items 13 Step 2: Charging the battery pack 14 Using an outside power source 17 Step 3: Turning the power on 17 Step 4: Adjusting the LCD panel and viewfinder 18 Adjusting the LCD panel 18 Adjusting the viewfinder 18 Step 5: Setting the date and time 19 Step 6: ... images 10 Recording/Playing back with ease - Table of Contents : Features available for tape only. : Features available for breaking into still images - Easy Handycam 34 Recording a movie 34 ,continued 5 Progressive recording mode (DCR-HC85 28 Recording still images -

Camera Operations Guide
Page 8
... the back of the slides back in the direction of the arrow to the camcorder. b Insert the cassette with c Press . b Slide the battery pack in by itself. its window-side facing Close the cassette lid after up the viewfinder. a Slide the OPEN/ EJECT lever in the direction of the arrow until it clicks...
... the back of the slides back in the direction of the arrow to the camcorder. b Insert the cassette with c Press . b Slide the battery pack in by itself. its window-side facing Close the cassette lid after up the viewfinder. a Slide the OPEN/ EJECT lever in the direction of the arrow until it clicks...
Camera Operations Guide
Page 10
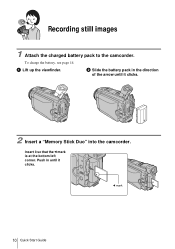
Insert it clicks. Recording still images 1 Attach the charged battery pack to the camcorder. a Lift up the viewfinder. b Slide the battery pack in until it clicks. 2 Insert a "Memory Stick Duo" into the camcorder. b mark 10 Quick Start Guide To charge the battery, see page 14. Push in the direction of the arrow until it so that the b mark is at the bottom left corner.
Insert it clicks. Recording still images 1 Attach the charged battery pack to the camcorder. a Lift up the viewfinder. b Slide the battery pack in until it clicks. 2 Insert a "Memory Stick Duo" into the camcorder. b mark 10 Quick Start Guide To charge the battery, see page 14. Push in the direction of the arrow until it so that the b mark is at the bottom left corner.
Camera Operations Guide
Page 14
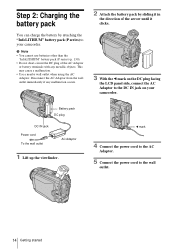
... Adaptor. 5 Connect the power cord to the DC IN jack on your camcorder. Battery pack DC plug DC IN jack Power cord To the wall outlet AC Adaptor 1 Lift up the viewfinder. b Note • You cannot use batteries other than the "InfoLITHIUM" battery pack (P series) (p. 130). • Do not short-circuit the DC plug of...
... Adaptor. 5 Connect the power cord to the DC IN jack on your camcorder. Battery pack DC plug DC IN jack Power cord To the wall outlet AC Adaptor 1 Lift up the viewfinder. b Note • You cannot use batteries other than the "InfoLITHIUM" battery pack (P series) (p. 130). • Do not short-circuit the DC plug of...
Camera Operations Guide
Page 15
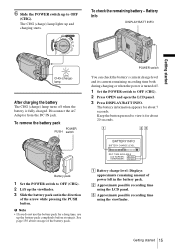
... b Note • If you do not use up the viewfinder. 3 Slide the battery pack out in the battery pack. C Approximate possible recording time using the LCD panel. Getting started CHG (charge) lamp After charging the battery The CHG (charge) lamp turns off . 1 Set the ...OPEN and open the LCD panel. 3 Press DISPLAY/BATT INFO. Battery Info DISPLAY/BATT INFO Getting started 15 BATTERY INFO BATTERY CHARGE LEVEL 0% 50% 100% REC TIME AVAILABLE LCD SCREEN: 54 min VIEWFINDER: 72 min A Battery charge level: Displays approximate remaining amount of power left in the...
... b Note • If you do not use up the viewfinder. 3 Slide the battery pack out in the battery pack. C Approximate possible recording time using the LCD panel. Getting started CHG (charge) lamp After charging the battery The CHG (charge) lamp turns off . 1 Set the ...OPEN and open the LCD panel. 3 Press DISPLAY/BATT INFO. Battery Info DISPLAY/BATT INFO Getting started 15 BATTERY INFO BATTERY CHARGE LEVEL 0% 50% 100% REC TIME AVAILABLE LCD SCREEN: 54 min VIEWFINDER: 72 min A Battery charge level: Displays approximate remaining amount of power left in the...
Camera Operations Guide
Page 16
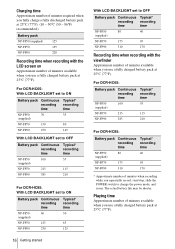
... time when recording with the LCD screen on Approximate number of minutes available when you use a fully charged battery pack at 25°C (77°F). For DCR-HC65: Battery pack Continuous Typical* recording recording time time NP-FP50 100 55 (supplied) NP-FP70 215 115 NP-FP90...required when you fully charge a fully discharged battery pack at 25°C (77°F). (10 - 30°C (50 - 86°F) recommended.) Battery pack NP-FP50 (supplied) 125 NP-FP70 155 NP-FP90 220 Recording time when recording with the viewfinder Approximate number of minutes available when you ...
... time when recording with the LCD screen on Approximate number of minutes available when you use a fully charged battery pack at 25°C (77°F). For DCR-HC65: Battery pack Continuous Typical* recording recording time time NP-FP50 100 55 (supplied) NP-FP70 215 115 NP-FP90...required when you fully charge a fully discharged battery pack at 25°C (77°F). (10 - 30°C (50 - 86°F) recommended.) Battery pack NP-FP50 (supplied) 125 NP-FP70 155 NP-FP90 220 Recording time when recording with the viewfinder Approximate number of minutes available when you ...
Camera Operations Guide
Page 18
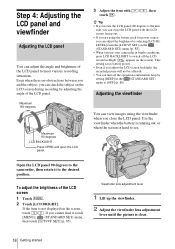
...the LCD screen facing out. • If you are obstructions between you and the subject, you close the LCD panel. Adjusting the viewfinder You can view images using the battery pack for power source, you can adjust the brightness by selecting [LCD BL LEVEL] from the [LCD/VF SET] on the ... cannot find it to the desired position. If you use your camcorder in the (STANDARD SET) menu to see. To adjust the brightness of the LCD screen 1 Touch . 2 Touch [LCD BRIGHT]. Step 4: Adjusting the LCD panel and viewfinder Adjusting the LCD panel You can adjust the angle and brightness of...
...the LCD screen facing out. • If you are obstructions between you and the subject, you close the LCD panel. Adjusting the viewfinder You can view images using the battery pack for power source, you can adjust the brightness by selecting [LCD BL LEVEL] from the [LCD/VF SET] on the ... cannot find it to the desired position. If you use your camcorder in the (STANDARD SET) menu to see. To adjust the brightness of the LCD screen 1 Touch . 2 Touch [LCD BRIGHT]. Step 4: Adjusting the LCD panel and viewfinder Adjusting the LCD panel You can adjust the angle and brightness of...

Camera Operations Guide
Page 19
...while checking the image on the viewfinder. Getting started 19 Step 5: Setting the date and time Set the date and time when using the battery pack, p. 85). SURE 1/3 FADER SPOT FOCUS SPOT PRGRAM METER AE ,continued Getting started To use your camcorder for about 3 months, the built...-in rechargeable button-type battery gets discharged and the date and time settings may be cleared from the memory. are using this camcorder for the first time. 3 Touch . 60min MENU -:--:-- If you do not use the viewfinder during operation When you are recording on a...
...while checking the image on the viewfinder. Getting started 19 Step 5: Setting the date and time Set the date and time when using the battery pack, p. 85). SURE 1/3 FADER SPOT FOCUS SPOT PRGRAM METER AE ,continued Getting started To use your camcorder for about 3 months, the built...-in rechargeable button-type battery gets discharged and the date and time settings may be cleared from the memory. are using this camcorder for the first time. 3 Touch . 60min MENU -:--:-- If you do not use the viewfinder during operation When you are recording on a...

Camera Operations Guide
Page 85
...the brightness of the LCD screen's backlight. To brighten the viewfinder screen. ,continued Using the Menu 85 LCD COLOR Touch / to brighten the LCD screen. However, you cannot record a dual sound track on this camcorder. AUDIO MIX You can play back a dual sound track ... When you disconnect the power source from your camcorder for details. b Note • You cannot adjust sound recorded in 16 bit audio mode. • Only the originally recorded sound will not be heard when you select [BRIGHT], battery life is automatically selected for more than 5 minutes...
...the brightness of the LCD screen's backlight. To brighten the viewfinder screen. ,continued Using the Menu 85 LCD COLOR Touch / to brighten the LCD screen. However, you cannot record a dual sound track on this camcorder. AUDIO MIX You can play back a dual sound track ... When you disconnect the power source from your camcorder for details. b Note • You cannot adjust sound recorded in 16 bit audio mode. • Only the originally recorded sound will not be heard when you select [BRIGHT], battery life is automatically selected for more than 5 minutes...

Camera Operations Guide
Page 88
... when you do not operate your camcorder, the camcorder is automatically turned off to prevent the battery from becoming consumed. GLCD PANEL V-OUT/PANEL Select to show the displays such as the time code on the TV screen, LCD screen, and in the viewfinder. MENU ROTATE You can select the... scrolling direction (up or down) of the melody. Select to sound a beep instead of the menu items on your camcorder to the wall outlet, [A.SHUT OFF] is selected. When approximately...
... when you do not operate your camcorder, the camcorder is automatically turned off to prevent the battery from becoming consumed. GLCD PANEL V-OUT/PANEL Select to show the displays such as the time code on the TV screen, LCD screen, and in the viewfinder. MENU ROTATE You can select the... scrolling direction (up or down) of the melody. Select to sound a beep instead of the menu items on your camcorder to the wall outlet, [A.SHUT OFF] is selected. When approximately...

Camera Operations Guide
Page 113
...problem Overall operations persists, remove the power source and contact your Sony dealer. cAttach a charged battery pack to the camcorder. (p. 14) cUse the AC Adaptor to connect to the wall outlet. (p. 17) The camcorder does not operate even when the power is activated. polarities ...correctly matching the + - Troubleshooting Troubleshooting 113 cSet [REMOTE CTRL] on the LCD screen or the viewfinder...
...problem Overall operations persists, remove the power source and contact your Sony dealer. cAttach a charged battery pack to the camcorder. (p. 14) cUse the AC Adaptor to connect to the wall outlet. (p. 17) The camcorder does not operate even when the power is activated. polarities ...correctly matching the + - Troubleshooting Troubleshooting 113 cSet [REMOTE CTRL] on the LCD screen or the viewfinder...

Camera Operations Guide
Page 115
...Handycam operation. (p. 34, 54) The buttons do not work at all. cPress DISPLAY/BATT INFO (or DISPLAY on the Remote Commander). (p. 57) The buttons on the touch panel do not cAdjust the screen ([CALIBRATION]). (p. 134) work correctly or do not appear on the screen. • The camcorder is in the viewfinder... Troubleshooting 115 The remaining tape indicator is automatically displayed when you disconnect the AC Adaptor from the wall outlet or remove the battery pack without inserting a cassette and "Memory Stick Duo.") cTouch on the screen are larger than usual, or the menu settings...
...Handycam operation. (p. 34, 54) The buttons do not work at all. cPress DISPLAY/BATT INFO (or DISPLAY on the Remote Commander). (p. 57) The buttons on the touch panel do not cAdjust the screen ([CALIBRATION]). (p. 134) work correctly or do not appear on the screen. • The camcorder is in the viewfinder... Troubleshooting 115 The remaining tape indicator is automatically displayed when you disconnect the AC Adaptor from the wall outlet or remove the battery pack without inserting a cassette and "Memory Stick Duo.") cTouch on the screen are larger than usual, or the menu settings...
Camera Operations Guide
Page 121
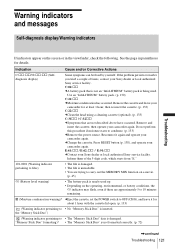
Press RESET button (p. 138), and operate your Sony dealer or local authorized Sony service facility. If the problem persists even after you tried a couple of the 5-digit code, which starts from "E." 101-0001 (Warning indicator pertaining to files) • The file is damaged. • The...up. • Depending on the operating, environmental, or battery conditions, the E indicator may flash, even if there are not described above have occurred. See the page in the viewfinder, check the following. Inform them of times, contact your camcorder for at least 1 hour, then re-insert the ...
Press RESET button (p. 138), and operate your Sony dealer or local authorized Sony service facility. If the problem persists even after you tried a couple of the 5-digit code, which starts from "E." 101-0001 (Warning indicator pertaining to files) • The file is damaged. • The...up. • Depending on the operating, environmental, or battery conditions, the E indicator may flash, even if there are not described above have occurred. See the page in the viewfinder, check the following. Inform them of times, contact your camcorder for at least 1 hour, then re-insert the ...
Camera Operations Guide
Page 132
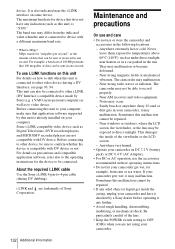
...have any indication (such as Digital Televisions, DVD recorders/players, and MICROMV recorders/players are not using your camcorder and have it checked by a Sony dealer before operating it any...shock. Near strong magnetic fields or mechanical vibration. The camcorder may be connected. Anywhere very humid. • Operate your camcorder get inside of the viewfinder or the LCD screen. - device. The baud ... sent in these operating instructions. • Do not let your camcorder on how to dub when this unit For details on DC 7.2 V (battery pack) or DC 8.4 V (AC Adaptor). • For...
...have any indication (such as Digital Televisions, DVD recorders/players, and MICROMV recorders/players are not using your camcorder and have it checked by a Sony dealer before operating it any...shock. Near strong magnetic fields or mechanical vibration. The camcorder may be connected. Anywhere very humid. • Operate your camcorder get inside of the viewfinder or the LCD screen. - device. The baud ... sent in these operating instructions. • Do not let your camcorder on how to dub when this unit For details on DC 7.2 V (battery pack) or DC 8.4 V (AC Adaptor). • For...
Camera Operations Guide
Page 135
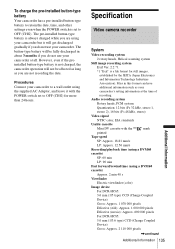
... (CHG). However, even if the preinstalled button-type battery is not charged, the camcorder operation will not be fully discharged in this format can have additional information such as you do not use your camcorder but it with the mark printed Tape speed SP: Approx.... 18.81 mm/s LP: Approx. 12.56 mm/s Recording/playback time (using a DVM60 cassette) SP: 60 min LP: 90 min Fast forward/rewind time (using a DVM60 cassette) Approx. 2 min 40 s Viewfinder Electric viewfinder (color) Image device For DCR-HC65...
... (CHG). However, even if the preinstalled button-type battery is not charged, the camcorder operation will not be fully discharged in this format can have additional information such as you do not use your camcorder but it with the mark printed Tape speed SP: Approx.... 18.81 mm/s LP: Approx. 12.56 mm/s Recording/playback time (using a DVM60 cassette) SP: 60 min LP: 90 min Fast forward/rewind time (using a DVM60 cassette) Approx. 2 min 40 s Viewfinder Electric viewfinder (color) Image device For DCR-HC65...

Camera Operations Guide
Page 136
...Zeiss Vario-Sonnar T* Combined power zoom lens Filter diameter: 37 mm (1 1/2 in.) 10 × (Optical), 120 × (Digital) F = 1.8 ~ 2.1 Focal length For DCR-HC65: 3.2 - 32 mm (5/32 - 1 5/16 in.) When converted to a 35 mm still camera In CAMERA-TAPE: 46 -...) General Power requirements DC 7.2 V (battery pack) DC 8.4 V (AC Adaptor) Average power consumption (when using the battery pack) For DCR-HC65: During camera recording using the viewfinder 2.7 W During camera recording using the LCD 3.8 W For DCR-HC85: During camera recording using the viewfinder 3.3 W During camera recording using the LCD...
...Zeiss Vario-Sonnar T* Combined power zoom lens Filter diameter: 37 mm (1 1/2 in.) 10 × (Optical), 120 × (Digital) F = 1.8 ~ 2.1 Focal length For DCR-HC65: 3.2 - 32 mm (5/32 - 1 5/16 in.) When converted to a 35 mm still camera In CAMERA-TAPE: 46 -...) General Power requirements DC 7.2 V (battery pack) DC 8.4 V (AC Adaptor) Average power consumption (when using the battery pack) For DCR-HC65: During camera recording using the viewfinder 2.7 W During camera recording using the LCD 3.8 W For DCR-HC85: During camera recording using the viewfinder 3.3 W During camera recording using the LCD...

Camera Operations Guide
Page 138
... (p. 34, 54) L Viewfinder (p. 4, 18) M "Memory Stick Duo" slot (p. 21) N Access lamp (p. 21, 128) O Battery pack (p. 14) P For DCR-HC65: CHG (charge) lamp For DCR-HC85: flash charge indicator /CHG (charge) lamp (p. 14) Q DC IN jack (p. 14) * This button is not available during Easy Handycam operation(zmark). 138 Quick Reference Quick Reference Identifying parts and controls Camcorder 1 2 3 4 5 6 7 8 A Lens...
... (p. 34, 54) L Viewfinder (p. 4, 18) M "Memory Stick Duo" slot (p. 21) N Access lamp (p. 21, 128) O Battery pack (p. 14) P For DCR-HC65: CHG (charge) lamp For DCR-HC85: flash charge indicator /CHG (charge) lamp (p. 14) Q DC IN jack (p. 14) * This button is not available during Easy Handycam operation(zmark). 138 Quick Reference Quick Reference Identifying parts and controls Camcorder 1 2 3 4 5 6 7 8 A Lens...

Camera Operations Guide
Page 140
... peripherals connected to it takes precedence. 1 9 2 3 4 q; 5 qa 6 qs 7 qd 8 qf qg A PHOTO button (p. 29) B CAMERA-TAPE, CAMERAMEMORY, PLAY/EDIT mode lamps (p. 17) C Viewfinder lens adjustment lever (p. 18) D PUSH (battery release) button (p. 14) E POWER switch (p. 17) F REC START/STOP button (p. 24, 50) G DV Interface H (USB) jack I NIGHTSHOT PLUS switch (p. 39) J i (headphones) jack (green...
... peripherals connected to it takes precedence. 1 9 2 3 4 q; 5 qa 6 qs 7 qd 8 qf qg A PHOTO button (p. 29) B CAMERA-TAPE, CAMERAMEMORY, PLAY/EDIT mode lamps (p. 17) C Viewfinder lens adjustment lever (p. 18) D PUSH (battery release) button (p. 14) E POWER switch (p. 17) F REC START/STOP button (p. 24, 50) G DV Interface H (USB) jack I NIGHTSHOT PLUS switch (p. 39) J i (headphones) jack (green...
Camera Operations Guide
Page 144
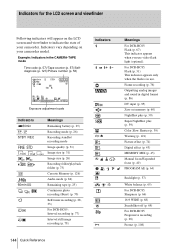
...) Q Z 9 . Indicators for the LCD screen and viewfinder Following indicators will appear on your camcorder. Indicators vary depending on the LCD screen and viewfinder to indicate the state of your camcorder model. n - 144 Quick Reference Meanings For DCR-HC65: Flash (p. 67) This indicator appears when you use . Example: Indicators in digital format (p. 86) DV input (p. 95) Zero set...
...) Q Z 9 . Indicators for the LCD screen and viewfinder Following indicators will appear on your camcorder. Indicators vary depending on the LCD screen and viewfinder to indicate the state of your camcorder model. n - 144 Quick Reference Meanings For DCR-HC65: Flash (p. 67) This indicator appears when you use . Example: Indicators in digital format (p. 86) DV input (p. 95) Zero set...


