
Camera Operations Guide
Page 3
... to radio or television reception, which the receiver is based on the countries/ regions. DCR-HC Serial No. Reorient or relocate the receiving antenna. - Notes on using this manual... direction, the terminal may be copyrighted. Consult a Sony dealer or an experienced radio/TV technician for a Class B digital device, pursuant to operate this equipment. The supplied ...the viewfinder are manufactured using a digital still camera, and thus may cause malfunctions. Increase the separation between the equipment and receiver. - To view your camcorder. These points are marked with ...
... to radio or television reception, which the receiver is based on the countries/ regions. DCR-HC Serial No. Reorient or relocate the receiving antenna. - Notes on using this manual... direction, the terminal may be copyrighted. Consult a Sony dealer or an experienced radio/TV technician for a Class B digital device, pursuant to operate this equipment. The supplied ...the viewfinder are manufactured using a digital still camera, and thus may cause malfunctions. Increase the separation between the equipment and receiver. - To view your camcorder. These points are marked with ...

Camera Operations Guide
Page 4
... the following illustration. Then, touch the buttons displayed on the screen. • Unavailable buttons will be used for screen display on your camcorder correctly. • You can also use the Strap Belt as shown in the following parts. • If the Strap Belt is too long, ... the button on the Strap Belt, see page 94. For details on the LCD screen. 4 Battery pack • When you are using the camcorder • Hold your camcorder (p. 20). • Be careful not to be grayed out. Viewfinder LCD panel • You can change the language to press buttons beside the...
... the following illustration. Then, touch the buttons displayed on the screen. • Unavailable buttons will be used for screen display on your camcorder correctly. • You can also use the Strap Belt as shown in the following parts. • If the Strap Belt is too long, ... the button on the Strap Belt, see page 94. For details on the LCD screen. 4 Battery pack • When you are using the camcorder • Hold your camcorder (p. 20). • Be careful not to be grayed out. Viewfinder LCD panel • You can change the language to press buttons beside the...

Camera Operations Guide
Page 7
...51 Using the (CM SET) menu - WORLD TIME, etc 60 Troubleshooting Troubleshooting 72 Warning indicators and messages .....78 Additional Information Using your camcorder abroad 81 Usable cassette tapes 82 About the "InfoLITHIUM" battery pack 83 About i.LINK 85 Maintenance and precautions 86 Specification 89 Quick Reference... Camcorder Changing the menu settings 43 Using the (MANUAL SET) menu - D ZOOM/16:9WIDE, etc 47 Using the (VCR SET) menu - TITLE/TAPE TITLE/ERASE ALL, etc 52 Using the (TAPE SET) menu - CLOCK SET/USB STREAM/ LANGUAGE, etc 58 Using the (OTHERS) menu - Digital...
...51 Using the (CM SET) menu - WORLD TIME, etc 60 Troubleshooting Troubleshooting 72 Warning indicators and messages .....78 Additional Information Using your camcorder abroad 81 Usable cassette tapes 82 About the "InfoLITHIUM" battery pack 83 About i.LINK 85 Maintenance and precautions 86 Specification 89 Quick Reference... Camcorder Changing the menu settings 43 Using the (MANUAL SET) menu - D ZOOM/16:9WIDE, etc 47 Using the (VCR SET) menu - TITLE/TAPE TITLE/ERASE ALL, etc 52 Using the (TAPE SET) menu - CLOCK SET/USB STREAM/ LANGUAGE, etc 58 Using the (OTHERS) menu - Digital...
Camera Operations Guide
Page 8
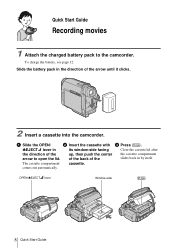
... lever in its window-side facing Close the cassette lid after the direction of the arrow until it clicks. 2 Insert a cassette into the camcorder. OPEN/ZEJECT lever Window-side 8 Quick Start Guide To charge the battery, see page 12. of the back of the slides back in ...the direction of the up, then push the center the cassette compartment arrow to the camcorder. comes out automatically. Quick Start Guide Recording movies 1 Attach the charged battery pack to open the lid. a Slide the OPEN/ b Insert the cassette with...
... lever in its window-side facing Close the cassette lid after the direction of the arrow until it clicks. 2 Insert a cassette into the camcorder. OPEN/ZEJECT lever Window-side 8 Quick Start Guide To charge the battery, see page 12. of the back of the slides back in ...the direction of the up, then push the center the cassette compartment arrow to the camcorder. comes out automatically. Quick Start Guide Recording movies 1 Attach the charged battery pack to open the lid. a Slide the OPEN/ b Insert the cassette with...

Camera Operations Guide
Page 11
A/V connecting cable (1) USB cable (1) Rechargeable battery pack NP-FP50 (1) CD-ROM "SPVD-012 USB Driver" (1) Getting started Power cord (1) Wireless Remote Commander (1) A button-type lithium battery is already installed. The number in parentheses indicates the number of that item supplied. Camera Operations Guide (This manual) (1) Computer Applications Guide (1) Getting started 11 Getting started Step 1: Checking supplied items Make sure you have following items supplied with your camcorder. AC Adaptor (1) Cleaning cloth (1) Shoe cover (1) Attached to the camcorder.
A/V connecting cable (1) USB cable (1) Rechargeable battery pack NP-FP50 (1) CD-ROM "SPVD-012 USB Driver" (1) Getting started Power cord (1) Wireless Remote Commander (1) A button-type lithium battery is already installed. The number in parentheses indicates the number of that item supplied. Camera Operations Guide (This manual) (1) Computer Applications Guide (1) Getting started 11 Getting started Step 1: Checking supplied items Make sure you have following items supplied with your camcorder. AC Adaptor (1) Cleaning cloth (1) Shoe cover (1) Attached to the camcorder.

Camera Operations Guide
Page 12
... pack (P series) to the DC IN jack on the DC plug facing down, connect the AC Adaptor to your camcorder. Battery pack DC IN jack DC plug 2 With the v mark on your camcorder. Step 2: Charging the battery pack You can charge the battery by sliding it in the direction of the AC...
... pack (P series) to the DC IN jack on the DC plug facing down, connect the AC Adaptor to your camcorder. Battery pack DC IN jack DC plug 2 With the v mark on your camcorder. Step 2: Charging the battery pack You can charge the battery by sliding it in the direction of the AC...

Camera Operations Guide
Page 14
...discharged. (For Battery information only) Using an outside power source You can use a fully charged battery pack at 25°C (77°F). Connect your camcorder, even if its charge even when it while connected to the wall outlet via the AC Adaptor. Battery pack LCD panel opened* NP-FP50 125... time time NP-FP50 125 65 (supplied) NP-FP70 265 145 NP-FP90 475 260 * Approximate number of minutes available when you use your camcorder. Playing time Approximate number of minutes when recording while you do not want the battery to run out. When LCD BACKLIGHT is set to ON....
...discharged. (For Battery information only) Using an outside power source You can use a fully charged battery pack at 25°C (77°F). Connect your camcorder, even if its charge even when it while connected to the wall outlet via the AC Adaptor. Battery pack LCD panel opened* NP-FP50 125... time time NP-FP50 125 65 (supplied) NP-FP70 265 145 NP-FP90 475 260 * Approximate number of minutes available when you use your camcorder. Playing time Approximate number of minutes when recording while you do not want the battery to run out. When LCD BACKLIGHT is set to ON....

Camera Operations Guide
Page 15
... on You need to slide the POWER switch repeatedly to select the desired power mode to record or play or edit pictures. When using this camcorder for the desired power mode lights up to OFF (CHG), then set the LENS COVER switch to CLOSE.
... on You need to slide the POWER switch repeatedly to select the desired power mode to record or play or edit pictures. When using this camcorder for the desired power mode lights up to OFF (CHG), then set the LENS COVER switch to CLOSE.

Camera Operations Guide
Page 16
... PAGE2. LCD BACKLIGHT 3 Adjust the brightness with the LCD screen facing out. • If you are obstructions between you and the subject, you use your camcorder in bright conditions, set LCD BACKLIGHT to turn off the backlight for power source, you can adjust the brightness by adjusting the angle of the... screen is clear. 16 Getting started When the POWER switch is set [BEEP] to the desired position. Open the LCD panel 90 degrees to the camcorder, then rotate it to [OFF] on the (LCD/VF SET) menu (p. 51). • When you can view images using the battery pack for the ...
... PAGE2. LCD BACKLIGHT 3 Adjust the brightness with the LCD screen facing out. • If you are obstructions between you and the subject, you use your camcorder in bright conditions, set LCD BACKLIGHT to turn off the backlight for power source, you can adjust the brightness by adjusting the angle of the... screen is clear. 16 Getting started When the POWER switch is set [BEEP] to the desired position. Open the LCD panel 90 degrees to the camcorder, then rotate it to [OFF] on the (LCD/VF SET) menu (p. 51). • When you can view images using the battery pack for the ...

Camera Operations Guide
Page 17
... mode. (p. 15) 2 Extend the viewfinder, and close the LCD panel with / and touch . • FADER: Touch it repeatedly to step 7 when you turn on your camcorder. b Note • If you do not set the date and time, the CLOCK SET screen appears every time you set the date and time again.... POWER switch 1 Turn on your camcorder (p. 15). 2 Open the LCD panel. The LCD screen is turned off. 5 Touch the LCD screen while checking the display in rechargeable button-type battery gets...
... mode. (p. 15) 2 Extend the viewfinder, and close the LCD panel with / and touch . • FADER: Touch it repeatedly to step 7 when you turn on your camcorder. b Note • If you do not set the date and time, the CLOCK SET screen appears every time you set the date and time again.... POWER switch 1 Turn on your camcorder (p. 15). 2 Open the LCD panel. The LCD screen is turned off. 5 Touch the LCD screen while checking the display in rechargeable button-type battery gets...
Camera Operations Guide
Page 19
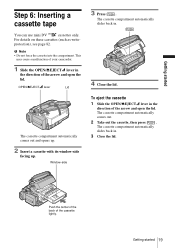
.... 2 Insert a cassette with its window-side facing up. Window-side 3 Press . Getting started 19 The cassette compartment automatically slides back in the direction of your camcorder. 1 Slide the OPEN/ZEJECT lever in . 4 Close the lid. Push the center of the back of the arrow and open the lid. The cassette compartment...
.... 2 Insert a cassette with its window-side facing up. Window-side 3 Press . Getting started 19 The cassette compartment automatically slides back in the direction of your camcorder. 1 Slide the OPEN/ZEJECT lever in . 4 Close the lid. Push the center of the back of the arrow and open the lid. The cassette compartment...

Camera Operations Guide
Page 20
... SET USB STREAM LANGUAGE DEMO MODE STBY ENGLISH ENG[SIMP] FRANÇAIS ESPANOL PORTUGUÊS EXEC RET. 20 Getting started z Tip • Your camcorder offers [ENG[SIMP]] (Simplified English) for when you cannot find your camcorder. 2 Open the LCD panel. 3 Touch to be used on your native tongue among the options.
... SET USB STREAM LANGUAGE DEMO MODE STBY ENGLISH ENG[SIMP] FRANÇAIS ESPANOL PORTUGUÊS EXEC RET. 20 Getting started z Tip • Your camcorder offers [ENG[SIMP]] (Simplified English) for when you cannot find your camcorder. 2 Open the LCD panel. 3 Touch to be used on your native tongue among the options.

Camera Operations Guide
Page 21
...with stereo sound. Camera recording lamp POWER switch LENS COVER switch REC START/STOP REC START/STOP z Tip • Performing Easy Handycam operation, even first time users can also record movies by pressing REC START/STOP beside the LCD screen. Recording Recording movies Before ... 60min REC 0:00:00 60min FN A Indicators for Cassette Memory cassettes B Remaining battery The indicated time may not be correct depending on your camcorder for recording from a low angle or recording yourself in "Getting started" (p. 11 - Date/time and the camera settings data (p. 37) ...
...with stereo sound. Camera recording lamp POWER switch LENS COVER switch REC START/STOP REC START/STOP z Tip • Performing Easy Handycam operation, even first time users can also record movies by pressing REC START/STOP beside the LCD screen. Recording Recording movies Before ... 60min REC 0:00:00 60min FN A Indicators for Cassette Memory cassettes B Remaining battery The indicated time may not be correct depending on your camcorder for recording from a low angle or recording yourself in "Getting started" (p. 11 - Date/time and the camera settings data (p. 37) ...

Camera Operations Guide
Page 22
... Tips • To ensure smooth transition on the screen (p. 37). The subject appears farther away (Wide angle). Recording in that point activate the digital zoom ([D ZOOM], p. 47). Do not remove the cassette. (The picture will automatically turn the power off to prevent battery loss ([A.SHUT OFF... To record closer view Move the power zoom lever towards W. The subject appears closer (Telephoto). Using zoom You can also utilize this camcorder. To record wider range of view Move the power zoom lever towards T. To restart recording, slide the POWER switch until the CAMERA ...
... Tips • To ensure smooth transition on the screen (p. 37). The subject appears farther away (Wide angle). Recording in that point activate the digital zoom ([D ZOOM], p. 47). Do not remove the cassette. (The picture will automatically turn the power off to prevent battery loss ([A.SHUT OFF... To record closer view Move the power zoom lever towards W. The subject appears closer (Telephoto). Using zoom You can also utilize this camcorder. To record wider range of view Move the power zoom lever towards T. To restart recording, slide the POWER switch until the CAMERA ...

Camera Operations Guide
Page 23
... the picture will hear a beep sound counting down Press REC START/STOP. appears. 60min STBY 0:00:00 Open the LCD panel 90 degrees to the camcorder, then rotate it 180 degrees towards the subject. Recording Extend the viewfinder. 3 Touch . A mirror-image of about 10 seconds.
... the picture will hear a beep sound counting down Press REC START/STOP. appears. 60min STBY 0:00:00 Open the LCD panel 90 degrees to the camcorder, then rotate it 180 degrees towards the subject. Recording Extend the viewfinder. 3 Touch . A mirror-image of about 10 seconds.

Camera Operations Guide
Page 25
... 20). Even first time users can record only movies. Recording 25 To cancel Easy Handycam operation Press EASY again. b Notes • You cannot switch from/to your camcorder. • You cannot use Easy Handycam operation together with ease - REC START/STOP REC START/STOP z Tip • ...When you touch MENU during Easy Handycam operation. EASY lights up to OFF (CHG), then set the...
... 20). Even first time users can record only movies. Recording 25 To cancel Easy Handycam operation Press EASY again. b Notes • You cannot switch from/to your camcorder. • You cannot use Easy Handycam operation together with ease - REC START/STOP REC START/STOP z Tip • ...When you touch MENU during Easy Handycam operation. EASY lights up to OFF (CHG), then set the...

Camera Operations Guide
Page 27
...; If keeps flashing even when you touch [ONE PUSH] 1 Frame a white object such as a piece of the recording environment. You brought your camcorder in a studio, under video lamps such as you disconnect the power source from inside the house, or vice versa. • Set [WHT BAL]... • When flashes slowly, the white balance is set to display [PAGE1]. 3 Touch [WHT BAL]. 4 Touch the desired effect. You bring your camcorder outdoors from outside. • Redo the [ONE PUSH] procedure when: - When you touch , set [EXPOSURE] to [ AUTO]. Adjusting the white balance ...
...; If keeps flashing even when you touch [ONE PUSH] 1 Frame a white object such as a piece of the recording environment. You brought your camcorder in a studio, under video lamps such as you disconnect the power source from inside the house, or vice versa. • Set [WHT BAL]... • When flashes slowly, the white balance is set to display [PAGE1]. 3 Touch [WHT BAL]. 4 Touch the desired effect. You bring your camcorder outdoors from outside. • Redo the [ONE PUSH] procedure when: - When you touch , set [EXPOSURE] to [ AUTO]. Adjusting the white balance ...

Camera Operations Guide
Page 32
... most recently recorded scene. b Note • The END SEARCH function will function even when you have played back the tape, for about 5 seconds, and the camcorder enters the standby mode at the point where you use a cassette with / , then touch [EXEC]. 5 Select [ON], then touch [EXEC]. 6 Touch . 7 Keep touching (to go...
... most recently recorded scene. b Note • The END SEARCH function will function even when you have played back the tape, for about 5 seconds, and the camcorder enters the standby mode at the point where you use a cassette with / , then touch [EXEC]. 5 Select [ON], then touch [EXEC]. 6 Touch . 7 Keep touching (to go...

Camera Operations Guide
Page 33
Then, your camcorder is set to display [PAGE1]. 3 Touch MENU. 4 Select (CAMERA SET), then select [EDITSEARCH] with / , then touch [EXEC]. 5 Select [ON], then touch [EXEC]. 6 Touch . 7 Touch once. The last few seconds of the most recently recorded scenes - Recording Reviewing the most recently recorded scene are played back. Recording 33 Rec review You can view a few seconds of the scene recorded just before you stopped the tape. 1 Slide the POWER switch to select the CAMERA mode. 2 Touch to the standby mode.
Then, your camcorder is set to display [PAGE1]. 3 Touch MENU. 4 Select (CAMERA SET), then select [EDITSEARCH] with / , then touch [EXEC]. 5 Select [ON], then touch [EXEC]. 6 Touch . 7 Touch once. The last few seconds of the most recently recorded scenes - Recording Reviewing the most recently recorded scene are played back. Recording 33 Rec review You can view a few seconds of the scene recorded just before you stopped the tape. 1 Slide the POWER switch to select the CAMERA mode. 2 Touch to the standby mode.

Camera Operations Guide
Page 34
...operations are possible using the Remote Commander or using the touch panel. To pause Touch (pause) during playback. POWER switch z Tip • Performing Easy Handycam operation, even first time users can play back recordings on your TV, see page 36. 1 Open the LCD panel. 2 Slide the POWER switch ...repeatedly until the PLAY/EDIT lamp lights up. 3 Touch (rewind) to go to the point you have a recorded tape inserted into your camcorder. Then, extend the viewfinder. For details, see page 39. Playback Viewing pictures recorded on a tape Make sure you want to play back easily.
...operations are possible using the Remote Commander or using the touch panel. To pause Touch (pause) during playback. POWER switch z Tip • Performing Easy Handycam operation, even first time users can play back recordings on your TV, see page 36. 1 Open the LCD panel. 2 Slide the POWER switch ...repeatedly until the PLAY/EDIT lamp lights up. 3 Touch (rewind) to go to the point you have a recorded tape inserted into your camcorder. Then, extend the viewfinder. For details, see page 39. Playback Viewing pictures recorded on a tape Make sure you want to play back easily.


