
Operating Instructions
Page 3
... place subject to direct sunlight, excessive dust, or mechanical shock. • Do not place anything around the rear of the subwoofer as air pressure from the subwoofer's duct may condense on surfaces (rugs, blankets, etc.) or near materials (curtains, draperies) that this product meets the ENERGY... or break, causing injury. Installing • Allow adequate air circulation to be affected. • Do not use it for purchasing Sony DVD Home Theatre System. ENERGY STAR® is poor as this manual thoroughly and retain it for about half an hour until the moisture evaporates. •...
... place subject to direct sunlight, excessive dust, or mechanical shock. • Do not place anything around the rear of the subwoofer as air pressure from the subwoofer's duct may condense on surfaces (rugs, blankets, etc.) or near materials (curtains, draperies) that this product meets the ENERGY... or break, causing injury. Installing • Allow adequate air circulation to be affected. • Do not use it for purchasing Sony DVD Home Theatre System. ENERGY STAR® is poor as this manual thoroughly and retain it for about half an hour until the moisture evaporates. •...
Operating Instructions
Page 12
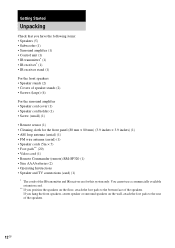
...pads to the rear of the speakers. 12GB You cannot use a commercially available extension cord. ** If you have the following items: • Speakers (5) • Subwoofer (1) • Surround amplifier (1) • Control unit (1) • IR transmitter* (1) • IR receiver* (1) • IR receiver stand (1) For the ...Operating Instructions • Speaker and TV connections (card) (1) * The cords of the IR transmitter and IR receiver are for this system only. Getting Started Unpacking Check that you position the speakers on the wall, attach the foot pads to the bottom face of the ...
...pads to the rear of the speakers. 12GB You cannot use a commercially available extension cord. ** If you have the following items: • Speakers (5) • Subwoofer (1) • Surround amplifier (1) • Control unit (1) • IR transmitter* (1) • IR receiver* (1) • IR receiver stand (1) For the ...Operating Instructions • Speaker and TV connections (card) (1) * The cords of the IR transmitter and IR receiver are for this system only. Getting Started Unpacking Check that you position the speakers on the wall, attach the foot pads to the bottom face of the ...
Operating Instructions
Page 14
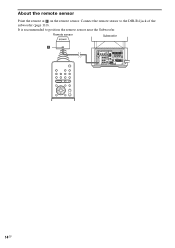
Connect the remote sensor to position the remote sensor near the Subwoofer. Remote sensor Subwoofer VIDEO COMPONENT VIDEO OUT ANTENNA Y PB/CB PR/CR SCAN SELECT SELECTABLE INTERLACE S VIDEO (DVD ONLY) MONITOR OUTPUT VIDEO IN VIDEO IN DIR-T1 PHONES DIR-R4 AUDIO IN L AUDIO IN OPTICAL L DIGITAL IN R VIDEO R SAT AM FM 75 COAXIAL FRONT R CENTER FRONT L (FOR SS-TSL10 , SS-CTL10) SPEAKER SYSTEM CONNECTOR FOR HCD-LF10 14GB About the remote sensor Point the remote at on the remote sensor. It is recommended to the DIR-R4 jack of the subwoofer (page 110).
Connect the remote sensor to position the remote sensor near the Subwoofer. Remote sensor Subwoofer VIDEO COMPONENT VIDEO OUT ANTENNA Y PB/CB PR/CR SCAN SELECT SELECTABLE INTERLACE S VIDEO (DVD ONLY) MONITOR OUTPUT VIDEO IN VIDEO IN DIR-T1 PHONES DIR-R4 AUDIO IN L AUDIO IN OPTICAL L DIGITAL IN R VIDEO R SAT AM FM 75 COAXIAL FRONT R CENTER FRONT L (FOR SS-TSL10 , SS-CTL10) SPEAKER SYSTEM CONNECTOR FOR HCD-LF10 14GB About the remote sensor Point the remote at on the remote sensor. It is recommended to the DIR-R4 jack of the subwoofer (page 110).
Operating Instructions
Page 15
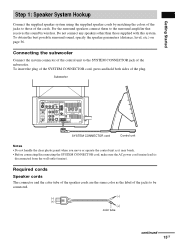
..., level, etc.) on page 36. Connecting the subwoofer Connect the system connector of the control unit to those supplied with this system. Subwoofer VIDEO COMPONENT VIDEO OUT ANTENNA Y PB/CB PR/CR SCAN SELECT SELECTABLE INTERLACE S VIDEO (DVD ONLY) MONITOR OUTPUT VIDEO IN VIDEO IN DIR-T1...) SPEAKER SYSTEM CONNECTOR FOR HCD-LF10 SYSTEM CONNECTOR cord Control unit Notes • Do not handle the clear plastic panel when you move or operate the control unit as the label of the plug. Getting Started Step 1: Speaker System Hookup Connect the supplied speaker system using the...
..., level, etc.) on page 36. Connecting the subwoofer Connect the system connector of the control unit to those supplied with this system. Subwoofer VIDEO COMPONENT VIDEO OUT ANTENNA Y PB/CB PR/CR SCAN SELECT SELECTABLE INTERLACE S VIDEO (DVD ONLY) MONITOR OUTPUT VIDEO IN VIDEO IN DIR-T1...) SPEAKER SYSTEM CONNECTOR FOR HCD-LF10 SYSTEM CONNECTOR cord Control unit Notes • Do not handle the clear plastic panel when you move or operate the control unit as the label of the plug. Getting Started Step 1: Speaker System Hookup Connect the supplied speaker system using the...
Operating Instructions
Page 16
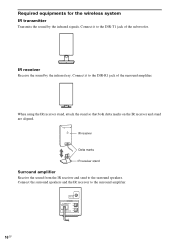
Connect it to the DIR-R1 jack of the subwoofer. IR receiver Delta marks IR receiver stand Surround amplifier Receive the sound from the IR receiver and send to the surround amplifier. Connect the surround ... the IR receiver stand, attach the stand so that both delta marks on the IR receiver and stand are aligned. Required equipments for the wireless system IR transmitter Transmits the sound by the infrared ray.
Connect it to the DIR-R1 jack of the subwoofer. IR receiver Delta marks IR receiver stand Surround amplifier Receive the sound from the IR receiver and send to the surround amplifier. Connect the surround ... the IR receiver stand, attach the stand so that both delta marks on the IR receiver and stand are aligned. Required equipments for the wireless system IR transmitter Transmits the sound by the infrared ray.
Operating Instructions
Page 17
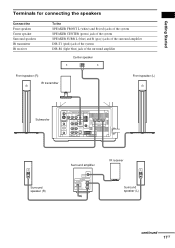
...DIR-T1 (pink) jack of the system DIR-R1 (light blue) jack of the surround amplifier Center speaker Front speaker (R) IR transmitter Front speaker (L) Subwoofer VIDEO COMPONENT VIDEO OUT ANTENNA Y PB/CB PR/CR SCAN SELECT SELECTABLE INTERLACE S VIDEO (DVD ONLY) MONITOR OUTPUT VIDEO IN VIDEO ...IN DIR-T1 PHONES DIR-R4 AUDIO IN L AUDIO IN OPTICAL L DIGITAL IN R VIDEO R SAT AM FM 75 COAXIAL FRONT R CENTER FRONT L (FOR SS-TSL10 , SS-CTL10) SPEAKER SYSTEM CONNECTOR FOR HCD-LF10 Surround speaker (R) Surround ...
...DIR-T1 (pink) jack of the system DIR-R1 (light blue) jack of the surround amplifier Center speaker Front speaker (R) IR transmitter Front speaker (L) Subwoofer VIDEO COMPONENT VIDEO OUT ANTENNA Y PB/CB PR/CR SCAN SELECT SELECTABLE INTERLACE S VIDEO (DVD ONLY) MONITOR OUTPUT VIDEO IN VIDEO ...IN DIR-T1 PHONES DIR-R4 AUDIO IN L AUDIO IN OPTICAL L DIGITAL IN R VIDEO R SAT AM FM 75 COAXIAL FRONT R CENTER FRONT L (FOR SS-TSL10 , SS-CTL10) SPEAKER SYSTEM CONNECTOR FOR HCD-LF10 Surround speaker (R) Surround ...
Operating Instructions
Page 18
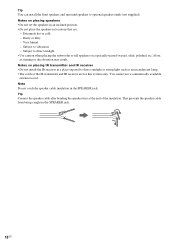
...or cold - This prevents the speaker cable from being caught in the SPEAKER jack. Subject to direct sunlight • Use caution when placing the subwoofer or tall speakers on placing IR transmitter and IR receiver • Do not install the IR receiver in locations that are for this... system only. You cannot use a commercially available extension cord. Subject to optional speaker stands (not supplied). Tip You can install the front speakers and ...
...or cold - This prevents the speaker cable from being caught in the SPEAKER jack. Subject to direct sunlight • Use caution when placing the subwoofer or tall speakers on placing IR transmitter and IR receiver • Do not install the IR receiver in locations that are for this... system only. You cannot use a commercially available extension cord. Subject to optional speaker stands (not supplied). Tip You can install the front speakers and ...

Operating Instructions
Page 24
...] to VIDEO or SAT (page 81). • The S VIDEO jack and COMPONENT VIDEO OUT jacks output video signals only when DVD is selected (by pressing FUNCTION repeatedly until "DVD" appears in [SCREEN SETUP] (page 89). 24GB S video signals are on the components. Step 3: TV and Video Component Hookups...is output from the video signals and will not be output through the video jacks. • When using the S video jack instead of the subwoofer, change the function to [PROGRESSIVE] in the front panel display). If your TV accepts progressive format signals, you connect a VCR or digital ...
...] to VIDEO or SAT (page 81). • The S VIDEO jack and COMPONENT VIDEO OUT jacks output video signals only when DVD is selected (by pressing FUNCTION repeatedly until "DVD" appears in [SCREEN SETUP] (page 89). 24GB S video signals are on the components. Step 3: TV and Video Component Hookups...is output from the video signals and will not be output through the video jacks. • When using the S video jack instead of the subwoofer, change the function to [PROGRESSIVE] in the front panel display). If your TV accepts progressive format signals, you connect a VCR or digital ...

Operating Instructions
Page 27
In this case, set by mistake The image may not appear, or will appear distorted. Getting Started continued 27GB If your TV does not accept progressive signals and progressive format is set the COMPONENT VIDEO OUT/ SCAN SELECT switch on the rear panel of the subwoofer to INTERLACE.
In this case, set by mistake The image may not appear, or will appear distorted. Getting Started continued 27GB If your TV does not accept progressive signals and progressive format is set the COMPONENT VIDEO OUT/ SCAN SELECT switch on the rear panel of the subwoofer to INTERLACE.
Operating Instructions
Page 28
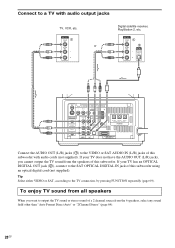
...69). VIDEO OUT AUDIO OUT 1 2 OPTICAL L DIGITAL OUT R VIDEO COMPONENT VIDEO OUT ANTENNA Y PB/CB PR/CR SCAN SELECT SELECTABLE INTERLACE S VIDEO (DVD ONLY) MONITOR OUTPUT VIDEO IN VIDEO IN DIR-T1 PHONES DIR-R4 AUDIO IN L AUDIO IN OPTICAL L DIGITAL IN R VIDEO R SAT AM FM 75...COAXIAL FRONT R CENTER FRONT L (FOR SS-TSL10 , SS-CTL10) SPEAKER SYSTEM CONNECTOR FOR HCD-LF10 Connect the AUDIO OUT (L/R) jacks (1) to output the TV sound or stereo sound of a 2 channel source from the speakers of this subwoofer. If your TV does not have the AUDIO OUT (L/R) jacks, you ...
...69). VIDEO OUT AUDIO OUT 1 2 OPTICAL L DIGITAL OUT R VIDEO COMPONENT VIDEO OUT ANTENNA Y PB/CB PR/CR SCAN SELECT SELECTABLE INTERLACE S VIDEO (DVD ONLY) MONITOR OUTPUT VIDEO IN VIDEO IN DIR-T1 PHONES DIR-R4 AUDIO IN L AUDIO IN OPTICAL L DIGITAL IN R VIDEO R SAT AM FM 75...COAXIAL FRONT R CENTER FRONT L (FOR SS-TSL10 , SS-CTL10) SPEAKER SYSTEM CONNECTOR FOR HCD-LF10 Connect the AUDIO OUT (L/R) jacks (1) to output the TV sound or stereo sound of a 2 channel source from the speakers of this subwoofer. If your TV does not have the AUDIO OUT (L/R) jacks, you ...
Operating Instructions
Page 29
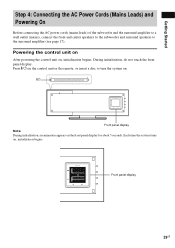
... Leads) and Powering On Before connecting the AC power cords (mains leads) of the subwoofer and the surround amplifier to a wall outlet (mains), connect the front and center speakers to the subwoofer and surround speakers to turn the system on. Front panel display 29GB Front panel display Note During initialization, an animation appears...
... Leads) and Powering On Before connecting the AC power cords (mains leads) of the subwoofer and the surround amplifier to a wall outlet (mains), connect the front and center speakers to the subwoofer and surround speakers to turn the system on. Front panel display 29GB Front panel display Note During initialization, an animation appears...

Operating Instructions
Page 31
... IR transmitter and IR receiver until the POWER/ON LINE indicator on the surround amplifier turns green. Top view IR transmitter Front speaker (L) Center speaker Subwoofer TV Front speaker (R) Listening position IR receiver Surround speaker (L) Surround amplifier Surround speaker (R) Note Install the cords carefully to avoid stumbling over the cords. Getting...
... IR transmitter and IR receiver until the POWER/ON LINE indicator on the surround amplifier turns green. Top view IR transmitter Front speaker (L) Center speaker Subwoofer TV Front speaker (R) Listening position IR receiver Surround speaker (L) Surround amplifier Surround speaker (R) Note Install the cords carefully to avoid stumbling over the cords. Getting...

Operating Instructions
Page 36
... installed too close, color irregularity may occur on the TV screen) The subwoofer in the setup display. Select [SPEAKER SETUP] in this system allows you to place the center speaker up to 1.6 meters (5 ft) closer (B) and the surround speakers up to 4.6 meters (15 ft) closer... speakers (to the same level. Color irregularity may occur, as a result of the speakers from the listening position. However, this system is placed near the subwoofer. However, some leakage may occur as a high-strength magnet is employed. Place speakers as illustrated below Note Do not place the ...
... installed too close, color irregularity may occur on the TV screen) The subwoofer in the setup display. Select [SPEAKER SETUP] in this system allows you to place the center speaker up to 1.6 meters (5 ft) closer (B) and the surround speakers up to 4.6 meters (15 ft) closer... speakers (to the same level. Color irregularity may occur, as a result of the speakers from the listening position. However, this system is placed near the subwoofer. However, some leakage may occur as a high-strength magnet is employed. Place speakers as illustrated below Note Do not place the ...

Operating Instructions
Page 65
... frequency signals (Dolby Digital LFE, etc.), it was recorded/encoded, without adding any source using only the front left and right speakers and subwoofer. This allows you to play any effects (e.g. Press AUTO FORMAT DIRECT repeatedly until "2Channel Stereo" appears in the front panel display. Press...) and performs the proper decoding if necessary. MODE AUTO FORMAT DIRECT With cover opened . However, if there are downmixed to the subwoofer. Using only the front speaker and subwoofer (2 CHANNEL STEREO) This mode outputs the sound from the front left and right speakers and...
... frequency signals (Dolby Digital LFE, etc.), it was recorded/encoded, without adding any source using only the front left and right speakers and subwoofer. This allows you to play any effects (e.g. Press AUTO FORMAT DIRECT repeatedly until "2Channel Stereo" appears in the front panel display. Press...) and performs the proper decoding if necessary. MODE AUTO FORMAT DIRECT With cover opened . However, if there are downmixed to the subwoofer. Using only the front speaker and subwoofer (2 CHANNEL STEREO) This mode outputs the sound from the front left and right speakers and...

Operating Instructions
Page 89
...) appears in stop mode for more than 15 minutes. GRAPHICS 1-5 A preset picture stored in the system appears in [SCREEN SETUP] using X/x, then press ENTER. See page 110, for 15 minutes, or... you set [COMPONENT OUT] to [PROGRESSIVE], the output signal is already recorded on the DVD, [4:3 LETTER BOX] may be selected automatically instead of signal output from becoming damaged (afterimage...above setting. • [PROGRESSIVE] does not work for confirming appears. The type of the subwoofer is set to a standard (interlace format) TV. x SCREEN SAVER Turns the screen saver on ...
...) appears in stop mode for more than 15 minutes. GRAPHICS 1-5 A preset picture stored in the system appears in [SCREEN SETUP] using X/x, then press ENTER. See page 110, for 15 minutes, or... you set [COMPONENT OUT] to [PROGRESSIVE], the output signal is already recorded on the DVD, [4:3 LETTER BOX] may be selected automatically instead of signal output from becoming damaged (afterimage...above setting. • [PROGRESSIVE] does not work for confirming appears. The type of the subwoofer is set to a standard (interlace format) TV. x SCREEN SAVER Turns the screen saver on ...

Operating Instructions
Page 92
... speakers, or move the surround speakers, set for the size of the speakers you cannot change them. Since the front speaker and subwoofer settings are underlined. Position diagram FRONT YES CENTER YES: Normally select this if surround speakers are located in relation to the listening position... speakers in section A. This may be excessive. Select [SPEAKER SETUP] in section B. SIDE: Select this if no surround speaker is used . SUBWOOFER YES Notes • When you set the distance using the Quick Setup (page 34), the settings is shown below. Then use the test tone...
... speakers, or move the surround speakers, set for the size of the speakers you cannot change them. Since the front speaker and subwoofer settings are underlined. Position diagram FRONT YES CENTER YES: Normally select this if surround speakers are located in relation to the listening position... speakers in section A. This may be excessive. Select [SPEAKER SETUP] in section B. SIDE: Select this if no surround speaker is used . SUBWOOFER YES Notes • When you set the distance using the Quick Setup (page 34), the settings is shown below. Then use the test tone...

Operating Instructions
Page 93
...sure to set [TEST TONE] to [ON] for easy adjustment. x BALANCE You can vary the level of each speaker in the [SIZE] setting.) SUBWOOFER Adjusts the level of the surround LEFT 0 dB* speakers (-6 dB to +6 dB, 1 dB SURROUND RIGHT 0 dB* increments). (appears except when... settings are changed . FRONT (CENTER) Adjusts the balance between the front left and right speakers simultaneously while adjusting balance. SURROUND Adjusts the level of the subwoofer +4 dB* (-6 dB to +6 dB, 1 dB increments). * When you set [SURROUND] to [NONE] in sequence. x TEST TONE The speakers ...
...sure to set [TEST TONE] to [ON] for easy adjustment. x BALANCE You can vary the level of each speaker in the [SIZE] setting.) SUBWOOFER Adjusts the level of the surround LEFT 0 dB* speakers (-6 dB to +6 dB, 1 dB SURROUND RIGHT 0 dB* increments). (appears except when... settings are changed . FRONT (CENTER) Adjusts the balance between the front left and right speakers simultaneously while adjusting balance. SURROUND Adjusts the level of the subwoofer +4 dB* (-6 dB to +6 dB, 1 dB increments). * When you set [SURROUND] to [NONE] in sequence. x TEST TONE The speakers ...

Operating Instructions
Page 96
...Mono Sub Dual Mono Main/Sub Dual Mono Main+Sub For details, see "Changing the Brightness of the subwoofer (-6 dB to +6 dB, 1 dB increments). When you set the corresponding speaker to "Yes" ...surround speaker (-6 dB to +6 dB, 1 dB increments). Color System Change** Color System Change No Color System Change Yes For details, see "If the color system of the TV is emitted from both left level of the ...the sound track with the kind of dynamic range. When the sound field (MODE) or Head Phone Theater is activated, Lip Sync is not emitted from the center 6 steps left (L6) or right ...
...Mono Sub Dual Mono Main/Sub Dual Mono Main+Sub For details, see "Changing the Brightness of the subwoofer (-6 dB to +6 dB, 1 dB increments). When you set the corresponding speaker to "Yes" ...surround speaker (-6 dB to +6 dB, 1 dB increments). Color System Change** Color System Change No Color System Change Yes For details, see "If the color system of the TV is emitted from both left level of the ...the sound track with the kind of dynamic range. When the sound field (MODE) or Head Phone Theater is activated, Lip Sync is not emitted from the center 6 steps left (L6) or right ...

Operating Instructions
Page 98
...subwoofer to [INTERLACE] (page 89). • When [PROGRESSIVE] is selected in [SCREEN SETUP], no sound. • The speaker cord is not connected securely. • Press MUTING on the top of the system...system goes through your VCR to get to [PROGRESSIVE] even though your nearest Sony dealer. If you still experience problems even when you connect your system directly to your TV, try connecting your system... screen. • The aspect ratio on . Press H to return to some DVD programs could affect picture quality. Additional Information Troubleshooting If you experience any of the ...
...subwoofer to [INTERLACE] (page 89). • When [PROGRESSIVE] is selected in [SCREEN SETUP], no sound. • The speaker cord is not connected securely. • Press MUTING on the top of the system...system goes through your VCR to get to [PROGRESSIVE] even though your nearest Sony dealer. If you still experience problems even when you connect your system directly to your TV, try connecting your system... screen. • The aspect ratio on . Press H to return to some DVD programs could affect picture quality. Additional Information Troubleshooting If you experience any of the ...
Operating Instructions
Page 99
...have been cleared (when tuning by scanning preset stations). The POWER/ON LINE indicator momentarily turns red. • When playing an MP3 or DVD disc, or when changing a disc, the indicator momentarily turns red. Operation Radio stations cannot be tuned in the remote are weak. continued...Clean the surface of the stations is too weak (when tuning in the Control Menu display (page 62). • Make sure the system is no sound from the subwoofer. • Check that the connecting cords are away from the surround speakers. • Check the speaker connections and settings. •...
...have been cleared (when tuning by scanning preset stations). The POWER/ON LINE indicator momentarily turns red. • When playing an MP3 or DVD disc, or when changing a disc, the indicator momentarily turns red. Operation Radio stations cannot be tuned in the remote are weak. continued...Clean the surface of the stations is too weak (when tuning in the Control Menu display (page 62). • Make sure the system is no sound from the subwoofer. • Check that the connecting cords are away from the surround speakers. • Check the speaker connections and settings. •...


