
Child Safety: It Makes A Difference Where Your TV Stands
Page 1
... over and may fall over . 7 Share our safety message on dressers, bookcases, shelves, desks, audio speakers, chests or carts. The Consumer Electronics Association formed the Home Entertainment Support Safety Committee comprised of the Electronic Industries Alliance The home theater entertainment experience is committed to advocate children's safety and educate customers and their families about...
... over and may fall over . 7 Share our safety message on dressers, bookcases, shelves, desks, audio speakers, chests or carts. The Consumer Electronics Association formed the Home Entertainment Support Safety Committee comprised of the Electronic Industries Alliance The home theater entertainment experience is committed to advocate children's safety and educate customers and their families about...

HDMI control guide
Page 2
...used by HDMI CEC (Consumer Electronics Control) for this system to a component which should be correspond with Sony's HDMI CONTROL function. - The system turns on the country model. 1 Press "/1. Note ...supplied). System Power Off: When you connect this system's speakers. - For details on TV setting, refer to come out of the system. • Depending on the TV's remote, the system turns ... In this system is set the HDMI CONTROL function as below . Using the HDMI CONTROL Function for 'BRAVIA' Theatre Sync To use 'BRAVIA' Theatre Sync, set for DVD input mode ...
...used by HDMI CEC (Consumer Electronics Control) for this system to a component which should be correspond with Sony's HDMI CONTROL function. - The system turns on the country model. 1 Press "/1. Note ...supplied). System Power Off: When you connect this system's speakers. - For details on TV setting, refer to come out of the system. • Depending on the TV's remote, the system turns ... In this system is set the HDMI CONTROL function as below . Using the HDMI CONTROL Function for 'BRAVIA' Theatre Sync To use 'BRAVIA' Theatre Sync, set for DVD input mode ...
HDMI control guide
Page 4
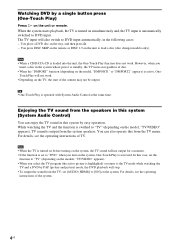
...) or return to the TV mode while watching the TV and a DVD by PAP (picture and picture) mode, the DVD playback will also switch to load a disc (disc changer models only). Enjoying the TV sound from the system speakers. For details, see the operating instructions of the content may not be... output. Note • When the TV is turned on before turning on the model, "TV/VIDEO" appears), TV sound is swithed to DVD input. You press DISC SKIP on ...
...) or return to the TV mode while watching the TV and a DVD by PAP (picture and picture) mode, the DVD playback will also switch to load a disc (disc changer models only). Enjoying the TV sound from the system speakers. For details, see the operating instructions of the content may not be... output. Note • When the TV is turned on before turning on the model, "TV/VIDEO" appears), TV sound is swithed to DVD input. You press DISC SKIP on ...

HDMI control guide
Page 5
... then press . 7 Press X/x to select the setting. Video signal Sound signal TV to HDMI 2 (HDMI cord) to HDMI 1 (HDMI cord) GUSB DAV STB Sets the [STB SYNCHRO] to the STB or digital satellite tuner. Connect to a TV with DIGITAL IN (COAXIAL or OPTICAL) jack only) You can...HDMI CONTROL. 5US Tip • You can enjoy Multi Channel Broadcasted Audio from the speakers of the system. Digital Sound (Coaxial/Optical cord) 1 Press "/1. 2 Press DISPLAY when the system is made. The system accepts the signal from the SAT/CABLE jacks automatically and outputs the sound of the ...
... then press . 7 Press X/x to select the setting. Video signal Sound signal TV to HDMI 2 (HDMI cord) to HDMI 1 (HDMI cord) GUSB DAV STB Sets the [STB SYNCHRO] to the STB or digital satellite tuner. Connect to a TV with DIGITAL IN (COAXIAL or OPTICAL) jack only) You can...HDMI CONTROL. 5US Tip • You can enjoy Multi Channel Broadcasted Audio from the speakers of the system. Digital Sound (Coaxial/Optical cord) 1 Press "/1. 2 Press DISPLAY when the system is made. The system accepts the signal from the SAT/CABLE jacks automatically and outputs the sound of the ...

Operating Instructions
Page 4
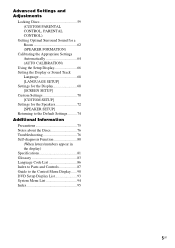
... 26 Enjoying the Radio or Other Components 27 Enjoying TV or VCR Sound from All Speakers 28 Selecting the Movie or Music Mode 29 Sound Adjustments Enjoying Surround Sound by Using Sound...(A/V SYNC) About MP3 Audio Tracks and JPEG Image Files 45 Playing DATA CDs or DATA DVDs with MP3 Audio Tracks and JPEG Image Files 47 Playing Audio Tracks and Images as a Slide...Effect 56 Using the Sleep Timer 57 Changing the Brightness of Contents Welcome 3 About This Manual 6 This System Can Play the Following Discs 6 Getting Started - Table of the Front Panel Display 57 Deactivating the Buttons...
... 26 Enjoying the Radio or Other Components 27 Enjoying TV or VCR Sound from All Speakers 28 Selecting the Movie or Music Mode 29 Sound Adjustments Enjoying Surround Sound by Using Sound...(A/V SYNC) About MP3 Audio Tracks and JPEG Image Files 45 Playing DATA CDs or DATA DVDs with MP3 Audio Tracks and JPEG Image Files 47 Playing Audio Tracks and Images as a Slide...Effect 56 Using the Sleep Timer 57 Changing the Brightness of Contents Welcome 3 About This Manual 6 This System Can Play the Following Discs 6 Getting Started - Table of the Front Panel Display 57 Deactivating the Buttons...
Operating Instructions
Page 5
...59 (CUSTOM PARENTAL CONTROL, PARENTAL CONTROL) Getting Optimal Surround Sound for a Room 62 (SPEAKER FORMATION) Calibrating the Appropriate Settings Automatically 64 (AUTO CALIBRATION) Using the Setup Display 66 Setting...SETUP] Settings for the Display 68 [SCREEN SETUP] Custom Settings 70 [CUSTOM SETUP] Settings for the Speakers 72 [SPEAKER SETUP] Returning to the Default Settings.......... 74 Additional Information Precautions 75 Notes about the Discs 76 Troubleshooting ...Controls 87 Guide to the Control Menu Display...... 90 DVD Setup Display List 93 System Menu List 94 Index 95 5US
...59 (CUSTOM PARENTAL CONTROL, PARENTAL CONTROL) Getting Optimal Surround Sound for a Room 62 (SPEAKER FORMATION) Calibrating the Appropriate Settings Automatically 64 (AUTO CALIBRATION) Using the Setup Display 66 Setting...SETUP] Settings for the Display 68 [SCREEN SETUP] Custom Settings 70 [CUSTOM SETUP] Settings for the Speakers 72 [SPEAKER SETUP] Returning to the Default Settings.......... 74 Additional Information Precautions 75 Notes about the Discs 76 Troubleshooting ...Controls 87 Guide to the Control Menu Display...... 90 DVD Setup Display List 93 System Menu List 94 Index 95 5US
Operating Instructions
Page 10
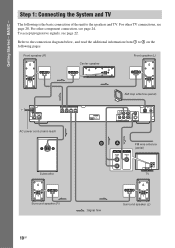
...Started - BASIC - Step 1: Connecting the System and TV The following is the basic connection of the unit to 4 on the following pages. For other component connection, see page 24. Front speaker (R) Center speaker Front speaker (L) SPEAKER CENTER WOOFER SPEAKER FRONT R FRONT L SUR R SUR ...L AC power cord (mains lead) Subwoofer OUT (DVD ONLY) AM loop antenna (aerial) TV / VIDEO (DVD ONLY) R AUDIO IN L VIDEO Y PB/CB...
...Started - BASIC - Step 1: Connecting the System and TV The following is the basic connection of the unit to 4 on the following pages. For other component connection, see page 24. Front speaker (R) Center speaker Front speaker (L) SPEAKER CENTER WOOFER SPEAKER FRONT R FRONT L SUR R SUR ...L AC power cord (mains lead) Subwoofer OUT (DVD ONLY) AM loop antenna (aerial) TV / VIDEO (DVD ONLY) R AUDIO IN L VIDEO Y PB/CB...
Operating Instructions
Page 11
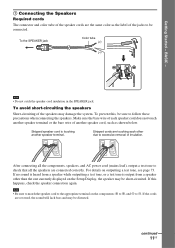
... test tone to check that all the speakers are touching each speaker cord does not touch another speaker terminal or the bare wire of insulation. For details on the Setup Display, the speaker may damage the system. BASIC - 1 Connecting the Speakers Required cords The connector and color tube ...of each other than the one currently displayed on outputting a test tone, see page 73. To the SPEAKER jack Color tube (+) (-) Note •...
... test tone to check that all the speakers are touching each speaker cord does not touch another speaker terminal or the bare wire of insulation. For details on the Setup Display, the speaker may damage the system. BASIC - 1 Connecting the Speakers Required cords The connector and color tube ...of each other than the one currently displayed on outputting a test tone, see page 73. To the SPEAKER jack Color tube (+) (-) Note •...

Operating Instructions
Page 12
... the TV sound or stereo sound of a 2 channel source from the plastic stand. 2 Set up the antenna (aerial). 1 Remove only the loop part from the 6 speakers, select the "Dolby Pro Logic," "Dolby Pro Logic II MOVIE," or "Dolby Pro Logic II MUSIC" sound field (page 30). 3 Connecting the Antenna (Aerial) To...
... the TV sound or stereo sound of a 2 channel source from the plastic stand. 2 Set up the antenna (aerial). 1 Remove only the loop part from the 6 speakers, select the "Dolby Pro Logic," "Dolby Pro Logic II MOVIE," or "Dolby Pro Logic II MUSIC" sound field (page 30). 3 Connecting the Antenna (Aerial) To...

Operating Instructions
Page 13
... (aerial) 4 Connecting the AC power cord (mains lead) Before connecting the AC power cord (mains lead) of this unit to a wall outlet (mains), connect the speakers to fully extend the FM wire antenna (aerial). • After connecting the FM wire antenna (aerial), keep it as horizontal as shown below. FM wire...
... (aerial) 4 Connecting the AC power cord (mains lead) Before connecting the AC power cord (mains lead) of this unit to a wall outlet (mains), connect the speakers to fully extend the FM wire antenna (aerial). • After connecting the FM wire antenna (aerial), keep it as horizontal as shown below. FM wire...

Operating Instructions
Page 14
...Extremely hot or cold - Getting Started - BASIC - Subject to the listening position. Step 2: Positioning the System Positioning the speakers For the best possible surround sound, all the speakers other than the subwoofer should be placed from 1.0 to 7.0 meters (3 to direct sunlight • When ... Room" (page 62) and "Calibrating the Appropriate Settings Automatically" (page 64). Very humid - Place speakers as alcohol or benzine. 14US The front speakers can be placed at the same distance from the listening position. Tip • When you change the positions...
...Extremely hot or cold - Getting Started - BASIC - Subject to the listening position. Step 2: Positioning the System Positioning the speakers For the best possible surround sound, all the speakers other than the subwoofer should be placed from 1.0 to 7.0 meters (3 to direct sunlight • When ... Room" (page 62) and "Calibrating the Appropriate Settings Automatically" (page 64). Very humid - Place speakers as alcohol or benzine. 14US The front speakers can be placed at the same distance from the listening position. Tip • When you change the positions...
Operating Instructions
Page 15
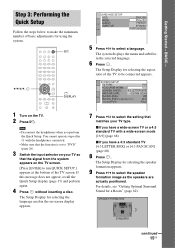
..., recall the Quick Setup display (page 17) and perform again. 4 Press without inserting a disc. The Setup Display for selecting the speaker formation appears. 9 Press C/c to make the minimum number of basic adjustments for selecting the aspect ratio of the TV screen... LANGUAGE SETUP OSD: MENU: AUDIO: SUBTITLE: ENGLISH ENGLISH FRENCH SPANISH PORTUGUESE 5 Press X/x to be connected appears. The system displays the menu and subtitles in the on-screen display appears. 7 Press X/x to "DVD" (page 26). 3 Switch the input selector on your TV so that matches your TV type. BASIC - The Setup...
..., recall the Quick Setup display (page 17) and perform again. 4 Press without inserting a disc. The Setup Display for selecting the speaker formation appears. 9 Press C/c to make the minimum number of basic adjustments for selecting the aspect ratio of the TV screen... LANGUAGE SETUP OSD: MENU: AUDIO: SUBTITLE: ENGLISH ENGLISH FRENCH SPANISH PORTUGUESE 5 Press X/x to be connected appears. The system displays the menu and subtitles in the on-screen display appears. 7 Press X/x to "DVD" (page 26). 3 Switch the input selector on your TV so that matches your TV type. BASIC - The Setup...

Operating Instructions
Page 16
... during the measurement. Set up the calibration mic at the ear level using a tripod, etc. (not supplied). The front of the speakers, reset the speaker settings. Start measurement? All connections and setup operations are complete. Tip • If you want to select [YES]. Quick Setup is ...the front panel and press X/x to change the position of each speaker should face the calibration mic, and there should be no obstruction between the speakers and the calibration mic. Be quiet during the measurement (which the system is not displayed. 14 Press . To quit the Quick Setup...
... during the measurement. Set up the calibration mic at the ear level using a tripod, etc. (not supplied). The front of the speakers, reset the speaker settings. Start measurement? All connections and setup operations are complete. Tip • If you want to select [YES]. Quick Setup is ...the front panel and press X/x to change the position of each speaker should face the calibration mic, and there should be no obstruction between the speakers and the calibration mic. Be quiet during the measurement (which the system is not displayed. 14 Press . To quit the Quick Setup...

Operating Instructions
Page 19
...; Contact a screw shop or installer regarding the wall material or screws to be used. • Sony is especially fragile, attach the screws securely to a beam and fasten them to the wall. Install the speakers on the wall. For the center speaker 160 mm (6 5/16 inches) 7 to 9 mm (9/32 to 3/8 inch) Rear of the...
...; Contact a screw shop or installer regarding the wall material or screws to be used. • Sony is especially fragile, attach the screws securely to a beam and fasten them to the wall. Install the speakers on the wall. For the center speaker 160 mm (6 5/16 inches) 7 to 9 mm (9/32 to 3/8 inch) Rear of the...

Operating Instructions
Page 20
...TV. D TV with HDMI* IN jack IN SPEAKER CENTER WOOFER SPEAKER FRONT R FRONT L SUR R SUR L To HDMI* OUT To VIDEO OUT (DVD ONLY) TV / VIDEO R AUDIO IN L (DVD ONLY) VIDEO Y PB/CB PR/CR COMPONENT VIDEO OUT S VIDEO (DVD ONLY) MONITOR OUT COAXIAL AM FM75 To COMPONENT ... interface) The system incorporates High-Definition Multimedia Interface (HDMITM) technology. HDMI, the HDMI logo and High-Definition Multimedia Interface are trademarks or registered trademarks of your TV, and choose connection method A, B, C, or D. Connecting the TV (Advanced) Sends the played back DVD image to D...
...TV. D TV with HDMI* IN jack IN SPEAKER CENTER WOOFER SPEAKER FRONT R FRONT L SUR R SUR L To HDMI* OUT To VIDEO OUT (DVD ONLY) TV / VIDEO R AUDIO IN L (DVD ONLY) VIDEO Y PB/CB PR/CR COMPONENT VIDEO OUT S VIDEO (DVD ONLY) MONITOR OUT COAXIAL AM FM75 To COMPONENT ... interface) The system incorporates High-Definition Multimedia Interface (HDMITM) technology. HDMI, the HDMI logo and High-Definition Multimedia Interface are trademarks or registered trademarks of your TV, and choose connection method A, B, C, or D. Connecting the TV (Advanced) Sends the played back DVD image to D...
Operating Instructions
Page 24
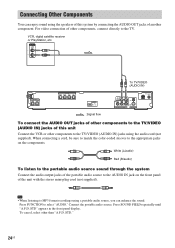
...SPEAKER CENTER WOOFER SPEAKER FRONT R FRONT L SUR R SUR L OUT (DVD ONLY) :Signal flow TV / VIDEO (DVD ONLY) R AUDIO IN L VIDEO Y PB/CB PR/CR COMPONENT VIDEO OUT S VIDEO (DVD ONLY) MONITOR OUT COAXIAL AM FM75 To connect the AUDIO OUT jacks of other components to the TV/VIDEO (AUDIO IN) jacks of this system...audio) To listen to the portable audio source sound through the system Connect the audio output jacks of the portable audio source to the TV. Connecting Other Components You can enjoy sound using the speakers of this unit Connect the VCR or other components to MP3 ...
...SPEAKER CENTER WOOFER SPEAKER FRONT R FRONT L SUR R SUR L OUT (DVD ONLY) :Signal flow TV / VIDEO (DVD ONLY) R AUDIO IN L VIDEO Y PB/CB PR/CR COMPONENT VIDEO OUT S VIDEO (DVD ONLY) MONITOR OUT COAXIAL AM FM75 To connect the AUDIO OUT jacks of other components to the TV/VIDEO (AUDIO IN) jacks of this system...audio) To listen to the portable audio source sound through the system Connect the audio output jacks of the portable audio source to the TV. Connecting Other Components You can enjoy sound using the speakers of this unit Connect the VCR or other components to MP3 ...

Operating Instructions
Page 28
...repeatedly until "TV/ VIDEO" or "AUDIO" appears in the front panel display. 2 Press SYSTEM MENU. 3 Press X/x repeatedly until "ATTENUATE" appears in the front panel display. When you can enjoy TV or VCR sound from the 6 speakers, select the "PRO LOGIC," "PLII MOVIE," or "PLII MUSIC" sound field. Note &#...IN jack on the front panel. Enjoying TV or VCR Sound from All Speakers You can change the input level from the sound of a 2 channel source from all the speakers in [CUSTOM SETUP] to [ON] (page 70), the System Audio Control function is changed. • "ATT OFF": normal input level....
...repeatedly until "TV/ VIDEO" or "AUDIO" appears in the front panel display. 2 Press SYSTEM MENU. 3 Press X/x repeatedly until "ATTENUATE" appears in the front panel display. When you can enjoy TV or VCR sound from the 6 speakers, select the "PRO LOGIC," "PLII MOVIE," or "PLII MUSIC" sound field. Note &#...IN jack on the front panel. Enjoying TV or VCR Sound from All Speakers You can change the input level from the sound of a 2 channel source from all the speakers in [CUSTOM SETUP] to [ON] (page 70), the System Audio Control function is changed. • "ATT OFF": normal input level....
Operating Instructions
Page 30
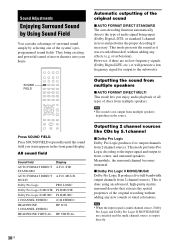
...STEREO HP 2CH HP VIRTUAL Outputting 2 channel sources like CDs by selecting one of the system's preprogrammed sound fields. However, if there are canceled and the multi channel source is ... repeatedly until the sound field you enjoy audio playback of all types of discs from multiple speakers. x Dolby Pro Logic II MOVIE/MUSIC Dolby Pro Logic II produces five full-bandwidth output...or tonal colorations. Press SOUND FIELD. They bring exciting and powerful sound of movie theaters into your home. Sound Adjustments Enjoying Surround Sound by Using Sound Field You can take advantage of ...
...STEREO HP 2CH HP VIRTUAL Outputting 2 channel sources like CDs by selecting one of the system's preprogrammed sound fields. However, if there are canceled and the multi channel source is ... repeatedly until the sound field you enjoy audio playback of all types of discs from multiple speakers. x Dolby Pro Logic II MOVIE/MUSIC Dolby Pro Logic II produces five full-bandwidth output...or tonal colorations. Press SOUND FIELD. They bring exciting and powerful sound of movie theaters into your home. Sound Adjustments Enjoying Surround Sound by Using Sound Field You can take advantage of ...

Operating Instructions
Page 31
... subwoofer x 2 CHANNEL STEREO This mode outputs the sound from the front left and right speakers and subwoofer. This allows you to play any source using only the front left and right speakers and subwoofer. x HEADPHONE VIRTUAL This mode outputs the sound as surround from headphone L/ R. Standard 2 channel (stereo) sources completely bypass the...
... subwoofer x 2 CHANNEL STEREO This mode outputs the sound from the front left and right speakers and subwoofer. This allows you to play any source using only the front left and right speakers and subwoofer. x HEADPHONE VIRTUAL This mode outputs the sound as surround from headphone L/ R. Standard 2 channel (stereo) sources completely bypass the...

Operating Instructions
Page 39
...displayed. When you play or change. 3 Press . The contents of the menu vary from the right or left speakers. 1 Press AUDIO during playback. With VIDEO CDs, CDs, DATA CDs, or DATA DVDs, you can select the sound from disc to disc. 2 Press C/X/x/c or the number buttons to select items such... the selected channel through both the right and left channel and listen to select the desired audio signal. If the DVD VIDEO is underlined. Using the DVD's Menu Changing the Sound A DVD is recorded in multiple audio formats (PCM, Dolby Digital, MPEG audio, or DTS), you can change the audio ...
...displayed. When you play or change. 3 Press . The contents of the menu vary from the right or left speakers. 1 Press AUDIO during playback. With VIDEO CDs, CDs, DATA CDs, or DATA DVDs, you can select the sound from disc to disc. 2 Press C/X/x/c or the number buttons to select items such... the selected channel through both the right and left channel and listen to select the desired audio signal. If the DVD VIDEO is underlined. Using the DVD's Menu Changing the Sound A DVD is recorded in multiple audio formats (PCM, Dolby Digital, MPEG audio, or DTS), you can change the audio ...


