
Child Safety: It Makes A Difference Where Your TV Stands
Page 1
... on top of TVs such as VCRs and remotes that is committed to advocate children's safety and educate customers and their families about television safety. Tune Into Safety 1 One size does NOT fit all. The home theater entertainment experience is a Sector of television and ...consumer electronics furniture manufacturers to making home entertainment enjoyable and safe. The Industry Cares! Sometimes televisions are not always supported on ...
... on top of TVs such as VCRs and remotes that is committed to advocate children's safety and educate customers and their families about television safety. Tune Into Safety 1 One size does NOT fit all. The home theater entertainment experience is a Sector of television and ...consumer electronics furniture manufacturers to making home entertainment enjoyable and safe. The Industry Cares! Sometimes televisions are not always supported on ...

HDMI control guide
Page 2
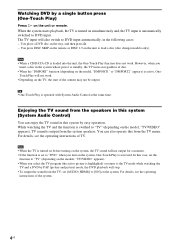
...Consumer Electronics Control) for DVD input mode automatically. - A component does not have a HDMI terminal. Refer to the operating instructions supplied with the TV. System Power Off: When ...system to products featuring 'BRAVIA' Theatre Sync. For details on . System Audio Control: While watching TV, you connect this system's speakers. - By connecting Sony components that are compatible with the HDMI CONTROL function with Sony... can switch the sound to come out of the system. • Depending on the TV's remote, the system turns off by a HDMI cord (not supplied). Preparing...
...Consumer Electronics Control) for DVD input mode automatically. - A component does not have a HDMI terminal. Refer to the operating instructions supplied with the TV. System Power Off: When ...system to products featuring 'BRAVIA' Theatre Sync. For details on . System Audio Control: While watching TV, you connect this system's speakers. - By connecting Sony components that are compatible with the HDMI CONTROL function with Sony... can switch the sound to come out of the system. • Depending on the TV's remote, the system turns off by a HDMI cord (not supplied). Preparing...
HDMI control guide
Page 4
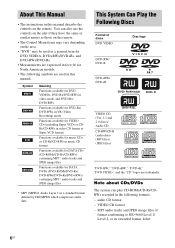
... program (the active picture is highlighted) or return to DVD input automatically, in the following cases: - You press DISC SKIP on the remote or DISC 1-5 on the tray, and then press A. - However, when you turn on the system, One-Touch Play is set to "DVD" when you insert a disc in this from the TV..., set the function to [ON] on the system, the TV sound will stop. • To...
... program (the active picture is highlighted) or return to DVD input automatically, in the following cases: - You press DISC SKIP on the remote or DISC 1-5 on the tray, and then press A. - However, when you turn on the system, One-Touch Play is set to "DVD" when you insert a disc in this from the TV..., set the function to [ON] on the system, the TV sound will stop. • To...

Operating Instructions
Page 4
...Child Lock) ADVANCED - Table of the Front Panel Display 57 Deactivating the Buttons on a DVD-R/DVD-RW 41 Viewing Information About the Disc ... 41 Changing the Angles 43 Displaying the Subtitles 44...Stations 52 Listening to the Radio 53 Other Operations Controlling the TV with the Supplied Remote 55 Using the THEATRE SYNC Function 55 Using the Sound Effect 56 Using the ... Welcome 3 About This Manual 6 This System Can Play the Following Discs 6 Getting Started - Step 1: Connecting the System and TV 10 Step 2: Positioning the System ...14 Step 3: Performing the Quick Setup...
...Child Lock) ADVANCED - Table of the Front Panel Display 57 Deactivating the Buttons on a DVD-R/DVD-RW 41 Viewing Information About the Disc ... 41 Changing the Angles 43 Displaying the Subtitles 44...Stations 52 Listening to the Radio 53 Other Operations Controlling the TV with the Supplied Remote 55 Using the THEATRE SYNC Function 55 Using the Sound Effect 56 Using the ... Welcome 3 About This Manual 6 This System Can Play the Following Discs 6 Getting Started - Step 1: Connecting the System and TV 10 Step 2: Positioning the System ...14 Step 3: Performing the Quick Setup...
Operating Instructions
Page 6
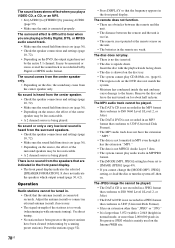
Note about CDs/DVDs The system can also use the controls on the unit if they have the same or similar names as those on the remote. • The Control Menu items may vary depending on the area. • "DVD" may be used in this manual describe the controls on the remote. MP3 audio tracks and...
Note about CDs/DVDs The system can also use the controls on the unit if they have the same or similar names as those on the remote. • The Control Menu items may vary depending on the area. • "DVD" may be used in this manual describe the controls on the remote. MP3 audio tracks and...

Operating Instructions
Page 9
... subwoofer and prevent it at the remote sensor on the batteries to avoid possible damage from slipping. 9US To use a new battery with an old one. • Do not drop any foreign object into the remote You can control the system using the supplied remote. Doing so may cause a malfunction.... • If you do not intend to use the remote for an extended period of the subwoofer to direct sunlight or lighting apparatus...
... subwoofer and prevent it at the remote sensor on the batteries to avoid possible damage from slipping. 9US To use a new battery with an old one. • Do not drop any foreign object into the remote You can control the system using the supplied remote. Doing so may cause a malfunction.... • If you do not intend to use the remote for an extended period of the subwoofer to direct sunlight or lighting apparatus...

Operating Instructions
Page 18
... Setting the demonstration mode to on the remote, the demonstration turns off. The system menu turns off , the system saves power in the system menu to on, the demonstration does not turn off. • When you set "DEMO" to select a setting. After connecting the ... . When the demonstration mode is underlined. • "DEMO ON": sets the demonstration mode to stop the demonstration, you press "/1 on the remote. Otherwise, to on the remote. The default setting is set the demonstration mode to off, then press "/1 on . • "DEMO OFF": sets the demonstration mode to ...
... Setting the demonstration mode to on the remote, the demonstration turns off. The system menu turns off , the system saves power in the system menu to on, the demonstration does not turn off. • When you set "DEMO" to select a setting. After connecting the ... . When the demonstration mode is underlined. • "DEMO ON": sets the demonstration mode to stop the demonstration, you press "/1 on the remote. Otherwise, to on the remote. The default setting is set the demonstration mode to off, then press "/1 on . • "DEMO OFF": sets the demonstration mode to ...

Operating Instructions
Page 27
...preceding . (except for further information. DVD t TUNER FM t TUNER AM t TV/VIDEO t AUDIO t ... Replay the previous scene* (instant replay) during playback. * DVD VIDEOs/DVD-RWs/DVD-Rs only. ** DVD VIDEOs/DVD-RWs/DVD-Rs/DVD+RWs/ DVD+Rs only. Note • You ...may not be able to use a VCR or other components connected to adjust the sound volume. Stop play and remove the Z on the remote or A disc on the rear panel. Enjoying the Radio or Other Components X/x/c, FUNCTION SYSTEM...
...preceding . (except for further information. DVD t TUNER FM t TUNER AM t TV/VIDEO t AUDIO t ... Replay the previous scene* (instant replay) during playback. * DVD VIDEOs/DVD-RWs/DVD-Rs only. ** DVD VIDEOs/DVD-RWs/DVD-Rs/DVD+RWs/ DVD+Rs only. Note • You ...may not be able to use a VCR or other components connected to adjust the sound volume. Stop play and remove the Z on the remote or A disc on the rear panel. Enjoying the Radio or Other Components X/x/c, FUNCTION SYSTEM...

Operating Instructions
Page 55
...control your TV or to use some of your TV (Sony only) with the supplied remote. For details, see the table) using following buttons. Other Operations Other Operations Controlling the TV with the Supplied Remote You can control your TV. DVD MENU* Display the menu of the TV. * Use... these buttons while pressing the TV button. - continued 55US Set your Sony TV and this system, changes the system mode to this unit (see the operating instructions...
...control your TV or to use some of your TV (Sony only) with the supplied remote. For details, see the table) using following buttons. Other Operations Other Operations Controlling the TV with the Supplied Remote You can control your TV. DVD MENU* Display the menu of the TV. * Use... these buttons while pressing the TV button. - continued 55US Set your Sony TV and this system, changes the system mode to this unit (see the operating instructions...

Operating Instructions
Page 56
...Press DYNAMIC BASS again. 56US Using the Sound Effect Reinforcing bass frequencies You can reinforce bass frequencies. Operating the THEATRE SYNC function Point the remote to the direction of the TV and this function does not work, change the transmit time Press and hold TV CH + while entering.... Press DYNAMIC BASS. To change the transmit time. The transmit time varies depending on some Sony TVs.) • If distance between TV and this unit is selected. The transmit time from the remote is too far, this unit, then press THEATRE SYNC once. If this unit while entering ...
...Press DYNAMIC BASS again. 56US Using the Sound Effect Reinforcing bass frequencies You can reinforce bass frequencies. Operating the THEATRE SYNC function Point the remote to the direction of the TV and this function does not work, change the transmit time Press and hold TV CH + while entering.... Press DYNAMIC BASS. To change the transmit time. The transmit time varies depending on some Sony TVs.) • If distance between TV and this unit is selected. The transmit time from the remote is too far, this unit, then press THEATRE SYNC once. If this unit while entering ...

Operating Instructions
Page 58
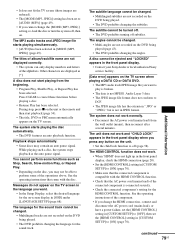
..."ON": Child lock function on. 4 Press . To cancel, press x for more than 5 seconds (" " lights up in the front panel display. (You can operate the system by pressing x for more than 5 seconds so that " " disappears from the front panel display. 58US Tip • You can deactivate the buttons on the unit... child mischief (child lock function). Deactivating the Buttons on the Unit (Child Lock) You can activate the child lock function by using the remote.) Note • When you operate the buttons on the unit while the child lock function is activated, the buttons on the unit are ...
..."ON": Child lock function on. 4 Press . To cancel, press x for more than 5 seconds (" " lights up in the front panel display. (You can operate the system by pressing x for more than 5 seconds so that " " disappears from the front panel display. 58US Tip • You can deactivate the buttons on the unit... child mischief (child lock function). Deactivating the Buttons on the Unit (Child Lock) You can activate the child lock function by using the remote.) Note • When you operate the buttons on the unit while the child lock function is activated, the buttons on the unit are ...

Operating Instructions
Page 73
... dB. [SUBWOOFER] +3.0 dB Set this between -6.0 dB and 0.0 dB +6.0 dB. (appears when you select one time Turn the VOLUME control on the remote. The Setup Display appears. 4 Press X/x repeatedly to select [SETUP], then press . Note • If all the speakers at an equal distance from your ... to select [CUSTOM], then press . Advanced Settings and Adjustments Adjusting the speaker level by using the test tone 1 Press DISPLAY when the system is emitted from your listening position than the front speakers. • Depending on the input stream, the [DISTANCE] setting may not be...
... dB. [SUBWOOFER] +3.0 dB Set this between -6.0 dB and 0.0 dB +6.0 dB. (appears when you select one time Turn the VOLUME control on the remote. The Setup Display appears. 4 Press X/x repeatedly to select [SETUP], then press . Note • If all the speakers at an equal distance from your ... to select [CUSTOM], then press . Advanced Settings and Adjustments Adjusting the speaker level by using the test tone 1 Press DISPLAY when the system is emitted from your listening position than the front speakers. • Depending on the input stream, the [DISTANCE] setting may not be...

Operating Instructions
Page 77
...77US Additional Information In this happens, check the following : 1 Turn the system off and on again. 2 Turn the connected equipment off and on the remote if "MUTING ON" is displayed in the front panel display. • The system is not connected securely. • Press MUTING on again. 3 Disconnect...to return to normal play mode. • Fast forward or fast reverse is used with alcohol. • Clean the disc. However, some DVD programs could affect picture quality. If you still experience problems even when you set [AUDIO (HDMI)] in Slow-motion Play mode. Even though you...
...77US Additional Information In this happens, check the following : 1 Turn the system off and on again. 2 Turn the connected equipment off and on the remote if "MUTING ON" is displayed in the front panel display. • The system is not connected securely. • Press MUTING on again. 3 Disconnect...to return to normal play mode. • Fast forward or fast reverse is used with alcohol. • Clean the disc. However, some DVD programs could affect picture quality. If you still experience problems even when you set [AUDIO (HDMI)] in Slow-motion Play mode. Even though you...
Operating Instructions
Page 78
...sound field function is on (page 30). • Check the speaker connections and settings (page 10, 72). • Depending on the DVD does not match the system. • Moisture has condensed inside the unit and may cause damage to the lenses. Insert the disc with automatic tuning). Use direct ... 1/Level 2, or Joliet. • The DATA DVD is not recorded in a JPEG format that are obstacles between the remote and the unit. • The distance between the remote and the unit is too far. • The remote is not MPEG1 Audio Layer 3 data. • The system cannot play a VIDEO CD, a CD, or ...
...sound field function is on (page 30). • Check the speaker connections and settings (page 10, 72). • Depending on the DVD does not match the system. • Moisture has condensed inside the unit and may cause damage to the lenses. Insert the disc with automatic tuning). Use direct ... 1/Level 2, or Joliet. • The DATA DVD is not recorded in a JPEG format that are obstacles between the remote and the unit. • The distance between the remote and the unit is too far. • The remote is not MPEG1 Audio Layer 3 data. • The system cannot play a VIDEO CD, a CD, or ...
Operating Instructions
Page 79
... format. During stop, press x on the unit or the remote and then start playing from the wall outlet (mains), then reconnect after several minutes. The system starts playing the disc automatically. • The DVD features an auto playback function. A disc cannot be ejected and... "LOCKED" appears in the front panel display. • Contact your Sony dealer or local authorized Sony service facility. [Data error] ...
... format. During stop, press x on the unit or the remote and then start playing from the wall outlet (mains), then reconnect after several minutes. The system starts playing the disc automatically. • The DVD features an auto playback function. A disc cannot be ejected and... "LOCKED" appears in the front panel display. • Contact your Sony dealer or local authorized Sony service facility. [Data error] ...

Operating Instructions
Page 82
...(aerial) (1) • FM wire antenna (aerial) (1) • Speaker cords (6, red/white/green/gray/blue/purple) • Video Cord (1) • Remote Commander (remote) (1) • R6 (size AA) batteries (2) • Calibration mic (1) • Foot pads (1 set) 82US • Operating Instructions • HDMI... ohms 93 × 162 × 75 mm (3 3/4 × 6 1/2 × 3 inches) (w/h/d) 0.6 kg (1 lb 6 oz) Subwoofer (SS-WS71) Speaker system Speaker unit Rated impedance Dimensions (approx.) Mass (approx.) Bass reflex 160 mm (6 3/8 inches) dia, cone type 3.0 ohms 197 × 322 × 345 mm (7 ...
...(aerial) (1) • FM wire antenna (aerial) (1) • Speaker cords (6, red/white/green/gray/blue/purple) • Video Cord (1) • Remote Commander (remote) (1) • R6 (size AA) batteries (2) • Calibration mic (1) • Foot pads (1 set) 82US • Operating Instructions • HDMI... ohms 93 × 162 × 75 mm (3 3/4 × 6 1/2 × 3 inches) (w/h/d) 0.6 kg (1 lb 6 oz) Subwoofer (SS-WS71) Speaker system Speaker unit Rated impedance Dimensions (approx.) Mass (approx.) Bass reflex 160 mm (6 3/8 inches) dia, cone type 3.0 ohms 197 × 322 × 345 mm (7 ...

Operating Instructions
Page 87
Front panel A "/1 (on/standby) (26) B A (open/close) (26) C Disc operation (26) D FUNCTION (26) E Front panel display (89) F (remote sensor) (9) G VOLUME control (26) H PHONES jack (26) I AUDIO IN/A.CAL MIC jack (15, 24) J Disc tray (26) Additional Information continued 87US Index to Parts and Controls For more information, refer to the pages indicated in parentheses.
Front panel A "/1 (on/standby) (26) B A (open/close) (26) C Disc operation (26) D FUNCTION (26) E Front panel display (89) F (remote sensor) (9) G VOLUME control (26) H PHONES jack (26) I AUDIO IN/A.CAL MIC jack (15, 24) J Disc tray (26) Additional Information continued 87US Index to Parts and Controls For more information, refer to the pages indicated in parentheses.

Operating Instructions
Page 94
System menu MEMORY1) FM MODE2) NAME IN1) SLEEP DIMMER DEMO ATTENUATE3) CHILD LOCK MEMORY 1-20 (FM), MEMORY 1-10 (AM) STEREO MONO SLEEP OFF, SLEEP 90M-1M DIMMER OFF DIMMER ON DEMO ON DEMO OFF ATT ON ATT OFF OFF ON 1)Appears during "TUNER FM" or "TUNER AM" only. 2)Appears during "TUNER FM" only. 3)"ATTENUATE" may not appear, depending on the remote. System Menu List You can set the following items with SYSTEM MENU on the selected function. 94US
System menu MEMORY1) FM MODE2) NAME IN1) SLEEP DIMMER DEMO ATTENUATE3) CHILD LOCK MEMORY 1-20 (FM), MEMORY 1-10 (AM) STEREO MONO SLEEP OFF, SLEEP 90M-1M DIMMER OFF DIMMER ON DEMO ON DEMO OFF ATT ON ATT OFF OFF ON 1)Appears during "TUNER FM" or "TUNER AM" only. 2)Appears during "TUNER FM" only. 3)"ATTENUATE" may not appear, depending on the remote. System Menu List You can set the following items with SYSTEM MENU on the selected function. 94US

Operating Instructions
Page 96
R Radio 53 Radio Stations 52 Rear Panel 88 Region Code 8, 84 Remote 9, 55 Repeat Play 38 RESET 67 Resume Play 34 S S VIDEO 21 Scan 32 SCENE 33 Scene 85 SCREEN SAVER 69 SCREEN SETUP 68 Searching 32 ... Slow-motion Play 32 Sound Field 30 SPEAKER FORMATION 62 SPEAKER SETUP 72 CONNECTION 72 DISTANCE 72 LEVEL 73 SUBTITLE 44, 68 SYSTEM MENU 18, 28, 53, 57, 58 System menu list 94 T TEST TONE 73 THEATRE SYNC 55 TIME/TEXT 33 TITLE 33 Title 85 TRACK 33 Track 85 TRACK SELECTION...
R Radio 53 Radio Stations 52 Rear Panel 88 Region Code 8, 84 Remote 9, 55 Repeat Play 38 RESET 67 Resume Play 34 S S VIDEO 21 Scan 32 SCENE 33 Scene 85 SCREEN SAVER 69 SCREEN SETUP 68 Searching 32 ... Slow-motion Play 32 Sound Field 30 SPEAKER FORMATION 62 SPEAKER SETUP 72 CONNECTION 72 DISTANCE 72 LEVEL 73 SUBTITLE 44, 68 SYSTEM MENU 18, 28, 53, 57, 58 System menu list 94 T TEST TONE 73 THEATRE SYNC 55 TIME/TEXT 33 TITLE 33 Title 85 TRACK 33 Track 85 TRACK SELECTION...

Operating Instructions
Page 99
... is not available for this model. ** The H, number 5, and VOLUME + buttons have tactile dots. Remote control ALPHABETICAL ORDER A - Use the tactile dots as references when operating the system. wk es (53) SOUND FIELD qh (30) SUBTITLE wf (44) SYSTEM MENU wg (18, 28, 55, 57, 94) THEATRE SYNC w; (56) TUNING +/- 0 qs (52)... TV e; (55) TV CH +/- O ANGLE 5 (43) AUDIO 4 (39) CLEAR ef (33, 55, 67) D.TUNING wf (53) DISC SKIP* eg DISPLAY 2 (41, 54) DVD MENU wh (39, 55) DVD TOP MENU qf (39) DYNAMIC ...
... is not available for this model. ** The H, number 5, and VOLUME + buttons have tactile dots. Remote control ALPHABETICAL ORDER A - Use the tactile dots as references when operating the system. wk es (53) SOUND FIELD qh (30) SUBTITLE wf (44) SYSTEM MENU wg (18, 28, 55, 57, 94) THEATRE SYNC w; (56) TUNING +/- 0 qs (52)... TV e; (55) TV CH +/- O ANGLE 5 (43) AUDIO 4 (39) CLEAR ef (33, 55, 67) D.TUNING wf (53) DISC SKIP* eg DISPLAY 2 (41, 54) DVD MENU wh (39, 55) DVD TOP MENU qf (39) DYNAMIC ...


