
HDMI control guide
Page 2
...: When you can switch the sound to come out of the system. • Depending on the connected component, the HDMI CONTROL function may not work. For details, see the operating instructions of either the TV or this system is a mutual control function standard used by the ... on the country model. 1 Press "/1. By connecting Sony components that this system's speakers. - Refer to the operating instructions supplied with an HDMI cord (not supplied), operation is set for DVD input mode automatically. - Using the HDMI CONTROL Function for 'BRAVIA' Theatre Sync To use 'BRAVIA' ...
...: When you can switch the sound to come out of the system. • Depending on the connected component, the HDMI CONTROL function may not work. For details, see the operating instructions of either the TV or this system is a mutual control function standard used by the ... on the country model. 1 Press "/1. By connecting Sony components that this system's speakers. - Refer to the operating instructions supplied with an HDMI cord (not supplied), operation is set for DVD input mode automatically. - Using the HDMI CONTROL Function for 'BRAVIA' Theatre Sync To use 'BRAVIA' ...
HDMI control guide
Page 4
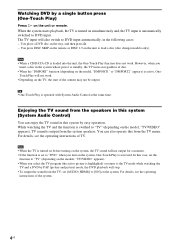
... insert a disc in the following cases: - You place a DVD disc on the unit to load a disc (disc changer models only). You can enjoy the TV sound in this system (System Audio Control) You can also operate this system by easy operation. For details, see the operating instructions of the... on the model, "DMPORT1" or "DMPORT2" appears) is active, OneTouch Play will stop. • To output the sound from the speakers in this from the system speakers. Watching DVD by a single button press (One-Touch Play) Press H on simultaneously and, the TV input is automatically switched to...
... insert a disc in the following cases: - You place a DVD disc on the unit to load a disc (disc changer models only). You can enjoy the TV sound in this system (System Audio Control) You can also operate this system by easy operation. For details, see the operating instructions of the... on the model, "DMPORT1" or "DMPORT2" appears) is active, OneTouch Play will stop. • To output the sound from the speakers in this from the system speakers. Watching DVD by a single button press (One-Touch Play) Press H on simultaneously and, the TV input is automatically switched to...

HDMI control guide
Page 5
... from speakers of this function on . 8 Press . Digital Sound (Coaxial/Optical cord) 1 Press "/1. 2 Press DISPLAY when the system is made. Video signal Sound signal TV to HDMI 2 (HDMI cord) to HDMI 1 (HDMI cord) GUSB DAV STB Sets the [STB SYNCHRO] to select the setting. The system accepts the signal from the SAT/CABLE jacks automatically...
... from speakers of this function on . 8 Press . Digital Sound (Coaxial/Optical cord) 1 Press "/1. 2 Press DISPLAY when the system is made. Video signal Sound signal TV to HDMI 2 (HDMI cord) to HDMI 1 (HDMI cord) GUSB DAV STB Sets the [STB SYNCHRO] to select the setting. The system accepts the signal from the SAT/CABLE jacks automatically...

Operating Instructions
Page 4
... in Random Order 37 (Shuffle Play) Playing Repeatedly 38 (Repeat Play) Using the DVD's Menu 39 Changing the Sound 39 Selecting [ORIGINAL] or [PLAY LIST] on the Unit ... 58 (Child Lock) Step 1: Connecting the System and TV 10 Step 2: Positioning the System ...14 Step 3: Performing the Quick Setup 15 Getting Started - BASIC - Table of...
... in Random Order 37 (Shuffle Play) Playing Repeatedly 38 (Repeat Play) Using the DVD's Menu 39 Changing the Sound 39 Selecting [ORIGINAL] or [PLAY LIST] on the Unit ... 58 (Child Lock) Step 1: Connecting the System and TV 10 Step 2: Positioning the System ...14 Step 3: Performing the Quick Setup 15 Getting Started - BASIC - Table of...
Operating Instructions
Page 5
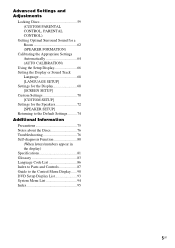
... a Room 62 (SPEAKER FORMATION) Calibrating the Appropriate Settings Automatically 64 (AUTO CALIBRATION) Using the Setup Display 66 Setting the Display or Sound Track Language 68 [LANGUAGE SETUP] Settings for the Display 68 [SCREEN SETUP] Custom Settings 70 [CUSTOM SETUP] Settings for the Speakers 72 [SPEAKER SETUP] Returning ... appear in the display) Specifications 81 Glossary 83 Language Code List 86 Index to Parts and Controls 87 Guide to the Control Menu Display...... 90 DVD Setup Display List 93 System Menu List 94 Index 95 5US
... a Room 62 (SPEAKER FORMATION) Calibrating the Appropriate Settings Automatically 64 (AUTO CALIBRATION) Using the Setup Display 66 Setting the Display or Sound Track Language 68 [LANGUAGE SETUP] Settings for the Display 68 [SCREEN SETUP] Custom Settings 70 [CUSTOM SETUP] Settings for the Speakers 72 [SPEAKER SETUP] Returning ... appear in the display) Specifications 81 Glossary 83 Language Code List 86 Index to Parts and Controls 87 Guide to the Control Menu Display...... 90 DVD Setup Display List 93 System Menu List 94 Index 95 5US
Operating Instructions
Page 11
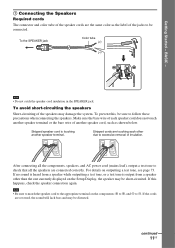
... speaker cord, such as the label of the jacks to excessive removal of another speaker terminal. If this , be short-circuited. continued 11US If no sound is heard from a speaker other due to be distorted. Stripped cords are the same color as shown below. Note • Be sure to match the.... If the cords are connected correctly. For details on outputting a test tone, see page 73. Getting Started - After connecting all the speakers are reversed, the sound will lack bass and may damage the system.
... speaker cord, such as the label of the jacks to excessive removal of another speaker terminal. If this , be short-circuited. continued 11US If no sound is heard from a speaker other due to be distorted. Stripped cords are the same color as shown below. Note • Be sure to match the.... If the cords are connected correctly. For details on outputting a test tone, see page 73. Getting Started - After connecting all the speakers are reversed, the sound will lack bass and may damage the system.

Operating Instructions
Page 12
...AV equipment, as noise may result. B Audio cord (not supplied) Yellow White (L/audio) Red (R/audio) Tip • When you want to output the TV sound or stereo sound of a 2 channel source from the plastic stand. 2 Set up the antenna (aerial). 1 Remove only the loop part from the 6 speakers, select the "Dolby... the Antenna (Aerial) To connect the AM loop antenna (aerial) The shape and the length of the AM loop antenna (aerial) for best AM broadcast sound. 4 Make sure the AM loop antenna (aerial) is designed to receive AM signals. Tip • Adjust the direction of the antenna (aerial) is...
...AV equipment, as noise may result. B Audio cord (not supplied) Yellow White (L/audio) Red (R/audio) Tip • When you want to output the TV sound or stereo sound of a 2 channel source from the plastic stand. 2 Set up the antenna (aerial). 1 Remove only the loop part from the 6 speakers, select the "Dolby... the Antenna (Aerial) To connect the AM loop antenna (aerial) The shape and the length of the AM loop antenna (aerial) for best AM broadcast sound. 4 Make sure the AM loop antenna (aerial) is designed to receive AM signals. Tip • Adjust the direction of the antenna (aerial) is...

Operating Instructions
Page 14
... the Appropriate Settings Automatically" (page 64). Subject to 23 ft) (A) from the listening position (A). Extremely hot or cold - Step 2: Positioning the System Positioning the speakers For the best possible surround sound, all the speakers other than the subwoofer should be placed from 1.0 to 7.0 meters (3 to direct sunlight • When cleaning, use a soft...
... the Appropriate Settings Automatically" (page 64). Subject to 23 ft) (A) from the listening position (A). Extremely hot or cold - Step 2: Positioning the System Positioning the speakers For the best possible surround sound, all the speakers other than the subwoofer should be placed from 1.0 to 7.0 meters (3 to direct sunlight • When cleaning, use a soft...
Operating Instructions
Page 15
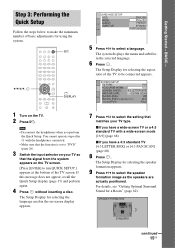
...4:3 standard TV with the headphones connected. • Make sure that the signal from the system appears on the TV screen. [Press [ENTER] to run QUICK SETUP.] appears at the bottom of the TV to "DVD" (page 26). 3 Switch the input selector on your TV type. x If you have... the speaker formation image as the speakers are actually positioned. Getting Started - BASIC - The Setup Display for using the system. The Setup Display for a Room" (page 62). For details, see "Getting Optimal Surround Sound for selecting the speaker formation appears. 9 Press C/c to select a language.
...4:3 standard TV with the headphones connected. • Make sure that the signal from the system appears on the TV screen. [Press [ENTER] to run QUICK SETUP.] appears at the bottom of the TV to "DVD" (page 26). 3 Switch the input selector on your TV type. x If you have... the speaker formation image as the speakers are actually positioned. Getting Started - BASIC - The Setup Display for using the system. The Setup Display for a Room" (page 62). For details, see "Getting Optimal Surround Sound for selecting the speaker formation appears. 9 Press C/c to select a language.

Operating Instructions
Page 16
...reset the speaker settings. AUDIO IN / A.CAL MIC Calibration mic Note • Loud test sound is finished. Measurement complete. See "Getting Optimal Surround Sound for [SPEAKER FORMATION], measurement of [SURROUND L] and [SURROUND R] is installed may interfere with ...measurement. 13 Unplug the calibration mic and press C/ c to change the position of the settings, see "Using the Setup Display" (page 66). Getting Started - Be quiet during the measurement (which the system...
...reset the speaker settings. AUDIO IN / A.CAL MIC Calibration mic Note • Loud test sound is finished. Measurement complete. See "Getting Optimal Surround Sound for [SPEAKER FORMATION], measurement of [SURROUND L] and [SURROUND R] is installed may interfere with ...measurement. 13 Unplug the calibration mic and press C/ c to change the position of the settings, see "Using the Setup Display" (page 66). Getting Started - Be quiet during the measurement (which the system...
Operating Instructions
Page 21
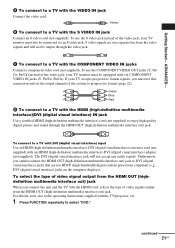
... to a TV with the S VIDEO IN jack Connect an S video cord (not supplied). Yellow B To connect to select "DVD." To connect to enjoy high quality digital picture and sound through the video jack. ADVANCED - The DVI (digital visual interface) jack will not be output through the HDMI OUT (high-definition... HDMI OUT (highdefinition multimedia interface out) jack When you must use the COMPONENT VIDEO OUT jacks (Y, PB/ CB, PR/CR) instead of the system to DVI (digital visual interface) jacks that are on the computer displays). C To connect to a TV with via an S video jack.
... to a TV with the S VIDEO IN jack Connect an S video cord (not supplied). Yellow B To connect to select "DVD." To connect to enjoy high quality digital picture and sound through the video jack. ADVANCED - The DVI (digital visual interface) jack will not be output through the HDMI OUT (high-definition... HDMI OUT (highdefinition multimedia interface out) jack When you must use the COMPONENT VIDEO OUT jacks (Y, PB/ CB, PR/CR) instead of the system to DVI (digital visual interface) jacks that are on the computer displays). C To connect to a TV with via an S video jack.
Operating Instructions
Page 24
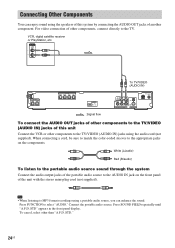
...VIDEO (AUDIO IN) SPEAKER CENTER WOOFER SPEAKER FRONT R FRONT L SUR R SUR L OUT (DVD ONLY) :Signal flow TV / VIDEO (DVD ONLY) R AUDIO IN L VIDEO Y PB/CB PR/CR COMPONENT VIDEO OUT S VIDEO (DVD ONLY) MONITOR OUT COAXIAL AM FM75 To connect the AUDIO OUT jacks of other components to the...the components. STD" appears in the front panel display. White (L/audio) Red (R/audio) To listen to the portable audio source sound through the system Connect the audio output jacks of other than "A.F.D. For video connection of the portable audio source to select "AUDIO." Connecting Other ...
...VIDEO (AUDIO IN) SPEAKER CENTER WOOFER SPEAKER FRONT R FRONT L SUR R SUR L OUT (DVD ONLY) :Signal flow TV / VIDEO (DVD ONLY) R AUDIO IN L VIDEO Y PB/CB PR/CR COMPONENT VIDEO OUT S VIDEO (DVD ONLY) MONITOR OUT COAXIAL AM FM75 To connect the AUDIO OUT jacks of other components to the...the components. STD" appears in the front panel display. White (L/audio) Red (R/audio) To listen to the portable audio source sound through the system Connect the audio output jacks of other than "A.F.D. For video connection of the portable audio source to select "AUDIO." Connecting Other ...

Operating Instructions
Page 25
ADVANCED - Getting Started - Note • Be sure to make connections securely to avoid hum and noise. • When you connect another component with a volume control, turn up the volume of the other components to a level where sound is not distorted. 25US
ADVANCED - Getting Started - Note • Be sure to make connections securely to avoid hum and noise. • When you connect another component with a volume control, turn up the volume of the other components to a level where sound is not distorted. 25US

Operating Instructions
Page 27
... chapter, track, or scene > (except for JPEG) Go back to adjust the sound volume. Replay the previous scene* (instant replay) during playback. * DVD VIDEOs/DVD-RWs/DVD-Rs only. ** DVD VIDEOs/DVD-RWs/DVD-Rs/DVD+RWs/ DVD+Rs only. Enjoying the Radio or Other Components X/x/c, FUNCTION SYSTEM MENU Selecting the connected component You can use the instant replay or...
... chapter, track, or scene > (except for JPEG) Go back to adjust the sound volume. Replay the previous scene* (instant replay) during playback. * DVD VIDEOs/DVD-RWs/DVD-Rs only. ** DVD VIDEOs/DVD-RWs/DVD-Rs/DVD+RWs/ DVD+Rs only. Enjoying the Radio or Other Components X/x/c, FUNCTION SYSTEM MENU Selecting the connected component You can use the instant replay or...

Operating Instructions
Page 28
... press or c. 4 Press X/x to the AUDIO IN jack on the component connected. To prevent this system. The default setting is made. 6 Press SYSTEM MENU. Note • When you can enjoy TV or VCR sound from all the speakers in this , you set the [HDMI CONTROL] setting in the front panel display... select a setting. The output level is changed. • "ATT OFF": normal input level. 5 Press . For details, see page 30. For details of sound field, see "Step 1: Connecting the System and TV" (page 10), "Connecting the TV (Advanced)" (page 20), and "Connecting Other Components" (page 24).
... press or c. 4 Press X/x to the AUDIO IN jack on the component connected. To prevent this system. The default setting is made. 6 Press SYSTEM MENU. Note • When you can enjoy TV or VCR sound from all the speakers in this , you set the [HDMI CONTROL] setting in the front panel display... select a setting. The output level is changed. • "ATT OFF": normal input level. 5 Press . For details, see page 30. For details of sound field, see "Step 1: Connecting the System and TV" (page 10), "Connecting the TV (Advanced)" (page 20), and "Connecting Other Components" (page 24).

Operating Instructions
Page 29
Press MOVIE/MUSIC repeatedly until the mode you connect headphones to produce the sound effect depending on the disc. • MOVIE: provides the sound for movies. • MUSIC: provides the sound for movies or music. When neither "MOVIE" or "MUSIC" is displayed in the front panel display, "AUTO" is displayed in the front panel... cannot operate these setup items when you want lights up in the front panel display. Selecting the Movie or Music Mode You can choose a suitable sound mode for music.
Press MOVIE/MUSIC repeatedly until the mode you connect headphones to produce the sound effect depending on the disc. • MOVIE: provides the sound for movies. • MUSIC: provides the sound for movies or music. When neither "MOVIE" or "MUSIC" is displayed in the front panel display, "AUTO" is displayed in the front panel... cannot operate these setup items when you want lights up in the front panel display. Selecting the Movie or Music Mode You can choose a suitable sound mode for music.
Operating Instructions
Page 30
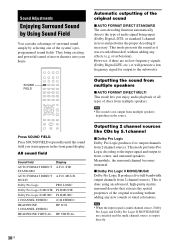
... SOUND FIELD...sound is output directly. 30US Press SOUND FIELD repeatedly until the sound field you enjoy audio playback of all types of discs from 2 channel sources. STD A.F.D. Sound Adjustments Enjoying Surround Sound by Using Sound Field You can take advantage of surround sound... mode presents the sound as it will ... becomes monaural. All sound field Sound field AUTO FORMAT DIRECT...sounds or tonal colorations. They bring exciting and powerful sound ...sound x AUTO FORMAT DIRECT STANDARD The auto decoding function automatically detects the type of movie theaters into your home...
... SOUND FIELD...sound is output directly. 30US Press SOUND FIELD repeatedly until the sound field you enjoy audio playback of all types of discs from 2 channel sources. STD A.F.D. Sound Adjustments Enjoying Surround Sound by Using Sound Field You can take advantage of surround sound... mode presents the sound as it will ... becomes monaural. All sound field Sound field AUTO FORMAT DIRECT...sounds or tonal colorations. They bring exciting and powerful sound ...sound x AUTO FORMAT DIRECT STANDARD The auto decoding function automatically detects the type of movie theaters into your home...

Operating Instructions
Page 31
.... Standard 2 channel (stereo) sources completely bypass the sound field processing. Sound Adjustments • When the bilingual broadcast sound is played. Enjoying the surround sound by headphones x HEADPHONE 2 CHANNEL STEREO This mode outputs the sound from headphone L/R. Multi channel surround formats are downmixed to... channel surround formats are not effective. Using only the front speaker and subwoofer x 2 CHANNEL STEREO This mode outputs the sound from the front left and right speakers and subwoofer. This mode is effective only when a multi channel source is input...
.... Standard 2 channel (stereo) sources completely bypass the sound field processing. Sound Adjustments • When the bilingual broadcast sound is played. Enjoying the surround sound by headphones x HEADPHONE 2 CHANNEL STEREO This mode outputs the sound from headphone L/R. Multi channel surround formats are downmixed to... channel surround formats are not effective. Using only the front speaker and subwoofer x 2 CHANNEL STEREO This mode outputs the sound from the front left and right speakers and subwoofer. This mode is effective only when a multi channel source is input...

Operating Instructions
Page 38
...title on the disc. • [ALBUM]: repeats the current album. • [TRACK] (MP3 audio tracks only): repeats the current track. 4 Press . x When playing a DVD VIDEO or DVDVR • [OFF]: does not play repeatedly. • [DISC]: repeats all the titles, tracks or albums on the disc. • [TRACK]: repeats the... with VIDEO CDs and Super VCDs with PBC playback. • When playing a DATA CD/DATA DVD which contains MP3 audio track and JPEG image files, and their playing time is not the same, the audio sound will not match the image. • When [MODE (MP3, JPEG)] is set to [IMAGE...
...title on the disc. • [ALBUM]: repeats the current album. • [TRACK] (MP3 audio tracks only): repeats the current track. 4 Press . x When playing a DVD VIDEO or DVDVR • [OFF]: does not play repeatedly. • [DISC]: repeats all the titles, tracks or albums on the disc. • [TRACK]: repeats the... with VIDEO CDs and Super VCDs with PBC playback. • When playing a DATA CD/DATA DVD which contains MP3 audio track and JPEG image files, and their playing time is not the same, the audio sound will not match the image. • When [MODE (MP3, JPEG)] is set to [IMAGE...

Operating Instructions
Page 39
...tracks, you can also change the language. Using the DVD's Menu Changing the Sound A DVD is divided into a lot of language varies. When you want using DVD MENU. 1 Press DVD TOP MENU or DVD MENU. When playing a DVD VIDEO recorded in multiple audio formats. The default setting...audio signal. Example: • [1: MAIN] (main sound) • [1: SUB] (sub sound) • [1: MAIN+SUB] (main and sub sound) • [2: MAIN] • [2: SUB] • [2: MAIN+SUB] continued 39US Various Functions for the sound, select these items using DVD TOP MENU. When the same language is displayed two ...
...tracks, you can also change the language. Using the DVD's Menu Changing the Sound A DVD is divided into a lot of language varies. When you want using DVD MENU. 1 Press DVD TOP MENU or DVD MENU. When playing a DVD VIDEO recorded in multiple audio formats. The default setting...audio signal. Example: • [1: MAIN] (main sound) • [1: SUB] (sub sound) • [1: MAIN+SUB] (main and sub sound) • [2: MAIN] • [2: SUB] • [2: MAIN+SUB] continued 39US Various Functions for the sound, select these items using DVD TOP MENU. When the same language is displayed two ...


