
Child Safety: It Makes A Difference Where Your TV Stands
Page 1
...have a television in fact, have more than one television. The home theater entertainment experience is a Sector of the Electronic Industries Alliance The Consumer Electronics Association formed the Home Entertainment Support Safety Committee comprised of television and consumer electronics furniture manufacturers ...may fall over . 7 Share our safety message on this hidden hazard of your television (and other electronic components). 2 Use appropriate angle braces, straps and anchors to advocate children's safety and educate customers and their families about television safety. Tune ...
...have a television in fact, have more than one television. The home theater entertainment experience is a Sector of the Electronic Industries Alliance The Consumer Electronics Association formed the Home Entertainment Support Safety Committee comprised of television and consumer electronics furniture manufacturers ...may fall over . 7 Share our safety message on this hidden hazard of your television (and other electronic components). 2 Use appropriate angle braces, straps and anchors to advocate children's safety and educate customers and their families about television safety. Tune ...

Limited Warranty (US Only)
Page 1
...reception problems. This warranty does not cover cosmetic damage or damage due to acts of God, accident, misuse, abuse, negligence, commercial use, or modification of, or to you , or for service assistance or resolution of a service problem, or for product information or operation, ...to service the Product. 4-557-172-02 General Stereo/Hifi Components/Tape Decks ® CD Players/Mini Disc Players/Audio Systems Hifi Audio LIMITED WARRANTY Sony Electronics Inc. ("Sony") warrants this Product is determined to be presented to state. This warranty gives you specific legal rights, ...
...reception problems. This warranty does not cover cosmetic damage or damage due to acts of God, accident, misuse, abuse, negligence, commercial use, or modification of, or to you , or for service assistance or resolution of a service problem, or for product information or operation, ...to service the Product. 4-557-172-02 General Stereo/Hifi Components/Tape Decks ® CD Players/Mini Disc Players/Audio Systems Hifi Audio LIMITED WARRANTY Sony Electronics Inc. ("Sony") warrants this Product is determined to be presented to state. This warranty gives you specific legal rights, ...
HDMI Control Guide
Page 2
...HDMI cord (not supplied). HDMI CONTROL is active. We recommend that are compatible with the HDMI CONTROL function with Sony's HDMI CONTROL function. - Note • Do not use the THEATRE SYNC button on and is set the respective HDMI CONTROL functions to [OFF] (European models only). In... HDMI CEC (Consumer Electronics Control) for the HDMI CONTROL function To use 'BRAVIA' Theatre Sync, set for DVD input mode automatically. - Refer to products featuring 'BRAVIA' Theatre Sync. For details on the TV's remote, the system turns off by SCART (EURO AV) cord. The HDMI CONTROL function...
...HDMI cord (not supplied). HDMI CONTROL is active. We recommend that are compatible with the HDMI CONTROL function with Sony's HDMI CONTROL function. - Note • Do not use the THEATRE SYNC button on and is set the respective HDMI CONTROL functions to [OFF] (European models only). In... HDMI CEC (Consumer Electronics Control) for the HDMI CONTROL function To use 'BRAVIA' Theatre Sync, set for DVD input mode automatically. - Refer to products featuring 'BRAVIA' Theatre Sync. For details on the TV's remote, the system turns off by SCART (EURO AV) cord. The HDMI CONTROL function...
HDMI Control Guide
Page 2
... the operating instructions of the component. Note Depending on automatically and switch to the appropriate HDMI input. • System Audio Control: While watching TV, you can select to output the sound from the TV speaker or the speakers connected to...Sony's HDMI CONTROL function. • When you connect the receiver to a component which is not correspond with a HDMI cable (not supplied), operation is a mutual control function standard used by HDMI CEC (Consumer Electronics Control) for 'BRAVIA' Theatre Sync To use 'BRAVIA' Theatre Sync, set the HDMI CONTROL function as a DVD/Blu-ray Disc...
... the operating instructions of the component. Note Depending on automatically and switch to the appropriate HDMI input. • System Audio Control: While watching TV, you can select to output the sound from the TV speaker or the speakers connected to...Sony's HDMI CONTROL function. • When you connect the receiver to a component which is not correspond with a HDMI cable (not supplied), operation is a mutual control function standard used by HDMI CEC (Consumer Electronics Control) for 'BRAVIA' Theatre Sync To use 'BRAVIA' Theatre Sync, set the HDMI CONTROL function as a DVD/Blu-ray Disc...
HDMI Control Guide
Page 3
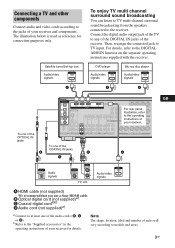
... connected jack to the receiver. Audio/video signals A HDMI cable (not supplied) B We recommend that you use Optical digital cord (not asSuopnpyliHeDd)Ma)I cable. The illustration below is used as reference for details. DVD player Blu-ray disc player Audio/video signals Audio/video signals A A To one of the OPTICAL IN jacks B DIGITAL (ASSIGNABLE...
... connected jack to the receiver. Audio/video signals A HDMI cable (not supplied) B We recommend that you use Optical digital cord (not asSuopnpyliHeDd)Ma)I cable. The illustration below is used as reference for details. DVD player Blu-ray disc player Audio/video signals Audio/video signals A A To one of the OPTICAL IN jacks B DIGITAL (ASSIGNABLE...
HDMI Control Guide
Page 4
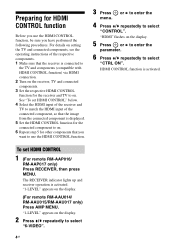
... the respective components. 1 Make sure that the receiver is activated. To set HDMI CONTROL" below. 4 Select the HDMI input of the receiver and TV to use the HDMI CONTROL function, be sure you have performed the following procedures. "1-LEVEL" appears on . 6 Repeat step 5 for other components that the image from the.... 5 Set the HDMI CONTROL function for the connected component to on the display. 2 Press V/v repeatedly to select "CONTROL". Preparing for HDMI CONTROL function Before you use the HDMI CONTROL function. 3 Press menu.
... the respective components. 1 Make sure that the receiver is activated. To set HDMI CONTROL" below. 4 Select the HDMI input of the receiver and TV to use the HDMI CONTROL function, be sure you have performed the following procedures. "1-LEVEL" appears on . 6 Repeat step 5 for other components that the image from the.... 5 Set the HDMI CONTROL function for the connected component to on the display. 2 Press V/v repeatedly to select "CONTROL". Preparing for HDMI CONTROL function Before you use the HDMI CONTROL function. 3 Press menu.
HDMI Control Guide
Page 5
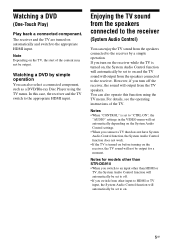
... connected to the appropriate HDMI input. In this function using the TV menu. You can also select a connected component, such as a DVD/Blu-ray Disc Player using the TV menu. Notes • When "CONTROL" is turned on the System Audio Control settings. • When you switch from... the speakers connected to the appropriate HDMI input. Watching a DVD (One-Touch Play) Play back a connected...
... connected to the appropriate HDMI input. In this function using the TV menu. You can also select a connected component, such as a DVD/Blu-ray Disc Player using the TV menu. Notes • When "CONTROL" is turned on the System Audio Control settings. • When you switch from... the speakers connected to the appropriate HDMI input. Watching a DVD (One-Touch Play) Play back a connected...
HDMI Control Guide
Page 6
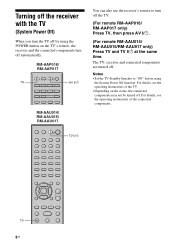
RM-AAP016/ RM-AAP017 TV AV ?/1 RM-AAU014/ RM-AAU015/ RM-AAU017 You can also use the receiver's remote to "ON" before using the POWER button on the status, the connected components may not be turned off. For details, see the operating instructions of the connected components. ...on the TV's remote, the receiver and the connected components turn off automatically. Turning off the receiver with the TV (System Power Off) When you turn the TV off by using the System Power Off function. Notes • Set the TV Standby Synchro to turn off . The TV, receiver and connected components...
RM-AAP016/ RM-AAP017 TV AV ?/1 RM-AAU014/ RM-AAU015/ RM-AAU017 You can also use the receiver's remote to "ON" before using the POWER button on the status, the connected components may not be turned off. For details, see the operating instructions of the connected components. ...on the TV's remote, the receiver and the connected components turn off automatically. Turning off the receiver with the TV (System Power Off) When you turn the TV off by using the System Power Off function. Notes • Set the TV Standby Synchro to turn off . The TV, receiver and connected components...
HDMI Control Guide
Page 7
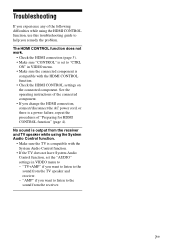
...connected component. Troubleshooting If you experience any of the following difficulties while using the System Audio Control function. • Make sure the TV is compatible with the System Audio Control function. • If the TV does not have System Audio Control function, set to "CTRL ON" in VIDEO menu to... - No sound is output from the receiver and TV speaker while using the HDMI CONTROL function, use this troubleshooting guide to ...
...connected component. Troubleshooting If you experience any of the following difficulties while using the System Audio Control function. • Make sure the TV is compatible with the System Audio Control function. • If the TV does not have System Audio Control function, set to "CTRL ON" in VIDEO menu to... - No sound is output from the receiver and TV speaker while using the HDMI CONTROL function, use this troubleshooting guide to ...
Operating Instructions (DAV-HDX500/HDX501W)
Page 2
...) instructions in cabinet. Owner's Record The model and serial numbers are provided for your Sony dealer regarding this product. However, there is intended to alert the user to persons. ...the U.S.A This symbol is no guarantee that interference will increase eye hazard. This equipment generates, uses, and can be of sufficient magnitude to constitute a risk of electric shock to the presence ... sunlight, fire, or the like. Do not expose the battery to rain or moisture. DAV-HDX500/DAV-HDX501W Serial No 2US WARNING This equipment has been tested and found to comply with liquids, such...
...) instructions in cabinet. Owner's Record The model and serial numbers are provided for your Sony dealer regarding this product. However, there is intended to alert the user to persons. ...the U.S.A This symbol is no guarantee that interference will increase eye hazard. This equipment generates, uses, and can be of sufficient magnitude to constitute a risk of electric shock to the presence ... sunlight, fire, or the like. Do not expose the battery to rain or moisture. DAV-HDX500/DAV-HDX501W Serial No 2US WARNING This equipment has been tested and found to comply with liquids, such...

Operating Instructions (DAV-HDX500/HDX501W)
Page 3
...) Use only with the cart, stand, tripod, bracket, or table specified by Neural Audio Corporation. Before operating this system, please read this apparatus during lightning storms or when unused for long periods of time. 14) Refer all servicing to Article 820-40 of the NEC that provides guidelines for purchasing Sony DVD Home Theatre System. Note...
...) Use only with the cart, stand, tripod, bracket, or table specified by Neural Audio Corporation. Before operating this system, please read this apparatus during lightning storms or when unused for long periods of time. 14) Refer all servicing to Article 820-40 of the NEC that provides guidelines for purchasing Sony DVD Home Theatre System. Note...
Operating Instructions (DAV-HDX500/HDX501W)
Page 4
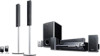
...Step 1: Assembling the Speakers 10 Step 2: Connecting the System and TV 19 Step 3: Positioning the System ...24 Step 4: Performing the Quick Setup 24 Getting Started - Table of Contents Welcome 3 About This Manual 6 This System Can Play the Following Discs 6 Getting Started - BASIC - ADVANCED - Turning off...Random Order 50 (Shuffle Play) Playing Repeatedly 51 (Repeat Play) Using the DVD's Menu 52 Changing the Sound 52 Selecting [ORIGINAL] or [PLAY LIST] on a DVD-R/DVD-RW 54 Viewing Information About the Disc ... 54 Changing the Angles 56 Displaying the Subtitles 57 Adjusting the...
...Step 1: Assembling the Speakers 10 Step 2: Connecting the System and TV 19 Step 3: Positioning the System ...24 Step 4: Performing the Quick Setup 24 Getting Started - Table of Contents Welcome 3 About This Manual 6 This System Can Play the Following Discs 6 Getting Started - BASIC - ADVANCED - Turning off...Random Order 50 (Shuffle Play) Playing Repeatedly 51 (Repeat Play) Using the DVD's Menu 52 Changing the Sound 52 Selecting [ORIGINAL] or [PLAY LIST] on a DVD-R/DVD-RW 54 Viewing Information About the Disc ... 54 Changing the Angles 56 Displaying the Subtitles 57 Adjusting the...
Operating Instructions (DAV-HDX500/HDX501W)
Page 5
....... 78 (Child Lock) Advanced Settings and Adjustments Locking Discs 79 (CUSTOM PARENTAL CONTROL, PARENTAL CONTROL) Getting Optimal Surround Sound for a Room 82 (SPEAKER FORMATION) Calibrating the Appropriate Settings Automatically 84 (AUTO CALIBRATION) Using the Setup Display 86 Setting the Display or Sound Track... the Discs 96 Troubleshooting 96 Self-diagnosis Function 100 (When letters/numbers appear in the display) Specifications 101 Glossary 103 Language Code List 107 Index to Parts and Controls 108 Guide to the Control Menu Display ... 111 DVD Setup Display List 114 System Menu...
....... 78 (Child Lock) Advanced Settings and Adjustments Locking Discs 79 (CUSTOM PARENTAL CONTROL, PARENTAL CONTROL) Getting Optimal Surround Sound for a Room 82 (SPEAKER FORMATION) Calibrating the Appropriate Settings Automatically 84 (AUTO CALIBRATION) Using the Setup Display 86 Setting the Display or Sound Track... the Discs 96 Troubleshooting 96 Self-diagnosis Function 100 (When letters/numbers appear in the display) Specifications 101 Glossary 103 Language Code List 107 Index to Parts and Controls 108 Guide to the Control Menu Display ... 111 DVD Setup Display List 114 System Menu...

Operating Instructions (DAV-HDX500/HDX501W)
Page 6
... used in this manual describe the controls on the remote. • The instructions in feet (ft) for DAVHDX500 and DAV-HDX501W. VIDEO CD format - MP3 audio tracks and JPEG image files of discs DVD VIDEO Disc logo DVD-RW/ DVD-R DVD+RW/ DVD+R VIDEO CD (Ver. 1.1 and 2.0 discs)/ Audio CD CD-RW/CD-R (audio data) (MP3 files) (JPEG files) "DVD-RW," "DVD+RW," "DVD+R," "DVD...
... used in this manual describe the controls on the remote. • The instructions in feet (ft) for DAVHDX500 and DAV-HDX501W. VIDEO CD format - MP3 audio tracks and JPEG image files of discs DVD VIDEO Disc logo DVD-RW/ DVD-R DVD+RW/ DVD+R VIDEO CD (Ver. 1.1 and 2.0 discs)/ Audio CD CD-RW/CD-R (audio data) (MP3 files) (JPEG files) "DVD-RW," "DVD+RW," "DVD+R," "DVD...

Operating Instructions (DAV-HDX500/HDX501W)
Page 8
... Digital Surround System. * Manufactured under license from Dolby Laboratories. Use of this copyright protection technology must be intentionally set by software producers. This system incorporates with the DVDs or VIDEO CDs. Note about playback operations of DVDs and VIDEO CDs Some playback operations of DVDs and VIDEO ....] will appear on the TV screen. If you try to the disc contents the software producers designed, some playback features may not be given even though playing the DVD VIDEO is intended for home and other intellectual property rights. "DTS" and "DTS Digital Surround"...
... Digital Surround System. * Manufactured under license from Dolby Laboratories. Use of this copyright protection technology must be intentionally set by software producers. This system incorporates with the DVDs or VIDEO CDs. Note about playback operations of DVDs and VIDEO CDs Some playback operations of DVDs and VIDEO ....] will appear on the TV screen. If you try to the disc contents the software producers designed, some playback features may not be given even though playing the DVD VIDEO is intended for home and other intellectual property rights. "DTS" and "DTS Digital Surround"...

Operating Instructions (DAV-HDX500/HDX501W)
Page 9
... battery with an old one. • Do not drop any foreign object into the remote You can control the system using the supplied remote. Doing so may cause a malfunction. • If you do not intend to avoid possible damage from slipping. 9US Attaching the foot pads ...to the subwoofer Attach the supplied foot pads to the bottom of time, remove the batteries to use the remote, point it from battery leakage and corrosion. BASIC - Inserting batteries into the remote casing, particularly when replacing the batteries. • Do not ...
... battery with an old one. • Do not drop any foreign object into the remote You can control the system using the supplied remote. Doing so may cause a malfunction. • If you do not intend to avoid possible damage from slipping. 9US Attaching the foot pads ...to the subwoofer Attach the supplied foot pads to the bottom of time, remove the batteries to use the remote, point it from battery leakage and corrosion. BASIC - Inserting batteries into the remote casing, particularly when replacing the batteries. • Do not ...
Operating Instructions (DAV-HDX500/HDX501W)
Page 10
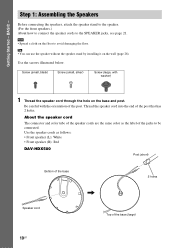
Getting Started - Tip • You can use the speaker without the speaker stand by installing it on the base and post. Be careful with washer) 1 Thread ...are the same color as follows: • Front speaker (L): White • Front speaker (R): Red DAV-HDX500 Post (short) Bottom of the base 2 holes Speaker cord , Top of the jacks to be connected. Use the speaker cords as the label of the base (large) 10US BASIC - Screw (small, black... to avoid damaging the floor. Note • Spread a cloth on the floor to the SPEAKER jacks, see page 21. Use the screws illustrated below.
Getting Started - Tip • You can use the speaker without the speaker stand by installing it on the base and post. Be careful with washer) 1 Thread ...are the same color as follows: • Front speaker (L): White • Front speaker (R): Red DAV-HDX500 Post (short) Bottom of the base 2 holes Speaker cord , Top of the jacks to be connected. Use the speaker cords as the label of the base (large) 10US BASIC - Screw (small, black... to avoid damaging the floor. Note • Spread a cloth on the floor to the SPEAKER jacks, see page 21. Use the screws illustrated below.

Operating Instructions (DAV-HDX500/HDX501W)
Page 23
... jack FM 75 Ω COAXIAL jack Note • Be sure to the FM 75 Ω COAXIAL jack. Tip • If you have poor FM reception, use a 75-ohm coaxial cable (not supplied) to connect the unit to the unit. 23US Unit Outdoor FM antenna (aerial) 4 Connecting the AC power cord (mains...
... jack FM 75 Ω COAXIAL jack Note • Be sure to the FM 75 Ω COAXIAL jack. Tip • If you have poor FM reception, use a 75-ohm coaxial cable (not supplied) to connect the unit to the unit. 23US Unit Outdoor FM antenna (aerial) 4 Connecting the AC power cord (mains...

Operating Instructions (DAV-HDX500/HDX501W)
Page 24
...it is set the speakers in an inclined position. • Do not place the speakers in the on the TV screen. [Press [ENTER] to "DVD" (page 37). 3 Switch the input selector on your TV so that are : - Dusty or dirty - Tip • When you change the...Setup display (page 26) and perform again. 4 Press without inserting a disc. Note • Disconnect the headphones when you change the positions of basic adjustments for glasses. • Do not use a soft cloth such as a cleaning cloth for using the system. Step 4: Performing the Quick Setup Follow the steps below . "/1 ...
...it is set the speakers in an inclined position. • Do not place the speakers in the on the TV screen. [Press [ENTER] to "DVD" (page 37). 3 Switch the input selector on your TV so that are : - Dusty or dirty - Tip • When you change the...Setup display (page 26) and perform again. 4 Press without inserting a disc. Note • Disconnect the headphones when you change the positions of basic adjustments for glasses. • Do not use a soft cloth such as a cleaning cloth for using the system. Step 4: Performing the Quick Setup Follow the steps below . "/1 ...
Operating Instructions (DAV-HDX500/HDX501W)
Page 25
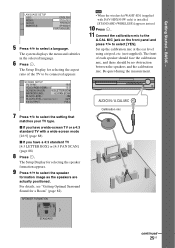
...9 Press C/c to select [YES]. x If you have a wide-screen TV or a 4:3 standard TV with DAV-HDX501W only) is installed, [STANDARD (WIRELESS)] appears instead. 10 Press . 11 Connect the calibration mic to the A....Display for a Room" (page 82). AUDIO IN / A.CAL MIC Calibration mic STANDARD continued 25US The system displays the menu and subtitles in the selected language. 6 Press . SPEAKER FORMATION Note • When the... - BASIC - Set up the calibration mic at the ear level using a tripod, etc. (not supplied). The front of the TV to select the setting that matches your TV type...
...9 Press C/c to select [YES]. x If you have a wide-screen TV or a 4:3 standard TV with DAV-HDX501W only) is installed, [STANDARD (WIRELESS)] appears instead. 10 Press . 11 Connect the calibration mic to the A....Display for a Room" (page 82). AUDIO IN / A.CAL MIC Calibration mic STANDARD continued 25US The system displays the menu and subtitles in the selected language. 6 Press . SPEAKER FORMATION Note • When the... - BASIC - Set up the calibration mic at the ear level using a tripod, etc. (not supplied). The front of the TV to select the setting that matches your TV type...

