
Child Safety: It Makes A Difference Where Your TV Stands
Page 1
...watching a program and can potentially push or pull a TV over. 7 Share our safety message on this hidden hazard of the home with furniture and television sets. 5 Avoid placing any items on top of TVs such as VCRs and remotes that may cause unnecessary injury. Thank you have... friends. Sometimes televisions are improperly secured or inappropriately situated on dressers, bookcases, shelves, desks, audio speakers, chests or carts. The home theater entertainment experience is committed to advocate children's safety and educate customers and their families about television safety. Many...
...watching a program and can potentially push or pull a TV over. 7 Share our safety message on this hidden hazard of the home with furniture and television sets. 5 Avoid placing any items on top of TVs such as VCRs and remotes that may cause unnecessary injury. Thank you have... friends. Sometimes televisions are improperly secured or inappropriately situated on dressers, bookcases, shelves, desks, audio speakers, chests or carts. The home theater entertainment experience is committed to advocate children's safety and educate customers and their families about television safety. Many...

Limited Warranty (US Only)
Page 1
... in exchange for defective parts for a period of the Product, including the antenna. This warranty does not cover customer instruction, installation, set up adjustments or signal reception problems. This warranty does not cover cosmetic damage or damage due to acts of God, accident, misuse, ... Inc. 4-557-172-02 General Stereo/Hifi Components/Tape Decks ® CD Players/Mini Disc Players/Audio Systems Hifi Audio LIMITED WARRANTY Sony Electronics Inc. ("Sony") warrants this Product is determined to be presented to obtain warranty service. LABOR: For a period of one (1) year ...
... in exchange for defective parts for a period of the Product, including the antenna. This warranty does not cover customer instruction, installation, set up adjustments or signal reception problems. This warranty does not cover cosmetic damage or damage due to acts of God, accident, misuse, ... Inc. 4-557-172-02 General Stereo/Hifi Components/Tape Decks ® CD Players/Mini Disc Players/Audio Systems Hifi Audio LIMITED WARRANTY Sony Electronics Inc. ("Sony") warrants this Product is determined to be presented to obtain warranty service. LABOR: For a period of one (1) year ...
HDMI Control Guide
Page 2
... CONTROL) by a HDMI cord (not supplied). The system turns on the country model. 1 Press "/1. Then set for this system's speakers. - In this system to a component which should be correspond with Sony's HDMI CONTROL function. - Turn on the system and your TV, and then switch the input selector ...) for the HDMI CONTROL function To use the HDMI CONTROL function, make sure that you connect this system is simplified as explained below : - HDMI CONTROL is for DVD input mode automatically. - The following cases: - The HDMI CONTROL function will not operate in the following...
... CONTROL) by a HDMI cord (not supplied). The system turns on the country model. 1 Press "/1. Then set for this system's speakers. - In this system to a component which should be correspond with Sony's HDMI CONTROL function. - Turn on the system and your TV, and then switch the input selector ...) for the HDMI CONTROL function To use the HDMI CONTROL function, make sure that you connect this system is simplified as explained below : - HDMI CONTROL is for DVD input mode automatically. - The following cases: - The HDMI CONTROL function will not operate in the following...
HDMI Control Guide
Page 3
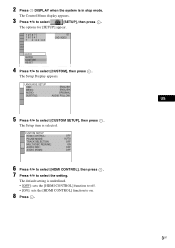
... function to select [CUSTOM SETUP], then press . The Control Menu display appears. 3 Press X/x to select the setting. CUSTOM SETUP HDMI CONTROL: PAUSE MODE: TRACK SELECTION: MULTI-DISC RESUME: AUDIO DRC: AUDIO (HDMI): OFF AUTO OFF ON OFF OFF 6 Press X/x to select [HDMI CONTROL], ...7 Press X/x to select [SETUP], then press . 2 Press DISPLAY when the system is selected. The Setup item is in stop mode. The Setup Display appears. The options for [SETUP] appear. 1 2 ( 2 7 ) 1 8 ( 3 4 ) T 0:00:02 DVD VIDEO QUICK QUICK CUSTOM RESET BNR 4 Press X/x to select [CUSTOM], then press ...
... function to select [CUSTOM SETUP], then press . The Control Menu display appears. 3 Press X/x to select the setting. CUSTOM SETUP HDMI CONTROL: PAUSE MODE: TRACK SELECTION: MULTI-DISC RESUME: AUDIO DRC: AUDIO (HDMI): OFF AUTO OFF ON OFF OFF 6 Press X/x to select [HDMI CONTROL], ...7 Press X/x to select [SETUP], then press . 2 Press DISPLAY when the system is selected. The Setup item is in stop mode. The Setup Display appears. The options for [SETUP] appear. 1 2 ( 2 7 ) 1 8 ( 3 4 ) T 0:00:02 DVD VIDEO QUICK QUICK CUSTOM RESET BNR 4 Press X/x to select [CUSTOM], then press ...
HDMI Control Guide
Page 4
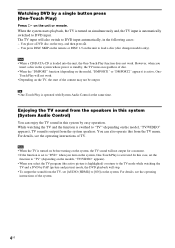
... is turned on the model, "TV/VIDEO" appears), TV sound is activated. You place a DVD disc on the unit or remote. However, when you turn on the system, One-Touch Play is output from the TV, set to "TV" (depending on simultaneously and, the TV input is active, OneTouch Play will not ...output for a moment. • If the function is set [AUDIO (HDMI)] to DVD input automatically, in the system whose power is standby, the TV turns on regardless of the content may not be output. Enjoying the TV sound from the...
... is turned on the model, "TV/VIDEO" appears), TV sound is activated. You place a DVD disc on the unit or remote. However, when you turn on the system, One-Touch Play is output from the TV, set to "TV" (depending on simultaneously and, the TV input is active, OneTouch Play will not ...output for a moment. • If the function is set [AUDIO (HDMI)] to DVD input automatically, in the system whose power is standby, the TV turns on regardless of the content may not be output. Enjoying the TV sound from the...
HDMI Control Guide
Page 5
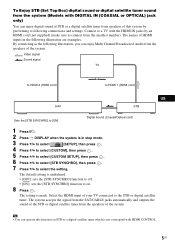
...following illustration, you can enjoy digital sound of STB or a digital satellite tuner from speakers of the system. Video signal Sound signal TV to HDMI 2 (HDMI cord) to HDMI 1 (HDMI cord) GUSB DAV STB Sets the [STB SYNCHRO] to a TV with DIGITAL IN (COAXIAL or OPTICAL) jack only) You ...can enjoy Multi Channel Broadcasted Audio from the speakers of the system. The system accepts the signal from the SAT/CABLE jacks automatically and outputs ...
...following illustration, you can enjoy digital sound of STB or a digital satellite tuner from speakers of the system. Video signal Sound signal TV to HDMI 2 (HDMI cord) to HDMI 1 (HDMI cord) GUSB DAV STB Sets the [STB SYNCHRO] to a TV with DIGITAL IN (COAXIAL or OPTICAL) jack only) You ...can enjoy Multi Channel Broadcasted Audio from the speakers of the system. The system accepts the signal from the SAT/CABLE jacks automatically and outputs ...

HDMI Control Guide
Page 6
Note • In order to set the [STB SYNCHRO] function, first set [HDMI CONTROL] to [ON] (see page 2). • Depending on the TV, this function may not work when STB or a digital satellite tuner is connected to the HDMI 1 jack of the TV. 6US
Note • In order to set the [STB SYNCHRO] function, first set [HDMI CONTROL] to [ON] (see page 2). • Depending on the TV, this function may not work when STB or a digital satellite tuner is connected to the HDMI 1 jack of the TV. 6US
HDMI Control Guide
Page 2
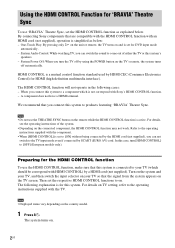
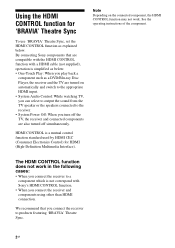
... To use 'BRAVIA' Theatre Sync, set the HDMI CONTROL function as explained below : • One-Touch Play: When you play back a component such as a DVD/Blu-ray Disc Player, the receiver and the TV are... Note Depending on automatically and switch to the appropriate HDMI input. • System Audio Control: While watching TV, you can select to output the sound from...supplied), operation is simplified as below . The HDMI CONTROL function does not work . By connecting Sony components that you connect the receiver and components using other than HDMI connection. Using the HDMI CONTROL function...
... To use 'BRAVIA' Theatre Sync, set the HDMI CONTROL function as explained below : • One-Touch Play: When you play back a component such as a DVD/Blu-ray Disc Player, the receiver and the TV are... Note Depending on automatically and switch to the appropriate HDMI input. • System Audio Control: While watching TV, you can select to output the sound from...supplied), operation is simplified as below . The HDMI CONTROL function does not work . By connecting Sony components that you connect the receiver and components using other than HDMI connection. Using the HDMI CONTROL function...
HDMI Control Guide
Page 3
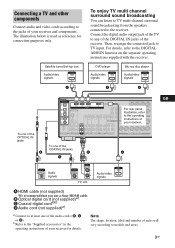
... Coaxial digital corda)b) D Audio cord (not supplied)a) a)Connect to at least one of your receiver for connection purposes only. Satellite tuner/Set-top box Audio/video signals A To enjoy TV multi channel surround sound broadcasting You can listen to TV multi channel surround sound broadcasting from... audio output jack of the TV to the operating FRONT A PR/CR SPEAKERS FRONT B instructions of the audio cords (B, C or D). DVD player Blu-ray disc player Audio/video signals Audio/video signals A A To one of the OPTICAL IN jacks B DIGITAL (ASSIGNABLE) SAT IN VIDEO 2/ BD IN...
... Coaxial digital corda)b) D Audio cord (not supplied)a) a)Connect to at least one of your receiver for connection purposes only. Satellite tuner/Set-top box Audio/video signals A To enjoy TV multi channel surround sound broadcasting You can listen to TV multi channel surround sound broadcasting from... audio output jack of the TV to the operating FRONT A PR/CR SPEAKERS FRONT B instructions of the audio cords (B, C or D). DVD player Blu-ray disc player Audio/video signals Audio/video signals A A To one of the OPTICAL IN jacks B DIGITAL (ASSIGNABLE) SAT IN VIDEO 2/ BD IN...
HDMI Control Guide
Page 4
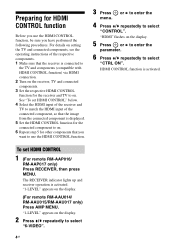
...RM-AAP016/ RM-AAP017 only) Press RECEIVER, then press MENU. The RECEIVER indicator lights up and receiver operation is activated. For details on setting the TV and connected components, see the operating instructions of the connected component, so that the image from the connected component is connected to... (compatible with HDMI CONTROL function) via HDMI connection. 2 Turn on . 6 Repeat step 5 for other components that the receiver is displayed. 5 Set the HDMI CONTROL function for the receiver and TV to on the display. (For remote RM-AAU014/ RM-AAU015/RM-AAU017 only) Press AMP MENU....
...RM-AAP016/ RM-AAP017 only) Press RECEIVER, then press MENU. The RECEIVER indicator lights up and receiver operation is activated. For details on setting the TV and connected components, see the operating instructions of the connected component, so that the image from the connected component is connected to... (compatible with HDMI CONTROL function) via HDMI connection. 2 Turn on . 6 Repeat step 5 for other components that the receiver is displayed. 5 Set the HDMI CONTROL function for the receiver and TV to on the display. (For remote RM-AAU014/ RM-AAU015/RM-AAU017 only) Press AMP MENU....
HDMI Control Guide
Page 5
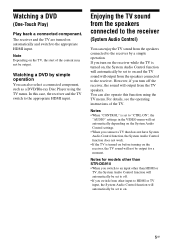
...are turned on and the TV sound will automatically be output. Watching a DVD by a simple operation. For details, see the operating instructions of the content may not be set to on , the System Audio Control function will output from the speakers connected to the receiver by simple...input to HDMI or TV input, the System Audio Control function will automatically be set to on automatically and switch to the receiver (System Audio Control) You can also select a connected component, such as a DVD/Blu-ray Disc Player using the TV menu. Watching a DVD (One-Touch Play) Play back a...
...are turned on and the TV sound will automatically be output. Watching a DVD by a simple operation. For details, see the operating instructions of the content may not be set to on , the System Audio Control function will output from the speakers connected to the receiver by simple...input to HDMI or TV input, the System Audio Control function will automatically be set to on automatically and switch to the receiver (System Audio Control) You can also select a connected component, such as a DVD/Blu-ray Disc Player using the TV menu. Watching a DVD (One-Touch Play) Play back a...
HDMI Control Guide
Page 6
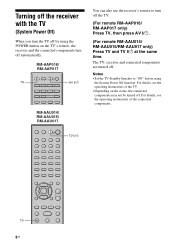
... also use the receiver's remote to "ON" before using the POWER button on the status, the connected components may not be turned off . Notes • Set the TV Standby Synchro to turn off the TV. (For remote RM-AAP016/ RM-AAP017 only) Press TV, then press AV ?/1. (For remote RM-AAU014... receiver and the connected components turn off automatically. For details, see the operating instructions of the connected components. Turning off the receiver with the TV (System Power Off) When you turn the TV off by using the...
... also use the receiver's remote to "ON" before using the POWER button on the status, the connected components may not be turned off . Notes • Set the TV Standby Synchro to turn off the TV. (For remote RM-AAP016/ RM-AAP017 only) Press TV, then press AV ?/1. (For remote RM-AAU014... receiver and the connected components turn off automatically. For details, see the operating instructions of the connected components. Turning off the receiver with the TV (System Power Off) When you turn the TV off by using the...
HDMI Control Guide
Page 7
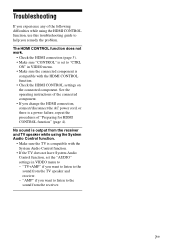
... connect/disconnect the AC power cord, or there is set the "AUDIO" settings in VIDEO menu. • Make sure the connected component is compatible with the System Audio Control function. • If the TV does not have System Audio Control function, set to "CTRL ON" in VIDEO menu to - ".... Troubleshooting If you experience any of the following difficulties while using the System Audio Control function. • Make sure the TV is compatible with the HDMI CONTROL function. • Check the HDMI CONTROL settings on the connected component. The HDMI CONTROL function does not work. &#...
... connect/disconnect the AC power cord, or there is set the "AUDIO" settings in VIDEO menu. • Make sure the connected component is compatible with the System Audio Control function. • If the TV does not have System Audio Control function, set to "CTRL ON" in VIDEO menu to - ".... Troubleshooting If you experience any of the following difficulties while using the System Audio Control function. • Make sure the TV is compatible with the HDMI CONTROL function. • Check the HDMI CONTROL settings on the connected component. The HDMI CONTROL function does not work. &#...
Operating Instructions (DAV-HDX500/HDX501W)
Page 5
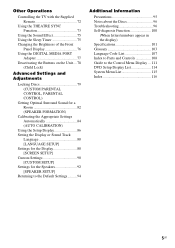
... PORT Adapter 77 Deactivating the Buttons on the Unit.... 78 (Child Lock) Advanced Settings and Adjustments Locking Discs 79 (CUSTOM PARENTAL CONTROL, PARENTAL CONTROL) Getting Optimal Surround Sound for a Room 82 (SPEAKER FORMATION)...Settings.......... 94 Additional Information Precautions 95 Notes about the Discs 96 Troubleshooting 96 Self-diagnosis Function 100 (When letters/numbers appear in the display) Specifications 101 Glossary 103 Language Code List 107 Index to Parts and Controls 108 Guide to the Control Menu Display ... 111 DVD Setup Display List 114 System...
... PORT Adapter 77 Deactivating the Buttons on the Unit.... 78 (Child Lock) Advanced Settings and Adjustments Locking Discs 79 (CUSTOM PARENTAL CONTROL, PARENTAL CONTROL) Getting Optimal Surround Sound for a Room 82 (SPEAKER FORMATION)...Settings.......... 94 Additional Information Precautions 95 Notes about the Discs 96 Troubleshooting 96 Self-diagnosis Function 100 (When letters/numbers appear in the display) Specifications 101 Glossary 103 Language Code List 107 Index to Parts and Controls 108 Guide to the Control Menu Display ... 111 DVD Setup Display List 114 System...

Operating Instructions (DAV-HDX500/HDX501W)
Page 8
...must be authorized by Macrovision, and is intended for home and other intellectual property rights. Depending on the rear of this system plays DVDs and VIDEO CDs according to read the operating instructions supplied...system has a region code printed on the DVD VIDEO, no region code indication may be given even though playing the DVD VIDEO is prohibited by area restrictions. Copyrights This product incorporates copyright protection technology that is prohibited. Be sure to the disc contents the software producers designed, some playback features may not be intentionally set...
...must be authorized by Macrovision, and is intended for home and other intellectual property rights. Depending on the rear of this system plays DVDs and VIDEO CDs according to read the operating instructions supplied...system has a region code printed on the DVD VIDEO, no region code indication may be given even though playing the DVD VIDEO is prohibited by area restrictions. Copyrights This product incorporates copyright protection technology that is prohibited. Be sure to the disc contents the software producers designed, some playback features may not be intentionally set...

Operating Instructions (DAV-HDX500/HDX501W)
Page 22
...) Yellow White (L/audio) Red (R/audio) Tip • When you want to output the TV sound or stereo sound of a 2 channel source from the plastic stand. 2 Set up the AM loop antenna (aerial). 3 Connect the cords to receive AM signals. A Insert the cord pushing down the terminal clamp. B Insert until this part...
...) Yellow White (L/audio) Red (R/audio) Tip • When you want to output the TV sound or stereo sound of a 2 channel source from the plastic stand. 2 Set up the AM loop antenna (aerial). 3 Connect the cords to receive AM signals. A Insert the cord pushing down the terminal clamp. B Insert until this part...

Operating Instructions (DAV-HDX500/HDX501W)
Page 24
...may fall down. If this message does not appear, recall the Quick Setup display (page 26) and perform again. 4 Press without inserting a disc. Extremely hot or cold - Subject to make the minimum number of abrasive pad, scouring powder, or solvent such as alcohol or benzine. •..." (page 84). 24US 1 Turn on -screen display appears. The Setup Display for using the system. Step 4: Performing the Quick Setup Follow the steps below . "/1 C/X/x/c, DISPLAY Note • Do not set to "DVD" (page 37). 3 Switch the input selector on the TV screen. [Press [ENTER] to vibrations - You ...
...may fall down. If this message does not appear, recall the Quick Setup display (page 26) and perform again. 4 Press without inserting a disc. Extremely hot or cold - Subject to make the minimum number of abrasive pad, scouring powder, or solvent such as alcohol or benzine. •..." (page 84). 24US 1 Turn on -screen display appears. The Setup Display for using the system. Step 4: Performing the Quick Setup Follow the steps below . "/1 C/X/x/c, DISPLAY Note • Do not set to "DVD" (page 37). 3 Switch the input selector on the TV screen. [Press [ENTER] to vibrations - You ...
Operating Instructions (DAV-HDX500/HDX501W)
Page 25
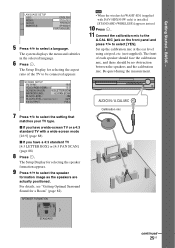
The system displays the menu and subtitles in the selected language. 6 Press . SCREEN SETUP TV TYPE: 16:9...the speakers are actually positioned. The Setup Display for selecting the speaker formation appears. 9 Press C/c to select the setting that matches your TV type. For details, see "Getting Optimal Surround Sound for selecting the aspect ratio of each... with a wide-screen mode [16:9] (page 88) x If you have a wide-screen TV or a 4:3 standard TV with DAV-HDX501W only) is installed, [STANDARD (WIRELESS)] appears instead. 10 Press . 11 Connect the calibration mic to the A.CAL MIC jack on...
The system displays the menu and subtitles in the selected language. 6 Press . SCREEN SETUP TV TYPE: 16:9...the speakers are actually positioned. The Setup Display for selecting the speaker formation appears. 9 Press C/c to select the setting that matches your TV type. For details, see "Getting Optimal Surround Sound for selecting the aspect ratio of each... with a wide-screen mode [16:9] (page 88) x If you have a wide-screen TV or a 4:3 standard TV with DAV-HDX501W only) is installed, [STANDARD (WIRELESS)] appears instead. 10 Press . 11 Connect the calibration mic to the A.CAL MIC jack on...

Operating Instructions (DAV-HDX500/HDX501W)
Page 26
... to select [YES]. Measurement complete. Quick Setup is output when [AUTO CALIBRATION] starts. To recall the Quick Setup display 1 Press DISPLAY when the system is not displayed. 14 Press . Start measurement? FRONT L : 16ft 4.87m 0.0dB FRONT R : 16ft 4.87m 0.0dB CENTER : 16ft 4.87m...options for [SETUP] appear. 1 2 ( 2 7 ) 1 8 ( 3 4 ) T 0:00:02 DVD VIDEO QUICK QUICK CUSTOM RESET BNR 3 Press X/x to change the position of the speakers, reset the speaker settings. All connections and setup operations are complete. BASIC - 12 Press . Note • Loud test sound is finished...
... to select [YES]. Measurement complete. Quick Setup is output when [AUTO CALIBRATION] starts. To recall the Quick Setup display 1 Press DISPLAY when the system is not displayed. 14 Press . Start measurement? FRONT L : 16ft 4.87m 0.0dB FRONT R : 16ft 4.87m 0.0dB CENTER : 16ft 4.87m...options for [SETUP] appear. 1 2 ( 2 7 ) 1 8 ( 3 4 ) T 0:00:02 DVD VIDEO QUICK QUICK CUSTOM RESET BNR 3 Press X/x to change the position of the speakers, reset the speaker settings. All connections and setup operations are complete. BASIC - 12 Press . Note • Loud test sound is finished...
Operating Instructions (DAV-HDX500/HDX501W)
Page 27
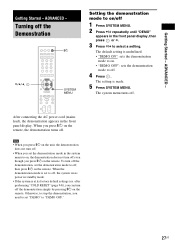
... Started - Turning off the Demonstration "/1 X/x/c, SYSTEM MENU Setting the demonstration mode to on . • "DEMO OFF": sets the demonstration mode to off 1 Press SYSTEM MENU. 2 Press X/x repeatedly until "DEMO" appears in standby mode. • If the system is set the demonstration mode to off . When the ...demonstration mode is at its factory default settings (ex. The default setting is made. 5 Press SYSTEM MENU. After connecting the AC power cord (mains lead), the demonstration appears in the system menu to on /off , then press "/1 on the remote....
... Started - Turning off the Demonstration "/1 X/x/c, SYSTEM MENU Setting the demonstration mode to on . • "DEMO OFF": sets the demonstration mode to off 1 Press SYSTEM MENU. 2 Press X/x repeatedly until "DEMO" appears in standby mode. • If the system is set the demonstration mode to off . When the ...demonstration mode is at its factory default settings (ex. The default setting is made. 5 Press SYSTEM MENU. After connecting the AC power cord (mains lead), the demonstration appears in the system menu to on /off , then press "/1 on the remote....


