Operating Instructions
Page 4
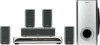
Table of Contents Welcome 3 About This Manual 6 This System Can Play the Following Discs 6 Guide to the Control Menu Display...... 10 Getting Started Unpacking 13 Inserting Batteries into the Remote....... 13 Hookup Overview 14 Step 1: Speaker System Hookup........... 15 Step 2: Antenna (Aerial) Hookup ......... 20 Step 3: TV ...27 Step 7: Performing the Quick Setup ..... 28 Speaker Setup 30 Playing Discs Playing Discs 31 Using the DVD's Menu 36 Selecting [ORIGINAL] or [PLAY LIST] on a DVD-RW 37 Selecting a Playback Area for a Super Audio CD 37 Playing VIDEO CDs with PBC Functions (Ver...
Table of Contents Welcome 3 About This Manual 6 This System Can Play the Following Discs 6 Guide to the Control Menu Display...... 10 Getting Started Unpacking 13 Inserting Batteries into the Remote....... 13 Hookup Overview 14 Step 1: Speaker System Hookup........... 15 Step 2: Antenna (Aerial) Hookup ......... 20 Step 3: TV ...27 Step 7: Performing the Quick Setup ..... 28 Speaker Setup 30 Playing Discs Playing Discs 31 Using the DVD's Menu 36 Selecting [ORIGINAL] or [PLAY LIST] on a DVD-RW 37 Selecting a Playback Area for a Super Audio CD 37 Playing VIDEO CDs with PBC Functions (Ver...
Operating Instructions
Page 6
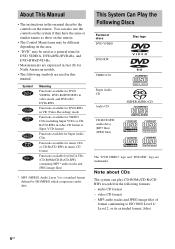
...Level 1/ Level 2, or its extended format, Joliet 6US Note about CDs The system can also use the controls on the system if they have the same or similar names as a general term for DVD VIDEOs, DVD+RWs/DVD+Rs, and DVD-RWs/DVD-Rs. • Measurements are trademarks. MP3 audio tracks and JPEG image files... logo are expressed in the following symbols are used as those on the remote. • The Control Menu items may be different depending on the area. • "DVD" may be used in this manual describe the controls on the remote. You can play CD-ROMs/CD-Rs/CDRWs recorded in feet (ft)...
...Level 1/ Level 2, or its extended format, Joliet 6US Note about CDs The system can also use the controls on the system if they have the same or similar names as a general term for DVD VIDEOs, DVD+RWs/DVD+Rs, and DVD-RWs/DVD-Rs. • Measurements are trademarks. MP3 audio tracks and JPEG image files... logo are expressed in the following symbols are used as those on the remote. • The Control Menu items may be different depending on the area. • "DVD" may be used in this manual describe the controls on the remote. You can play CD-ROMs/CD-Rs/CDRWs recorded in feet (ft)...

Operating Instructions
Page 13
...; Do not expose the remote sensor to direct light from battery leakage and corrosion. 13US Getting Started Getting Started Unpacking Check that you do not intend to use a new battery with an old one. • Do not drop any foreign object into the Remote You can control the system using the remote, point it at... the remote sensor on the batteries to the markings inside the compartment.
...; Do not expose the remote sensor to direct light from battery leakage and corrosion. 13US Getting Started Getting Started Unpacking Check that you do not intend to use a new battery with an old one. • Do not drop any foreign object into the Remote You can control the system using the remote, point it at... the remote sensor on the batteries to the markings inside the compartment.

Operating Instructions
Page 64
...buttons* Select the TV channel. Other Operations Controlling the TV with the Supplied Remote By adjusting the remote signal, you replace the batteries of the remote, the code number may reset itself to the default (SONY) setting. Code numbers of controllable TVs If more than one code number ...TV ?/1 TV/VIDEO TV VOL +/- With cover opened. Reset the appropriate code number. Controlling TVs with the remote Press and hold TV [/1 while entering your TV. 64US TV Manufacturer Code number SONY 001 (default) DAEWOO 002, 004, 005, 006 FISHER 009 GOLDSTAR 020 HITACHI 014...
...buttons* Select the TV channel. Other Operations Controlling the TV with the Supplied Remote By adjusting the remote signal, you replace the batteries of the remote, the code number may reset itself to the default (SONY) setting. Code numbers of controllable TVs If more than one code number ...TV ?/1 TV/VIDEO TV VOL +/- With cover opened. Reset the appropriate code number. Controlling TVs with the remote Press and hold TV [/1 while entering your TV. 64US TV Manufacturer Code number SONY 001 (default) DAEWOO 002, 004, 005, 006 FISHER 009 GOLDSTAR 020 HITACHI 014...
Operating Instructions
Page 65
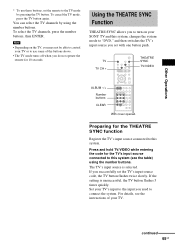
...TV. Other Operations * To use some of your TV's input to the input you do not operate the remote for the THEATRE SYNC function Register the TV's input source connected to connect the system. TV TV CH + THEATRE SYNC TV/VIDEO ALBUM -/+ Number buttons CLEAR With cover opened. If the setting... SYNC allows you to turn on the TV, you may not be able to control your SONY TV and this system, changes the system mode to "DVD," and then switches the TV's input source you successfully set the remote to this system. Press and hold TV/VIDEO while entering the code for the TV's input source...
...TV. Other Operations * To use some of your TV's input to the input you do not operate the remote for the THEATRE SYNC function Register the TV's input source connected to connect the system. TV TV CH + THEATRE SYNC TV/VIDEO ALBUM -/+ Number buttons CLEAR With cover opened. If the setting... SYNC allows you to turn on the TV, you may not be able to control your SONY TV and this system, changes the system mode to "DVD," and then switches the TV's input source you successfully set the remote to this system. Press and hold TV/VIDEO while entering the code for the TV's input source...

Operating Instructions
Page 78
... emit a test tone to adjust [LEVEL (FRONT)] and [LEVEL (SURROUND)]. [OFF] [ON] The test tone is emitted from each speaker in 1 dB increments. on the remote. The Control Menu appears. 1.0 - 7.0 m/ 4 - 23 ft 0.0 - 7.0 m/ 0 - 23 ft Be sure to change the value in the Setup Display when you move the ... except when you set [SURROUND] listening position can be effective. Adjusting the speaker level by using the test tone 1 Press DISPLAY when the system is emitted from the speakers. Be sure to set [TEST TONE] to [ON] for easy adjustment. (This settings appear except when you ...
... emit a test tone to adjust [LEVEL (FRONT)] and [LEVEL (SURROUND)]. [OFF] [ON] The test tone is emitted from each speaker in 1 dB increments. on the remote. The Control Menu appears. 1.0 - 7.0 m/ 4 - 23 ft 0.0 - 7.0 m/ 0 - 23 ft Be sure to change the value in the Setup Display when you move the ... except when you set [SURROUND] listening position can be effective. Adjusting the speaker level by using the test tone 1 Press DISPLAY when the system is emitted from the speakers. Be sure to set [TEST TONE] to [ON] for easy adjustment. (This settings appear except when you ...

Operating Instructions
Page 90
Index to Parts and Controls For more information, refer to the pages indicated in parentheses. Front panel A Disc slot (31) B (remote sensor) (13) C Front panel display (91) D PHONES jack (31) E VOLUME +/- (31) F FUNCTION (31) G ./> (32) H x (stop) (32, 71) I X (pause) (32) J H (play) (31) K A (eject) (31, 71) L DISC 1-5 (31) M "/1 (on/standby) (27, 31, 71) 90US
Index to Parts and Controls For more information, refer to the pages indicated in parentheses. Front panel A Disc slot (31) B (remote sensor) (13) C Front panel display (91) D PHONES jack (31) E VOLUME +/- (31) F FUNCTION (31) G ./> (32) H x (stop) (32, 71) I X (pause) (32) J H (play) (31) K A (eject) (31, 71) L DISC 1-5 (31) M "/1 (on/standby) (27, 31, 71) 90US

Operating Instructions
Page 97
... DIGITAL 53 Dolby Digital 86 Dolby Pro Logic II 86 Dolby Surround Pro Logic 86 DSGX 58 DTS 53, 87 DUAL MONO 67 DVD 87 DVD+RW 87 DVD's menu 36 DVD-RW 37, 87 E EFFECT 45 F Fast forward 46 Fast reverse 46 FILE 47 File 87 Film based software 87 Front Panel 90... Component Hookup 25 P PARENTAL CONTROL 61, 87 PAUSE MODE 76 PBC Playback 7, 38, 87 PICTURE NAVI 42, 49 PLAY LIST 37 Preset Station 68 Program Play 33 PROGRESSIVE AUTO 22 Progressive format 22, 88 PROGRESSIVE VIDEO 23 Q Quick Setup 28 R Radio 68 Rear Panel 92 Region Code 8, 88 Remote 13, 64, 93...
... DIGITAL 53 Dolby Digital 86 Dolby Pro Logic II 86 Dolby Surround Pro Logic 86 DSGX 58 DTS 53, 87 DUAL MONO 67 DVD 87 DVD+RW 87 DVD's menu 36 DVD-RW 37, 87 E EFFECT 45 F Fast forward 46 Fast reverse 46 FILE 47 File 87 Film based software 87 Front Panel 90... Component Hookup 25 P PARENTAL CONTROL 61, 87 PAUSE MODE 76 PBC Playback 7, 38, 87 PICTURE NAVI 42, 49 PLAY LIST 37 Preset Station 68 Program Play 33 PROGRESSIVE AUTO 22 Progressive format 22, 88 PROGRESSIVE VIDEO 23 Q Quick Setup 28 R Radio 68 Rear Panel 92 Region Code 8, 88 Remote 13, 64, 93...
Marketing Specifications
Page 2
... 3 1/9 x 4 9/16" (300 x 79 x 116mm); Sony, Digital Cinema Sound, Precision Cinema Progressive, Remote Commander, and S-Master are trademarks of their respective owners. DAV-FX10 DVD Dream® System Specifications Receiver Power Power Consumption: 160 Watts (at 3 ohms and ...) Subwoofer Speaker Speaker Speaker System: DDTD (Single Unit) Speaker Unit: 8" DAV-FX10 Weight Receiver: 11 lbs, 4 oz (5.1 Kg); Surround: 3 5/13 x 6 1/2 x 4" (86 x 165 x 102mm); Remote Commander™ remote control supports most manufacturers ©2005 Sony Electronics Inc. Sony Electronics Inc. • ...
... 3 1/9 x 4 9/16" (300 x 79 x 116mm); Sony, Digital Cinema Sound, Precision Cinema Progressive, Remote Commander, and S-Master are trademarks of their respective owners. DAV-FX10 DVD Dream® System Specifications Receiver Power Power Consumption: 160 Watts (at 3 ohms and ...) Subwoofer Speaker Speaker Speaker System: DDTD (Single Unit) Speaker Unit: 8" DAV-FX10 Weight Receiver: 11 lbs, 4 oz (5.1 Kg); Surround: 3 5/13 x 6 1/2 x 4" (86 x 165 x 102mm); Remote Commander™ remote control supports most manufacturers ©2005 Sony Electronics Inc. Sony Electronics Inc. • ...


