Operating Instructions
Page 3
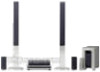
...warm location, or is designed to be damaged. • For power saving purposes, set the system to direct sunlight, excessive dust, or mechanical shock. Before operating this system, please read this case, remove the disc and leave the system turned on for about half an hour until the moisture evaporates. • When you... volume Do not turn off . • Unplug the unit from equipment with a high power amplifier. To disconnect the cord, pull it for purchasing Sony DVD Home Theatre System. Welcome! However, touching the cabinet should be changed only at the qualified service shop.
...warm location, or is designed to be damaged. • For power saving purposes, set the system to direct sunlight, excessive dust, or mechanical shock. Before operating this system, please read this case, remove the disc and leave the system turned on for about half an hour until the moisture evaporates. • When you... volume Do not turn off . • Unplug the unit from equipment with a high power amplifier. To disconnect the cord, pull it for purchasing Sony DVD Home Theatre System. Welcome! However, touching the cabinet should be changed only at the qualified service shop.
Operating Instructions
Page 4
... consult your TV for an extended period of holding a still video image or on-screen display image on your nearest Sony dealer. IMPORTANT NOTICE Caution: This system is located on after 15 to your television screen indefinitely. On your TV's color If the speakers should persist, place the... speakers farther away from the set. The front panel display is removed from the wall outlet (mains). 4US Do not use a commercially available CD/DVD cleaning disc. On moving the system When you have color irregularity, turn off the TV at once then ...
... consult your TV for an extended period of holding a still video image or on-screen display image on your nearest Sony dealer. IMPORTANT NOTICE Caution: This system is located on after 15 to your television screen indefinitely. On your TV's color If the speakers should persist, place the... speakers farther away from the set. The front panel display is removed from the wall outlet (mains). 4US Do not use a commercially available CD/DVD cleaning disc. On moving the system When you have color irregularity, turn off the TV at once then ...
Operating Instructions
Page 5
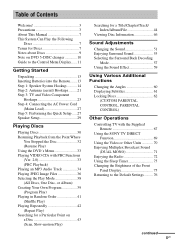
... Notes about Discs 9 Note on DVD 5-DISC changer 10 Guide to the Control Menu Display...... 11 Getting Started Unpacking 13 Inserting Batteries into the Remote....... 13 Step 1: Speaker System Hookup........... 14 Step 2: Antenna (aerial...Resuming Playback from the Point Where You Stopped the Disc 32 (Resume Play) Using the DVD's Menu 33 Playing VIDEO CDs with PBC Functions (Ver. 2.0 33 (PBC Playback) Playing..., PARENTAL CONTROL) Other Operations Controlling TV with the Supplied Remote 67 Using the SONY TV DIRECT Function 69 Using the Video or Other Units 70 Enjoying Multiplex Broadcast ...
... Notes about Discs 9 Note on DVD 5-DISC changer 10 Guide to the Control Menu Display...... 11 Getting Started Unpacking 13 Inserting Batteries into the Remote....... 13 Step 1: Speaker System Hookup........... 14 Step 2: Antenna (aerial...Resuming Playback from the Point Where You Stopped the Disc 32 (Resume Play) Using the DVD's Menu 33 Playing VIDEO CDs with PBC Functions (Ver. 2.0 33 (PBC Playback) Playing..., PARENTAL CONTROL) Other Operations Controlling TV with the Supplied Remote 67 Using the SONY TV DIRECT Function 69 Using the Video or Other Units 70 Enjoying Multiplex Broadcast ...
Operating Instructions
Page 6
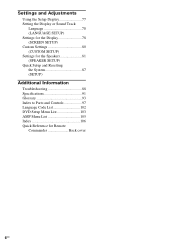
Settings and Adjustments Using the Setup Display 77 Setting the Display or Sound Track Language 78 (LANGUAGE SETUP) Settings for the Display 78 (SCREEN SETUP) Custom Settings 80 (CUSTOM SETUP) Settings for the Speakers 81 (SPEAKER SETUP) Quick Setup and Resetting the System 87 (SETUP) Additional Information Troubleshooting 88 Specifications 91 Glossary 93 Index to Parts and Controls 97 Language Code List 102 DVD Setup Menu List 103 AMP Menu List 105 Index 106 Quick Reference for Remote Commander Back cover 6US
Settings and Adjustments Using the Setup Display 77 Setting the Display or Sound Track Language 78 (LANGUAGE SETUP) Settings for the Display 78 (SCREEN SETUP) Custom Settings 80 (CUSTOM SETUP) Settings for the Speakers 81 (SPEAKER SETUP) Quick Setup and Resetting the System 87 (SETUP) Additional Information Troubleshooting 88 Specifications 91 Glossary 93 Index to Parts and Controls 97 Language Code List 102 DVD Setup Menu List 103 AMP Menu List 105 Index 106 Quick Reference for Remote Commander Back cover 6US
Operating Instructions
Page 9
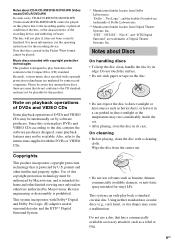
... nor circular discs (e.g., card, heart, or star shape) may be intentionally set by Macrovision. Wipe the disc from Dolby Laboratories. Use of DVDs and VIDEO CDs may cause a malfunction. Since this system plays DVDs and VIDEO CDs according to the disc contents the software producers designed, some... cases, CD-R/CD-RW/DVD-R/DVD-RW (Video mode)/DVD+R/DVD+RW cannot be played on this player...
... nor circular discs (e.g., card, heart, or star shape) may be intentionally set by Macrovision. Wipe the disc from Dolby Laboratories. Use of DVDs and VIDEO CDs may cause a malfunction. Since this system plays DVDs and VIDEO CDs according to the disc contents the software producers designed, some... cases, CD-R/CD-RW/DVD-R/DVD-RW (Video mode)/DVD+R/DVD+RW cannot be played on this player...

Operating Instructions
Page 11
... the track (VIDEO CD) to be played. Displays the scene (VIDEO CD in PBC playback). AUDIO (DVD/VIDEO CD/Super Audio CD/CD/MP3 only) (page 51) Changes the audio setting. ALBUM (JPEG only) (page 36) Selects the album (JPEG) to be played. Total number of Currently playing title ... Menu Items DISC Displays the disc name or the disc type inserted into the system. INDEX (Super Audio CD/CD only) Displays the index and selects the index (Super Audio CD) to be played. continued 11US SUBTITLE (DVD only) (page 61) Displays the subtitles. TIME (page 46) Checks the ...
... the track (VIDEO CD) to be played. Displays the scene (VIDEO CD in PBC playback). AUDIO (DVD/VIDEO CD/Super Audio CD/CD/MP3 only) (page 51) Changes the audio setting. ALBUM (JPEG only) (page 36) Selects the album (JPEG) to be played. Total number of Currently playing title ... Menu Items DISC Displays the disc name or the disc type inserted into the system. INDEX (Super Audio CD/CD only) Displays the index and selects the index (Super Audio CD) to be played. continued 11US SUBTITLE (DVD only) (page 61) Displays the subtitles. TIME (page 46) Checks the ...

Operating Instructions
Page 12
ANGLE (DVD only) (page 60) Changes the angle. CUSTOM PARENTAL CONTROL (page 62) Sets the disc to [OFF]. • The [ANGLE] indicator...), one title/chapter/ track/album, or contents of program repeatedly. Tips • Each time you press DVD DISPLAY, the Control Menu display changes as follows: Control Menu display m Control Menu display off The Control Menu..., depending on the disc. • The Control Menu icon indicator lights up in green t unless you set the [REPEAT] setting to prohibit playing. PLAYMODE (VIDEO CD/Super Selects the play mode. DATE (JPEG only) (page 50)...
ANGLE (DVD only) (page 60) Changes the angle. CUSTOM PARENTAL CONTROL (page 62) Sets the disc to [OFF]. • The [ANGLE] indicator...), one title/chapter/ track/album, or contents of program repeatedly. Tips • Each time you press DVD DISPLAY, the Control Menu display changes as follows: Control Menu display m Control Menu display off The Control Menu..., depending on the disc. • The Control Menu icon indicator lights up in green t unless you set the [REPEAT] setting to prohibit playing. PLAYMODE (VIDEO CD/Super Selects the play mode. DATE (JPEG only) (page 50)...
Operating Instructions
Page 18
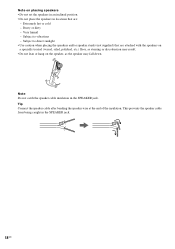
... a specially treated (waxed, oiled, polished, etc.) floor, as staining or discoloration may result. • Do not lean or hang on placing speakers • Do not set the speakers in an inclined position. • Do not place the speakers in the SPEAKER jack. 18US This prevents the speaker cable from being caught...
... a specially treated (waxed, oiled, polished, etc.) floor, as staining or discoloration may result. • Do not lean or hang on placing speakers • Do not set the speakers in an inclined position. • Do not place the speakers in the SPEAKER jack. 18US This prevents the speaker cable from being caught...
Operating Instructions
Page 19
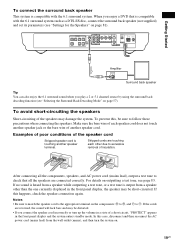
... short-circuited. Getting Started To connect the surround back speaker This system is compatible with the 6.1 surround system such as a DTS-ES disc, connect the surround back speaker (not supplied) and set its parameters (see "Settings for the Speakers" on page 81). Examples of poor conditions of... a short circuit, "PROTECT" appears in the front panel display, the speaker may damage the system. SPEAKER FRONT R CENTER FRONT L WOOFER R VIDEO AUDIO IN Y L PB/CB PR/CR S VIDEO (DVD ONLY) OPTICAL ...
... short-circuited. Getting Started To connect the surround back speaker This system is compatible with the 6.1 surround system such as a DTS-ES disc, connect the surround back speaker (not supplied) and set its parameters (see "Settings for the Speakers" on page 81). Examples of poor conditions of... a short circuit, "PROTECT" appears in the front panel display, the speaker may damage the system. SPEAKER FRONT R CENTER FRONT L WOOFER R VIDEO AUDIO IN Y L PB/CB PR/CR S VIDEO (DVD ONLY) OPTICAL ...

Operating Instructions
Page 23
... instead of the video jacks, your TV monitor must also be connected via COMPONENT VIDEO OUT jacks (Y,PB/CB, PR/CR). When [COMPONENT OUT] is set to [INTERLACE] in [SCREEN SETUP] (page 79) (default) The video signal is output from the COMPONENT VIDEO OUT jacks only. • When you must ...use this system, change the function to VIDEO or SAT (page 70). continued 23US If your TV monitor must also be connected via an S video jack. Tips •...
... instead of the video jacks, your TV monitor must also be connected via COMPONENT VIDEO OUT jacks (Y,PB/CB, PR/CR). When [COMPONENT OUT] is set to [INTERLACE] in [SCREEN SETUP] (page 79) (default) The video signal is output from the COMPONENT VIDEO OUT jacks only. • When you must ...use this system, change the function to VIDEO or SAT (page 70). continued 23US If your TV monitor must also be connected via an S video jack. Tips •...
Operating Instructions
Page 25
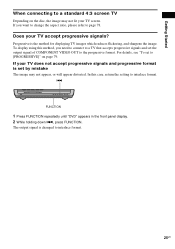
... format. 25US If you need to connect to a TV that accepts progressive signals and set by mistake The image may not fit your TV accept progressive signals? The output signal is set the output signal of COMPONENT VIDEO OUT to [PROGRESSIVE]" on the disc, the image ... flickering, and sharpens the image. Getting Started When connecting to a standard 4:3 screen TV Depending on page 79. FUNCTION 1 Press FUNCTION repeatedly until "DVD" appears in the front panel display. 2 While holding down ., press FUNCTION. In this method, you want to change the aspect ratio, please refer...
... format. 25US If you need to connect to a TV that accepts progressive signals and set by mistake The image may not fit your TV accept progressive signals? The output signal is set the output signal of COMPONENT VIDEO OUT to [PROGRESSIVE]" on the disc, the image ... flickering, and sharpens the image. Getting Started When connecting to a standard 4:3 screen TV Depending on page 79. FUNCTION 1 Press FUNCTION repeatedly until "DVD" appears in the front panel display. 2 While holding down ., press FUNCTION. In this method, you want to change the aspect ratio, please refer...

Operating Instructions
Page 27
... in [LANGUAGE SETUP] is different depending on the area. • The language you select in the system, the guide message does not appear on the TV to this system to a wall outlet (mains), connect the speakers to the system (see "Settings for [OSD], [DVD MENU], and [SUBTITLE] (page 78). 6 Select a language using the Quick Setup.
... in [LANGUAGE SETUP] is different depending on the area. • The language you select in the system, the guide message does not appear on the TV to this system to a wall outlet (mains), connect the speakers to the system (see "Settings for [OSD], [DVD MENU], and [SUBTITLE] (page 78). 6 Select a language using the Quick Setup.

Operating Instructions
Page 28
... [QUICK] from [SETUP] in Setup Display (page 87). • When you can select varies, depending on the system. When the Quick Setup is completed, the settings are only examples and may differ from [SMALL], [MEDIUM], or [LARGE] using X/x, then press ENTER. If you press CLEAR... in guide message, the message disappears. To quit the Quick Setup Press DVD SETUP in [TV TYPE], [4:3 LETTER BOX] is complete. LISTENING POSITION FRONT...
... [QUICK] from [SETUP] in Setup Display (page 87). • When you can select varies, depending on the system. When the Quick Setup is completed, the settings are only examples and may differ from [SMALL], [MEDIUM], or [LARGE] using X/x, then press ENTER. If you press CLEAR... in guide message, the message disappears. To quit the Quick Setup Press DVD SETUP in [TV TYPE], [4:3 LETTER BOX] is complete. LISTENING POSITION FRONT...

Operating Instructions
Page 29
... shielded speakers (to prevent color irregularity occurring on after performing the above ). If it on the TV screen) The subwoofer in this system is magnetically shielded to the same level. Specifying the speaker parameters To obtain the best possible surround sound, first specify the distance of... magnetic interference include: magnetic latches on the screen. However, this case, set . Use the test tone to adjust the speaker level and balance to prevent magnetic leakage. The front speakers can be the same ...
... shielded speakers (to prevent color irregularity occurring on after performing the above ). If it on the TV screen) The subwoofer in this system is magnetically shielded to the same level. Specifying the speaker parameters To obtain the best possible surround sound, first specify the distance of... magnetic interference include: magnetic latches on the screen. However, this case, set . Use the test tone to adjust the speaker level and balance to prevent magnetic leakage. The front speakers can be the same ...

Operating Instructions
Page 30
...you want to load the disc to select "DVD." To play ) of the system. Press the Z button of the system is green. If there is a disc in the front panel display. 6 Press H on the remote or on the system. The system turns on the system. 30US "NO DISC" appears in the ... selector on the remote or DISC1-5 of the disc whose DISC indicator is set to "DVD," press FUNCTION to the disc stocker 1, press DISC1 Z. Playing Discs Playing Discs Depending on the system. Refer to this system. 3 Press "/1 on the DVD or VIDEO CD, some operations may be different or restricted.
...you want to load the disc to select "DVD." To play ) of the system. Press the Z button of the system is green. If there is a disc in the front panel display. 6 Press H on the remote or on the system. The system turns on the system. 30US "NO DISC" appears in the ... selector on the remote or DISC1-5 of the disc whose DISC indicator is set to "DVD," press FUNCTION to the disc stocker 1, press DISC1 Z. Playing Discs Playing Discs Depending on the system. Refer to this system. 3 Press "/1 on the DVD or VIDEO CD, some operations may be different or restricted.

Operating Instructions
Page 31
... menu may cancel the menu settings. Tip The DISC1-5 indicators change their colors as follows: - To Press Stop x Pause* X Resume play from the control menu. 31US Change a disc while playing DISC SKIP another disc Play the desired disc directly DISC1-5 on . Tip If a DVD has more than two titles,...in continuous play mode Mute the sound MUTING. Playing Discs After following the instructions on the menu. (DVD: page 33), (VIDEO CD: page 33). Doing so may appear on the system lights up in continuous play mode Go back to the disc stocker, however, the disc is ejected from...
... menu may cancel the menu settings. Tip The DISC1-5 indicators change their colors as follows: - To Press Stop x Pause* X Resume play from the control menu. 31US Change a disc while playing DISC SKIP another disc Play the desired disc directly DISC1-5 on . Tip If a DVD has more than two titles,...in continuous play mode Mute the sound MUTING. Playing Discs After following the instructions on the menu. (DVD: page 33), (VIDEO CD: page 33). Doing so may appear on the system lights up in continuous play mode Go back to the disc stocker, however, the disc is ejected from...

Operating Instructions
Page 32
.... • The point where you stopped playing is not available. 2 Press H. H x 1 While playing a disc, press x to stop the disc, the system remembers the point where you pressed x and "RESUME" appears in Step 1. Notes • You cannot perform Resume Play during Shuffle Play or Program Play. •...; Depending on the Setup Menu. 32US When you stop playback. you change the setting on where you stop the disc, the system may not resume playback from the beginning of the disc, press x twice, then press H. Resuming Playback from the Point...
.... • The point where you stopped playing is not available. 2 Press H. H x 1 While playing a disc, press x to stop the disc, the system remembers the point where you pressed x and "RESUME" appears in Step 1. Notes • You cannot perform Resume Play during Shuffle Play or Program Play. •...; Depending on the Setup Menu. 32US When you stop playback. you change the setting on where you stop the disc, the system may not resume playback from the beginning of the disc, press x twice, then press H. Resuming Playback from the Point...

Operating Instructions
Page 34
... recognize the data properly and will generate a loud noise which could damage your speaker system. • If the system cannot play MP3, set [DATA CD PRIORITY] to [MP3] in the [CUSTOM SETUP] setting (page 81). • The system can also be played back. • Maximum number of albums on an album is ...stopped to a depth of MP3 audio tracks that does not include an MP3 audio track is located in the later sessions, can play . The system cannot play audio ...
... recognize the data properly and will generate a loud noise which could damage your speaker system. • If the system cannot play MP3, set [DATA CD PRIORITY] to [MP3] in the [CUSTOM SETUP] setting (page 81). • The system can also be played back. • Maximum number of albums on an album is ...stopped to a depth of MP3 audio tracks that does not include an MP3 audio track is located in the later sessions, can play . The system cannot play audio ...

Operating Instructions
Page 36
... H. or >. However, the discs must be contained on an album is skipped. • If the system cannot play JPEG, set [DATA CD PRIORITY] to [JPEG] in the [CUSTOM SETUP] setting (page 81). • A JPEG image file of a length or width of more than 4,720 dots cannot be played. •... ".JPG" or ".JPEG." • The system can play Multi Session CDs. • An album that does not include a JPEG file is 250.) Tip When you want to the previous file, press . DVD DISPLAY DVD MENU/ ALBUM+ C/X/x/c/ ENTER O RETURN 1 Press DVD DISPLAY. DVD TOP MENU/ ALBUM- Playing JPEG Image Files ...
... H. or >. However, the discs must be contained on an album is skipped. • If the system cannot play JPEG, set [DATA CD PRIORITY] to [JPEG] in the [CUSTOM SETUP] setting (page 81). • A JPEG image file of a length or width of more than 4,720 dots cannot be played. •... ".JPG" or ".JPEG." • The system can play Multi Session CDs. • An album that does not include a JPEG file is 250.) Tip When you want to the previous file, press . DVD DISPLAY DVD MENU/ ALBUM+ C/X/x/c/ ENTER O RETURN 1 Press DVD DISPLAY. DVD TOP MENU/ ALBUM- Playing JPEG Image Files ...

Operating Instructions
Page 39
... (Program Play) You can play mode. The Program Menu appears on the disc to create your own program. To turn off the display Press DVD DISPLAY. You can set Shuffle Play or Repeat Play for the Album. H C/X/x/c/ ENTER Number buttons ORETURN REPEAT PLAY MODE CLEAR With cover opened. 1 In stop mode,... 39US Playing Discs ALL/ONE/ALBUM • ALL: The system plays all discs in the system consecutively in the order of the disc slot number, and you can set Shuffle Play or Repeat Play for all the discs. • ONE: The system plays only the one disc you have selected, and you ...
... (Program Play) You can play mode. The Program Menu appears on the disc to create your own program. To turn off the display Press DVD DISPLAY. You can set Shuffle Play or Repeat Play for the Album. H C/X/x/c/ ENTER Number buttons ORETURN REPEAT PLAY MODE CLEAR With cover opened. 1 In stop mode,... 39US Playing Discs ALL/ONE/ALBUM • ALL: The system plays all discs in the system consecutively in the order of the disc slot number, and you can set Shuffle Play or Repeat Play for all the discs. • ONE: The system plays only the one disc you have selected, and you ...


