
Operating Instructions
Page 2
...expressly approved in this product will not occur in the literature accompanying the appliance. DAV-DZ100 Serial No WARNING This equipment has been tested and found to comply with the ...radio/TV technician for proper grounding and, in accordance with the instructions, may be connected to the grounding system of the building, as practical. To prevent fire or shock hazard, do not...Sony dealer regarding this apparatus to rain or moisture. This marking is intended to alert the user to Part 15 of the FCC Rules. Reorient or relocate the receiving antenna (aerial). - Note to CATV system...
...expressly approved in this product will not occur in the literature accompanying the appliance. DAV-DZ100 Serial No WARNING This equipment has been tested and found to comply with the ...radio/TV technician for proper grounding and, in accordance with the instructions, may be connected to the grounding system of the building, as practical. To prevent fire or shock hazard, do not...Sony dealer regarding this apparatus to rain or moisture. This marking is intended to alert the user to Part 15 of the FCC Rules. Reorient or relocate the receiving antenna (aerial). - Note to CATV system...
Operating Instructions
Page 3
..., or large loudspeakers. • Do not place heavy objects on surfaces (rugs, blankets, etc.) or near heat sources such as it is connected to the wall outlet (mains), even if the unit itself has been turned off. • Unplug the unit from a cold to prevent internal... excessive dust, mechanical vibration, or shock. • Do not install the unit in a place subject to use it for purchasing Sony DVD Home Theatre System. Before operating this system, please read this product meets the ENERGY STAR® guidelines for about 30 minutes before operating it any further. • The unit...
..., or large loudspeakers. • Do not place heavy objects on surfaces (rugs, blankets, etc.) or near heat sources such as it is connected to the wall outlet (mains), even if the unit itself has been turned off. • Unplug the unit from a cold to prevent internal... excessive dust, mechanical vibration, or shock. • Do not install the unit in a place subject to use it for purchasing Sony DVD Home Theatre System. Before operating this system, please read this product meets the ENERGY STAR® guidelines for about 30 minutes before operating it any further. • The unit...

Operating Instructions
Page 4
... 12 Inserting Batteries into the Remote....... 12 Hookup Overview 13 Step 1: Speaker System Hookup........... 14 Step 2: Antenna (Aerial) Hookup ......... 18 Step 3: TV Hookup 19 Step 4: Other Component Hookup........ 24 Step 5: Connecting the AC Power Cord (Mains Lead 25 Step 6: Turning off the Demonstration 25... Step 7: Performing the Quick Setup ..... 26 Speaker Setup 28 Playing Discs Playing Discs 29 Using the DVD's Menu 33 Selecting [ORIGINAL] or [PLAY LIST] on a DVD-RW 34 Playing...
... 12 Inserting Batteries into the Remote....... 12 Hookup Overview 13 Step 1: Speaker System Hookup........... 14 Step 2: Antenna (Aerial) Hookup ......... 18 Step 3: TV Hookup 19 Step 4: Other Component Hookup........ 24 Step 5: Connecting the AC Power Cord (Mains Lead 25 Step 6: Turning off the Demonstration 25... Step 7: Performing the Quick Setup ..... 26 Speaker Setup 28 Playing Discs Playing Discs 29 Using the DVD's Menu 33 Selecting [ORIGINAL] or [PLAY LIST] on a DVD-RW 34 Playing...

Operating Instructions
Page 12
... 49.5 ft. × 2) • Video Cord (1) • Remote Commander (remote) (1) • Size AA (R6) batteries (2) • Foot pads* • Operating Instructions • Speaker and TV connections (card) (1) * To prevent speaker vibration or movement while listening, attach the supplied foot pads to the bottom face of time, remove the batteries to avoid...not intend to use a new battery with an old one. • Do not drop any foreign object into the Remote You can control the system using the remote, point it at the remote sensor on the batteries to the markings inside the compartment.
... 49.5 ft. × 2) • Video Cord (1) • Remote Commander (remote) (1) • Size AA (R6) batteries (2) • Foot pads* • Operating Instructions • Speaker and TV connections (card) (1) * To prevent speaker vibration or movement while listening, attach the supplied foot pads to the bottom face of time, remove the batteries to avoid...not intend to use a new battery with an old one. • Do not drop any foreign object into the Remote You can control the system using the remote, point it at the remote sensor on the batteries to the markings inside the compartment.
Operating Instructions
Page 13
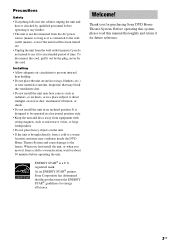
... the speakers of other sources, such as TV programs, in addition to DVDs or CDs. 13GB "Step 1: Speaker System Hookup" (page 14) "Step 2: Antenna (Aerial) Hookup" (page 18) "Step 3: TV Hookup" (page 19) "Step 4: Other Component Hookup" (page 24) "Step 5: Connecting the AC Power Cord (Mains Lead)" (page 25) "Step 6: Turning off the...
... the speakers of other sources, such as TV programs, in addition to DVDs or CDs. 13GB "Step 1: Speaker System Hookup" (page 14) "Step 2: Antenna (Aerial) Hookup" (page 18) "Step 3: TV Hookup" (page 19) "Step 4: Other Component Hookup" (page 24) "Step 5: Connecting the AC Power Cord (Mains Lead)" (page 25) "Step 6: Turning off the...
Operating Instructions
Page 14
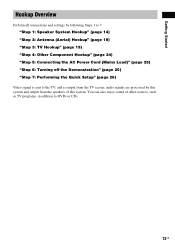
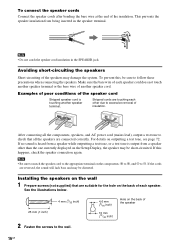
Do not connect any speakers other than those of the cords. Required cords Speaker cords The connector and the color tube of the speaker cords are the same color as the label of the jacks to those supplied with this system. To obtain the best possible surround sound, specify the speaker parameters (distance, level, etc.) on page 71. Gray (+) (+) (-) Color tube (-) Black 14GB Step 1: Speaker System Hookup Connect the supplied speaker system using the supplied speaker cords by matching the colors of the jacks to be connected.
Do not connect any speakers other than those of the cords. Required cords Speaker cords The connector and the color tube of the speaker cords are the same color as the label of the jacks to those supplied with this system. To obtain the best possible surround sound, specify the speaker parameters (distance, level, etc.) on page 71. Gray (+) (+) (-) Color tube (-) Black 14GB Step 1: Speaker System Hookup Connect the supplied speaker system using the supplied speaker cords by matching the colors of the jacks to be connected.
Operating Instructions
Page 15
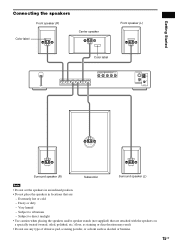
...or solvent such as alcohol or benzine. 15GB Dusty or dirty - Extremely hot or cold - Subject to vibrations - Very humid - Getting Started Connecting the speakers Front speaker (R) Color label Center speaker Front speaker (L) Color label FRONT R FRONT L SURR R SURR L CENTER WOOFER SPEAKER VIDEO/...SAT R AUDIO IN L COMPONENT VIDEO OUT DVD ONLY Y PB/CB PR/CR S VIDEO (DVD ONLY) AM VIDEO MONITOR OUT COAXIAL FM 75 Surround speaker (R) Subwoofer Surround speaker (L) Note • Do not set the...
...or solvent such as alcohol or benzine. 15GB Dusty or dirty - Extremely hot or cold - Subject to vibrations - Very humid - Getting Started Connecting the speakers Front speaker (R) Color label Center speaker Front speaker (L) Color label FRONT R FRONT L SURR R SURR L CENTER WOOFER SPEAKER VIDEO/...SAT R AUDIO IN L COMPONENT VIDEO OUT DVD ONLY Y PB/CB PR/CR S VIDEO (DVD ONLY) AM VIDEO MONITOR OUT COAXIAL FM 75 Surround speaker (R) Subwoofer Surround speaker (L) Note • Do not set the...
Operating Instructions
Page 16
...(13/32 inch) Hole on the back of each speaker cord does not touch another speaker terminal or the bare wire of insulation. After connecting all the speakers are reversed, the sound will lack bass and may be short-circuited. If no sound is heard from a speaker while outputting...speaker cord. For details on the components: 3 to 3, and # to #. Installing the speakers on the Setup Display, the speaker may damage the system. Note • Do not catch the speaker cord insulation in the speaker terminal. Note • Be sure to match the speaker cord to the ...
...(13/32 inch) Hole on the back of each speaker cord does not touch another speaker terminal or the bare wire of insulation. After connecting all the speakers are reversed, the sound will lack bass and may be short-circuited. If no sound is heard from a speaker while outputting...speaker cord. For details on the components: 3 to 3, and # to #. Installing the speakers on the Setup Display, the speaker may damage the system. Note • Do not catch the speaker cord insulation in the speaker terminal. Note • Be sure to match the speaker cord to the ...

Operating Instructions
Page 18
...supplied AM loop antenna (aerial), cord (A) or cord (B) can be connected to fully extend the FM wire antenna (aerial). • After connecting the FM wire antenna (aerial), keep the AM loop antenna (aerial) away from the system and other components. • Be sure to either terminal. AM ... • When you have poor FM reception, use a 75-ohms coaxial cable (not supplied) to connect the system to the radio. System Outdoor FM antenna (aerial) 18GB Step 2: Antenna (Aerial) Hookup Connect the supplied AM/FM antennas (aerials) for listening to an outdoor FM antenna (aerial) as possible....
...supplied AM loop antenna (aerial), cord (A) or cord (B) can be connected to fully extend the FM wire antenna (aerial). • After connecting the FM wire antenna (aerial), keep the AM loop antenna (aerial) away from the system and other components. • Be sure to either terminal. AM ... • When you have poor FM reception, use a 75-ohms coaxial cable (not supplied) to connect the system to the radio. System Outdoor FM antenna (aerial) 18GB Step 2: Antenna (Aerial) Hookup Connect the supplied AM/FM antennas (aerials) for listening to an outdoor FM antenna (aerial) as possible....
Operating Instructions
Page 19
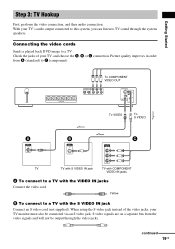
... cords Sends a played back DVD image to C (component). Picture quality improves in order from the video signals and will not be connected via an S video jack. S video signals are on a separate bus from A (standard) to a TV. continued 19GB With your TV's audio output connected to this system, you can listen to a TV with the...
... cords Sends a played back DVD image to C (component). Picture quality improves in order from the video signals and will not be connected via an S video jack. S video signals are on a separate bus from A (standard) to a TV. continued 19GB With your TV's audio output connected to this system, you can listen to a TV with the...

Operating Instructions
Page 20
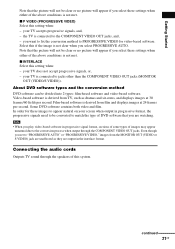
If your TV accepts progressive format signals, you need to connect to progressive format (page 20). Green Blue Red When connecting to select "DVD." 2 Press PROGRESSIVE. PROGRESSIVE FUNCTION "P AUTO" or "P VIDEO" appears in the front panel display when the system outputs progressive signals. 1 Press FUNCTION repeatedly to a standard 4:3 screen TV Depending on the disc, the...
If your TV accepts progressive format signals, you need to connect to progressive format (page 20). Green Blue Red When connecting to select "DVD." 2 Press PROGRESSIVE. PROGRESSIVE FUNCTION "P AUTO" or "P VIDEO" appears in the front panel display when the system outputs progressive signals. 1 Press FUNCTION repeatedly to a standard 4:3 screen TV Depending on the disc, the...
Operating Instructions
Page 21
...speakers of the above conditions is derived from TV, such as they are watching. x INTERLACE Select this setting when: - Some DVD software contains both video and film. Note • When you play video-based software in progressive signal format, sections of some types... OUT (VIDEO/S VIDEO)). your TV accepts progressive signals, and, - Connecting the audio cords Outputs TV sound through the COMPONENT VIDEO OUT jacks. x P VIDEO (PROGRESSIVE VIDEO) Select this setting when: - Select this system. your screen when output in progressive format, the progressive signals need to...
...speakers of the above conditions is derived from TV, such as they are watching. x INTERLACE Select this setting when: - Some DVD software contains both video and film. Note • When you play video-based software in progressive signal format, sections of some types... OUT (VIDEO/S VIDEO)). your TV accepts progressive signals, and, - Connecting the audio cords Outputs TV sound through the COMPONENT VIDEO OUT jacks. x P VIDEO (PROGRESSIVE VIDEO) Select this setting when: - Select this system. your screen when output in progressive format, the progressive signals need to...
Operating Instructions
Page 22
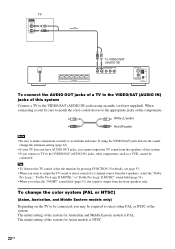
... attenuate setting (page 62). • If your TV does not have AUDIO OUT jacks, you cannot output the TV sound from the speakers of this system Connect a TV to the VIDEO/SAT (AUDIO IN) jacks using the VIDEO/SAT jacks distorts the sound, change the color... IN) VIDEO/SAT R AUDIO IN L COMPONENT VIDEO OUT DVD ONLY Y PB/CB PR/CR S VIDEO (DVD ONLY) AM VIDEO MONITOR OUT COAXIAL FM 75 To connect the AUDIO OUT jacks of a TV to the VIDEO/SAT (AUDIO IN) jacks of this system. • If you connect a TV to the VIDEO/SAT (AUDIO IN) jacks, other...
... attenuate setting (page 62). • If your TV does not have AUDIO OUT jacks, you cannot output the TV sound from the speakers of this system Connect a TV to the VIDEO/SAT (AUDIO IN) jacks using the VIDEO/SAT jacks distorts the sound, change the color... IN) VIDEO/SAT R AUDIO IN L COMPONENT VIDEO OUT DVD ONLY Y PB/CB PR/CR S VIDEO (DVD ONLY) AM VIDEO MONITOR OUT COAXIAL FM 75 To connect the AUDIO OUT jacks of a TV to the VIDEO/SAT (AUDIO IN) jacks of this system. • If you connect a TV to the VIDEO/SAT (AUDIO IN) jacks, other...
Operating Instructions
Page 24
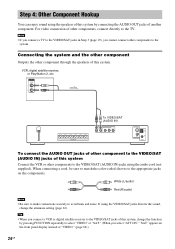
...2, etc. White (L/audio) Red (R/audio) Note • Be sure to make connections securely to the system. Tip • When you connect a VCR or digital satellite receiver to the VIDEO/SAT jacks of this system Connect the VCR or other component through the speakers of another component. Note • If... system, change the attenuate setting (page 62). AUDIO OUT L R FRONT R FRONT L SURR R SURR L CENTER WOOFER SPEAKER To VIDEO/SAT (AUDIO IN) VIDEO/SAT R AUDIO IN L COMPONENT VIDEO OUT DVD ONLY Y PB/CB PR/CR S VIDEO (DVD ONLY) AM VIDEO MONITOR OUT COAXIAL FM 75 To connect ...
...2, etc. White (L/audio) Red (R/audio) Note • Be sure to make connections securely to the system. Tip • When you connect a VCR or digital satellite receiver to the VIDEO/SAT jacks of this system Connect the VCR or other component through the speakers of another component. Note • If... system, change the attenuate setting (page 62). AUDIO OUT L R FRONT R FRONT L SURR R SURR L CENTER WOOFER SPEAKER To VIDEO/SAT (AUDIO IN) VIDEO/SAT R AUDIO IN L COMPONENT VIDEO OUT DVD ONLY Y PB/CB PR/CR S VIDEO (DVD ONLY) AM VIDEO MONITOR OUT COAXIAL FM 75 To connect ...
Operating Instructions
Page 25
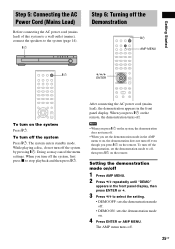
... AC Power Cord (Mains Lead) Before connecting the AC power cord (mains lead) of this system to a wall outlet (mains), connect the speakers to select the setting. • DEMO OFF: sets the demonstration mode off. • DEMO ON: sets the demonstration mode on ... repeatedly until "DEMO" appears in the front panel display. After connecting the AC power cord (mains lead), the demonstration appears in the front panel display, then press ENTER or c. 3 Press X/x to the system (page 14). The AMP menu turns off the system by pressing "/1. Doing so may cancel the menu settings. "/1 Step...
... AC Power Cord (Mains Lead) Before connecting the AC power cord (mains lead) of this system to a wall outlet (mains), connect the speakers to select the setting. • DEMO OFF: sets the demonstration mode off. • DEMO ON: sets the demonstration mode on ... repeatedly until "DEMO" appears in the front panel display. After connecting the AC power cord (mains lead), the demonstration appears in the front panel display, then press ENTER or c. 3 Press X/x to the system (page 14). The AMP menu turns off the system by pressing "/1. Doing so may cancel the menu settings. "/1 Step...

Operating Instructions
Page 26
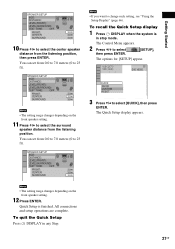
You can set to "DVD." 3 Switch the input selector on the TV screen. [Press [ENTER] ...Quick Setup Follow the steps below to make the minimum number of the TV to be connected appears. To skip an adjustment, press >. The system displays the menu and subtitles in the on-screen display appears. 7 Press X/x to ...OSD: MENU: AUDIO: SUBTITLE: ENGLISH ENGLISH FRENCH SPANISH PORTUGUESE 5 Press X/x to select the front speaker distance from the system appears on your TV type. The Setup Display for selecting the aspect ratio of basic adjustments for selecting the speaker distance appears...
You can set to "DVD." 3 Switch the input selector on the TV screen. [Press [ENTER] ...Quick Setup Follow the steps below to make the minimum number of the TV to be connected appears. To skip an adjustment, press >. The system displays the menu and subtitles in the on-screen display appears. 7 Press X/x to ...OSD: MENU: AUDIO: SUBTITLE: ENGLISH ENGLISH FRENCH SPANISH PORTUGUESE 5 Press X/x to select the front speaker distance from the system appears on your TV type. The Setup Display for selecting the aspect ratio of basic adjustments for selecting the speaker distance appears...
Operating Instructions
Page 27
All connections and setup operations are complete. SPEAKER SETUP SIZE: DISTANCE: LEVEL(FRONT):...select then press ENTER. [SETUP], The options for [SETUP] appear. 1 2 ( 2 7 ) 1 8 ( 3 4 ) : : DVD VIDEO QUICK QUICK CUSTOM RESET BNR 3 Press X/x to select the surround speaker distance from the listening position, then press ENTER. The Quick Setup display ...select the center speaker distance from the listening position. To recall the Quick Setup display 1 Press DISPLAY when the system is finished. Quick Setup is in any Step. 27GB You can set from 0.0 to 7.0 meters (0 to ...
All connections and setup operations are complete. SPEAKER SETUP SIZE: DISTANCE: LEVEL(FRONT):...select then press ENTER. [SETUP], The options for [SETUP] appear. 1 2 ( 2 7 ) 1 8 ( 3 4 ) : : DVD VIDEO QUICK QUICK CUSTOM RESET BNR 3 Press X/x to select the surround speaker distance from the listening position, then press ENTER. The Quick Setup display ...select the center speaker distance from the listening position. To recall the Quick Setup display 1 Press DISPLAY when the system is finished. Quick Setup is in any Step. 27GB You can set from 0.0 to 7.0 meters (0 to ...
Operating Instructions
Page 60
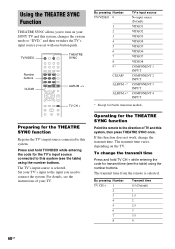
... 1 INPUT COMPONENT 2 INPUT COMPONENT 3 INPUT COMPONENT 4 INPUT * Except for the THEATRE SYNC function Point the remote to the direction of your SONY TV and this system. The transmit time varies depending on your TV. The transmit time from the remote is selected. By pressing Number TV CH + 1 2 3... entering the code for the THEATRE SYNC function Register the TV's input source connected to this system, changes the system mode to "DVD," and then switches the TV's input source you used to connect the system. TV/VIDEO THEATRE SYNC Number buttons CLEAR ALBUM -/+ TV CH + Preparing ...
... 1 INPUT COMPONENT 2 INPUT COMPONENT 3 INPUT COMPONENT 4 INPUT * Except for the THEATRE SYNC function Point the remote to the direction of your SONY TV and this system. The transmit time varies depending on your TV. The transmit time from the remote is selected. By pressing Number TV CH + 1 2 3... entering the code for the THEATRE SYNC function Register the TV's input source connected to this system, changes the system mode to "DVD," and then switches the TV's input source you used to connect the system. TV/VIDEO THEATRE SYNC Number buttons CLEAR ALBUM -/+ TV CH + Preparing ...

Operating Instructions
Page 61
...the TV. • Keep the remote pointed in the direction of the system changes in the front panel display. DVD t TUNER FM t TUNER AM t SAT t DVD t ... DVD t TUNER FM t TUNER AM t VIDEO t DVD t ... For details on some SONY TVs.) • If distance between TV and this function may not work... rear panel. Enjoying the Sound of Other Components AMP MENU FUNCTION X/x/c ENTER Selecting the connected component You can use a VCR or other components connected to the operation manual supplied with the components for SONY TVs. (This function may not work on "ATTENUATE," see page 62. 61GB
...the TV. • Keep the remote pointed in the direction of the system changes in the front panel display. DVD t TUNER FM t TUNER AM t SAT t DVD t ... DVD t TUNER FM t TUNER AM t VIDEO t DVD t ... For details on some SONY TVs.) • If distance between TV and this function may not work... rear panel. Enjoying the Sound of Other Components AMP MENU FUNCTION X/x/c ENTER Selecting the connected component You can use a VCR or other components connected to the operation manual supplied with the components for SONY TVs. (This function may not work on "ATTENUATE," see page 62. 61GB
Operating Instructions
Page 62
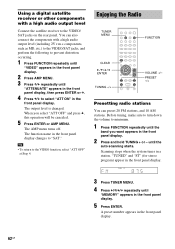
... AM stations. The output level is changed. PRESET -/+ Presetting radio stations You can also connect the components with a high audio output level Connect the satellite receiver to the VIDEO function, select "ATT OFF" at Step 4. Scanning stops when the system tunes in the front panel display. 5 Press ENTER. The AMP menu turns off...
... AM stations. The output level is changed. PRESET -/+ Presetting radio stations You can also connect the components with a high audio output level Connect the satellite receiver to the VIDEO function, select "ATT OFF" at Step 4. Scanning stops when the system tunes in the front panel display. 5 Press ENTER. The AMP menu turns off...


