
Child Safety: It Makes A Difference Where Your TV Stands
Page 1
...potentially push or pull a TV over. 7 Share our safety message on this hidden hazard of the home with furniture and television sets. 5 Avoid placing any items on top of TVs such as VCRs ... 1 One size does NOT fit all. Many homes, in fact, have a television in your family and friends. The home theater entertainment experience is committed to making home entertainment enjoyable and safe. Use the appropriate furniture ... allow children to climb on or play with your home. Sometimes televisions are improperly secured or inappropriately situated on dressers, bookcases, shelves, desks, audio...
...potentially push or pull a TV over. 7 Share our safety message on this hidden hazard of the home with furniture and television sets. 5 Avoid placing any items on top of TVs such as VCRs ... 1 One size does NOT fit all. Many homes, in fact, have a television in your family and friends. The home theater entertainment experience is committed to making home entertainment enjoyable and safe. Use the appropriate furniture ... allow children to climb on or play with your home. Sometimes televisions are improperly secured or inappropriately situated on dressers, bookcases, shelves, desks, audio...
Operating Instructions
Page 4
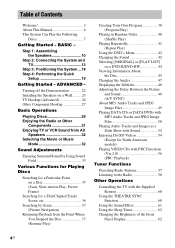
...Delay Between the Picture and Sound 48 (A/V SYNC) About MP3 Audio Tracks and JPEG Image Files 49 Playing DATA CDs or DATA DVDs with MP3 Audio Tracks and JPEG Image Files 50 Playing Audio Tracks and Images as a Slide Show with Sound 52 Enjoying DivX&#... Sleep Timer 62 Changing the Brightness of Contents Welcome 3 About This Manual 6 This System Can Play the Following Discs 7 Getting Started - Step 1: Assembling the Speakers 10 Step 2: Connecting the System and TV 13 Step 3: Positioning the System ...18 Step 4: Performing the Quick Setup 19 Getting Started - ADVANCED - BASIC -...
...Delay Between the Picture and Sound 48 (A/V SYNC) About MP3 Audio Tracks and JPEG Image Files 49 Playing DATA CDs or DATA DVDs with MP3 Audio Tracks and JPEG Image Files 50 Playing Audio Tracks and Images as a Slide Show with Sound 52 Enjoying DivX&#... Sleep Timer 62 Changing the Brightness of Contents Welcome 3 About This Manual 6 This System Can Play the Following Discs 7 Getting Started - Step 1: Assembling the Speakers 10 Step 2: Connecting the System and TV 13 Step 3: Positioning the System ...18 Step 4: Performing the Quick Setup 19 Getting Started - ADVANCED - BASIC -...
Operating Instructions
Page 5
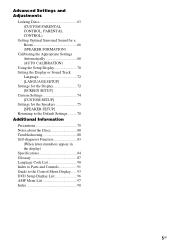
... Settings for the Display 72 [SCREEN SETUP] Custom Settings 74 [CUSTOM SETUP] Settings for the Speakers 75 [SPEAKER SETUP] Returning to the Default Settings.......... 78 Additional Information Precautions 79 Notes about the Discs 80 ...Troubleshooting 80 Self-diagnosis Function 83 (When letters/numbers appear in the display) Specifications 84 Glossary 87 Language Code List 90 Index to Parts and Controls 91 Guide to the Control Menu Display...... 93 DVD...
... Settings for the Display 72 [SCREEN SETUP] Custom Settings 74 [CUSTOM SETUP] Settings for the Speakers 75 [SPEAKER SETUP] Returning to the Default Settings.......... 78 Additional Information Precautions 79 Notes about the Discs 80 ...Troubleshooting 80 Self-diagnosis Function 83 (When letters/numbers appear in the display) Specifications 84 Glossary 87 Language Code List 90 Index to Parts and Controls 91 Guide to the Control Menu Display...... 93 DVD...
Operating Instructions
Page 10
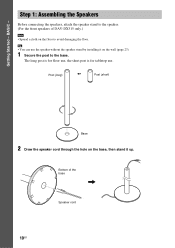
... it up. Tip • You can use . Post (long) or Post (short) Base 2 Draw the speaker cord through the hole on the floor to the speaker. (For the front speakers of the base , Speaker cord 10GB Bottom of DAV-DX315 only.) Note • Spread a cloth on the base, then stand it on the wall (page 23...
... it up. Tip • You can use . Post (long) or Post (short) Base 2 Draw the speaker cord through the hole on the floor to the speaker. (For the front speakers of the base , Speaker cord 10GB Bottom of DAV-DX315 only.) Note • Spread a cloth on the base, then stand it on the wall (page 23...
Operating Instructions
Page 11
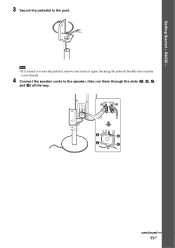
Note • If it is hard to the speaker, then run them through the slots (A, B, C, and D) all the way. Getting Started - A B C D continued 11GB Securing the pedestal forcibly may ruin the screw threads. 4 Connect the speaker cords to secure the pedestal, remove and secure it again. BASIC - 3 Secure the pedestal to the post.
Note • If it is hard to the speaker, then run them through the slots (A, B, C, and D) all the way. Getting Started - A B C D continued 11GB Securing the pedestal forcibly may ruin the screw threads. 4 Connect the speaker cords to secure the pedestal, remove and secure it again. BASIC - 3 Secure the pedestal to the post.
Operating Instructions
Page 12
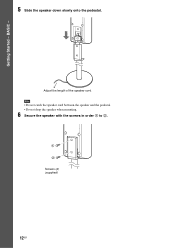
Getting Started - Adjust the length of the speaker cord. Note • Do not catch the speaker cord between the speaker and the pedestal. • Do not drop the speaker when mounting. 6 Secure the speaker with the screws in order 1 to 2. 1 2 Screws (2) (supplied) 12GB BASIC - 5 Slide the speaker down slowly onto the pedestal.
Getting Started - Adjust the length of the speaker cord. Note • Do not catch the speaker cord between the speaker and the pedestal. • Do not drop the speaker when mounting. 6 Secure the speaker with the screws in order 1 to 2. 1 2 Screws (2) (supplied) 12GB BASIC - 5 Slide the speaker down slowly onto the pedestal.
Operating Instructions
Page 13
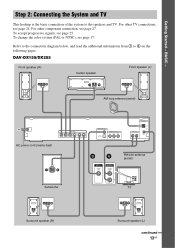
... read the additional information from 1 to the speakers and TV. To change the color system (PAL or NTSC), see page 25. BASIC - DAV-DX155/DX255 Front speaker (R) Center speaker Front speaker (L) AM loop antenna (aerial) AC power cord (mains lead) SPEAKER FRONT R FRONT L CENTER WOOFER SUR R SUR L MONITOR OUT VIDEO S VIDEO (DVD ONLY) COMPONENT VIDEO OUT Y PB/CB...
... read the additional information from 1 to the speakers and TV. To change the color system (PAL or NTSC), see page 25. BASIC - DAV-DX155/DX255 Front speaker (R) Center speaker Front speaker (L) AM loop antenna (aerial) AC power cord (mains lead) SPEAKER FRONT R FRONT L CENTER WOOFER SUR R SUR L MONITOR OUT VIDEO S VIDEO (DVD ONLY) COMPONENT VIDEO OUT Y PB/CB...
Operating Instructions
Page 14
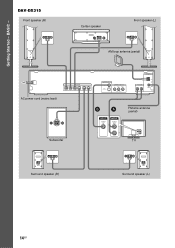
Getting Started - DAV-DX315 Front speaker (R) Center speaker Front speaker (L) AM loop antenna (aerial) AC power cord (mains lead) SPEAKER FRONT R FRONT L CENTER WOOFER SUR R SUR L MONITOR OUT VIDEO S VIDEO (DVD ONLY) COMPONENT VIDEO OUT Y PB/CB PR/CR (DVD ONLY) ANTENNA AM TV/VCR R AUDIO IN L COAXIAL FM75 BA FM wire antenna (aerial) Subwoofer VIDEO IN AUDIO OUT L R TV Surround speaker (R) Surround speaker (L) 14GB BASIC -
Getting Started - DAV-DX315 Front speaker (R) Center speaker Front speaker (L) AM loop antenna (aerial) AC power cord (mains lead) SPEAKER FRONT R FRONT L CENTER WOOFER SUR R SUR L MONITOR OUT VIDEO S VIDEO (DVD ONLY) COMPONENT VIDEO OUT Y PB/CB PR/CR (DVD ONLY) ANTENNA AM TV/VCR R AUDIO IN L COAXIAL FM75 BA FM wire antenna (aerial) Subwoofer VIDEO IN AUDIO OUT L R TV Surround speaker (R) Surround speaker (L) 14GB BASIC -

Operating Instructions
Page 15
... 77. BASIC - 1 Connecting the Speakers Required cords The connector and color tube of the speaker cords are touching each speaker cord does not touch another speaker terminal. Stripped speaker cord is output from a speaker other due to excessive removal of the speakers may be sure to be short-circuited...• Be sure to match the speaker cord to the appropriate terminal on the components: 3 to 3, and # to check that all the speakers are reversed, the sound will lack bass and may damage the system. After connecting all the components, speakers, and AC power cord (mains lead),...
... 77. BASIC - 1 Connecting the Speakers Required cords The connector and color tube of the speaker cords are touching each speaker cord does not touch another speaker terminal. Stripped speaker cord is output from a speaker other due to excessive removal of the speakers may be sure to be short-circuited...• Be sure to match the speaker cord to the appropriate terminal on the components: 3 to 3, and # to check that all the speakers are reversed, the sound will lack bass and may damage the system. After connecting all the components, speakers, and AC power cord (mains lead),...
Operating Instructions
Page 16
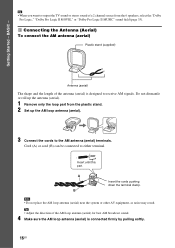
... clamp. Note • Do not place the AM loop antenna (aerial) near the system or other AV equipment, as noise may result. Do not dismantle or roll up the antenna (aerial). 1 Remove only the loop part from the 6 speakers, select the "Dolby Pro Logic," "Dolby Pro Logic II MOVIE," or "Dolby Pro...
... clamp. Note • Do not place the AM loop antenna (aerial) near the system or other AV equipment, as noise may result. Do not dismantle or roll up the antenna (aerial). 1 Remove only the loop part from the 6 speakers, select the "Dolby Pro Logic," "Dolby Pro Logic II MOVIE," or "Dolby Pro...

Operating Instructions
Page 17
... If you may be unplugged from the wall socket immediately in the front display when the color system is NTSC. The initial setting of this system to a wall outlet (mains), connect the speakers to select either PAL or NTSC for Australian and Middle Eastern models is PAL. Each time you... perform this system so that the power cord can be required to the system. System Outdoor FM antenna (aerial) 4 ...
... If you may be unplugged from the wall socket immediately in the front display when the color system is NTSC. The initial setting of this system to a wall outlet (mains), connect the speakers to select either PAL or NTSC for Australian and Middle Eastern models is PAL. Each time you... perform this system so that the power cord can be required to the system. System Outdoor FM antenna (aerial) 4 ...
Operating Instructions
Page 18
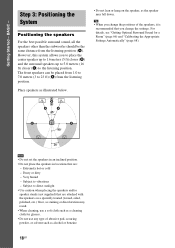
... (C) to 23 ft) (A) from the listening position (A). Step 3: Positioning the System Positioning the speakers For the best possible surround sound, all the speakers other than the subwoofer should be placed from 1.0 to 7.0 meters (3 to the listening position. Extremely hot or cold - However, this system allows you change the settings. For details, see "Getting Optimal...
... (C) to 23 ft) (A) from the listening position (A). Step 3: Positioning the System Positioning the speakers For the best possible surround sound, all the speakers other than the subwoofer should be placed from 1.0 to 7.0 meters (3 to the listening position. Extremely hot or cold - However, this system allows you change the settings. For details, see "Getting Optimal...
Operating Instructions
Page 19
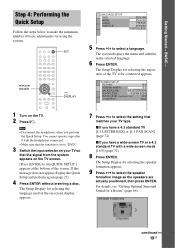
... the headphones when you have a wide-screen TV or a 4:3 standard TV with the headphones connected. • Make sure that the signal from the system appears on the TV. 2 Press [/1. The Setup Display for selecting the aspect ratio of the TV to make the minimum number of the screen. For... appears. 9 Press C/c to select the setting that matches your TV so that the function is set to "DVD." 3 Switch the input selector on your TV type. SPEAKER FORMATION STANDARD continued 19GB Getting Started - If this message does not appear, display the Quick Setup and perform again (page 21). 4 Press ...
... the headphones when you have a wide-screen TV or a 4:3 standard TV with the headphones connected. • Make sure that the signal from the system appears on the TV. 2 Press [/1. The Setup Display for selecting the aspect ratio of the TV to make the minimum number of the screen. For... appears. 9 Press C/c to select the setting that matches your TV so that the function is set to "DVD." 3 Switch the input selector on your TV type. SPEAKER FORMATION STANDARD continued 19GB Getting Started - If this message does not appear, display the Quick Setup and perform again (page 21). 4 Press ...
Operating Instructions
Page 20
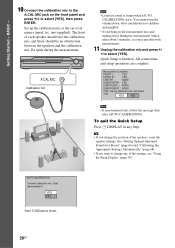
The front of the speakers, reset the speaker settings. Quick Setup is output when [AUTO CALIBRATION] starts. FRONT L : YES FRONT R : YES CENTER : NONE SUBWOOFER : YES SURROUND L : NONE SURROUND R : NONE If OK, unplug calibration ...), as it may interfere with measurement. 11 Unplug the calibration mic and press C/ c to change the position of each speaker should face the calibration mic, and there should be no obstruction between the speakers and the calibration mic. YES NO Auto Calibration starts. 20GB Tip • If you want to select [YES...
The front of the speakers, reset the speaker settings. Quick Setup is output when [AUTO CALIBRATION] starts. FRONT L : YES FRONT R : YES CENTER : NONE SUBWOOFER : YES SURROUND L : NONE SURROUND R : NONE If OK, unplug calibration ...), as it may interfere with measurement. 11 Unplug the calibration mic and press C/ c to change the position of each speaker should face the calibration mic, and there should be no obstruction between the speakers and the calibration mic. YES NO Auto Calibration starts. 20GB Tip • If you want to select [YES...
Operating Instructions
Page 23
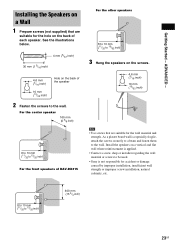
...screw installation, natural calamity, etc. 8 to 10 mm (11/32 to the wall. Install the speakers on a vertical and flat wall where reinforcement is applied. • Contact a screw shop or installer... regarding the wall material or screws to be used. • Sony is especially fragile, attach the screws securely to a beam and fasten them to 13/32 inch) 400...the back of the speaker 2 Fasten the screws to 13/32 inch) 3 Hang the speakers on the back of DAV-DX315 For the other speakers 8 to 10 mm (11/32 to the wall. For the center speaker 160 mm (6 ...
...screw installation, natural calamity, etc. 8 to 10 mm (11/32 to the wall. Install the speakers on a vertical and flat wall where reinforcement is applied. • Contact a screw shop or installer... regarding the wall material or screws to be used. • Sony is especially fragile, attach the screws securely to a beam and fasten them to 13/32 inch) 400...the back of the speaker 2 Fasten the screws to 13/32 inch) 3 Hang the speakers on the back of DAV-DX315 For the other speakers 8 to 10 mm (11/32 to the wall. For the center speaker 160 mm (6 ...
Operating Instructions
Page 24
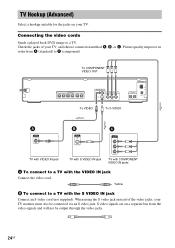
... a TV with the S VIDEO IN jack Connect an S video cord (not supplied). To COMPONENT VIDEO OUT SPEAKER FRONT R FRONT L CENTER WOOFER SUR R SUR L MONITOR OUT VIDEO S VIDEO (DVD ONLY) COMPONENT VIDEO OUT Y PB/CB PR/CR (DVD ONLY) To VIDEO To S VIDEO ANTENNA AM TV/VCR R AUDIO IN L COAXIAL FM75 A VIDEO IN B S VIDEO... VIDEO IN jack Connect the video cord. . S video signals are on your TV, and choose connection method A, B, or C. Connecting the video cords Sends a played back DVD image to a TV with COMPONENT VIDEO IN jacks A To connect to a TV.
... a TV with the S VIDEO IN jack Connect an S video cord (not supplied). To COMPONENT VIDEO OUT SPEAKER FRONT R FRONT L CENTER WOOFER SUR R SUR L MONITOR OUT VIDEO S VIDEO (DVD ONLY) COMPONENT VIDEO OUT Y PB/CB PR/CR (DVD ONLY) To VIDEO To S VIDEO ANTENNA AM TV/VCR R AUDIO IN L COAXIAL FM75 A VIDEO IN B S VIDEO... VIDEO IN jack Connect the video cord. . S video signals are on your TV, and choose connection method A, B, or C. Connecting the video cords Sends a played back DVD image to a TV with COMPONENT VIDEO IN jacks A To connect to a TV.
Operating Instructions
Page 27
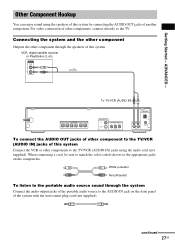
...audio cord (not supplied). continued 27GB When connecting a cord, be sure to match the color-coded sleeves to the TV. Connecting the system and the other component Outputs the other components to the AUDIO IN jack on the front panel of other components, connect directly to the ...- VCR, digital satellite receiver or PlayStation 2, etc. AUDIO OUT L R To TV/VCR (AUDIO IN) SPEAKER FRONT R FRONT L CENTER WOOFER SUR R SUR L MONITOR OUT VIDEO S VIDEO (DVD ONLY) COMPONENT VIDEO OUT Y PB/CB PR/CR (DVD ONLY) ANTENNA AM TV/VCR R AUDIO IN L COAXIAL FM75 To connect the AUDIO OUT jacks of...
...audio cord (not supplied). continued 27GB When connecting a cord, be sure to match the color-coded sleeves to the TV. Connecting the system and the other component Outputs the other components to the AUDIO IN jack on the front panel of other components, connect directly to the ...- VCR, digital satellite receiver or PlayStation 2, etc. AUDIO OUT L R To TV/VCR (AUDIO IN) SPEAKER FRONT R FRONT L CENTER WOOFER SUR R SUR L MONITOR OUT VIDEO S VIDEO (DVD ONLY) COMPONENT VIDEO OUT Y PB/CB PR/CR (DVD ONLY) ANTENNA AM TV/VCR R AUDIO IN L COAXIAL FM75 To connect the AUDIO OUT jacks of...
Operating Instructions
Page 32
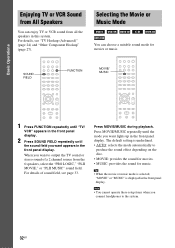
...in the front panel display. Basic Operations Enjoying TV or VCR Sound from All Speakers You can choose a suitable sound mode for music. Press MOVIE/MUSIC repeatedly until the sound field you connect headphones to the system. 32GB For details, see page 33. Press MOVIE/MUSIC during playback. Selecting... the Movie or Music Mode You can enjoy TV or VCR sound from all the speakers in the front panel display. Note • You cannot...
...in the front panel display. Basic Operations Enjoying TV or VCR Sound from All Speakers You can choose a suitable sound mode for music. Press MOVIE/MUSIC repeatedly until the sound field you connect headphones to the system. 32GB For details, see page 33. Press MOVIE/MUSIC during playback. Selecting... the Movie or Music Mode You can enjoy TV or VCR sound from all the speakers in the front panel display. Note • You cannot...
Operating Instructions
Page 33
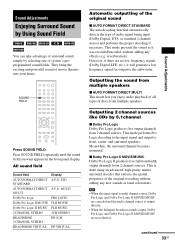
... VIRTUAL HP VIRTUAL Outputting 2 channel sources like CDs by selecting one of discs from multiple speakers. x Dolby Pro Logic II MOVIE/MUSIC Dolby Pro Logic II produces five full-bandwidth output channels...Press SOUND FIELD repeatedly until the sound field you enjoy audio playback of all types of system's preprogrammed sound fields. Press SOUND FIELD. This is input, Dolby Pro Logic and Dolby... decoding if necessary. They bring the exciting and powerful sound of movie theaters into your home. This mode presents the sound as it will generate a low frequency signal for output to...
... VIRTUAL HP VIRTUAL Outputting 2 channel sources like CDs by selecting one of discs from multiple speakers. x Dolby Pro Logic II MOVIE/MUSIC Dolby Pro Logic II produces five full-bandwidth output channels...Press SOUND FIELD repeatedly until the sound field you enjoy audio playback of all types of system's preprogrammed sound fields. Press SOUND FIELD. This is input, Dolby Pro Logic and Dolby... decoding if necessary. They bring the exciting and powerful sound of movie theaters into your home. This mode presents the sound as it will generate a low frequency signal for output to...
Operating Instructions
Page 34
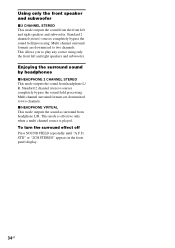
...stereo) sources completely bypass the sound field processing. STD" or "2CH STEREO" appears in the front panel display. 34GB Using only the front speaker and subwoofer x 2 CHANNEL STEREO This mode outputs the sound from headphone L/ R. Multi channel surround formats are downmixed to two channels. Standard... Enjoying the surround sound by headphones x HEADPHONE 2 CHANNEL STEREO This mode outputs the sound from the front left and right speakers and subwoofer. x HEADPHONE VIRTUAL This mode outputs the sound as surround from headphone L/R. This allows you to two channels. Multi...
...stereo) sources completely bypass the sound field processing. STD" or "2CH STEREO" appears in the front panel display. 34GB Using only the front speaker and subwoofer x 2 CHANNEL STEREO This mode outputs the sound from headphone L/ R. Multi channel surround formats are downmixed to two channels. Standard... Enjoying the surround sound by headphones x HEADPHONE 2 CHANNEL STEREO This mode outputs the sound from the front left and right speakers and subwoofer. x HEADPHONE VIRTUAL This mode outputs the sound as surround from headphone L/R. This allows you to two channels. Multi...


