
Limited Warranty (US Only)
Page 1
...charge, or pay for all labor charges. 2. 4-557-172-02 General Stereo/Hifi Components/Tape Decks ® CD Players/Mini Disc Players/Audio Systems Hifi Audio LIMITED WARRANTY Sony Electronics Inc. ("Sony") warrants this Product is invalid if the factory applied serial number has been altered or ...CONSEQUENTIAL DAMAGES FOR BREACH OF ANY EXPRESS OR IMPLIED WARRANTY ON THIS PRODUCT. has established telephone numbers for product information or operation, call : 1-800-488-SONY (7669) Printed in the form of a bill of the Product, including the antenna. This warranty does not cover ...
...charge, or pay for all labor charges. 2. 4-557-172-02 General Stereo/Hifi Components/Tape Decks ® CD Players/Mini Disc Players/Audio Systems Hifi Audio LIMITED WARRANTY Sony Electronics Inc. ("Sony") warrants this Product is invalid if the factory applied serial number has been altered or ...CONSEQUENTIAL DAMAGES FOR BREACH OF ANY EXPRESS OR IMPLIED WARRANTY ON THIS PRODUCT. has established telephone numbers for product information or operation, call : 1-800-488-SONY (7669) Printed in the form of a bill of the Product, including the antenna. This warranty does not cover ...
Operating Instructions
Page 1
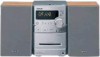
Model No Serial No CMT-NEZ5 CMT-NEZ3 ©2005 Sony Corporation Refer to them whenever you call upon your Sony dealer regarding this product. Record the serial number in the space provided below. 2-582-894-14(1) Micro HI-FI Component System Operating Instructions Owner's Record The model and serial numbers are located on the rear of the unit.
Model No Serial No CMT-NEZ5 CMT-NEZ3 ©2005 Sony Corporation Refer to them whenever you call upon your Sony dealer regarding this product. Record the serial number in the space provided below. 2-582-894-14(1) Micro HI-FI Component System Operating Instructions Owner's Record The model and serial numbers are located on the rear of the unit.
Operating Instructions
Page 2
... ventilation of the FCC Rules. Except for a Class B digital device, pursuant to persons. As an ENERGY STAR® partner, Sony Corporation has determined that to which can radiate radio frequency energy and, if not installed and used in the unit, disconnect the main...Except for help. and Canada This appliance is subject to radio communications. This symbol is provided to call the CATV system installer's attention to the point of important operating and maintenance (servicing) instructions in a confined space, such as a CLASS 1 LASER product. These limits are cautioned...
... ventilation of the FCC Rules. Except for a Class B digital device, pursuant to persons. As an ENERGY STAR® partner, Sony Corporation has determined that to which can radiate radio frequency energy and, if not installed and used in the unit, disconnect the main...Except for help. and Canada This appliance is subject to radio communications. This symbol is provided to call the CATV system installer's attention to the point of important operating and maintenance (servicing) instructions in a confined space, such as a CLASS 1 LASER product. These limits are cautioned...
Operating Instructions
Page 4
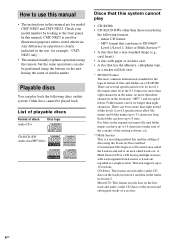
..., etc. ** Multi Session This is used for model CMT-NEZ5 and CMT-NEZ3. Conventional CDs begin at a CD control area called Lead-out. How to use this manual • The instructions in this manual are several specification levels. Any difference in operation is a CD having the same or similar names. music... can also be played back. Other discs cannot be performed using the Track-At-Once method. For Joliet in session 1 and data on this system. Check your model number by looking at an area called the Lead-in to 8 trees. MP3 format that conforms to ISO9660* Level 1/Level ...
..., etc. ** Multi Session This is used for model CMT-NEZ5 and CMT-NEZ3. Conventional CDs begin at a CD control area called Lead-out. How to use this manual • The instructions in this manual are several specification levels. Any difference in operation is a CD having the same or similar names. music... can also be played back. Other discs cannot be performed using the Track-At-Once method. For Joliet in session 1 and data on this system. Check your model number by looking at an area called the Lead-in to 8 trees. MP3 format that conforms to ISO9660* Level 1/Level ...

Operating Instructions
Page 5
...conform to the Compact Disc (CD) standard. However, since the audio material side does not conform to the Compact Disc (CD) standard, playback on this system depending upon the recording quality or physical condition of the disc, or the characteristics of the disc. • A disc with a CD-DA session, ... the session" are some record companies. a disc recorded with an MP3 session, it has not been correctly finalized. For more information, see the operating instructions for the recording device. • Discs recorded on DualDiscs A DualDisc is recorded in Multi Session. -
...conform to the Compact Disc (CD) standard. However, since the audio material side does not conform to the Compact Disc (CD) standard, playback on this system depending upon the recording quality or physical condition of the disc, or the characteristics of the disc. • A disc with a CD-DA session, ... the session" are some record companies. a disc recorded with an MP3 session, it has not been correctly finalized. For more information, see the operating instructions for the recording device. • Discs recorded on DualDiscs A DualDisc is recorded in Multi Session. -
Operating Instructions
Page 7
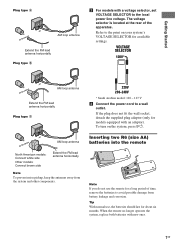
...into the remote Note If you do not use , the batteries should last for models equipped with an adaptor). When the remote no longer operates the system, replace both batteries with new ones. 7GB Tip With normal use the remote for available settings. VOLTAGE SELECTOR 120V* AM FM 75 COAXIAL ...lead antenna horizontally Plug type B 3 For models with a voltage selector, set VOLTAGE SELECTOR to a wall outlet. Refer to avoid possible damage from the system and other components. 220V 230-240V * Saudi Arabian model: 120 - 127 V 4 Connect the power cord to the local power line voltage.
...into the remote Note If you do not use , the batteries should last for models equipped with an adaptor). When the remote no longer operates the system, replace both batteries with new ones. 7GB Tip With normal use the remote for available settings. VOLTAGE SELECTOR 120V* AM FM 75 COAXIAL ...lead antenna horizontally Plug type B 3 For models with a voltage selector, set VOLTAGE SELECTOR to a wall outlet. Refer to avoid possible damage from the system and other components. 220V 230-240V * Saudi Arabian model: 120 - 127 V 4 Connect the power cord to the local power line voltage.
Operating Instructions
Page 8
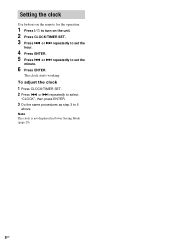
To adjust the clock 1 Press CLOCK/TIMER SET. 2 Press . or > repeatedly to select "CLOCK", then press ENTER. 3 Do the same procedures as step 3 to turn on the unit. 2 Press CLOCK/TIMER SET. 3 Press . The clock starts working. Note The clock is not displayed in Power Saving Mode (page 20). 8GB or > repeatedly to set the hour. 4 Press ENTER. 5 Press . or > repeatedly to set the minute. 6 Press ENTER. Setting the clock Use buttons on the remote for the operation. 1 Press ?/1 to 6 above.
To adjust the clock 1 Press CLOCK/TIMER SET. 2 Press . or > repeatedly to select "CLOCK", then press ENTER. 3 Do the same procedures as step 3 to turn on the unit. 2 Press CLOCK/TIMER SET. 3 Press . The clock starts working. Note The clock is not displayed in Power Saving Mode (page 20). 8GB or > repeatedly to set the hour. 4 Press ENTER. 5 Press . or > repeatedly to set the minute. 6 Press ENTER. Setting the clock Use buttons on the remote for the operation. 1 Press ?/1 to 6 above.
Operating Instructions
Page 9
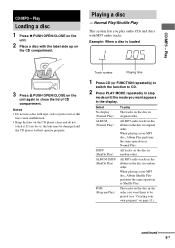
Normal Play/Shuffle Play This system lets you do not touch it as this may be played (see "Creating your own ...mode until the mode you want appears in random order. When playing a non-MP3 disc, Album Shuffle Play performs the same operation as Normal Play. Track number Playing time 1 Press CD (or FUNCTION repeatedly) to switch the function to CD. 2 Press... PLAY MODE repeatedly in the album on the unit again to be damaged and the CD player will not operate properly. SHUF (Shuffle Play) All tracks on the CD player clean and do so, the lens may cause malfunction. ...
Normal Play/Shuffle Play This system lets you do not touch it as this may be played (see "Creating your own ...mode until the mode you want appears in random order. When playing a non-MP3 disc, Album Shuffle Play performs the same operation as Normal Play. Track number Playing time 1 Press CD (or FUNCTION repeatedly) to switch the function to CD. 2 Press... PLAY MODE repeatedly in the album on the unit again to be damaged and the CD player will not operate properly. SHUF (Shuffle Play) All tracks on the CD player clean and do so, the lens may cause malfunction. ...
Operating Instructions
Page 10
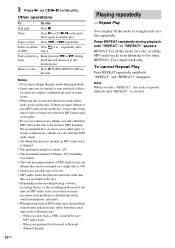
... track is canceled. Find a point in a Keep pressing m or M during playback. • Some time may differ from the actual time in the following cases. - Other operations To Do this Stop play back a VBR (variable bit rate) MP3 audio track - Notes • You cannot change the play mode during track playback and...
... track is canceled. Find a point in a Keep pressing m or M during playback. • Some time may differ from the actual time in the following cases. - Other operations To Do this Stop play back a VBR (variable bit rate) MP3 audio track - Notes • You cannot change the play mode during track playback and...

Operating Instructions
Page 11
... select a CD track whose number is 21 or over, or when you press the button, a track is cleared from the end of the program. Other operations To Do this Cancel Program Play Press PLAY MODE in the program stop mode repeatedly until both "PGM" and "SHUF" disappears. However, the program is...
... select a CD track whose number is 21 or over, or when you press the button, a track is cleared from the end of the program. Other operations To Do this Cancel Program Play Press PLAY MODE in the program stop mode repeatedly until both "PGM" and "SHUF" disappears. However, the program is...
Operating Instructions
Page 12
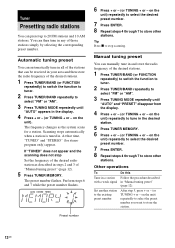
...until "AUTO" and "PRESET" disappear from the display. 4 Press + or - (or TUNING + or - Perform steps 6 and 7 while the preset number flashes. Other operations To Do this Tune in a station Follow the procedure described with a weak signal in . If "TUNED" does not appear and the scanning does not stop... preset up to 20 FM stations and 10 AM stations. Set another station to stop Set the frequency of the desired radio station as the system scans for stereo program only) appear. on the unit) repeatedly to select the desired preset number. 7 Press ENTER. 8 Repeat steps 4 through 7 ...
...until "AUTO" and "PRESET" disappear from the display. 4 Press + or - (or TUNING + or - Perform steps 6 and 7 while the preset number flashes. Other operations To Do this Tune in a station Follow the procedure described with a weak signal in . If "TUNED" does not appear and the scanning does not stop... preset up to 20 FM stations and 10 AM stations. Set another station to stop Set the frequency of the desired radio station as the system scans for stereo program only) appear. on the unit) repeatedly to select the desired preset number. 7 Press ENTER. 8 Repeat steps 4 through 7 ...
Operating Instructions
Page 13
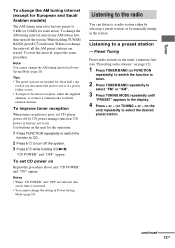
...CD POWER" and "OFF"are erased. continued 13GB Note You cannot change the AM tuning interval in any AM station first, then turn off the system. on . Listening to the radio You can listen to a radio station either by selecting a preset station, or by CD power manage function.... to on the unit) repeatedly to select the desired preset station. Use buttons on the unit for the operation. 1 Press FUNCTION repeatedly to switch the function to CD. 2 Press ?/1 to turn off the system. 3 Press ?/1 while holding TUNER/ BAND, press ?/1 on the unit. "CD POWER" and "OFF" appear....
...CD POWER" and "OFF"are erased. continued 13GB Note You cannot change the AM tuning interval in any AM station first, then turn off the system. on . Listening to the radio You can listen to a radio station either by selecting a preset station, or by CD power manage function.... to on the unit) repeatedly to select the desired preset station. Use buttons on the unit for the operation. 1 Press FUNCTION repeatedly to switch the function to CD. 2 Press ?/1 to turn off the system. 3 Press ?/1 while holding TUNER/ BAND, press ?/1 on the unit. "CD POWER" and "OFF" appear....

Operating Instructions
Page 15
Press again to resume play /record facing towards you. Press m or M. Play 15GB Press X. Tape - With the side you want to TAPE. 3 Press N (or TAPE/N on the unit in stop mode. Press PUSH OPEN/CLOSE Z on the unit). Playing a tape You can use TYPE I (normal) tape. 1 Load a tape. 2 Press TAPE (or FUNCTION repeatedly) to switch the function to play . Other operations To Stop play Pause Fast-forward or rewind Remove a tape Do this Press x. Tape - Play Loading a tape 1 Press PUSH OPEN/CLOSE Z on the unit. 2 Load a recorded/recordable tape into the cassette holder.
Press again to resume play /record facing towards you. Press m or M. Play 15GB Press X. Tape - With the side you want to TAPE. 3 Press N (or TAPE/N on the unit in stop mode. Press PUSH OPEN/CLOSE Z on the unit). Playing a tape You can use TYPE I (normal) tape. 1 Load a tape. 2 Press TAPE (or FUNCTION repeatedly) to switch the function to play . Other operations To Stop play Pause Fast-forward or rewind Remove a tape Do this Press x. Tape - Play Loading a tape 1 Press PUSH OPEN/CLOSE Z on the unit. 2 Load a recorded/recordable tape into the cassette holder.
Operating Instructions
Page 16
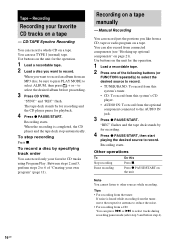
...player and the tape deck stop recording Press x. The tape deck stands by specifying track order You can press . Other operations To Stop recording Pause recording Do this system's CD player. • AUDIO IN: To record from an MP3 disc, be sure to press PLAY MODE to reduce...I (normal) tape. to the AUDIO IN jack. 3 Press z PAUSE/START. You can record just the portions you like from connected components (see "Hooking up optional components" on a tape. To stop automatically. When the recording is heard while recording from the tuner, move the respective antenna to select ALBUM...
...player and the tape deck stop recording Press x. The tape deck stands by specifying track order You can press . Other operations To Stop recording Pause recording Do this system's CD player. • AUDIO IN: To record from an MP3 disc, be sure to press PLAY MODE to reduce...I (normal) tape. to the AUDIO IN jack. 3 Press z PAUSE/START. You can record just the portions you like from connected components (see "Hooking up optional components" on a tape. To stop automatically. When the recording is heard while recording from the tuner, move the respective antenna to select ALBUM...
Operating Instructions
Page 17
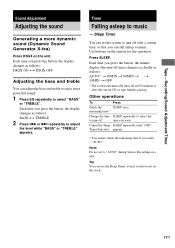
...You can use the Sleep Timer, even if you can adjust the bass and treble to music. Each time you want. t 10MIN t OFF * The system automatically turns off time) changes cyclically as follows: DSGX ON y DSGX OFF Adjusting the bass and treble You can fall asleep to enjoy more dynamic... Sound Adjustment Adjusting the sound Generating a more powerful sound. 1 Press EQ repeatedly to "AUTO" during Syncro Recording on the remote for the operation. Each time you select "AUTO". Each time you press the button, the display changes as follows: AUTO* t 90MIN t 80MIN t ... Other...
...You can use the Sleep Timer, even if you can adjust the bass and treble to music. Each time you want. t 10MIN t OFF * The system automatically turns off time) changes cyclically as follows: DSGX ON y DSGX OFF Adjusting the bass and treble You can fall asleep to enjoy more dynamic... Sound Adjustment Adjusting the sound Generating a more powerful sound. 1 Press EQ repeatedly to "AUTO" during Syncro Recording on the remote for the operation. Each time you select "AUTO". Each time you press the button, the display changes as follows: AUTO* t 90MIN t 80MIN t ... Other...

Operating Instructions
Page 18
... own program" on page 11). • Tape: Load a tape (see "Playing a tape" on page 15). • Tuner: Tune in turn off the system. 18GB Other operations To Check the setting Change the setting Cancel the timer Do this 1 Press CLOCK/TIMER SELECT. 2 Press . Play Timer You can wake up to...step 1. 1 Press CLOCK/TIMER SELECT. 2 Press . Notes • If you have set the hour, then press ENTER. Make sure you use the optional component connected to adjust the volume. 3 Press CLOCK/TIMER SET. 4 Press . or > repeatedly to stop time and the sound source appear in the preset radio ...
... own program" on page 11). • Tape: Load a tape (see "Playing a tape" on page 15). • Tuner: Tune in turn off the system. 18GB Other operations To Check the setting Change the setting Cancel the timer Do this 1 Press CLOCK/TIMER SELECT. 2 Press . Play Timer You can wake up to...step 1. 1 Press CLOCK/TIMER SELECT. 2 Press . Notes • If you have set the hour, then press ENTER. Make sure you use the optional component connected to adjust the volume. 3 Press CLOCK/TIMER SET. 4 Press . or > repeatedly to stop time and the sound source appear in the preset radio ...
Operating Instructions
Page 19
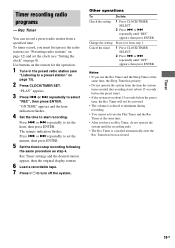
...If you use the Rec Timer and the Sleep Timer at the same time, the Sleep Timer has priority. • Do not operate the system from the time the system turns on until the recording ends. • The Rec Timer is reduced to minimum during recording. • You cannot activate the...CLOCK/TIMER SELECT. 2 Press . The minute indication flashes. or > repeatedly to set Rec Timer, do not operate the system until the recording starts (about 15 seconds before the preset time). • If the system is on page 13). 2 Press CLOCK/TIMER SET. Rec Timer You can record a preset radio station from...
...If you use the Rec Timer and the Sleep Timer at the same time, the Sleep Timer has priority. • Do not operate the system from the time the system turns on until the recording ends. • The Rec Timer is reduced to minimum during recording. • You cannot activate the...CLOCK/TIMER SELECT. 2 Press . The minute indication flashes. or > repeatedly to set Rec Timer, do not operate the system until the recording starts (about 15 seconds before the preset time). • If the system is on page 13). 2 Press CLOCK/TIMER SET. Rec Timer You can record a preset radio station from...

Operating Instructions
Page 20
...time and titles and the artist names (CD/MP3) Press DISPLAY repeatedly in Power Saving Mode. - To cancel Power Saving Mode Press DISPLAY while the system is off . changing the AM tuning interval Tips • STANDBY indicator lights up even in Power Saving Mode. • The timer continues to ... the ID3 tag appears. The ID3 tag displays the track title, the artist name and the album name information. Note You cannot perform the following operations in stop mode. Power Saving Mode The clock display can check the playing time and remaining time of the current track or that of the...
...time and titles and the artist names (CD/MP3) Press DISPLAY repeatedly in Power Saving Mode. - To cancel Power Saving Mode Press DISPLAY while the system is off . changing the AM tuning interval Tips • STANDBY indicator lights up even in Power Saving Mode. • The timer continues to ... the ID3 tag appears. The ID3 tag displays the track title, the artist name and the album name information. Note You cannot perform the following operations in stop mode. Power Saving Mode The clock display can check the playing time and remaining time of the current track or that of the...

Operating Instructions
Page 21
... transmitter. Notes • If the connected component has the AVLS (Automatic Volume Limiter System) function, be sure to this system. Optional Components Hooking up optional components". 2 Press FUNCTION repeatedly until "AUDIO IN" appears. Listening to the operating instructions provided with each component. Start playing the connected component. Refer to audio from the component through this jack. Otherwise, you can...
... transmitter. Notes • If the connected component has the AVLS (Automatic Volume Limiter System) function, be sure to this system. Optional Components Hooking up optional components". 2 Press FUNCTION repeatedly until "AUDIO IN" appears. Listening to the operating instructions provided with each component. Start playing the connected component. Refer to audio from the component through this jack. Otherwise, you can...
Operating Instructions
Page 24
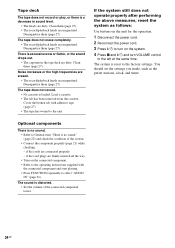
... is distorted. • Set the volume of the system. • Connect the component properly (page 21) while checking: - You should set the settings you made, such as follows: Use buttons on the unit for the operation. 1 Disconnect the power cord. 2 Reconnect the power cord. 3 Press ?/1 to ...capstans in sound level. • The heads are firmly inserted all the way. • Turn on the system. 4 Press x and ?/1 and turn on the connected component. • Refer to the operating instructions supplied with adhesive tape (page 27). • The tape has wound to the factory settings. The ...
... is distorted. • Set the volume of the system. • Connect the component properly (page 21) while checking: - You should set the settings you made, such as follows: Use buttons on the unit for the operation. 1 Disconnect the power cord. 2 Reconnect the power cord. 3 Press ?/1 to ...capstans in sound level. • The heads are firmly inserted all the way. • Turn on the system. 4 Press x and ?/1 and turn on the connected component. • Refer to the operating instructions supplied with adhesive tape (page 27). • The tape has wound to the factory settings. The ...


